Showing posts with label Authentique. Show all posts

Monday, 1 August 2022

July Papermaze Kit - Part 2

Lynn here today with my second pair of layouts using this kit. The July Papermaze Kit is still available in the shop and online. Featuring greens, blues, white and a touch of yellow papers and cardstock. A pretty and useful selection of embellishments are also included.

 Before looking at how these layouts were made, here is what you will find in the kit:


For full details of the kit please see PART 1.


Island Hopping - This layout shows photos of our sailing holiday last year.

To create my background for this layout I trimmed the white Bazzill to 27cm x 27cm. I inked the edges (of all papers) with Chipped Sapphire Distress Oxide Ink. With a Vicki Boutin Color Study Stencil I used Clear Embossing Ink to transfer the pattern onto the card. Then I heat embossed with clear embossing powder.

With a blending tool and Distress Oxide Ink Pads (Chipped Sapphire, Salvaged Patina and Mermaid Lagoon), I applied colour over the card to highlight the embossed pattern.

I gutted the 'Documented' paper to make a frame of 4cm. With the heart side up, I mounted the decorated cardstock centrally over the frame. I cropped my photos and mounted them onto mats cut from the lined side of the Documented paper. 

My bunting triangles were cut from Paige Evans Splendid '#10' paper. I joined these with some navy-blue jute twine and applied them to the layout with 3D pads. 


I added an eyelet to a tag from the kit and tied some light blue jute twine through the hole.  This was applied just under one of the photos.

My Title and details were added with some glittery foam letter stickers from my stash, and the Authentique Petite Type alpha stickers from the kit.

Family History - This lovely photo from 1922, a real fashion plate, may show very distant cousins, but I couldn't resist scrapbooking the beautiful wedding portrait.


The beautiful 'Cotton Candy' paper, with its subtle lace, print and colour wash background was ideal for this 100-year-old photo. I used the same Distress Oxide Inks as above for inking edges and painting.

I picked this chipboard Ivy Corner from Dusty Attic, and primed it with a thin coat of Gesso. Then I applied colour with a paint brush, using Distress Oxide Inks, diluted on the craft mat.
I used Clear Embossing Ink which I then heat embossed with clear embossing powder. I glued this into position at the top right corner of the layout, leaving the hanging vines unglued so I could slip the photo under later.


I made a double mat with Arctic and Jetstream Bazzill. Then slipped this into place so the ivy hung over the top of the photo.


Using the Tim Holtz Thinlits die set - Crochet - I cut three lengths of lace, two from cream and one from Parakeet Bazzill. These were arranged below the photo. Using the same Bazzill I cut my title on the Cricut. 


My journalling was printed onto card and then die cut into a tag shape (TH Framelit Tag collection), clipping into the edges to create a distressed look. I threaded some green organza ribbon through the hole and tied a bow. I placed this beneath the title.


I clipped the word 'Moments' from the detail strip and popped this at the bottom of the layout.


With the Tim Holtz Thinlits die set - Silhouette Birds, I cut three of the nine birds in the set. I cut them in Arctic and Jetstream Bazzill, I shaded the lighter birds with Distress Oxide Ink and trimmed off the feet and beaks, before sticking down on the dark birds. Then I bent the tails on the dark blue birds so they showed alongside their lighter tails. I glued these in place along with the large paper flower from the kit.


I picked some small cream and white paper flowers from my stash and added them to the vines.


I punched some butterflies from the #10 paper, and arranged these over the page. I finished off with the pearls from the kit, adding one of the smallest to each bird to represent an eye.

That's all from the July Kit, I'm now busy working with the August Kit to bring you soon.
Thanks for looking.
Lynn x

Saturday, 16 July 2022

July Papermaze Kit - Part 1

Greens, blues and a touch of yellow is the colour scheme of this delightful Papermaze Kit for the month of July. Some wonderful patterned papers, Bazzill cardstock and a selection of embellishments including an exclusive honeycomb piece cut from chipboard.

Lynn here today with my first pair of layouts using this kit. 


 Before looking at how these layouts were made, here is what you will find in the kit:


Patterned Paper:
American Crafts - Vicki Boutin - Sweet Rush - Garden Variety & Sprinkles
American Crafts - Paige Evans - Splendid - #10 & #16
American Crafts - Maggie Holmes - Round Trip -  Documented

49 & Market - Spectrum Sherbet - Cotton Candy
Bazzill Basics Cardstock - Parakeet & Arctic

Reverse side of papers
Embellishments:
Sheet of petite type alphas, reel of mini washi tape, Prima flower, strip pearls, 2 - P13 tags, 5
Doodlebug heart sprinkles, exclusive hexagon honeycomb chipboard piece


An extra Bazzill Basics cardstock pack to match is also available with Jetstream, Whirlpool, White & Pollen

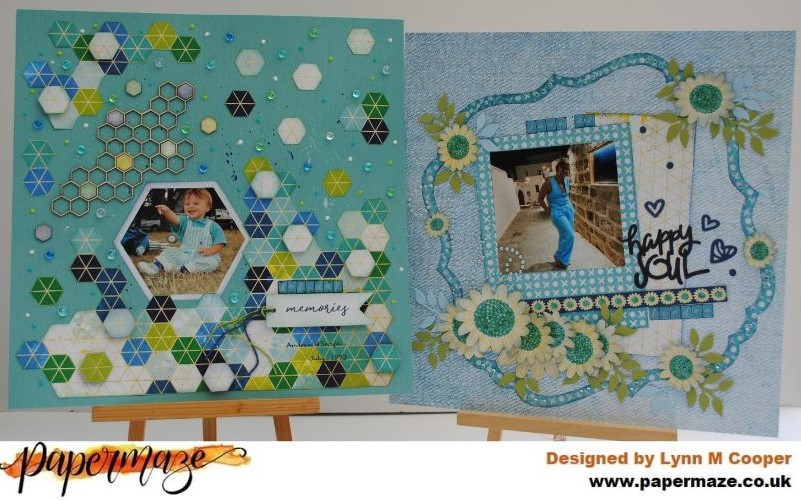
Holiday Memories - an early outing to Snape when my son was little. The colours were perfect for his outfit!

For inking the edges of the papers, tag, mats and chipboard I used Blueprint Sketch and Twisted Citron Distress Ink.

I used the Whirlpool Bazzill as the base for this layout. To add some interest to the cardstock I used some diluted Distress Paints, to flick over the surface - I matched the colours from the papers - Cracked Pistachio, Blueprint Sketch, Picket Fence and Twisted Citron.


With the 'Sprinkles' paper, I selected a large area and cut around the hexagons to create a piece for the lower area of the page. Then I cut smaller groups of hexagons to arrange elsewhere on the page and some single hexagons to superimpose over those already selected.


I used the Hexagon Layers dies from Memory Box to cut my photo and a photo mat from a scrap of white card. Once all this was ready, I placed everything into position together with the exclusive chipboard honeycomb piece and the tiny drop out hexagon pieces. I stuck everything in place, layering up some of the hexagon paper shapes with 3D foam pads. 


I made my title with the Authentique Petite Type alpha stickers and one of the tags from the kit. I tied two lengths of hemp twine to make a tie for the tag. 


I scattered a selection on Dew Drops (Clear, Aqua and Green) and some Nuvo Crystal Drops (Simply White Gloss, Apple Green Gloss and Caribbean Ocean) to finish off.


Happy Soul - My daughter on holiday in Lindos this summer for a friend's wedding.

For this design I used a mix of papers - choosing the denim side of Paige Evans Splendid '#16' paper as the backdrop.

I used both sides of Vicky Boutin 'Garden Variety' paper. I trimmed off the detail strip and saved this for later. With a template I drew the large frame shape onto the OXOX side and cut this out with my craft knife.


Stormy Sky Distress Ink was the colour of choice here to ink all the edges of my cut papers, I also distressed the straight edges of cut papers.

The large photo mat was cut from the OXOX side of the paper too, this measures 12.5cm x 16cm. I trimmed my photo to a square shape 10cm x 10cm and mounted it near the top of the mount.


From the scraps of 'Sprinkles' paper, used above, I cut a piece 9cm x 19cm. The frame, photo and papers were arranged and stuck to the '#16' paper. I cut a length from the detail strip, and ran this along the page under the photo.


I fussy cut some flowers form the remains of the 'Garden Variety' paper, curved the petals with the scissor blade and arranged them around the frame. I found a pearl swirl from my stash and placed this to the left of the photo.


For title and details I used the Authentique Petite Type alpha stickers and a phrase and hearts from my VB Storyteller Puffy Phrase Stickers


I used a die and the Parakeet and Whirlpool Bazzill, to add leaves to my flowers. I decorated the frame with aqua gems and the flower centres with Nuvo Glitter Drops - Blue Lagoon.


That's all for part 1, I'll be back with more soon
Thanks for looking
Lynn x

Wednesday, 1 January 2020

December Papermaze Kit - Part 3

Hello and Happy New Year! Lynn here today with a third pair of Christmas layouts made with the December Papermaze kit. For me this kit has been amazing value for money, I have just added an extra sheet of Bazzill to create a total of six pages. To purchase the kit and have a look at the other products please see the new shop website. 


Before looking at the layouts in detail - here is what you will find in the kit.


Patterned papers:
Simple Stories - Holly Jolly collection - Home for the Holidays & Cozy Christmas
Kaisercraft - Under the Gum Leaves collection - Protea
Kaisercraft - Enchanted collection - Imagine
Authentique - Rejoice collection - Rejoice #22
American Crafts - Heidi Swapp - Winter Wonderland collection - Poinsettia Lane
Bazzill cardstock - Fawn & Crabapple Dark


reverse side of papers
Extra Matched Bazzil Cardstock Pack
The extra Bazzill pack is made up of Butter Mints, Mocha Divine, Safari, Grenadine.


Embellishments include: Doily, exclusive star stencil, 50cm twine, 2 paper fern leaves, Prima paper flower, 2 heart buttons, 3 tiny paper roses glittery chipboard star, 20cm lace with velvet ribbon &  strip dots. 

Holly Fairy - This layout was made to celebrate the costume Emily and I made for her to wear for Book Week in the year 2000.


 Starting with the Mocha Divine Bazzill, I gutted the card to give me a frame 4cm deep. Then with an extra sheet of cream Bazzill, trimmed to 26cm x 26cm I used the Cherish - Martha Stewart Punch Around the Page set to create a border. With green embroidery thread I stitched around the punched design, tying a small bow with the ends.

Using some of the Mocha Divine Bazzill left over, I mounted my large photo. Then I cut the three small photos to measure 4cm x 4cm.


With scraps from
Rejoice #22, Home for the Holidays & Cozy Christmas I cut more pieces 4cm x 4cm. I arranged all these small squares into a grid on the cream card. 

I cut two branches from Safari Bazzill with the Sizzix Holiday Greens Thinlits set. I dabbed them with some Versamark Ink and embossed them with a little Stampendous Frantage Shabby White Embossing Enamel. I applied these to the layout and added the self adhesive domes from the kit as berries.

I used the Bigz XL Handmade lettering die to cut my title from scraps of cream card. These were coloured with Distress Oxide Ink in Forest Green and Aged Mahogany.  Once arranged on the page I added some Crystal Stickles.

Christingle - For my last Christmas layout with the December 2019 kit, I made another layout using this old favourite photo from 1995, when the children were dressed up for the Christingle Service at our local church. I have scrapped this again so I can place a layout in each of the children's scrapbook albums. 


To start off I have used some of the gutted cardstock from previous layouts made from this kit. The outer layer is Fawn, then
Grenadine, and the paper cut to 28cm x 28cm, is the burlap print side of the Protea paper. I splattered some Dylusions - Ink Spray - White Linen over the page. 

There was a doily in the kit, which I managed to mess up! - So I have taken one of similar size from my stash and placed it in the centre of the layout. I mounted my photo onto a scrap of
Grenadine Bazzill and mounted this towards the bottom of the doily.

Next I die cut seven fir trees with the Woodlands Sizzix Thinlits set. I cut the trees from scraps of Safari and Fawn Bazzill.  They were treated to a coat of Versamark Ink and some Super Sparkle embossing powder. I'm not sure the photo does justice to the amount of sparkle in these trees! I placed the trees around the base of the photo.

I created the title and date with the Wanted Sizzix Sizzlit alphabet die and some scraps of Mocha Divine, which took on a different colour when glitter was added with Crystals Stickles.

I also added some Stickles to three wooden stars from a previous kit and placed them around the doily.

That's all for the December kit, and I will be back next with the January kit.
Thanks for looking.
Lynn x

Friday, 20 December 2019

December Papermaze Kit - Part 2

Hello - Lynn here today with my second pair of Christmas layouts made with the December Papermaze kit. To purchase the kit have a look at the great new shop website, you will find all the products used on my post, and much, much more.  


Before looking at the layouts in detail - here is what you will find in the kit.


Patterned papers:
Simple Stories - Holly Jolly collection - Home for the Holidays & Cozy Christmas
Kaisercraft - Under the Gum Leaves collection - Protea
Kaisercraft - Enchanted collection - Imagine
Authentique - Rejoice collection - Rejoice #22
American Crafts - Heidi Swapp - Winter Wonderland collection - Poinsettia Lane
Bazzill cardstock - Fawn & Crabapple Dark

reverse side of papers
Extra Matched Bazzil Cardstock Pack
The extra Bazzill pack is made up of Butter Mints, Mocha Divine, Safari, Grenadine.


Embellishments include: Doily, exclusive star stencil, 50cm twine, 2 paper fern leaves, Prima paper flower, 2 heart buttons, 3 tiny paper roses glittery chipboard star, 20cm lace with velvet ribbon &  strip dots. 

Lego Gingerbread House - This layout using the Mistletoe Kisses SVG file from Pink Fresh Studio, shows photos of a Christmas Lego project my big kids enjoyed building - Christmas eve 2015.


The base of my layout is this amazing wood effect paper from Kaisercraft's Enchanted collection - Imagine. I used the cut file to create the image from Fawn Bazzill. I chose the measurements of 24cm x 25.5 cm and positioned the cut in the centre of the Bazzill (leaving a border around the edges of the cardstock for another layout).

I filled the open areas of the cut image with scraps of Bazzill - Butter Mint for the berries, Safari for the leaves and the tartan side of the Cozy Christmas paper for the bow.

I mounted my photos onto scraps of the Authentique Rejoice #22 paper, with the star side up. I inked the edges of the photos and the mounts with Fired Brick Distress Oxide Ink.

I arranged the photos and Mistletoe onto the wood paper, leaving an area for the title. The Mistletoe was mounted with 3D foam pads and the berries were given a frosting with Crystal Stickles.

For my title I used several different ideas together. The '2015' and 'Lego' were cut with a Bigz XL Alphabet Sizzix die Wonderland, I cut them twice, once with Safari and once with Butter Mints Bazzill, then inked them and offset the letters to make a shadow. The word 'Christmas' was trimmed from the #22 paper and 'Gingerbread House' was created with Pink Fresh Studio Mini Puffy Alpha Stickers - Just a Little Lovely.


I found a chipboard 'Merry Christmas' in my stash and inked it, then I added a coat of Glossy Accents and once dry a tiny dot of Xmas Red Stickles for the berry. I popped this at across the base of the photos.

The Legend of the Icelandic Yule Lads - This time I have used photos from our holiday to Iceland last Christmas. We learnt much about the legends and folk law surrounding the festivities from the tour guides, one of them read the fairy stories to us on the long journeys through the snow covered mountains. 


The base for this layout is the sheet of Crabapple Dark Bazzill. I used the sheet of Simple Stories Holly Jolly - Home for the Holidays paper, cutting a piece 15cm x 29 cm with the large flower print uppermost (I gutted the centre of this and set aside for later). Then I cut a piece 13cm x 27cm with the small print uppermost. I mounted these, onto the top half of the Bazzill (I also gutted a piece from the Bazzill to use later).

I mounted my photos onto some Fawn Bazzill, and attached them to the layout with 3D foam tape, leaving the edges free to tuck the ribbon underneath. I cut the lacy/velvet ribbon into two pieces and attached it along the bottom of the patterned paper.


I like to mix fonts and sizes of lettering for my titles, so I used the Burton's Nightmare font and my Cricut, changing the sizes as I wanted them. I also used the Pink Fresh Studio Tiny Puffy Alpha Stickers - Everyday Musings


I covered the top half of the layout and photos with some waste paper, and flicked some White Linen Dylusions Ink spray over the bottom area where the lettering would go later.
I added the heart buttons, leaves, tiny flowers and Prima flower from the kit. I used three wooden buttons left over from a previous kit. I added some stitching to the buttons with some embroidery floss.

I punched a few fronds from scraps of patterned paper and arranged them around the flowers, then I added a little Stickles to make them sparkle. 


I still have plenty of papers left so will be back with two more layouts soon.
Thanks for looking
Lynn x

Wednesday, 11 December 2019

December Papermaze Kit

Hello - Lynn here today with the December Papermaze kit. This kit is a collection of Christmas papers, but several of them could easily be used for non-Christmas layouts too. Take a look on the fabulous new shop website, for the kit, the products used here, and much more. 


Before looking at the layouts in detail - here is what you will find in the kit.


Patterned papers:
Simple Stories - Holly Jolly collection - Home for the Holidays & Cozy Christmas
Kaisercraft - Under the Gum Leaves collection - Protea
Kaisercraft - Enchanted collection - Imagine
Authentique - Rejoice collection - Rejoice #22
American Crafts - Heidi Swapp - Winter Wonderland collection - Poinsettia Lane
Bazzill cardstock - Fawn & Crabapple Dark


reverse side of papers
Extra Matched Bazzil Cardstock Pack
The extra Bazzill pack is made up of Butter Mints, Mocha Divine, Safari, Grenadine.


Embellishments include: Doily, exclusive star stencil, 50cm twine, 2 paper fern leaves, Prima paper flower, 2 heart buttons, 3 tiny paper roses glittery chipboard star, 20cm lace with velvet ribbon &  strip dots.

Merry Christmas - This layout features a photograph of my daughter having breakfast with her cousins on Christmas Eve when she was doing Panto in Bromley in 2017.


I used Distress Oxide Ink Pads for this layout, for inking all the edges and for working through the stencil. The colours I chose - Aged Mahogany, Fired Brick, Peeled Paint and Crushed Olive.

Starting with Simple Stories Cosy Christmas I gutted the paper to make a frame 2.5cm deep all round. I tore the edges of the Butter Mints Bazzill to reduce the size to 28cm x 28cm. 


I trimmed some of the images from the Authentique - Rejoice #22 paper, I used both sides of this sheet and arranged them and the photo onto the Bazzill, I lightly marked where they would be with a pencil and removed them again. Then with the Papermaze exclusive star stencil I inked several times with the Distress Oxide above and below the photo and a smaller amount at the bottom left of the page.


Next all the images and photo were put back in place and stuck down, some onto the page, and others raised with 3D foam pads.

With the glittery chipboard star from the kit, I added a little Safari Bazzill to fill the centre. From my stash I added some red dew drops, some Pebbles - Merry, Merry puffy stickers, a gold and white paper straw, a Tim Holtz Ideology Quote Chip and two yellow star pins.


As many of the paper's images had the word 'Merry', I die cut the word 'Christmas' from Safari Bazzill with the Sizzix Thinlit set - Retro Merry Christmas. I made this shiny with some Glossy Accents.

I added my journalling beneath the straw pieces and then made my stenciled stars glitter with some Crystal Stickles


Heartfelt and Homemade - for this layout I used this favourite photo of my three babies wearing the Christmas Pudding hats I knitted for them in 1992. I have scrapped this photo before, but to keep things fair it has to be done three times so there is one of each of their albums! 


I was inspired by a layout on the Kaisercraft site by Trudi Harrison as a good starting point for my page. I loved both sides of the Winter Wonderland - Poinsettia Lane paper, and always love a strip pattern. So I divided the paper in half and flipped one half to give me vertical stripes at the bottom and the flowers at the top of the layout. With the Grenadine Bazzill, (I gutted the card to leave a frame of 2.5cm and set this aside for next time). With the remainder Grenadine I die cut some lace using the Crochet Sizzix Thinlits set and stuck this along the join between the two papers. Then I mounted my photo onto the same colour Bazzill. I tucked three small doilies under the photo. Then built up the decoration with more Sizzix Thinlit dies and a selection of Bazzill from the kit, with the addition of cream and yellow Bazzill from my stash. The swirls were cut with the Adorned set and gold metallic card. Most of the flowers and greenery were die cut with the Large Festive Funky set and the fir cones with the Festive Greens set. I inked some of the Safari Bazzill pieces with Forest Moss Distress Oxide Ink to give another shade of green to the leaves.

I arranged all the elements around the photo, sticking them only partly to the page to allow some movement. The berries and the poinsettia centers were made shiny with Glossy Accents. 


I cut the 'Heartfelt and Homemade' sentiment from the Authentique - Rejoice #22 paper and double mounted it with gold and
Grenadine Bazzill, this was raised up with 3D foam pads and attached to the bottom right of the page. 

I added Nuvo Crystal Drops - Simply White Gloss, in various size blobs around the greenery.

I will be back with more layouts from this kit soon.
Thanks for looking.
Lynn x