Showing posts with label Stickles. Show all posts

Tuesday, 20 December 2022

Our Snow Babies..... Mintay Merry Little Christmas


Hello, it's Anita here today.


I have made this wreath based layout using papers from the gorgeous Mintay Merry Little Christmas Collection and combined it with a black and white photo of our girls and dear little Grandson, taken when we visited Father Christmas at our local animal park earlier this month.


The layout is based on a sheet of Hibiscus cardstock and I have splattered it liberally with some white acrylic paint. I used 2 identical sheets ( 04) for the wreath so that I could fussy cut the whole wreath out and then also cut out elements from the 2nd sheet to layer up on the wreath

I cut several little items from the 2nd sheet and then layered them up on little foam pads to add some dimension to the page, without making it too lumpy.

The little deer was cut from the sheet (09) and i popped it down to the bottom right hand corner.


In my kit I also had some Sprinkled with Cheer stickers from Rosie's Studio. These are lovely and come in a variety of collections. They are puffy and easy to peel off and use, so I picked the ones I wanted for the title and added a few others randomly around the wreath with sayings on.


I love a bit of sparkle on most things and this page was no different, so I let loose with a tube of Icicle Stickes and added sparkle to most of the wreath. I love how this particular colour catches the light and can really glow


So that's my page....I have to say this collection is absolutely beautiful and has such gorgeous details on it. There are lots of collections from Mintay if you pop over to the shop and have a look about.


I would like to take this opportunity to wish you all a Very Merry Christmas and a Happy and Healthy New Year.


Warmest wishes

Anita x

Monday, 12 December 2022

December Papermaze Kit - Part 1

Hello, Lynn here, I can't quite believe it's time for the December Papermaze kit already, this year has gone by so fast. A lovely selection of papers, cardstock and embellishments with a red and pink colour scheme.

Here are my first two layouts. The first with my children at the age of two, Christmas 1994  and the second featuring Christmas Lego. Both were created with the use of Tim Holtz - Sizzix Thinlits die sets (also available from Papermaze). 
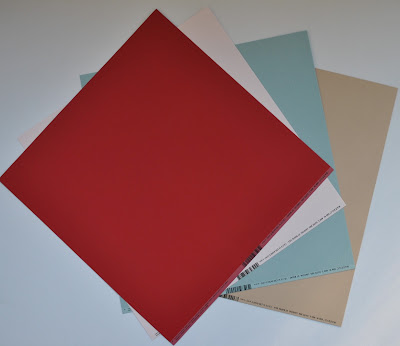
Patterned papers:
American Crafts - Vicki Boutin - Evergreen & Holly collection - Making Spirits Bright & Holiday Cheer
Mintay Papers - Merry Little Christmas collection - #04 & #05
Crate Paper - Mittens & Mistletoe - Dear Santa
Prima Marketing - Candy Cane Lane collection -
Sparkling Christmas
Bazzill Basics cardstock - Bazzill White & Lagoon


Reverse side of papers


Embellishments
4" x 12" Prima Candy Cane Lane Poinsettia Vellum, 3 sparkly buttons, 3 Vicki Boutin chipboard stickers, 3 Rosie's Studio chipboard frames, 50cm Holiday Divine Twine, Prima poinsettia, strip red pearls, Crate Paper epoxy charm, 8 printed label phrases


Extra Bazzill Pack
Cherry Splash, Pink Cloud, Coastal & Toasted Nut


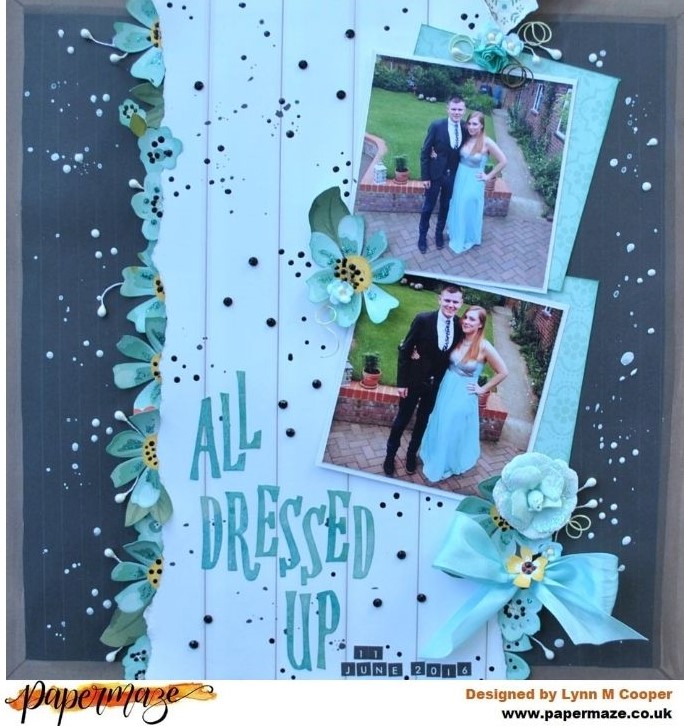
Merry Christmas 1994 - My three children when they were two years old, all dressed up for Christmas Day.

First of all, I gutted the 'Making Spirits Bright' paper to make a border of 4cm deep. Next, I trimmed the 'Holiday Cheer' paper to measure 26cm x 26cm. This was spritzed with Distress Mica Spray Stain (Holiday) and the edges inked with Lumberjack Plaid Distress Oxide Ink. The paper was mounted over the frame paper at an angle.
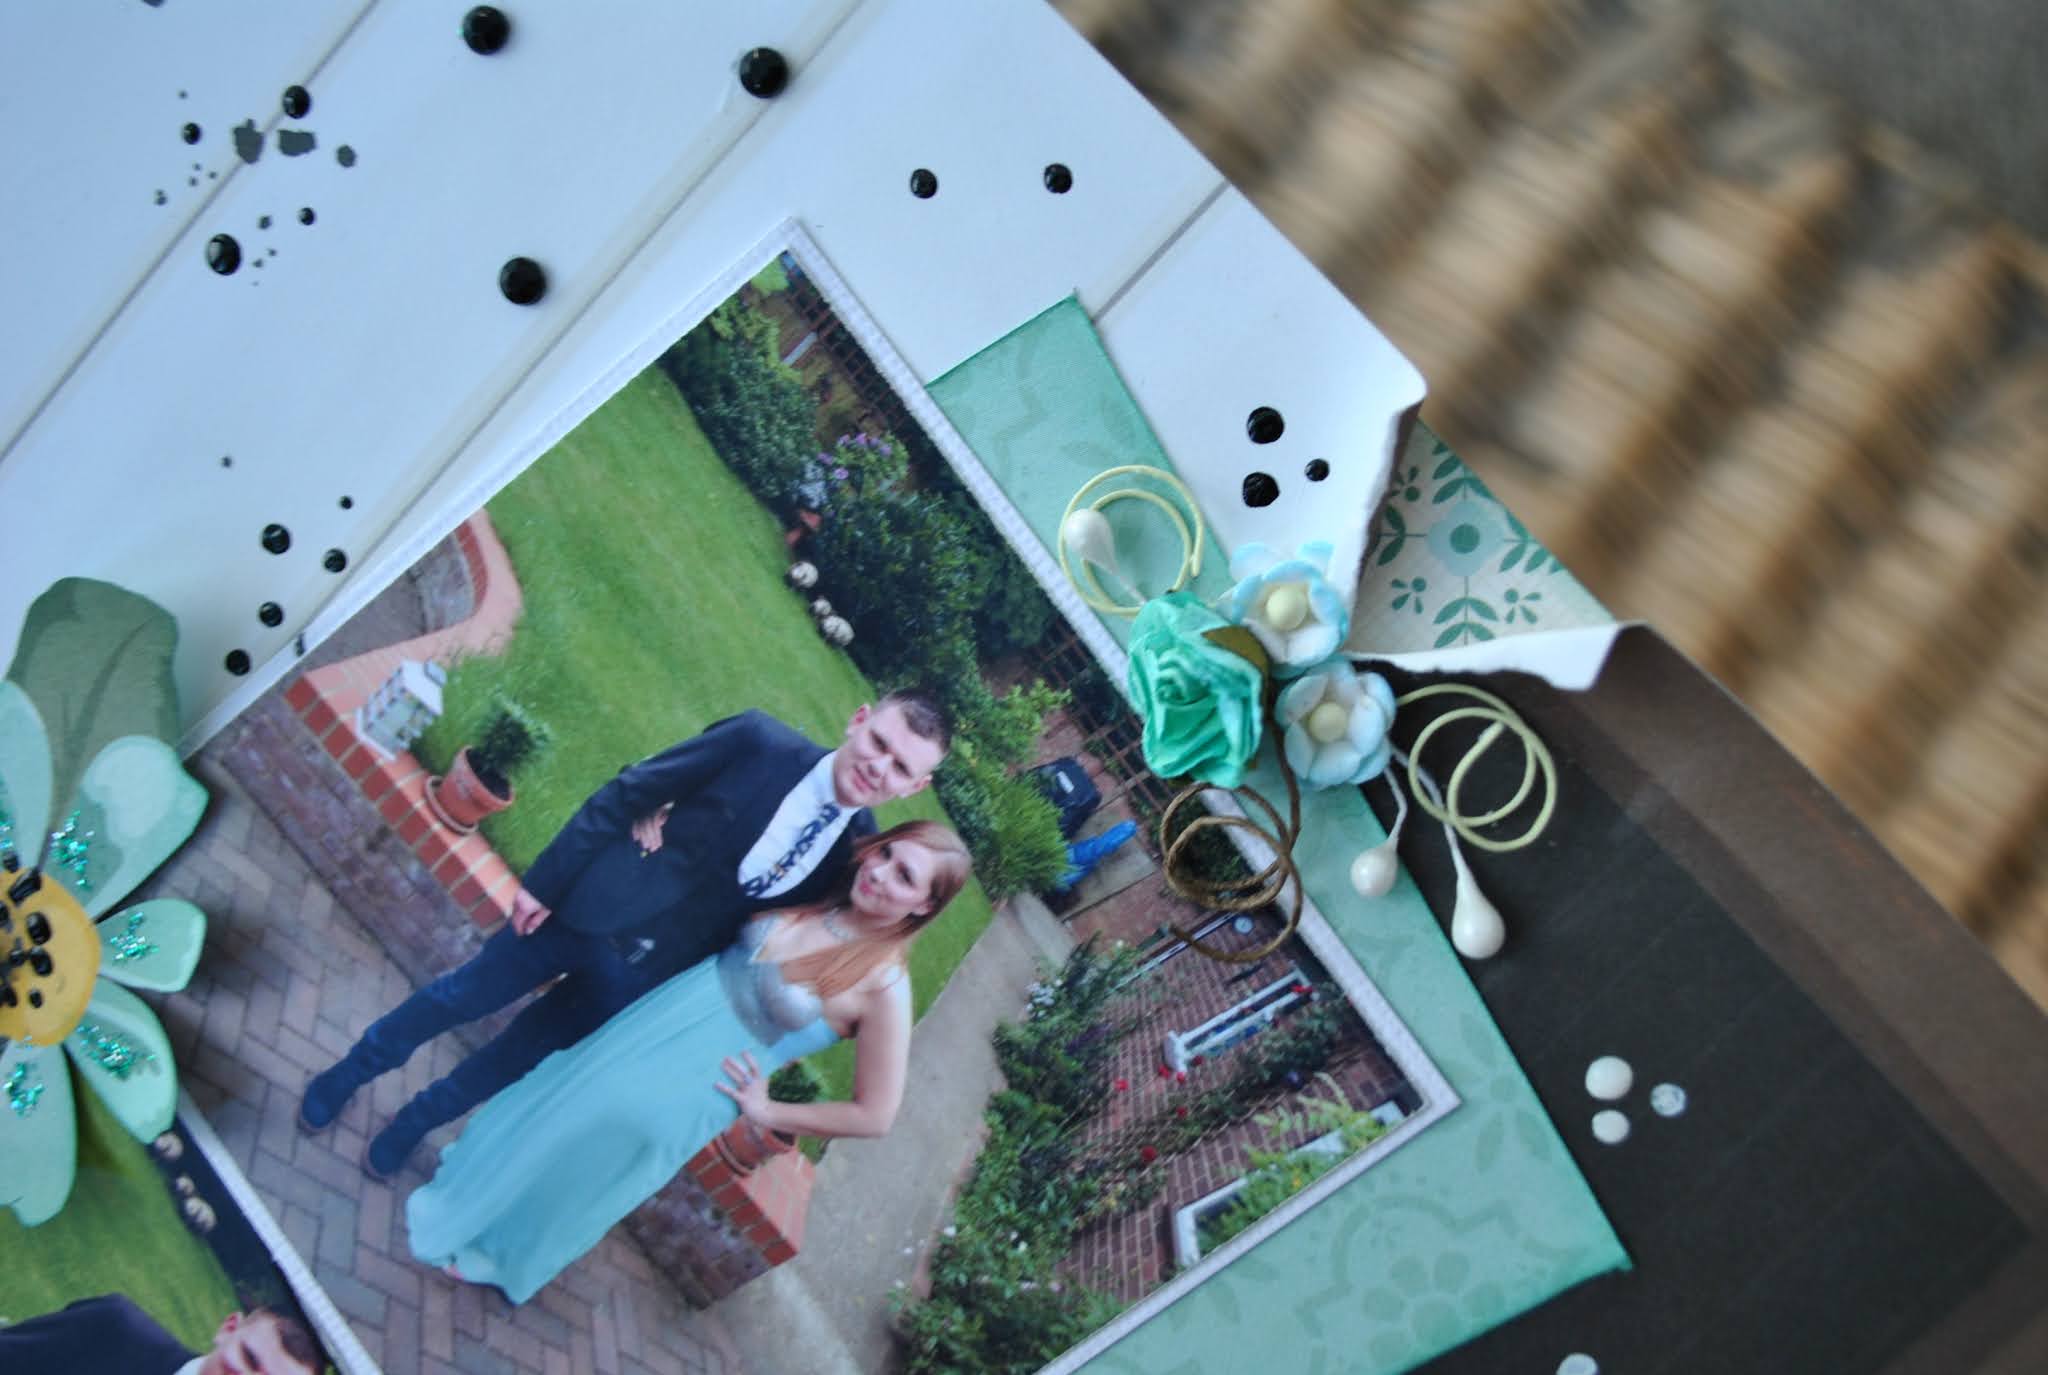
I mounted my photos onto three spare pieces from the 'Making Spirits Bright' paper. These were inked and attached across the middle of the page. 


With the Tim Holtz Sizzix Thinlits Colourize Bowtie set, I cut the bow from three shades of red Bazzill cardstock. I also cut a ribbon from the same card to stretch across the page, just below the photos. The ribbon was applied to the page and then the bow (raised up on 3D foam tape).


From the Candy Cane Lane Vellum, I cut five poinsettia flowers and four baubles. I placed the baubles under the ribbon and drew in strings to make them hang down. The flowers were arranged at the top of the photos. 


I cut two sprigs of fir using Tim Holtz Sizzix Thinlits Holiday Greens die set and the Lagoon Bazzill. These were added to the bow. 


My title was created with some Thickers Cecily Glitter letter stickers and Rosie's Studio, Hearth & Home puffy letter stickers.


Finally, I added some sparkle to the fir and flowers with Stickles glitter glue.


Santa Lego - Part of our growing collection of Christmas Lego.


I started this layout with the White Bazzill, and some Lumberjack Plaid Distress Oxide Ink. The ink was slightly diluted on the craft mat before applying to the card. I also flicked some of this ink over the page.

I tore strips from the sides of  'Sparkling Christmas' paper and attached to the very top and bottom of the Bazzill. I tore the scrap of  'Holiday Cheer' paper into two strips and ticked these just under the 'Sparkling Christmas' paper strips.

I mounted my photo onto scraps of 'Making Spirits Bright' paper, using both sides. With the photo in place on the page, but not stuck down, I placed two of the chipboard frame stickers under two opposite corners of the layout, again without sticking down.


Using the Holiday Divine Twine, I wound the ends around the frames and trailed the rest over the page, under the photo, making a few loops. The photo, frames and twine were then glued in place. 


From the remains of 'Sparkling Christmas' paper, I fussy cut seven stockings and an additional seven bows, to match. I inked the edges of bows and stockings, the with 3D foam pads I applied the bows to the stockings. The stockings were then hung from the twine with more 3D foam pads.


I made my title and date with Pinkfresh Studio Some Days - Mini Puffy Alpha Stickers.
I used some of the phrase stickers from the kit, to add detail inside the frames. Finally, I scattered the read pearls to the Bazzill. 


That's all for today, I will be back with more from this kit after Christmas. Have fun celebrating!!
Thanks for looking.
Lynn x

Monday, 29 August 2022

Just Beautiful....... Mintay Papers....Joy of Life pt 2

Hello again

It's Anita here with you today and I have my 2nd layout using Mintay's Joy of Life Collection.

I wanted to scrap this photo of my eldest daughter that I absolutely adore. It was captured on the day that should have been her wedding day, but due to covid and lockdown etc it was all postponed. We couldn't let the original date pass without doing something special for them and so we had a 'Nearly Weds Day', complete with flowers, cake, decor and getting dressed up nicely.


The page is based on a sheet of white cardstock that I trimmed 1cm from the top and also the same down one side. it was then laid onto a gutted out sheet of 04 to create a slim patterned frame around the outside edge. The large square that I gutted from the centre was full of the hot air balloon design so I cut out as many as I could from this.
These were then folded gently in half from top to bottom and layered on top of each other starting with the largest at the bottom and I made 2 stacks.
 I bent up the sides to create some dimension to each stack and then popped them to one side to use later.

Once again I used the Tim Holtz Distress Oxide Spray in Spun Sugar, I misted some patches but also spattered some drops too. I was fascinated watching the drops dry because the ink and the paint in them separated and when they had completely dried they ended up looking like small blossoms across the page ( well in my eyes they did lol)

Lots of fussy cutting came next from the sheet of 09 with a mix of flowers, birds, a cottage and a record player!
I used some of the scrappy bits to cut out some small triangles and added some twine to create a little string of bunting that I hung between the balloon stacks

The other birds and flowers were raised up on foam pads to add some more dimension to the page and the whole thing was then finished with the addition of Icicle Stickles and some AB flat backed crystals to bring a bit more sparkle.

Not sure how this last photo ended up down here..... but this is to show how the Distress Oxide Spray dried and separated...and how it looks like little blossoms ( to me anyway ;) )


I have really enjoyed creating with these Mintay papers and am really looking forward to seeing their new releases...I wonder what they will be.


Happy Crafting!

Warmest wishes

Anita xx

Monday, 1 March 2021

February Papermaze Kit - Part 2

Hello Lynn here today with the second pair of layouts using the Papermaze kit for February. This time I have used the teal / turquoise / aqua papers and card from the kit for both pages.


Patterned papers:
American Crafts - Vicki Boutin - Storyteller collection - Bohemian, Fresh Cut & Narrative
Simple Stories - Apron Strings collection - Live Love Eat & What's For Dinner
Echo Park Coffee and Friends collection - Letterboard

Bazzill - Vanilla & Blackberry Swirl


Beautiful Beach
- The photo for this layout was taken on our first trip to the Western Isles, the beaches are beautiful beaches look tropical. This is on Harris - Seilebost Beach.

My base for this page is the Vanilla Bazzill, and I started by using a TCW stencil, and a mix of Ranger's Transparent Gloss Texture Paste and some Distress Oxide Ink (Evergreen Bough). I then splattered some Distress Paints and Stains onto the page. 


With the 'Bohemia' paper I tore off the bottom of the sheet at an angle, then I tore off another strip about 3cm deep. I inked the edges and glued them to the bottom of the Bazzill, tucking the strip under the top of the larger piece. Between these two pieces of paper I applied a strip of frayed cheesecloth.

I mounted my photo onto white card then onto a piece of Blue Ocean Bazzill. I added it to the left side of the layout raised with 3D foam tape.

I used the 'BEAUTIFUL' Papermaze exclusive cutfile, and embossed the solid letters with Stampendous Frantage Aged Teal Embossing Enamel. Then I embossed the outer letters with a translucent teal embossing powder. I put the letters together beneath the photo, and cut the word 'BEACH' with the Cricut from Blue Ocean Bazzill.


With the tiny alpha stickers from the kit I added the details to the bottom right corner of the layout. 

Finally with the dew drops from the kit and some embellishments (glass nuggets, cork pieces, tiny shells and gems), from my stash I added the finishing touches to the torn edges of paper. 


All Dressed Up - My daughter and her husband ready to go to a friend's evening wedding reception.


This time I took a sheet of scrap 12" x 12" paper as base to stick my background to. Both sides of the 'Letterboard' paper were used to build up the background, I tore a strip (about 15cm wide), from the centre of the paper, so I could retain the wooden border at the sides and corners of the blackboard side, and use the white of the letterboard for the centre of my page. These were placed onto my scrap paper, leaving the edges unstuck so I could tuck in my flowers later.

I splattered some Dylusions Black Marble Ink spray on the white paper and White Linen on the black paper!

I mounted the photos onto white cardstock and then off set them onto 'Live, Love, Eat' paper, cut to a similar size to the photos. These were stuck, one above the other over the paper join on the left side of the page. Above this join I peeled back both papers and tucked in a scrap of 'Whats for Dinner' paper. I embellished this area with some small paper flowers and a pearl stamen.


I fussy cut the flowers from what was left of the 'Live, Love, Eat' paper and sucked these all the way down the right hand join, and the bottom of the left hand join. Many of these flowers were incomplete, but because they were being tucked in, I didn't need whole flowers. I inked the cut edges with evergreen Bough Distress Ink and shaped the petals over the scissor blade.

I placed the large Prima flower at the bottom left of the photo, and added a ribbon bow in that area too. 


I scattered a few more tiny blossoms among the paper flowers, together with more stamen.

The title was cut from 'Bohemia' paper scraps using the Tim Holtz, Handmade Sizzix BigzXL die. The date was created with more of the Websters mini alphabet stickers from the kit.

To add different dimensions, I used the strip of black gems and some dots of Ebony Black Nuvo Crystal Drops on the white area. To the black areas I used some Gloss Simply White Nuvo Crystal Nuvo Drops. A little sparkle was applied to the petals with Turquoise Stickles.

That's all for the February kit, although I still have plenty more paper and other bits left, so I may make more at a later date. Off to start work on the March kit now! 

Thanks for looking.

Lynn x

Friday, 17 July 2020

July Papermaze Kit

Hello, Lynn here with the pretty Papermaze Kit for the month of July. Lovely pastel shades of lemon, lilac, aqua, blue and pink, with much bolder purple. Together with the extra Bazzill pack, the kit is available in the shop from today.

Here are my first two layouts:


Before I explain how the layouts were made, here is a list of what is in the kit.


Patterned Papers:
Kaisercraft - Amethyst collection - Flutter & Gem

Pink Paislee - Bloom Street collection - #08
& #19
Fancy Pants Design - Cherry on Top collection - Flavour Burst
Heidi Swapp Art Walk collection - Escape

Bazzill Basics Cardstock: Pansy & Avalanche

Reverse side of papers:


Embellishments:


30cm Washi tape, cheesecloth, 30cm lace, 3 Tando butterflies, 2 wooden feathers, 2 strips Doodlebug jewels, 3 cherry blossom flowers, 1 Prima flower and Pinkfresh puffy word stickers, 2 pieces Pinkfresh acetate ephemera


As always there is a pack of four sheets of Bazzill available as an optional extra. 


Ocean Breeze, Chiffon, Tutu Pink & Purple Palisades

The Good Life - This photo of me was captured recently in the garden by my husband - he says it's me in my element! We certainly have plenty of garden here in our Suffolk home to keep me busy!

The layout was inspired by the cut file which I cut once as it is presented, then flipped horizontally for a second cut to give me a mirror image. The cut file is from Handipaper and the inspiration from a layout by Nathalie DeSousa.


Starting with the Bazzill Purple Pallisades, I cut it into three pieces 30cm x 10cm. Setting one piece aside for later I flicked ink over the other two pieces. For this I used Dylusions Ink Spray in Black Marble and White Linen (flicked rather than sprayed), and diluted Distress Oxide Ink in Wilted Violet and Shaded Lilac (giving a chalky effect). Once dry, these were glued vertically to either side of a scrap sheet of 30cm x 30cm paper.

I cut a piece of Kaisercraft - Amethyst collection - Gem to measure 30cm x 10cm and this was placed in the centre of the Bazzill.

Using the cut file I cut the two floral borders from Avalanche Bazzill and placed them along the edges of the patterned paper over the Purple Pallisades Bazzill, to give some dimension and movement I only used glue along the straight edge. 

From the remainder of the Purple Pallisades Bazzill I trimmed both 30cm sides with a Martha Stewart Border Punch, then trimmed them to give me two strips 2.5cm wide. These were glued into place overlapping the cut file pieces by adhering the straight edge only, leaving me room to tuck something underneath later


I took the cheesecloth from the kit and opened it out. Then I wiped Distress Oxide, using the two purple shades onto the craft mat and spritzed with water. I dragged the cheesecloth back and forth through the ink until I had some of both shads and a mix of the two showing. I also left a few parts white.  This was left to dry, then I cut strips and tucked them under the trimmed Bazzill as shown in the photo.

I cut six of the smaller butterflies from the
Kaisercraft - Amethyst collection - Flutter paper, inked the wings and placed then randomly onto the page with 3D foam. I added Nuvo Glitter Drops to the wings and Nuvo Crystal Drops to the bodies.

From the kit I used the
Doodlebug jewels to scatter over the page, together with some lilac Dew Drops from my stash.

My title was made with Pinkfresh Studio Joyful Day Puffy Alpha Stickers.


Daisy Girls -  These photos of my girls were taken in 1993 in the garden when Nanny was visiting and she made them each a daisy chain.


I made the border by gutting a sheet of Pansy Bazzill, leaving a frame of 2.5 cm. Then I trimmed the Pink Paislee - Bloom Street collection - #08 paper to measure 29cm x 29cm.
Before attaching the paper to the Bazzill frame. I used the Vicki Boutin Wildflower and Honey Stencil and some texture paste to apply some daisies to the background.


While the texture paste was drying I set about fussy cutting the largest butterflies from the
Kaisercraft - Amethyst collection - Flutter paper. I inked the edges with Wilted Violet Distress Ink, then I sculpted some shape into the wings with the blade of my scissors. I attached some pearl stamen to each butterfly for antenna. The butterflies were attached across the middle of the page with 3D foam.  I added some Diamond Stickles to the veins on the wings, and I found some gold pearls to stick to the daisy centres.

Finally the title was made from Purple Pallisades and Pansy Bazzill using Tonic Studios Uppercase Alpha Die Set - Windsor.

So that's all for today! I will be back with more from the July kit in two weeks time.
Thanks for looking
Lynn x