Showing posts with label Water Colour. Show all posts

Thursday, 5 August 2021

July Kit - Extra

Lynn here today, I'm back with an extra layout using some left over patterned papers and embellishments from the Papermaze July kit. I simply added a 12" x 12" sheet of Watercolour paper from a pad I purchased at Papermaze.


Before looking at how the layout was made, here is a reminder of the kit:


I started with the water colour paper and made a mixed media background using a selection of Distress Oxide Inks, picked to match the colours on the
P13 -When We First Met - # 06 paper. I used Black Soot, Antique Linen, Brushed Corduroy, Dusty Concord, Stormy Sky and Old Paper, diluted with water and flicked, dripped and dropped onto the watercolour paper, then spritzed with more water.

When the paper was dry, I used the remains of the #06 paper from an earlier layout, I tore this down the left side. My piece was about 10cm wide. this was stuck to the right side of the layout.

My photo was mounted onto scraps of 'In the Water Garden' paper, with the lilac side up. The photo was put in place without glueing down. This allowed me to position the embellishments. I used thin strips of paper, the washi tape and the 49 & Market Rub-ons from the kit; arranging pieces of these around three sides of the photo. The matted photo was then attached. 


From the remaining scraps of P13, I fussy cut two circles and placed them on top of one another to make a journalling spot. This was positioned top left of the photo. Then I fussy cut some rose clusters and arranged them around the photo, using 3D foam tape.

I tied some Baker's Twine around the journalling spot and tied the star embellishment to this. 

I scattered the wooden hearts over the layout.

Finally I added title, date and place using American Crafts Thickers - Happy Life alpha stickers. 

Thanks for looking.
Lynn x

Friday, 13 November 2020

Good For The Sole - Simple Stories - Cozy Days Collection

Hello, Rebecca here with you today sharing another layout using the Cozy Days Collection by Simple Stories. I'm really enjoying working with this collection because it's full of autumnal goodness! 

I wanted to use a cutfile on this layout to act as my title, and I cut it from a sheet of 'Stonehenge' Bazzill Cardstock from the Matchmaker Pack. I backed the individual letters of the cutfile with the 'B' sides of both the 'Sweaters and Boots' and 'Happy Falliday' patterned papers. I love how these papers look next to each other, and they go really well with the stoney-coloured cardstock of the cutfile. Next I selected the floral 'B' side of the '2 x 2 Elements' patterned paper and used this to back the walking boots in the cutfile.

I knew I wanted my cutfile title to sit to the right of my layout, with my two photos to the left of it. I marked out roughly where they would all sit on my background cardstock and then set about creating a mixed media background. 

I kept my mixed media quite simple - I used a brown watercolour pen and added the colour to a scrap of bubble wrap and then pressed it down onto my background to create an impression. This reminded me of mud splatters - and there were a lot of these the day these photos were taken! I finished my background with some paint splatters using the same watercolour pen, and also two cosmic shimmer watercolour paints, which have a beautiful iridescent shimmer.

I matted both of my photos first onto white cardstock, and then matted one with the 'Sweaters and Boots' patterned paper and the other with the 'Happy Falliday' paper to bring the blue and yellow tones over to the left hand side of the layout. I raised my cutfile and both photos up using craft foam to add dimension to the layout.

To embellish my layout, I fussy-cut a number of leaves from the 'Harvest Wishes' patterned paper. This paper is amazing and will go a long way as it is full of beautiful leaves in various Autumnal colours. I also selected a number of elements from the Journal Bits & Pieces pack. I used the larger elements to create some layers above my photos and cutfile, and distressed all the edges with my scissors. I've added a couple of the tiny word ephemera pieces on top of my cutfile to bring some additional colour to the title.


I also fussy-cut a couple of the adorable woodland creatures from the 'Comfy Cozy' patterned paper and added them to the layout with some leaf clusters around them. 


As a last minute decision, I created a small cluster in the top right hand corner of my layout. I used one of the tags from the 'Tags' patterned paper and 'hung' it upside down. I also used a couple of elements from the Journal Bits & Pieces. I initially added some thick gardeners twine through the two tags on the layout, but decided it was too bulky and so I replaced it with some brown embroidery thread, which I think works so much better with the colours on the page.


I finished my layout with some gold paint splatters and Nuvo Glitter Drops in 'Golden Sunset', and my very final step was to add some torn washi tape to the top and bottom of my layout.


If you'd like to watch the layout come together and see the step-by-step process, I have a process video on my YouTube channel here

Thank you for reading, I hope you've enjoyed this layout. The Cozy Days collection is already available in the shop for purchase so head over to take a look!

See you later in the month with more Autumnal goodness!

Take care,

Rebecca x


Friday, 5 May 2017

Words to Live by.....Wildflower from Kaisercraft.

Hello....
It's Anita here with you today and I would like to share with you a layout I have made using the delightful Wildflower collection from Kaisercraft ...a range of beautiful papers, combining watercolour prints in a beautiful pastel colour palette.....with the added beauty of soft florals and delicate butterflies.


The designs are very soft and although pastel, also have little twists of citrus tones in patches which work really well. I matted all the elements with black cardstock to really make then *pop* and create dimension without too much added actual *depth*


I often prefer to scrap using black and white photo's and today was no exception....although these papers would carry a coloured photo well, I really felt that black and white would sit best on there and I chose a photo of our youngest daughter, taken on a family holiday in 2010. I still look at it and wonder just what she was thinking as she stared at the camera.


I used a sheet of  Spring and trimmed a thin slice from 2 sides, I then popped this onto a sheet of Raven Bazill to create a frame all round.


I cut some flowers and different shaped panels from a sheet of  In Bloom and then also matted these onto black cardstock, I also did the same for the quotes that were taken from a sheet of  Gathered and I popped the photo onto a black mat.


 I layered the various panels and then took the sheet of  Wings, cutting out several butterflies. These were then adhered to the page to look like they were gently fluttering past and finished off with a delicate sprinklng of Stickles to make the wings glisten.


This really is a truly beautiful collection from Kaisercraft and will cover a range of subjects I think. After suffering from a total lack of mojo of late this actually came out rather nice and I am really quite pleased with it.

Thanks for looking and I would like to wish you all a super weekend.
Warmest wishes
Anita x

Thursday, 16 June 2016

Experimenting with Distress Crayons

Hello, It's Lynn with you today sharing my experiments with Tim Holtz Distress Crayons.


A little information about the crayons:

* The crayons look like markers, the medium is in a plastic barrel with a removable lid at one end, the other end is twisted to extend the medium - much like a lipstick.  Each crayon is the length and diameter of marker so easy to handle.  The cap and the 'twister bit' show the colour of the crayon and the name is also written on the barrel. This shows the crayon fully extended so you can see how much of the product is in the barrel.


* The crayons are available in packs of six colours, there are three packs available so far - brights, neutrals and earth tones.

* The crayon is a very smooth, creamy consistency.

* The pigment is water reactive, so can be applied (1) as it is dry or (2) smudged with a rag, sponge or your finger or (3) blended with water.


* The crayons can be used on many different coloured surfaces and because it is a pigment it works well on dark cardstock.


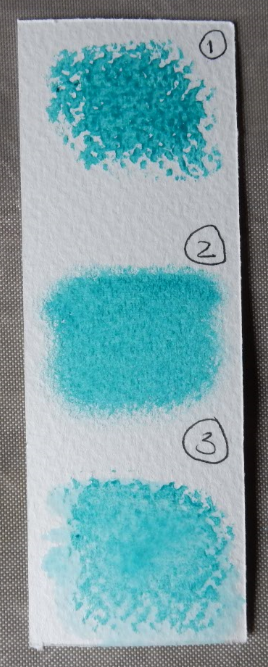
* The colours can be mixed, and appear to work best when a large amount of medium is used. This shows the results of blending the colours (shown dry at the top of each image) with water (left) and dry with my finger (right).


* The colours match the existing Distress palette of products.


* The crayon pigments do not contaminate one-another when adding one color over another. So you can add in a pale colour when you have already used a dark one, without spoiling your crayon.

* You can take the colour from the crayon with a wet brush and apply it to paper that way.


* The colour is permanent when dry, but can be made wet if further movement needed or sealed to prevent movement.

*The medium is non toxic and odour free, but the package says they are for adult use only and should be kept out of the reach of children.

Here are a few ideas I experimented with:

Gesso
I used watercolour paper and treated one piece with Gesso to see what the difference would be. The Gesso sealed the surface and made the colour move around more easily.

1. I coloured them both with the crayons, then blended the colour by rubbing it with my dry finger.


I tried lifting colour with a baby wipe through a stencil on both samples (a wet piece of kitchen paper or cloth works just as well).  The Gesso base appears to result in a whiter finish when the colour is removed.


While I still had the Gesso out, I tried different tricks with water - this shows application of crayon over water (top) and water over crayon (bottom) - with and without a Gesso base. 


Texture Paste
I tried colouring the texture paste with the brights crayons by mixing the two together on my craft mat before using through a stencil. I like the subtle shades it produced, a lot of crayon would be needed to make a strong colour.


I added texture paste through a stencil and allowed to dry then added colour using the crayons. These were then blended with a water brush.  This gave a good result as the texture paste took up the colour easily, and gave the same intensity as the paper.


I tried transparent texture paste next - this was applied through a stencil and allowed to dry completely.  I drew onto the surface with the crayons and rubbed in with my finger. Initially the pigment on the paper was a dark contrast to that of the texture paste. Rubbing further with a soft cloth removes colour from the texture paste until it is just tinted and finally disappears all-together from the shiny surface.


Stamping
The verdict for stamping is that the crayons can be stamped onto but not stamped with!

I tried pigment ink and dye based ink both work, despite applying to dry colour, both smudged a little after about 15 minutes.


However the next day it seems not to smudge, shown here on Gesso (left) and without (right).


I tried using the crayons on the stamp to make an impression, Look carefully to see the top image which is barely visible and was created with the crayon applied and stamped directly onto the paper (labelled 'dry'). The second impression shows what happened when I added crayon to the stamp then misted it with water before stamping.


Masks and Stencils
I tried applying the colour directly from the crayon through the stencil. This gave a lovely rich colour but there is a build up of medium around the edges of the shapes which takes longer to dry and therefore the card remained tacky for some days after application. You can see where I have tried to blend the thicker areas out but rubbing and so smudging the colours together.


I wanted to achieve a softer application of colour and so tried using the blending tool and foam. The colour was added to the craft mat and applied through the stencil with the foam and tool. This was a successful way of obtaining subtle colour blending.


Textured surface
I made a textured surface using an embossing folder, then several colours were added to the raised areas and blended with my finger.


Painting
Using the crayon pigment as water colour was achieved by adding some colour to the craft mat and picking it up with a wet brush and painting with it. The stamped images are on watercolour paper in fast drying oil based pigment ink (Versafine). I added each colour and blended them as I went along on the paper. I edged the paper by drawing on the edges with the crayon and then used the wet brush to drag in the pigment in creating a colour wash type background.


Metal
I tried colouring a metal embellishment to highlight the detail. I added the crayon directly to the surface and left it for a few minutes before polishing off the excess.


These crayons were fun to use once I got going. I have to say I was a little disappointed at first, but it just took a bit of practice to get to understand how they work. I found them easier to use as I went along. I like the way they can be used as the very bold colour they are in the crayon but can also create much paler shades. A pack of six crayons can result in many additional shades by blending the colours together. The effects shown can be achieved with other media, and all give slightly different results.

The closest comparison I have found is the Gelatos by Faber-Castell. Carol reviewed these on this blog last year and her post can be found here.

I hope this gives you some ideas for using the crayons. Have fun and please leave comments when you have tried them or to ask questions.

Thanks for looking, and well done if you have reached the end of this post!
Lynn x

Monday, 1 February 2016

Calendar Birds

Hi, Lynn here with a different way to use your stencils.  Instead of inking through the stencil, try inking the stencil and using it like a stamp!


I used this technique to make a set of tags, one for each month of the year.

Using water colour paper cut a piece 8 cm x 16 cm and snip the top corners to make a tag shape. I used an existing Ranger Inkessentials Craft Tags #8 as a template.

Choose a stencil and on a craft sheet, ink the surface with a selection of water based inks. For this tag I used Tim Holtz Layering stencil THS050 and four shades of Distress Ink (Iced Spruce, Faded Jeans, Tumbled Glass and Salty Ocean).


Use a water mister to spritz inked stencil with water to create droplets of ink on the surface.


Place the paper over the stencil, or the stencil over the paper, either way seems to work well, press firmly over the paper and stencil.


Separate and allow the paper to dry or speed up the process with a heat gun. Clean off the stencil.


Every one turns out a little differently:


The next step is to add images to the tag, I chose to use Tim Holtz - Stampers Anonymous - Bird Crazy and Crazy Things stamps sets. These were also stamped onto water colour paper using an Onyx Black VersaFine ink pad and coloured using Distress Inks, by inking onto the craft sheet and using a brush and water to paint the images.


Cut the bird and accessories out using scissors or the matching dies, no need to worry about cutting the fine details, such as the feet. Stamp the image again in place on the tag, the cut image can be glued in place over this image - reuniting the bird with his feet again!


To prevent the bird from floating in space, tear some paper to make a mask and ink some ground for the bird to stand on.


Punch a hole in the top of the tag and add matching ribbon, twine or fibers. I made a set of these tags - one for each month of the year. I used a Sizzlet decorative strip alphabet die - Typeset, for the lettering.


I also added bling, Stickles and embossing powders. For the May tag I added some stamped images using JOFY stamps.

Now I am the process of creating cards using these completed tags.


Thank you for looking.
Lynn x
Just flown back with the finished cards:


Thanks
Lynn x