Showing posts with label bright. Show all posts

Wednesday, 20 September 2023

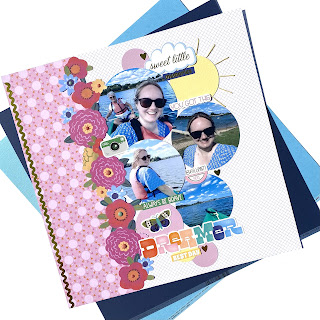
American Crafts - Shimelle Main Character Energy #3 ☀️

Hey everyone, it’s Anna back today. I’m sharing my third layout using Main Character Energy by Shimelle and American Crafts. You can find the collection in the shop here


I used the b side of ‘prop table’ as my base and then trimmed a strip of the b side of ‘after hours’ and adhered it to the left side of the layout. 


I cut my photos into circles and also created some circles out of cardstock from the matchmaker pack. I used a yellow circle to create a sunshine, which I then added some stitched sunbeams to using matching yellow thread. 


I fussy cut lots of florals from ‘prettiest pick’ and adhered them down the meeting point of my two papers. 


I then arranged my circles overlapping them slightly. I added some cardstock stickers on the cardstock circles and layered around them too. 


I added my title using the cardstock stickers and a few of the gold hearts dotted around. 


Finally, I finished my layout by adding some enamel dots to the fussy cut florals. 


Thanks so much for looking. 

I have one more layout to share using this collection, so I’ll see you soon with that! 

Anna 
x

@acraftylifewithanna

Monday, 21 August 2023

Shimelle ~ Main Character Energy #1 ☀️

Hi, it’s Anna back with you today!
For my next few blog posts I will be working with American Crafts collaboration with Shimelle - Main Character Energy. 
You can find the collection in the shop here


I used the ‘Right on Target’ paper and trimmed it down to achieve various sized wedges. I cut each section out and distressed the edges before adhering to white bazzill cardstock

My layout features a photo from Disney last year with me meeting Olaf! We were given the circular cards with his autograph on and this card just happened to fit perfectly into the pre determined circle lines on this paper. So I chose to centre this card in the middle and place my photo to the left side. 


I fussy cut some florals from the Prettiest Pink paper and placed them above and below my photograph which I mounted onto some orange bazzill cardstock from the Matchmaker Pack


I selected various stickers from the Cardstock Stickers, I placed some of the phrase stickers around the circle and used others to embellish around my photo. 


For my title, I used some phrase stickers by Vicki Boutin and the smaller yellow alphas are by Simple Stories - alpha sticker books


Thanks so much for looking! I’ll be back with another layout with this collection in September! 
See you then! 

Anna 

@acraftylifewithanna

Monday, 22 November 2021

Pinkfresh Studio ~ Holiday Magic

Hey!
 It’s Anna back with you today and I’m so excited to kick off the Christmas spirit on the blog with the latest collection I’m working with…
Over the next few weeks, I’ll be working with the bright and bold ‘Holiday Magic’ collection from Pinkfresh Studio

Just in time for the start of December, I have made an advent calendar for my first project… 


To create this calendar I used a diy fillable calendar box from hobbycraft. 
I then set about altering it using my Pinkfresh goodies. 
I began by measuring the squares and creating a template. I used the template to cut out a covering for every door using a variety of patterned papers from the collection.


I used various pieces from the ephemera pack to embellish each door, but you could also use the puffy stickers and die cuts to do this too. I adhered some of the ephemera using 3D foam pads to add some extra dimension. 


I embellished each door further by adding lots of Nuvo drops and enamel dots. I also added wooden numbers to each door. 


I filled each door with a little treat and I’m all ready for the countdown to Christmas with my very own diy advent calendar! 


I’ll be back soon with a layout using this collection! 

Thanks for looking, see you soon! 

Anna 
X

Wednesday, 4 August 2021

My Candy Girl - 'Sugar and Spice' by Meg

Hello everyone, it's Meg here sharing my latest layout using the delicious My Candy Girl collection by Bella Blvd!


My previous page with this collection was super pink and girly, so I knew this time I wanted to use a photo of my baby boy and I picked out my photo of him in his baby blue dressing gown. I thought it went really well with the bright colours! 

I knew I wanted to make the page full of colour so I decided I would layer paper in a central square with a wide white border around the page to really frame the colour and balance it out. I measured and drew a 6x6 square on white
Marshmallow Bazzill cardstock in pencil and cut strips from yellow Lemonade Bazzill cardstock. I then cut the striped turquoise border from the My Candy Girl Borders paper, cut it in half, arranged my strips in the square and trimmed them to fit. 

I glued in place, distressed the edges and handstitched across the strips and around the 6x6 square using a ruler and a pokey tool to poke holes in the paper every quarter inch, then I stitched in a dark pink glittery thread I had in my stash already. I fussy cut elements from the Borders paper, Sweet as Sugar paper and I cut out the 'Sugar and Spice' journaling element, 'S is for Sweet' plus a turquoise frame from the Daily Details paper. 

I splattered some pink acrylic around the edges of my 6x6 square and began tucking in my fussy-cut photo and the other fussy-cut elements in between the paper layers, in a triangle shape around my photo to draw attention to it. I finished with the Sugar Coating Puffy Stickers, flat back gems and a diamond shaped charm from my stash. 


And thats it! A colour-packed, sweet layout that came together quickly using My Candy Girl. I really loved how this turned out as I find bold colours a challenge sometimes, but these pieces are so cute and fun they feel like they don't need to be put together 'perfectly' to look good! 
Hope you enjoyed this page today and take care, 

Meg x