Showing posts with label outdoors. Show all posts

Wednesday, 13 August 2025

Photoplay Paper -Travel Junque- Girlie Weekend

 Hi everyone! Rebecca Bee here today! For my final layout using Photoplay Paper Travel Junque collection, I wanted to focus on some of the softer colours and images in the collection. While the collection itself is generally quite vintage and grungy (which I love!) there are also some softer pink and yellow hues which I felt suited my girlie caravanning weekend away absolutely perfectly! 


The caravan image on the sticker sheet was crying out to be used for this layout, as it perfectly matches the caravan we were away in. The caravan is nicknamed Esther so a girlie layout featuring Esther the cute caravan just had to be made!


I've isolated the more feminine colours and images from the cut aparts in the Post Card & Roam patterned papers and sticker sheet, and paper-pieced an envelope shape from the Tickets paper.


I offset a piece of Bazzil cardstock in the shade Touch of Pink onto the Away We Go Ledger paper to add a softer background for my photographs. I've added two 2x3" photographs and tucked all my fussycut elements into my paper- pieced envelope. Finally to create my title I've used some of the cut apart letters in the Roam paper coupled with a perspex piece to finish off my title. 

I hope you've enjoyed the layouts I have created using Travel Junque or been inspired by them in some way. Until next time XOXO


Friday, 26 January 2024

Enjoy Yourself - Mintay Papers - The Great Outdoors Collection

Hello everyone, Rebecca with you today. I hope you've all had a good week and have lots of scrappy fun planned for the weekend. I managed to escape to my craft room for a bit this week and have created another layout with Mintay Papers' 'The Great Outdoors' collection. You can find the collection in the shop here.


For this layout, I began by cutting different sized hexagons from several of the patterned papers. After distressing the edges using my scissors, I layered them up, trying to pair a patterned paper with a more solid paper. I arranged them on the page, and added my hexagon shaped photo to the left, with a couple of patterned papers behind it. 


Using the Paper Die Cuts, I embellished the layout creating small clusters around the edges of the hexagons. I've placed foam pads behind the die cuts so that I could create some dimension on the page.


I felt like the background needing something, but I didn't want to add lots of mixed media and lose the definition of the hexagons, so I decided to add some stencilling. I selected some tree stencils from my stash, and a Distress Oxide Ink Pad in the shade 'Rustic Wilderness'. Using a blending brush, I added the colour through the stencils. I stencilled the trees overlapping and varied how hard I pressed the ink through the stencil to help create lots of depth. 


For my title. I've used an acrylic perspextive from my stash, and finished the layout off with the addition of some wooden stars.


I hope you've enjoyed the layouts I've created with this collection, and it's inspired you to try something new this year!


Thanks for reading.

Rebecca x
@preciouspagespapercraft

Wednesday, 10 January 2024

Stay Wild - Mintay Papers - The Great Outdoors Collection

Hi everyone, and happy new year! Rebecca with you today sharing my first layout of 2024! This year I am determined to try new things and I'm kicking this off with a collection from Mintay Papers! It's a new brand to me having never created with it before and I have to say I'm pleasantly surprised. The quality of the papers is really impressive - nice and thick with good quality die cut ephemera to match. I chose to work with 'The Great Outdoors' as I was drawn to the outdoorsy feel and the neutral colours. You can find the collection in the shop here.


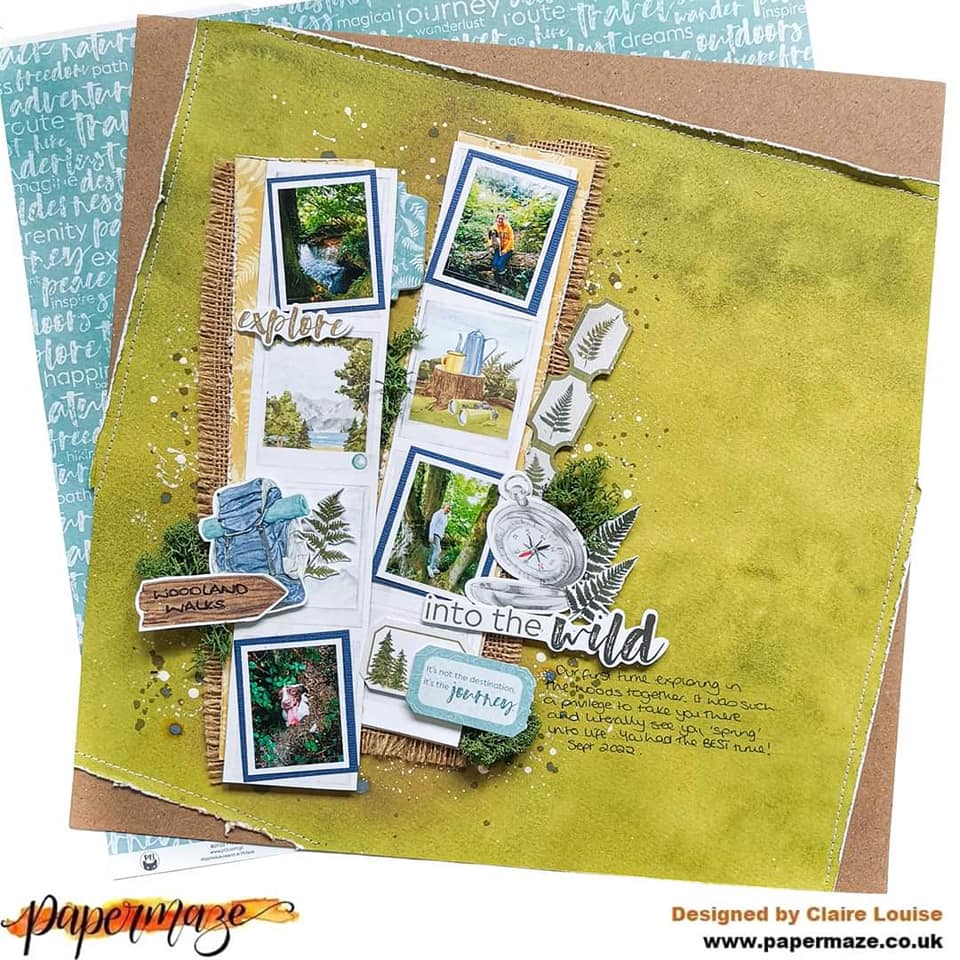
I begun with Paper 05, tearing a strip to sit horizontally across my layout. I then tore 2 thin strips of the reverse of this paper to sit above and below to provide some contrast. The photo I'm scrapping here is of my son in a wildllife hideout in the woods. We were trying to stay quiet so that he could see an elusive red squirrel! I wanted to translate this onto the layout, so selected Paper 01 and fussy-cut the trees from it, which I positioned either side of my photo.


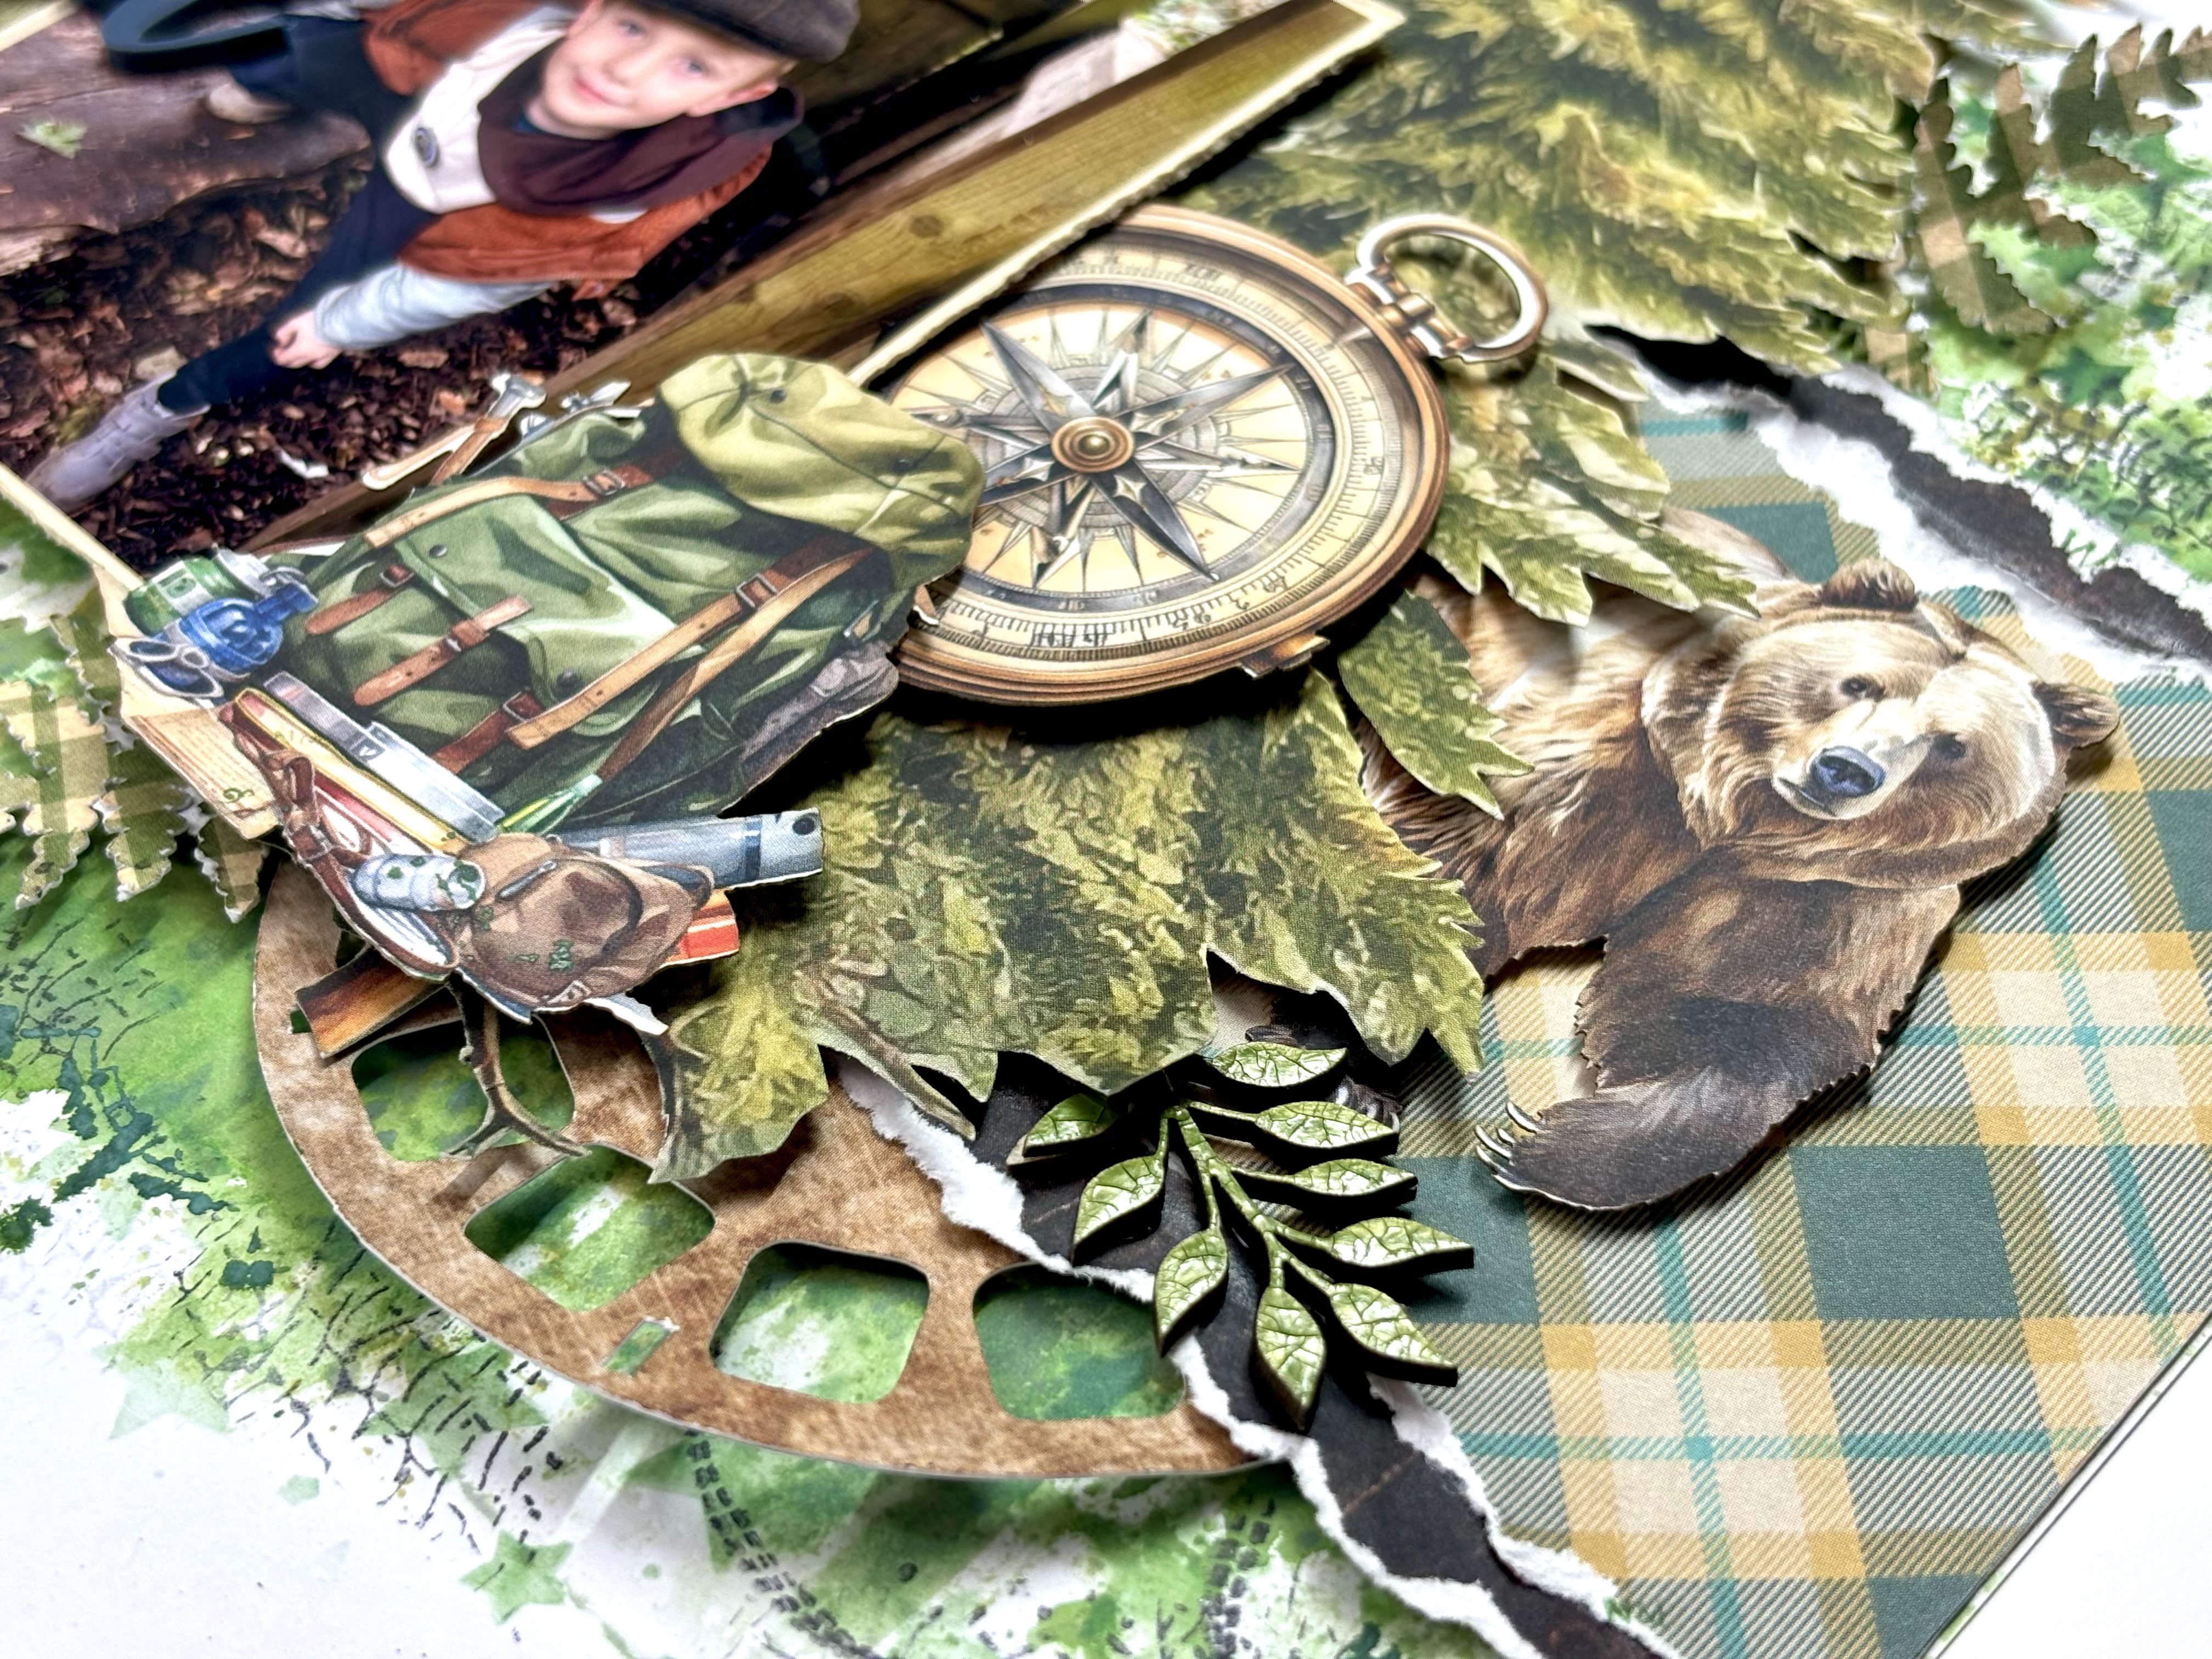
Using the Paper Die Cuts, I built clusters either side of my photo. Sadly, there are no red squirrels in this collection, but I felt that the bear and stag worked well as we saw plenty of wildlife in the woods. 


With my Cameo 4, I cut a viewfinder from Paper 04, cut it in half and used it above and below my torn paper strips.


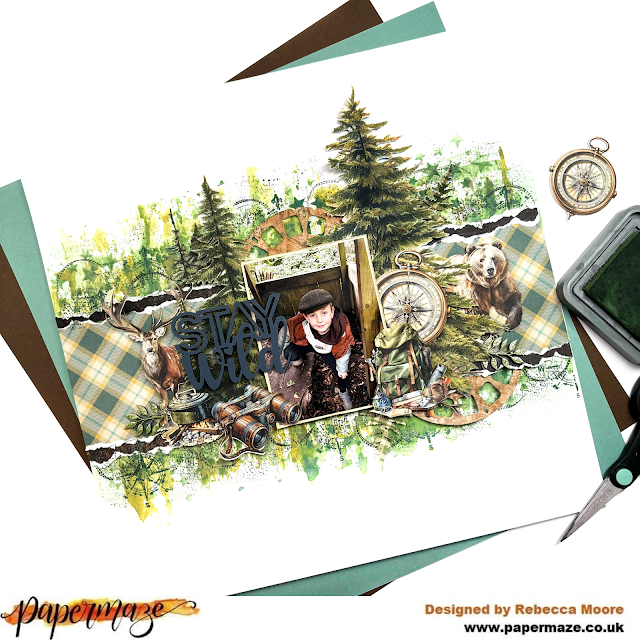
For my title, I added an acrylic perspextive from my stash. At this point, I was going to call the layout finished, but I felt like it needed something more. I decided on some mixed media. It's been a long time since I indulged in some messiness so I made the decision to go 'all out'.

I began with my brayer and Distress Oxides in the shades Rustic Wilderness, Iced Spruce and Forest Moss. After applying the inks to some packaging, I spritzed with water and then ran my brayer over the ink. I then rolled this over a sheet of Premium White Cardstock. On top of this, I added some stencilling using a star stencil. I wasn't too keen on how this looked, so ended up covering most of it up with more ink! To finish off, I added some stamping using various different stamps and my Staz On black ink pad.


Once the inks and stamping was all dry, I was able to move everything back onto the page. Luckily, I'd stuck everything together initially, but not to the page. This meant I could easily move everything off and back on again in one single piece. 

To finish off the layout, I added two raw chipboard leaf clusters from Dusty Attic. To elevate them, I covered them in Nuvo Crystal Drops in the shade Bottle Green. I love how this looks - it cracked slightly as it dried which gives it the same effect as crackle paste! 


And yes... eventually we did see a red squirrel!


I hope you've enjoyed this layout. I really enjoyed working with something different and trying a new brand. I'll be back later in the month with a second layout.

Take care,

Rebecca x

@preciouspagespapercraft


Friday, 22 September 2023

Simple Stories - Trail Mix - Let's Go

Hi everyone,

Claire back with you today sharing my second layout with the Trail Mix collection from Simple Stories. You can find it in the shop here.


I'm thoroughly enjoying this collection. As I mentioned in my last post, there's a great combination of earthy colours, alongside some richer warmer tones like I've used here.

The inspiration for my design came from a Post It note wreath I saw on Pinterest, so I decided to replicate it, using 3" squares of patterned paper.

I trimmed the Campfire Stories paper by 1/4" on all sides, distressing the edges and laying it flat on a piece of Premium White Cardstock. I've always loved a woodgrain paper and this one is no exception.

To create my paper square wreath, I cut four 3" squares from each of the Bugs & Kisses and So Outdoorsy papers.

I marked 1" down from two sides of the square and used this as a guide to score diagonally across the corner, creating a folded back edge, showcasing both sides of the patterned paper.


I repeated this for each square and then began to build the wreath, laying each square with the corner to the top left, and arranging these in a circular motion.

I cut my photo to fit in the centre of the wreath, measuring approximately 2.5" in size. I raised this on foam to help it stand proud against the wreath.


I cut the Let's Go title from the Tag Elements paper to create my title.

Once these elements were in place, the layout needed just a few small embellishments. I took a selection of ephemera pieces from the Bits & Pieces pack


I love how just a few small embellishment clusters has brought the wreath to life, and really given it that 'exploring outdoors' feeling.

On the top and bottom square, I added some phrases from the Sticker Book, laying these in the edge of the flap to create a bit of extra movement. 


To help make sure they stayed visible, I added a small foam pad under the folded paper edge to stop it raising too high. This worked perfectly and makes sure you can see the stickers in full.

As a final touch, I added a few die cut leaves from plain white cardstock and added a few splashes of white paint across the wreath.


I hope you've enjoyed this layout. It was certainly a fun one to create!

See you next time.
Claire xx

@scrappysoulmate

Friday, 9 September 2022

P13 - Hit The Road - Into The Wild

Hi everyone,

Claire here with you today, and this month I will be using the Hit The Road collection from P13


This collection immediately caught my eye. It's jam packed with the beautiful papers you would expect from P13, but they've also released exciting additional products that will take your scrapbooking even further:

  • Four Decorative Tags sets
  • Ephemera Tickets
  • Die Cut Garlands
  • Ephemera Bits & Pieces
  • Three Sticker Sheets
  • Three Chipboard Sticker Sheets
  • Chipboard embellishments and more!

I wanted my layout to feature the beautiful papers, Ephemera Tickets, Ephemera Bits and Pieces and Ephemera Frames and Words.

Using a piece of Premium Kraft Cardstock as my base, I positioned the b side of Paper 3 on an angel, distressing the edges for texture. I trimmed off the overlapping edges and added white machine stitching.

I wanted to create a multi-photo layout, and Paper 4 provided the perfect opportunity to create a photo strip format. I worked out where the strips would sit, and brushed on some Frayed Burlap Distress Oxide ink to create a shadow and help them contrast against the green paper. I also added some splatters.

I printed four photographs, layering them onto blue Bazzill cardstock from the Matchmaker Pack. I positioned these on two strips of Paper 4, and created a second layer using the b side of the paper to show that pop of yellow.

I added a strip of burlap ribbon underneath to create that extra texture you find when out in the woods.


With the main design in place, I began embellishing. I absolutely adore the Ephemera Tickets and couldn't resist the opportunity to tuck some alongside my photo strip.


I also added a few more at the bottom, bringing out the blue tones of the collection.


Just above, I created another small cluster, made with the leaves and compass from the Ephemera Bits & Pieces Pack. The title is from the Ephemera frames and Words Pack.


On the opposite photo strip, I created another small cluster, using the backpack, leaves and signpost which were fussy cut from Paper 7.


Towards the top of the cluster, I used a beautiful blue tab from Chipboard Sticker Sheet #3 and added a small 'Explore' phrase from the Phrase and Words set.


As a final touch, I added some moss from my stash around the clusters to really bring home the feel of the forest, and that was the page complete!

I hope you find inspiration in the page and are as excited as I was to see all the extra bits now included in this P13 collection - it really was a joy to create with.

I'll be back in a few week with another project with Hit The Road.

See you soon.
Claire xx
@scrappysoulmate