Hello again,
Anita here and today I would like to share a few cards that I have made using some left overs from my selection of papers from the beautiful Indigo Skies collection by Kaisercraft.
The first one was made for my lovely friend and fellow DT member, Lynn for her birthday. I made her an 8 x 8 easel card.
The card was decorated using various papers sections, butterflies, crystals, a doily, some die cuts and some gems. I made a rectangular shaker box which I filled with sequins and popped on the front, to add some extra dimension and movement.
I also decorated the inside of the card with papers and crystals and popped a raised sentiment on it, this works as a stand point to hold the card open.
I am really not a card maker, but I was rather happy with how this one came out and I am pretty sure that Lynn liked it too.
This paper collection is just sooo pretty and it makes it much easier to design with. I made a few other smaller cards with the rest of the left overs......I think I need to go shopping now to get some more of the collection.....I am absolutely smitten with it!!
The papers I used across this set of cards are as follows:
Blue Moon ,
Misty,
Storm,
Windswept,
Washed Out
Chambray
Well that's me done for now....I will be back to see you in July!
Have a super weekend!
Warmest wishes
Anita xx
Friday, 30 June 2017
Wednesday, 28 June 2017
wedding part 2
so as you can see this post is heavily laden with pictures some of which doesn't show how stunning the kasiercraft PS i love you papers are. Firstly I'm using a tando letter tray heart. It comes in 4 parts one whole heart back base, and 3 frames that sit on top that should be glued together to create a platform for memorabilia to sit on.
I wanted to make something quite flat that i could hang and add a small photo of the couple. So i drew around my base part and used only one frame. The original base and the rest i would use for a later project. I wanted to make one of my apertures bigger so i could add a photo. That was easy enough to do with a sharp craft knife. Painted the frame in a dark colour, used crackle glaze and a lighter stone colour added to the top.
The rest was just adding papers to the apertured areas.The decorative flourish to the sides of the heart
where done using a tim holtz thinlits mixed media set #2.
Flowers were made using tattered pine cones die, punched and die cut leaves. The "just married", is a small sizzix die, date of wedding added to the frame and a small hanger finishes off the piece.
close up of the flourish die and stitching
next piece is a memory box created in much the same way as the guest book. A painted kraft box in a chalk finish off white colour and a decorated lid. The same stamped focal image and flowers and leaves around the side of the oval. sewing machine stitched edges and a date in the bottom corner
Finally something to put all my creations in. Pintrest is an addictive app, and something i often search to get ideas which many of us do. Well I'd been looking at decorated apple crates/wooden boxes and all seemed to have this etched name and date idea and i wondered if i could also create something similar at a fraction of the price.
I knew that amongst my old girl guiding stuff i had a pyrography kit (wood burning kit) of which i got for my 15th birthday and wondered if it still worked.(I'm now in my 40's) And to my surprise it did. Searched amongst my clear letter and number stamps, and stamped directly on to the wooden box with grey memento ink. Once stamped i went over with my pyrography set and then gave my wooden box a watered down white wash.
i absolutely love how this turned out, and I'm keen to try it again. I do hope you've enjoyed looking at these wedding creations and much as i have had making them
Monday, 26 June 2017
Doodlebug Designs ~ Spring Things #2
Hi, it's Anna here. I'm back with my second post using the very cute Doodlebug Designs - Spring Things collection.
(Apologies for the bad lighting in my photographs)
For this layout I used a Kaisercraft template along with the Spring Things collection.
I used white cardstock for my background, adhered the Kaisercraft template and then began to fit circles of patterned paper into the circles in the template.
I finished by adding stickers, alpha stickers and enamel dots.
Supplies Used:
Thanks for looking.
Anna
X
Friday, 23 June 2017
Project Life | Crate Paper Oasis
Hi everyone!
I hope you've had a wonderful week. I'm back today to share a Project Life layout, documenting a weekend getaway my boyfriend, dogs and I went on in April. As with my last project, I'm using Crate Paper Oasis!
I used papers from the collection to back my photos, and to create a journaling card at the top of my layout: one of the papers is a travel log design, perfect for writing on! I trimmed the lined paper down to 4x6, added some washi tape and puffy stickers (also from Oasis), and it was the perfect spot to talk about our weekend. I stamped the date with a Heidi Swapp stamp I had in my stash.
I love these caravan puffy stickers! We stayed in my parents' holiday van at the coast, so they were ideal for this particular layout.
These tiny word strips from Simple Stories are perfect for embellishing pocket cards! I'm going super simple with my Project Life this year, and I'm trying to keep my pages as flat as possible. These stickers add cute sentiments and that little something extra, without bulking up your pages.
I hope you've enjoyed seeing this layout! If you'd like to see the process itself, there is a video on my channel which you can watch HERE. You can also find me on instagram HERE, if you're interested in following me!
Have a fabulous weekend!
ChloƩ
ChloƩ
Wednesday, 21 June 2017
Cards and tags...
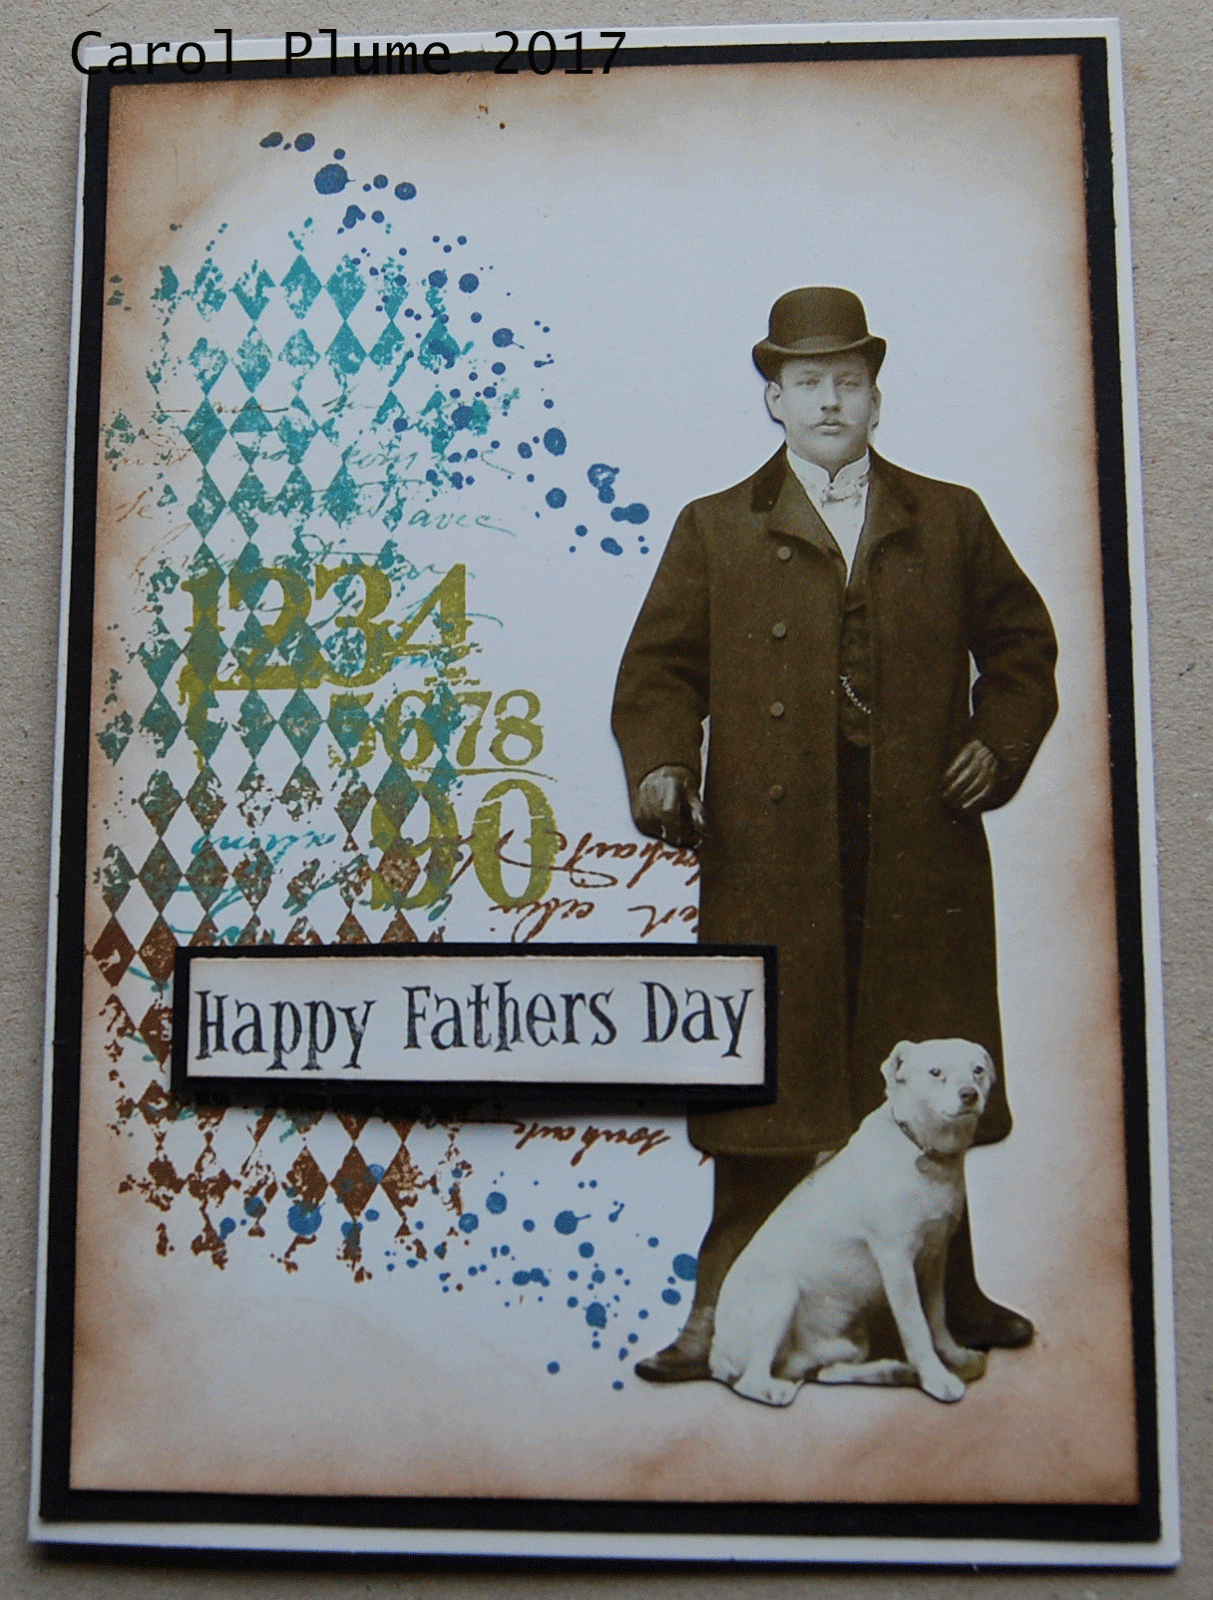
Hello, Carol with you today…. I'm still playing with my Distress Oxide ink pads…have you got any yet??
Have you seen the gorgeous stamps by 49 and Market? I love the way they interlock a background with a strong shape, I missed out on the set I would have liked so decided to do my own…
I took a piece of white cardstock just smaller than my card bland and using distress oxide inks in peeled paint, walnut stain and broken china I inked up kaisercraft clear stamp - diamonds - just be careful when you layer the colours… and stamped this to the side… I then overstamped with a number stamp, splatters and a text stamp so that I had the following base to work with…
I get carried away when I craft and forget to take pictures… so the finished piece is:-
I inked the edges with distress ink and then matted with black cardstock before mounting onto the card base. A couple of images and then a stamped sentiment finished it off.
As usual, I like to make matching gift tags so here is the matching tag:-
The technique was copies just onto a smaller scale….
I really liked the effect so decided to make a couple more cards for some colleagues who are "moving on" - this time distress oxides in spiced marmalade, walnut stain and broken china… this time some Tando minis were painted with acrylic paint and then doodled with pens… this is the finished effect.
TFL xx
Monday, 19 June 2017
Graphic 45 - Vintage Hollywood - Part 1
Hello! Lynn here today with the first of several posts using the Graphic 45 - Vintage Hollywood collection. I think these papers are fascinating with all the attention to detail on each theme, but sometimes that makes them a bit of a challenge to use for scrapbooking pages when you need the photographs to be the focal point. These collections all have double-sided, heavyweight, good quality papers.
I had four sheets of 12" x 12" paper and a sheet of cardstock stickers. Together with some Bazzill cardstock I have created four layouts and some cards. Today I'm sharing the first two layouts, both have been made with one sheet of 'Star Studded' paper.
I was drawn to this collection as it was ideal for featuring photographs of some of the plays my daughter has been involved in.
Agatha Christie - And Then There Were None - 2015 UK Tour
For this layout I gutted a sheet of 'Star Studded' paper to make a 1" frame then I layered up Bazzill cardstock in a teal colour (10.5" x 10.5") and Cream Puff (10" x 10"). The Teal cardstock was also gutted, to give me enough card to do the punching and matting.
I created a starry background by lightly stenciling through a Tim Holtz Layering Stencil with Distress Ink - Mermaid Lagoon. This ink pad was also used to ink the edges of paper and stickers.
Stickers were selected from the 'Cardstock Sticker' sheet - photo corners, and two tags. I also took letters and numbers from this sheet to add the title.
I cut a teal cardstock mat for each photo and tag. A Crop-A-Dile was used to punch holes and I added narrow, bright orange ribbons.
In keeping with the Art Deco period I used the Martha Stewart Deep Edger Punch - Daisy Fan, with a few flat-backed pearls.
To finish I used a bronze coloured metal clip and a smattering of sequins.
The Wild Party - The Other Theatre
The Wild Party is a show my daughter was involved with in London earlier this year.
For this page I used:
12" x 12" Navy Bazzill cardstock gutted to make a 1" frame
Cream Bazzill cardstock cut to 11.5" x 11.5", with the corners rounded
The gutted area of 'Star Studded' paper from before cut to 8.5" x 8"
The same MS punch with the gutted area of navy cardstock
Photos matted with Gold Miri card and navy cardstock
Distress Ink - Chipped Sapphire for inking the edges of the papers
Letter & number stickers from the Cardstock sticker sheet
Title cut from Miri card using Cricut and the Rivanna font
Finished off with flat- backed bling.
12" x 12" Navy Bazzill cardstock gutted to make a 1" frame
Cream Bazzill cardstock cut to 11.5" x 11.5", with the corners rounded
The gutted area of 'Star Studded' paper from before cut to 8.5" x 8"
The same MS punch with the gutted area of navy cardstock
Photos matted with Gold Miri card and navy cardstock
Distress Ink - Chipped Sapphire for inking the edges of the papers
Letter & number stickers from the Cardstock sticker sheet
Title cut from Miri card using Cricut and the Rivanna font
Finished off with flat- backed bling.
Back with more 'Vintage Hollywood' soon
Thanks for looking
Lynn x
Thanks for looking
Lynn x
Labels:
Bazzill,
Bling,
Crop-A-Dile,
Distress Ink,
Element Stickers,
Graphic 45,
Martha Stewart,
Miri card,
pearls,
sequins,
Stencils
Friday, 16 June 2017
Cropping in June
Tomorrow is crop day and this month's kit uses a mixture of papers and gives you the opportunity to play with Cosmic Shimmer Pixie Powders :)
As usual, we're at Otley Village Hall from 10am until 5pm with homemade cakes, a selection of punches and dies and a discount in the shop!
Subscribe to:
Posts (Atom)