Saturday, 12 March 2022

'One Magical Amazing Day' by Meg, using Echo Parks Its's a Girl

Hey all, it's Meg here today with a layout using the sweet pink It's A Girl collection by Echo Park. I absolutely love the colour pink so I was super excited to see this in my DT pack! 

I looked through and this one paper especially caught my eye - it's the B-Side to the 3x4 Journaling Cards but it's so so pretty! They're like little tiles! So I cut out and distressed 6 of the 'tiles' to use as my background. 

I also loved the look of Rosies Studio 'By Starlight' Gold Puffy Stickers with the beautiful It's A Girl colours, so I wanted to create a title using them. I made a banner using a Paige Taylor Evans banner cutfile, cut from the soft Dreamland paper for the cutfile and backed with Dresses and Jumpers.

I had picked out a few photos of my little girl to go with this collection and decided on this one - I moved it around the page a bit to decide where it would go, and I double matted it with the Dreamland paper to co-ordinate with the title banner and a darker Coral Cream Bazzill cardstock. 

I decided I wanted the photo on the bottom right of my tile column and I wanted to do a sort of diagonal cluster, so I splattered some gold and green watercolour paint to highlight the diagonal shape and then I began building my cluster on top. 

The title 'One Magical Day' is made up of the Rosies Studio Gold Puffy Stickers and the 'Amazing' is a Bramblefox perspective. The tag tucked behind my photo, the mini green banner and the 'It's a Girl' are all Chipboard Phrases; I fussy cut the pink frilly dress, 'You will do amazing things' phrase and the yarn bunting from the 3x4 Journaling Cards and the sweet little deer and flowers came from the Dreamland paper. I finished my large cluster with stars from the pack of Rosies Studio Gold Puffy Stickers and a few gold Nuvo Drops

I popped my journalling on some vellum paper and made a mini cluster behind it on the top left of my page, with a rectangle of Dreamland paper and the 'Beautiful Girl' phrase I cut from the 3x4 Journaling Cards. 

And that's it! My one-month-old little girls pink page finished - perfect! 

Thank you for stopping by and until next time, 

Meg x 


Friday, 11 March 2022

Pebbles Kid at Heart 💕 #3

Hello! Welcome back to the @papermaze_uk blog! 
It’s Anna here today to share my third layout with the wonderful Pebbles Kid at Heart collection.
You can find the whole range over in the shop here.


For this layout I used the ‘b’ side of ‘You got this’ as my base. I then chose a cutfile by PeartreeCutfiles that went perfectly with the photos I wanted to use. I backed the wording of the cutfile with the ‘b’ side of ‘playful’ and the hearts with ‘party time’ I adhered the cutfile just slightly off centre and then placed my two photographs tucked in on the right side of the page.


I fussy cut lots of flowers from the ‘scatter happiness’ paper and adhered them in two clusters at the top right and bottom left of the layout. I also cut our some of the bees from this paper and poked them out of wording in the cutfile.


I then had a look through the phrase ephemera pack and picked out a few pieces that would work well with the layout. I added them in amongst my clusters of florals. I also scattered lots of sequins around my floral clusters. 


I fussy cut some of the scalloped boarder strips from the ‘playful’ paper and adhered them along the top and bottom of the layout. I trimmed two of them down and layered them up together.


Thanks so much for looking! 

Anna
X

@acraftylifewithanna

Thursday, 10 March 2022

March Crop

Our March crop is a week earlier than normal, and our crop kit uses mainly Bungalow Lane papers from Paige Evans.


As usual, we'll be at Otley Village Hall with homemade cakes and a selection of tools.  The shop will not be open this Saturday though I'm afraid.  Drop us a message if you'd like to come along!


Wednesday, 9 March 2022

'Love love love' page by Meg using Happy Hearts, Simple Stories

Hey all it's Meg here today and I'm sharing my last page (for now!) using Simple Stories Happy Hearts. I love all of the vibrant colours in this collection and so I wanted to try a colourful non-white background! 

I started with the navy Bazzill cardstock and I used my Cricut and a Paige Taylor Evans cutfile to make the butterfly background, which added lots of texture and interest. I backed it using coral Bazzill cardstock and the Wink Wink paper (confession time - I used two co-ordinating papers to back it because I didn't have enough of either ha)!

This cutfile gave me a great starting point and I knew I wanted to create a central cluster with lots of colour. I looked through my photos and picked a photo of my baby girl and cut it into a circle shape, then matted it using the coral Bazzill cardstock and I popped it up with foam tape. 

I cut a larger circle of the Happy Hearts - Forever Yours paper and a couple of torn circles of vellum to layer behind my photo and then I began tucking in lots of pieces of colourful ephemera! 

The bouquet, 'cute' banner, the hearts and little cake on the left came from the Bits And Pieces pack, the 'Love Love Love' was a Foam Sticker, I fussy cut a few tiny flowers from the Forever Yours paper and the rest were Happy Hearts Puffy Stickers. I finished my central cluster with a sort of diagonal splatter of white paint, which I reallyyyyy loved against the navy blue cardstock! 

I added journaling on a little tag that I fussy cut from the Happy Heart Day paper and I popped that up in the corner of my page, with an acrylic clippie embellishment that came from Bramblefox. 

As my cutfile came out a little wonky on the page (a happy error!), it wasn't completely central and I had a little extra space on the bottom of the page, so I used the border sticker from the 12x12 Combo Stickers page which really finished the page off! It matches the paper I'd used behind my photo and it couldn't have worked out better. 

I'm thrilled with how this page came together, especially because I don't often use colourful backgrounds, su that was a fun challenge! I hope my page inspires you in some way and thank you so much for reading. 

Take care and I'll be back again soon with another page from a new collection! 

Meg x 

Monday, 7 March 2022

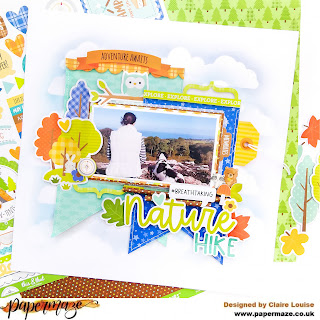
Doodlebug - Great Outdoors - Breathtaking Nature Hike

Hi everyone!

Claire here with you today, and this month, I am pushing myself right out of my comfort zone with lots of bright colours, patterns and mixed media - and I am having so much fun!!

During March, I'm using Doodlebug's Great Outdoors collection which you can find in the store here.

Doodlebug is a brand that's new to me, and I have been completely blown away.  The collections are bursting full of the most fabulous patterns with colours that immediately inspire creativity.  The ephemera packs are unlike any I have come across before - they contain so many different elements, I could make a dozen pages and still have product left over to play with!  

For my first page, I'm documenting a hike to the top of Howth Hill in Dublin. The views from the top are exquisite. 


I used two shades of Distress Oxide in Stormy Sky and Tumbled Glass, brushing them across a cloud cutfile from Cricut Design Space.

Once the background was done, I cut two rectangles (one slightly smaller than the other) from the b sides of the Happy Camper and Wild Things paper, and cut in fishtails to form two banners.

I sticthed around the edges in white thread and raised these on foam pads before adhering to my page. Along the top of each banner, I added some trim from the This and That Stickers, along with an orange 'Adventure Awaits' banner from the Odds & Ends Chit Chat pack.


Next, I positioned my photo, backing this with the Colors of Nature and Wildflowers papers along with some tissue paper for extra texture.


I built clusters around my photo using those beautiful coloured trees from the Odds & Ends friendly Forest pack - a real must have with this collection!


I also clustered some leaves from the same pack around my title and added a few of those super cute forest critters from the Campground Critters Shape Sprinkles pack - the cutest things you'll ever see!


The Breathtaking Nature Hike title is made from the Odds & Ends Chit Chat pack. It's full of statement pieces that make titles super easy. I stitched through the Nature Hike , folding them over for extra texture before sticking to my page.


This was soooo much fun to create - and I'll let you into a secret - Once I had created this one, I just kept going, making multiple pages one after the other!! The possibilities with this collection are endless and so enjoyable to play with.


You can explore everything this collection has to offer here, and I'll be back with another layout (or 2 or 3 or 4!) in a few weeks time.

See you soon!


Claire

@scrappysoulmate

Friday, 4 March 2022

Photoplay Notting Hill - So Many Good Books

Hello. Karen here. This month I've been playing with the fabulous Notting Hill Collection from Photoplay. This collection is perfect for book lovers! The collection features books, e-readers, bookshelves, library cards, and lots more and the colour palette is so bright and cheerful. 

For my first project I decided to scrapbook about my love of books and in particular some of the books I've read since joining a local book club.


I started with a white cardstock background and onto this I layered 3 pieces of the patterned paper. The blue (Books I Love) measured 11.5 x 7.5, The red (Book Nerd) measured 8.5 x 10.5 and the lime green (Currently Reading) measured 7 x 8. Because my photo was very colourful I choose to use the less busy B sides of the papers.


My 6.75 x 7 photo was matted onto a folded piece of white cardstock to make a 'book' which when opened reveals a couple more smaller photos, some journalling and a book list. 


Some of the stickers from the sticker sheet were used to embellish the inside of the book and the book was glued onto the layout on top of the lime green patterned paper.


More stickers were used to embellish the photo.


I created a bookmark, as a home for some more journalling, using one of the die cuts and a piece of white cardstock and this was placed beside the photo.


I made a tassel for the bookmark using some lime green embroidery thread. It turned out a bit bigger than I had planned but it adds a lot of texture to the layout which without it would be very flat. The tassel was held in place with some wet glue.


Finally I added my title at the bottom of the layout using some very, very old chipboard letters from my stash. 


I hope you like this page. I could think of so many themes the Notting Hill collection could be used for - your book collection, favourite book, people reading, World Book Day, your favourite book store. There are so many possibilities. 

I'll be back later in the month with another project using this collection so until then, please take care.

Karen x x

Wednesday, 2 March 2022

Papermaze February Kit - Part 2


Lynn back here today with my second pair of layouts using the February Papermaze Kit. A lovely selection of soft natural colours in the papers, card and embellishments. This time I have a family history layout and travel page.


Before looking at the layouts in more detail, here is a reminder of what you will find included in this month's kit. Please see previous post for full details.

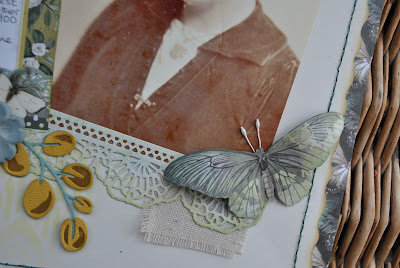
Susan - An old photo of my great grandmother, giving details for future generations looking at my Humm family album.


I wanted to make use both sides of Fills My Heart paper, making a frame for the page using the small all-over butterfly print, saving the large butterflies for fussy cutting to make embellishments. (see photo below.) I gutted the paper with a very narrow border, making sure the large butterflies remained complete, then I cut these out.


I took a sheet of Natural Bazzill and trimmed the edges with wavy scissors (although you could do this with plain scissors and make a wavy line). On the left side of the page, I stencilled a pattern through a Tim Holtz Layering Stencil (THS 147 Deco Arch), using several colours of Distress Oxide Ink ranging from pale green to golden brown. Then I placed some ink onto a craft mat, mixed in a little water and flicked the ink over the page. Once dry, I hand stitched all around the edges with some dark green embroidery thread.


I trimmed the linen ribbon and frayed the edges, then placed this down the right side of the page.

I cut a piece of Yukon Gold Bazzill to match the size of my photo and embossed this with the Tim Holtz A6 Texture Fades Embossing Folder - Arched which is the same pattern as the stencil. I highlighted the raised pattern by rubbing it over with some Distress Oxide Ink.
This was layered up with my photo, a small gold doily and the Chipboard frame from the kit across the page. I added a lacy trim to the base of the photo using the Tim Holtz Sizzix Thinlits Crochet die set. I used scrap paper from the
Fills My Heart paper, and decorated with more  Distress Oxide Inks.


I die cut letters for my title in Avocado Bazzill and placed them at the top of the chipboard frame. With an image cut from the Journal Elements paper, I wrote the details of Susan's birth, marriage, children and death.


I further built up the page by adding the four of butterflies I cut out earlier. These were raised on 3D foam pads and had flower stamen added to the bodies. With Gold cardstock, Avocado, Aqua and Yukon Gold Bazzill, I cut and built stems and leaves using the Sizzix Tim Holtz Thinlits set - Bloom. Together with some pre-made and painted clay flowers*, I created clusters of flowers and leaves around photo and other elements.


*These flowers were made with a cake making mould and some fimo light air dry clay, which creates very light embellishments. I painted these with Distress Oxide inks, swiped onto craft mat, spritzed with water and painted onto the clay with a brush. 


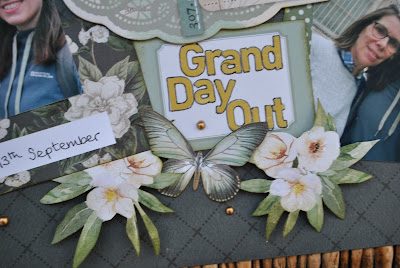
York Minster - a selection of small photos from our trip to York last year.


I used the black quilted side of the Garden Guru paper as a backdrop for this layout.

From the kit I selected the large
Simple Stories Chipboard Cluster and made this the centre piece for the page.


I had so many interesting images left over from the P13
#02 paper and the Simple Stories Journal Elements paper after making the other three layouts. I cut out the elements from these papers that I wanted to include on my page and arranged them with my photos. I used the Journalling elements for journalling, titles and date.  

I cut up a white paper doily and added the pieces randomly around the page, tucking them under the papers. 

The
P13 Alphabet Stickers and others from my stash, were used to create the title, highlighting the letters with a black marker pen. The word 'Loved' is one of the
Simple Stories Foam Stickers from the kit.


I used, another large and a few small fussy cut butterflies from the remains of the
Fills My Heart paper.

Finally I scattered the gold
Pinkfresh pearls over the layout.

That's all for the February kit, although there is plenty left to add to more layouts or to make some cards.
Thanks for looking.
Back with the new kit for March in a few weeks.
Lynn x