Monday, 8 June 2020

'Hard at Play' - 12x12 Layout using Photoplay - 'Little Builder' Collection

Hello, it's Rebecca back with you sharing another 12x12 layout created using the 'Little Builder' collection from Photoplay. I'm really enjoying working with this collection as my little one is very much into his construction vehicles at the moment so it's perfect for documenting all the garden fun we've been having over the last few months!


I started this layout by cutting a section from the green 'B' side of the 'Little Trucks' patterned paper and placing it central on the bottom half of my cardstock. I then layered a piece of the 'Construction Zone' patterned paper running horizontally on top. I distressed the edges of both pieces of paper and drew a black border around the edges before adhering using double-sided tape.

I had lots of photos to chose from for this layout, but narrowed it down to 5, so had to print them quite small. I think in the end I settled on 2.5 x 2.5 inches. I matted them on white cardstock first, and then on blue bazzill cardstock from the Matchmaker Pack. I positioned 3 photos onto the orange 'construction zone' paper and placed the other two floating above - all with adhesive foam behind them to add dimension to the page.


Next came the fun part of trying to fill all the gaps with embellishments! I pulled several stickers from the 'Elements Sticker Sheet'. I used two of the strip stickers - I placed the 'caution' strip above the patterned paper at the top left, and the strip that looks like a road underneath my three photos with a couple of vehicles at either end.


I then pulled out my Ephemera pack and added a few of the bigger bits across the layout. I added a coloured chevron strip at the bottom, a ticket shaped piece that says 'fun zone' in between the top two photos to tie the photos together, a round cement mixer, and also a square piece with a crane on. I mounted the crane onto the same blue bazzill cardstock as the photos to help it pop a bit more. I used foam dots behind most of the stickers and ephemera pieces to add dimension and interest to the page.


I then worked on trying to fill the smaller gaps with smaller elements. I used the round star stickers from the sticker sheet, a 'road work ahead' sign from the ephemera pack and also a green arrow I'd previously fussy cut from the 'Hard at Play' cut-apart patterned paper.


There were still a few areas that looked a bit bare, and I felt that this was making the layout look a bit disjointed so I continued to add bits and pieces to make the layout feel less like it was made up of sections. I added a couple of chipboard pieces that read 'live in the moment' and 'shine brightly', a wood veneer circle with the word 'today' in the middle which I'd heat embossed with black embossing powder, and a barrier sticker from the elements sheet.


I finished the layout off by adding a large digger sticker to the top right corner, my title 'Hard at Play' using thickers from my stash and finally a doodled border around the edge of the white cardstock.

I hope you've enjoyed this layout. This collection is so fun to work with and is still available in the shop.

I'll be back later in the month with my final layout using this collection - and it includes some mixed media messiness!

Take care,

Rebecca x


Friday, 5 June 2020

Simple Stories ~ Birthday Blast #1

Hi everyone, I hope you are all continuing to keep safe and well.
It's Anna back with you today and for my next few posts I will be working with the new Simple Stories Birthday Blast collection. Take a look at it here. There is another accompanying collection alongside this one, featuring more pink, purple and pastel colours - 'Magical Birthday' is available in the shop here. So you can choose a collection to suit your birthday photographs.

Here is what I've been working with:

I used the yay! patterned paper as my base, and trimmed down some white cardstock by approx 1.5cm each side. I began by spritzing some Ranger Dylusions shimmer spray to the left and right side of the cardstock. I used 'polished jade' and 'periwinkle blue'.


I then mounted my photos with bazzill cardstock and mounted them over the 'lets celebrate' patterned paper. I then wrapped some twine around the white cardstock and tied it in a bow. I also cut out a scalloped strip from the let's celebrate patterned paper too.


I then finished by adding a selection of the foam stickers (these are so lovely and easy to use -I love them!) and finished with a few random drops of the shimmer mists.


Thanks for looking!
Take care and I'll be back soon with my second layout.
Anna
X


Wednesday, 3 June 2020

Papermaze May Kit - Part 3

Hello, Lynn back with the papers left over from the May kit. After the four layouts I have already made, I created one more page. This time I used a photo of my daughter Emily and her husband James moving into their new house in Wollaton, near Nottingham. 


Here is a reminder of what you get in the kit, please see my previous post for details of the content:


I used the watercolour wash side of the American Crafts - Dear Lizzy - She's Magic collection - Feeling Fine, and splattered some black ink over the page. I used the Cricut to cut the wording Home Sweet Home from the American Crafts - Heidi Swapp - Art Walk collection - Artsy. This was applied to the left side of the layout after inking the edges.

Then I cut the word 'Sweet' again from Desert Sun Bazzill, and applied this directly over the first cut. Using the cut-off strip from the bottom of the paper, I trimmed and inked the words into three pieces. I applied these to the layout with foam tape, over the second word 'Home'.


I mounted my photo onto some of the Desert Sun Bazzill and glued this towards the bottom right of the page. 


From scraps of patterned paper and Bazzill, I made two tags, adding a journalling block to one of them. The tags were added above the photo, I linked them with a tassel and threaded in two key charms (from my stash).

With Pinkfresh Studio Just a Little Lovely, Mini Puffy Alpha Stickers, I created a subtitle under the photo. 


Finally with some old stickers from my stash I added the date to the die cut letters.


This is the last of my posts using the May kit. I will be back soon with the new kit for the month of June. 


Thanks for looking.
Lynn x

Monday, 1 June 2020

Simple Stories Simple Vintage Garden District - Banner Stickers

Hello, it's Karen C here again with another layout using the Simple Vintage Garden District Collection from Simple Stories.


I started (as I often do!) with a sheet of white cardstock which I trimmed to 11.75" x 11.75" before placing in the centre of a gutted sheet of teal coloured cardstock. Using white thread I zig-zag stitched round the edges of the cardstock on my sewing machine.


I took four of the banner stickers from the sheet of banner stickers and stuck these horizontally across the page. By carefully positioning my two photos, which I had matted with the teal cardstock, on top of the banners I was able to hide the gap where two of the banner stickers didn't meet. I added staples to the ends of the banners.


I cut some butterflies from left over pieces of the 3x4 elements paper and  used these to embelish the banners and photos. Only the bodies of the butterflies were glued to allow the wings to be folded upwards for dimension.


Some Prima flowers, sequins, heart stickers and punched paper hearts were added as finishing touches.

This is another very simple layout but with such pretty supplies you don't need much to make a great layout.

Take Care everyone. I'll be back soon.
Karen x x


Friday, 29 May 2020

Furlough Fun......Stamperia Face art

Hello again!

It's Anita here to finish off the month and see May out! This year is passing ridiculously fast already isn't it!
My layout today is about our eldest daughter and the fact that whilst being furloughed from work she wanted something to do and became a Consultant for Body Shop at Home. Initially it was just for something to keep her occupied and help fill her time. I don't think she expected to love it so much, fall in love with the products and enjoy promoting them and selling to others. She has made a whole network of new friends at the same time and is having an absolute ball. She has also introduced our younger daughter to it and she has also become a Consultant too ( I can see another layout in the pipeline!)


I based the layout on a sheet of Stamperia called Face Art and I used the reverse side as I liked the repetitive lacy pattern. Before anything else, I gently sponged around the edge of the photographs with some ivory paint to soften the edges.


I like the texture of corrugated card and thought it would work well on this page, so I tore a strip to lay across the page and dabbed some ivory paint in patches and also some random dribbles of Cosmic Shimmer mists that I dragged across it.


From a sheet of Dream Writings I cut a few panels and words to scatter about the page, some
                             tucked in and others were raised on foam pads to add dimension.


I printed out some journaling strips on the printer and swiped the edges with some Antique copper mist to highlight.

Below shows the mix of Cosmic Shimmer Mists, Stickles and Liquid Pearls I used across the layout.


Aswell as dropping blobs of Shimmer mists in various places, I also used it to drag along the edges of the photos, around some of the sayings panels and also on the 2 Prima Capri Amalfi flowers. When it dried the mica glistened beautifully and really highlighted the edges.


I used the Liquid Pearls and Stickles to create circles of dots, using various lids and glasses as stencils to dot round. I like how the Liquid Pearls stay like raised little domes and once again add a little dimension, whereas the Stickles dries flatter.

I finished by adding lots of bi-colour pearls in various sizes in clusters about the page. Amazingly these arrived through the post on the very morning I was making this layout...and the colour match was perfect!


So there it is, my last page for May. I wonder what June will bring for us all. Hopefully some safer days and we will see a bit more of a return to some sort of normality. Thank goodness as crafters we all have plenty to keep us occupied and gives us a means of escape from everything else eh!

If you feel the need to treat yourself to some new goodies there are always lots and lots of lovely new products arriving in the SHOP, along with a vast selection of great products and monthly kits that are always popular......I believe the popular saying at the moment is Be Kind..... that's a great policy to have.... so why not start by being kind to yourself, you deserve a treat!!

Happy Crafting!

Warmest wishes
Anita xx

Wednesday, 27 May 2020

'Never Stop Being You' - 12x12 Layout using Photoplay - 'Little Builder' Collection

Hello, Rebecca back with my second layout created using the 'Little Builder' Collection from Photoplay. This layout came together really quickly (for me!) as I'm finding this collection so fun and easy to work with.


I started by cutting two sections of yellow Bazzill cardstock from the Matchmaker pack and distressed the edges with the blade of my scissors. I adhered these to the top right and bottom left of the layout, at an angle. I then cut two sections of the 'Construction Zone' patterned paper - slightly smaller than the yellow bazzill sheets - and also distressed the edges. I adhered these down simply using double sided tape. I chose this patterned paper to work with for this layout because it has the same 'stop' signs on it that my son is stood with in my photo so they matched perfectly!


I matted my photo first on white card, and then on a piece of blue cardstock from the matchmaker pack. The blue bazzill matches the background of the patterned paper perfectly. I placed my photo in the centre of the layout where the two corners of patterned paper meet. I raised it up on adhesive foam to add some dimension to the page.

I embellished the layout using some pieces from the Ephemera pack and the Element Stickers Sheet either side of my photo to make two small clusters. I placed the two arrows facing inwards to draw attention to the photo in the centre of the layout.


I raised some of the pieces up on foam dots to bring them up to the same level as my photo and to add more depth to the layout.


I finished the layout by adding my title 'Never Stop Being You' using two different alphabet thickers from my stash, and with a doodled border around the edge of the white cardstock background.


This is quite a 'simple' layout for me but I really love how clean and crisp it looks. I'm excited to return next month with some more layouts created using this collection which include some mixed media!

Take care,

Rebecca x

Monday, 25 May 2020

May Papermaze Kit - Part 2

Hi, Hope you are enjoying the bank holiday weekend Lynn here today with the second post using the pretty spring May Papermaze Kit. For both of my layouts, I have chosen photos from the children's childhood.


Here is a reminder of what you will find in the kit, please see my previous post for full details of the kit content:


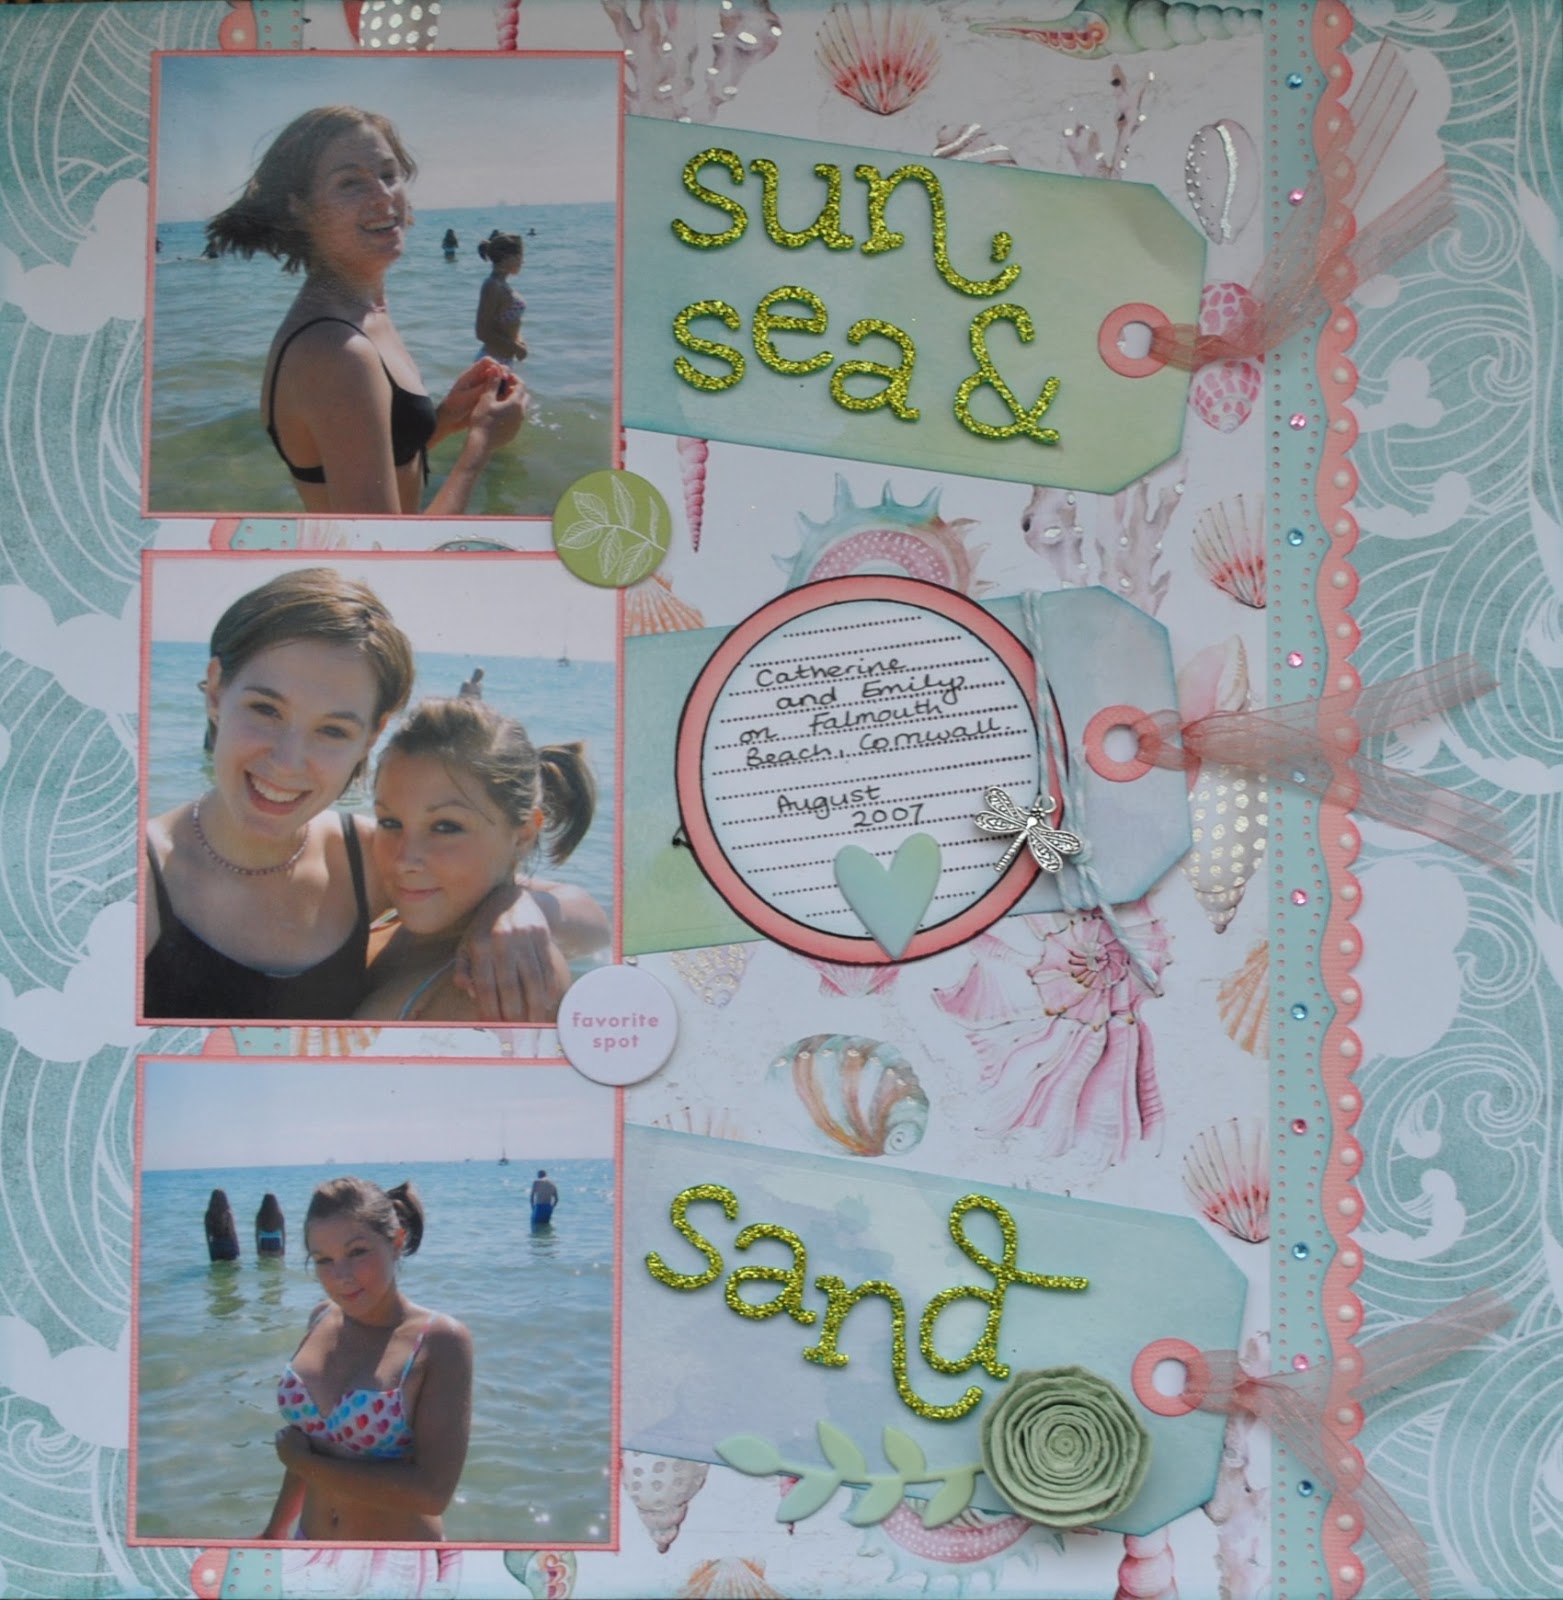
Sun, Sea & Sand - The photos for this layout show my daughters having fun on the beach at Falmouth in 2007. I love both sides of
All The Shells paper, the pretty foiled shells and the waves, so I found a way to have some of each showing. 


For this layout I used a scrap piece of cardstock to 'build' my page on. I cut the sheet of
All The Shells paper dividing it into three pieces. Two strips 6cm x 30cm, were attached to both sides of the page with the waves pattern up. Then the remainder was placed in-between the strips, shell side up.  monthly

I used two different border punches and with Blossom and Ocean Breeze Bazzill scraps I cut some decorative strips. I applied these to either side of the shell paper. 


My three photos were trimmed to measure 9cm x 9cm and mounted them with fine borders of Blossom Bazzill. I added them to the left side of the layout as pockets for the tags, by applying glue to just three sides. 


I cut three tags using the left over
Bloom Street #10 paper and the Sizzix Thinlits die set.
These were placed on the page with the ends tucked under each photo. I cut the reinforcement rings from more Blossom Bazzill and used the ribbon from the kit to loop through the holes. 


My journalling block was created with an old stamp from my stash, I applied this to the central tag, adding some Baker's twine and the charm from the kit. 

The title was divided over the other two tags using Thickers glitter foam stickers. 


Using embellishments from the kit I added the spiral paper rose, some of the Puffy Phrase Thickers and two of Pinkfresh Studio Flair Stickers. From my own stash I chose some pink and blue gems and used white Nuvo Crystal Drops to decorate the punched borders on the right of the page.


Terrific Trio - This layout has a photo of a drawing my father created of my triplets when they were three years old. I have scrapped this before, so now all three of them have a layout of this photo for their collection.


For this layout I used a sheet of White Bazzill, and trimmed the bottom with a strip of Blossom Bazzill 5cm x 30cm. I trimmed the join with the washi tape from the kit. 


I chose a cut file and the Heather Bazzill to make the heart background, and back-filled the hearts with Bloom Street #06 paper. I stuck this to the page and popped a few of the Heather heart cut-outs overlapping the others. 

I trimmed my photo with Limeade Bazzill, and placed it towards the bottom right of the layout. I used the butterfly from the Phrase Thickers at the top of the photo.

I cut a heart from the Heather Bazzill to place behind the centre of the heart doily. I then cut a smaller heart from the Ocean Breeze Bazzill to go in the centre of the doily and wrote my journalling onto it. I decorated the doily with the pink pearls from the kit.

For the title I cut the words using the Cricut from Ocean Breeze Bazzill and embossed it with Embossing Enamel. 


Finally the five wooden heart buttons were all treated with a Baker's Twine bow, each in a different colour of the rainbow. They were then placed down the left side of the page.


This completes four layouts for May, but I do have two sheets of patterned paper and some Bazzill left over, so I will be able to make at least one more page, which I will be back with next week.

Thanks for looking
Lynn x