Showing posts with label Shimmerz Paints. Show all posts

Saturday, 26 February 2022

Wet Mixed Media - Shimmerz Paints

Hello, it’s Rebecca with you today sharing my second layout of the month. In my previous blog, I talked about ‘dry mixed media’ - using mixed media products without any water. Today, I’m focusing on ‘wet mixed media’ and getting messy and having fun. Papermaze stock a HUGE range of mixed media products - head over to the shop and take a look here (click the 'Mixed Media' tab at the top!)


I often see people on social media commenting that they are too scared or apprehensive to try mixed media. I was exactly the same a few years ago, until I decided to pick up some scrap cardstock and have a play. And that’s exactly what mixed media is for me - playing and having fun. At the end of the day, it’s only paper! If you create a background and decide you don’t like it, start again! There are so many different ways to apply mixed media products to your background, but the most popular way is using the ‘packaging technique’ - which is exactly what it says on the tin! Add your medium to a scrap piece of plastic packaging (the packaging that ephemera or thickers come in is perfect) and add some water. Then turn this packing over onto your layout and ‘smoosh’ it down onto the page. I love this method as it’s quick and simple and I love the watercolour effect it gives on the background. If you’d like to apply your medium with slightly more control, you can apply your medium to some plastic packaging or grease proof paper and mix with a little water, and then apply to your background using a sponge, some scrunched up tin foil or cling film, scrunched up plastic etc - most things will work! You could also use a paintbrush to apply the colour directly to the page, use a brayer, or scrape ink pads across the background and then add water to it! The possibilities are endless and the effect you get will be different depending on how you apply the colour and that’s what makes mixed media so fun!For me, the key to creating a mixed media background is to build it up in layers; and that’s exactly what I have done with my layout today.


I begun by applying a layer of clear gesso to my white cardstock background. Gesso is a primer, and acts as a barrier between the cardstock and the mixed media products you are using. It prevents the inks/paints from soaking straight into the cardstock and allows you to add plenty of water to blend and mix the colours together. I have two types of gesso in my stash - clear and white. Although it’s called white gesso, I'm yet to find one that is actually white! It usually has an off-white/cream tint to it. Because of this, I only ever use clear gesso on white cardstock and white gesso on patterned papers.I allowed my layer of gesso to dry, and then using a stencil I made from Premium White Cardstock on my silhouette cameo 4, I added some white Texture Paste to my background.


I love using texture paste on my backgrounds - especially through stencils. I use a plastic spatula to apply the paste and on this occasion, I was going for a ‘rough/messy’ look. I use a white texture paste by Ranger as it’s nice and thick and dries quite quickly.Once the texture paste was dry, I moved on to the next layer of mixed media - adding some colour! I swiped two Distress Oxide Ink Pads across my texture paste in the shades Chipped Sapphire and Mermaid Lagoon. I decided on a dark blue background to co-ordinate with my son’s clothes in my photo. Using a spray bottle, I added water to my page and tutoring it from side to side, spread the colour around and let it run across the texture paste.I could tell the colour wasn’t quite what I was after, so I used some kitchen towel to soak a lot of the ink up. This was only possible because of the gesso - if I didn’t have gesso on the page those inks would have soaked through the cardstock and wouldn’t have mopped up.Next, I moved on to my stash of Shimmerz Paints. I absolutely love Shimmerz products! There are various different products within the Shimmerz Range and they are all available at Papermaze:Shimmerz - The original Shimmerz product! They are wet paints with tons of shimmer. They will need a quick stir before use just to evenly distribute all the shimmer as over time, it will sit on the bottom of the pot. Blingz are the same as original shimmerz but with much more shimmer!

Inklingz - Are solid pots of paint with intense shimmer that are activated by adding water. 

Creameez - Like Inklingz, these are intensely pigmented, solid watercolours that are activated by adding water to the pot. Creameez tend to have just a hint of shimmer, put are richer in colour.

Vibez - A spray bottle of intense colour, highly saturated with shimmer. They also come in variations of iridescence - gold, silver, bronze, pearl or a mix of these!

Spritz - Pastel coloured iridescent sprays which are pigmented and shimmery.


I added 'Teal The End Of Time' and 'Winters Mist', sprayed more water on my background and tilted the page to move the colour around, being careful to try and keep it to the area of the page with the texture paste on it. I added more using the packaging technique, and also used a paintbrush to help move the colours around. I kept adding more paint in the different shades, and adding more water, until I was happily with the colour and the coverage. At this stage the page looked a bit of a mess… but this is quite normal! Sometimes mixed media looks awful until you add your photo and embellishments on top and then it’s transformed. The key here is to keep going until you are happy and have fun! Once I was happy, I used my heat gun to dry the mixed media. I always dry from the front AND the back of the page as this helps to prevent warping.On to the next layer! I finished off my background by adding some gold splatters using 'Good As Gold' and again, dried it with my heat gun. Sometimes I will soak up excess paint/water with kitchen towel but I find this often soaks up a lot of the shimmer - using a heat gun might take longer but it means the shimmer remains on the page. I also find that sometimes water can dilute the shimmer in the paints - the more water you add, the less shimmery the background will be, so bear that in mind when adding your water.


I actually added a fair amount of water to this background, but because I also added a lot of paint, it’s kept it’s shimmery appearance.


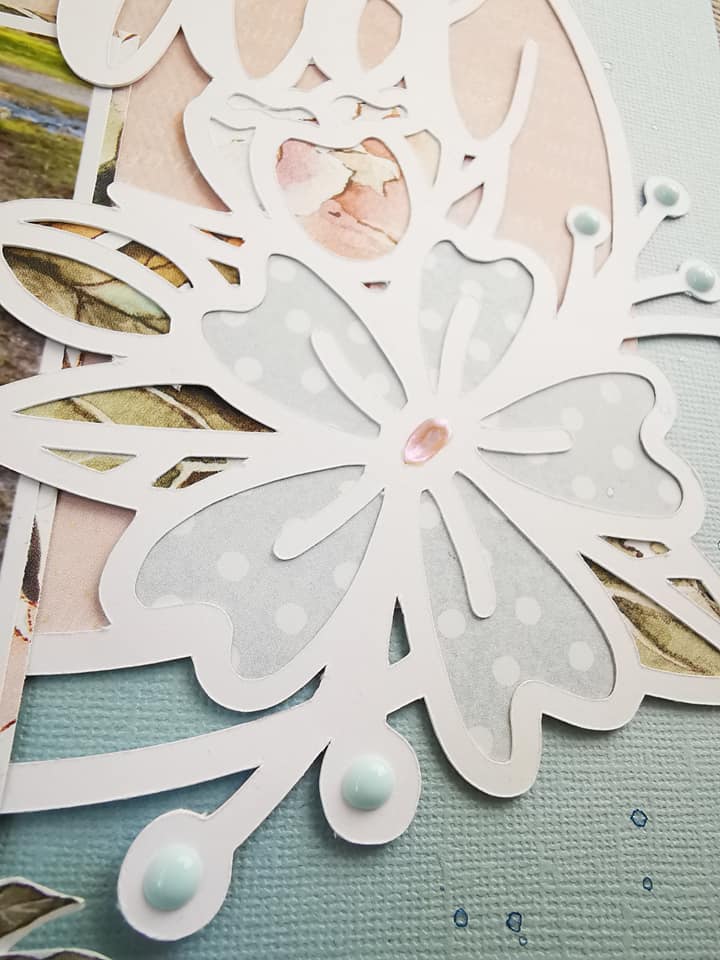
Mixed media isn’t just for backgrounds - you can add mixed media to lots of things - Cutfiles, chipboard, die cuts, ephemera etc. For this layout, I cut some layered flowers on my Silhouette using a cutfile by Paige Evans. I wanted to paint them yellow and purple to match the flowers in my photo.


I reached for my Shimmerz again, using 'Dandy-Lion' and 'Sun Kissed' Inklingz and 'Mango Tango' Vibez for the yellow and a mix of 'Plum Candy' and 'Beets Me' Inklingz and 'Berry Hot' Creameez for the purple. I also added in a small amount of Distress Oxide to give a bit of variation in the shading and tone. (Fosilized Amber and Dusty Concord). 


I then added the flowers to my layout, along with my photo and embellished lightly with some butterflies from Vicki Boutin's Color Study Collection and some sequins.


I hope you've enjoyed this blog and it's given you some useful information and inspired you to have a play. Just remember - it's only paper! Have a play and try adding ink or paints in different ways, mix your colours and just have fun!

I will have a process layout up on my YouTube channel over the weekend showing how I created this layout and my mixed media. You can find my channel here.

Thanks for reading, see you next time.Take care,Rebecca x@preciouspagespapercraft

Friday, 2 July 2021

Papermaze June Kit - Part 2

Lynn here today, with my second pair of layouts using the summery and colourful June Papermaze Kit which is available from the shop.

As always before looking at how the layouts were made, here is what you will find in this month's kit:

Patterned papers:
Doodlebug Designs - Made with Love collection - Heartwarmer & Dab of Butter
Pinkfresh Studio - Keeping It Real collection - Adulting & Big Mood
Simple Stories - Bunnies + Blooms collection - Choose Happy
Maggie Holmes - Garden Party collection - Sown

Bazzill Basics - Aqua & Avalanche

Reverse side of patterned papers:


Embellishments:

12" Washi tape, 2 Phrase Sticker, 3 cardstock stickers, pink baker's twine, 3 paper flowers, fabric butterfly, strip Heart Shape Sprinkles, large sequins.

Extra Bazzill Basics: Juneberry, Lemonade, Wild Pansy, Romance.


Story Teller - This layout shows a photo of my girls enjoying a story with their Nanny. 

For this layout I used the Sown paper as a background. Some of my cut pieces were inked with Worn Lipstick Distress Ink.

I needed images from both sides of the
Big Mood paper, so first I picked the 'read more books' phrase from the arch shaped images on one side and cut this out. From the multicoloured striped side, I cut lacy shapes using the two largest dies, from the Crochet Sizzix Thinlits die set by Tim Holtz. I cut one piece from each of the colours, and then one from spare Avalanche, Juneberry and Wild Pansy Bazzill. These were arranged, overlapping one-another, down the left side of the page.  

My photo was mounted onto scraps of Choose Happy patterned paper and Romance Bazzill. This was placed to right of centre, raised on some foam tape.


With Adulting paper I chose and cut the book store images and a few other buildings. I arranged my images along the top of the photo and down the edge of the lacy die cuts. Some of these were also raised on foam tape.

For my title I used some Pink Fresh Mini Alpha Stickers - from various collections to give mixed colours for the 'Nanny, Our Very Own' part of the title. 'Story Teller' and the heart arrow are American Crafts Thickers - The Story Teller Puffy Stickers by Vicki Boutin.


Sam's Girls - I received some photos from my nephew recently and he said this picture was his favourite, so I thought I would scrap it first. His Girls on route to their summer holiday.

For this layout I distressed the edges of all the papers and cardstock.

I chose the fun papers from Doodlebug Designs Inc.
Made with Love papers.
I gutted Heartwarmer to give me a nice wide border, to show off the colourful hearts. I made this 4cm deep. Then I mounted a piece of Wild Pansy Bazzill over the centre - I had trimmed this to 24 x 24cm. Over the top, I stuck the pink side of the piece gutted from the Heartwarmer paper.


Using the piece of Dab of Butter
paper left over from a previous layout and a Peartree Cutfile, I cut a sunburst from the yellow polka dot side of the paper.  This was mounted over the pink paper. I splattered some Shimmerz Paints Spritz Cotton Candy over the sunburst area. 


My photo was mounted onto scraps of
Choose Happy patterned paper and Romance Bazzill. I cut the Romance Bazzill 3.5cm deeper than the Choose Happy paper; I wrapped the Baker's Twine around this area and added a yellow heart button from my stash. 


In the top left corner of the layout I added one of the cardstock stickers and scattered the Heart Shape Sprinkles. I created a title and date with some Doodlebug Designs Inc. alphabet stickers from my stash.


Finally I added some sequins in colours to match the papers. 


That's all for today, back with a new kit for July very soon.
Thanks for looking
Lynn x

Wednesday, 2 June 2021

Papermaze May Kit - Part 2

Hi, Lynn back today with the second set of layouts using the delightful May Kit from Papermaze. Here are the pages, both started by using some mixed media.

Before looking at how the layouts were made, here are the details of the kit:

Patterned Papers:

Jen Hadfield - Reaching Out collection - Birds Of A Feather & Stick Together
P13 - Till We Meet Again collection - #01
Heidi Swapp - Care Free collection - Sunset
Paige Evans - Wonders collection #11
Vicki Boutin - Story Teller collection - Mariposa
Bazzill Basics - Vanilla & Arroyo

Reverse Side of Papers:

Embellishments:

Simple Stories Chipboard Frame, 3 paper flowers, strip of Doodlebug Jewels, 2 P13 decorative Tags, bird clip, 12" scalloped ribbon, metallic paper fern leaf

Extra Bazzill Pack:

Yukon Gold, Parakeet, Classic Blue & Tutu Pink

Bobby's Girl - This layout has a photo from 1961 which I discovered recently, when scanning some negatives. So lovely to have a photo of my dad and me together as he was usually behind the camera. 

The basis for this layout is the lined side of the Heidi Swapp 'Sunset' paper. I gutted a piece from under where the photo would go (saving this for the next layout). I used Distress Oxide Inks (Spiced Marmalade and Kitsch Flamingo) through a Vicki Boutin Stencil from the Colour Study - Bubbles set.  Then I mixed more of the inks with water to splatter over the paper. I also sprinkled a little Black Soot Distress Paint.
sten

From the Vicki Boutin 'Mariposa' paper I cut and distressed three strips 4.5cm x 27cm. These were placed vertically on the left of the page.


The photo was arranged in the centre, with a Doodlebug cupcake mini doily under the top right corner. I placed this upside-down to give a pale peach effect.

I placed the scalloped ribbon (self-adhesive) in a curve under the photo.

Three butterflies were cut from the 'Mariposa' paper and added to the page using 3D foam pads. I added some stamen to each butterfly to represent antenna and painted the large butterfly with Nuvo Glitter Drops.

In the bottom right corner of the photo I made a cluster with the large butterfly together with the metallic fern leaf from the kit and some wired crystals from my stash.

I used some Nuvo Crystal / Glitter Drops to add a trail from the butterflies. A few gems were added to the doily.

My title was cut from
Arroyo Bazzill using alphabet dies. I found some old alphabet stamps to add the names and date. 


Rock Star - Little Andrew loved sitting on this rock at our accommodation on holiday in Norfolk!

The base for this layout is the Vanilla Bazzill. I decorated this by splatting with several blue and green shades of Distress Stain. Then with some stains applied to the craft mat and mixed with a little water, I flicked a splattering of smaller drops and drips over the page.

I mounted both photos onto some of the
Parakeet Bazzill and arranged them with two pieces of the 'Sunset' paper in the centre of the layout.

I stamped the title with Distress Paint and Tim Holtz, Type lower cling foam stamps.

I cut some more butterflies from
'Mariposa' paper and added these to the page. I had some Dusty Attic mini butterflies and mini dragonflies - I painted them with some Shimmering watercolours - Corney Flower Blue.  I glued these onto the page.

Finally I cut fronds from more of the Parakeet Bazzill and just one layer from the Tim Holtz Sizzix Thinlits - Bloom Colorize die set.

Thanks for looking. Back with the June Kit soon.
Lynn x

Monday, 24 May 2021

Simple Stories ~ School Life

Hi, it’s Anna back with you today and I’m working with a new collection - Simple Stories School Life for my next couple of blog posts. 

My first layout is all about the obligatory back to school photos in front of the front door! These were taken last September, after several months away from school...


I began with a sheet of white 12x12 bazzill cardstock as my base. I trimmed down half of the journal elements paper - using the corkboard ‘b’ side. 
I wanted to add some texture and interest to my cardstock before going any further. So I used an Echo Park star stencil with some Nuvo Embellishment Mousse (you can also use texture paste) to both sides of the cardstock. I waited for this to dry before sticking down the cork board paper, I also lightly distressed the edges. 


I’ve had this Paige Evans ‘Back to School’ cutfile cut for ages now and I lost one little part of it! As it’s been cut ages there was no chance of finding it, so I just went with it... but I may have to go back and change that at some point! I backed it with the ready. set. learn patterned paper and some black bazzill cardstock. 


I love the journal bits from this collection and chose a few of them to add to my layout. Including the journaling element below. I added our personal back to school journaling after I’d taken the photo. I added a few more of the journal bits around my layout too. 


To the left side of my photos I added a couple of tags tucked in behind the patterned paper and some Pom Pom trim from my stash. 
I painted some dusty attic chipboard stars with shimmerz paint and adhered them to the layout, I also added some enamel dots to my layout. 
To finish, I added some splatters of distress spray


Thanks so much for looking! See you next time. 
Anna 

IG - adisneycraftylifewithanna 


Monday, 29 March 2021

Smile - P13 Paper Products - Beyond the Sea

Hello, Rebecca back with you today with another layout created using the gorgeous 'Beyond the Sea' collection by P13 Paper Products. I think I may have found my new favourite collection - I am enjoying working with it so much and I cannot believe how far this collection is stretching. I've made 7 layouts now and still have so much left!


I had the idea in my head that I wanted to cut a ship's steering wheel (Sailing folk - I apologise! I'm sure the wheel has a proper name but for the life of me I can't think of it!) from Paper #03, which is a gorgeous weathered wood effect pattern. I found an image online, and traced it in my silhouette software to give me the outline of the wheel. I then offset the image, and cut it slightly larger from a sheet of Bazzill Cardstock in 'Bark'. I stuck the two together and added foam on the reverse. 


I've used a sheet of white Premium Cardstock for my background, and have trimmed half an inch off each side and have used the leftover sheets of brown bazzill cardstock, and Paper #03 to add a layered border around the edge of my layout to frame the page. I've also distressed the edges to bring some texture to the layout.

Behind my wheel, I have added some very soft mixed media using a stencil brush and a distress ink in Salty Ocean to help create a bit of depth to the page.


In my photo, my husband and son are looking directly at the camera so I decided to have my photo sitting in the centre of my layout. I raised it up on foam, and added some cheesecloth behind it to bring in some more texture. I love using cheesecloth on beachy layouts and feel like it's the perfect texture. 


Moving on to embellishing my layout, I added some florals which I had fussy-cut from Paper #04 and some more of the fussy-cut elements from Paper #07 that were left over from my previous layouts. I've built a cluster either side of my photo, raising some of the elements up with foam pads. Nestled in the centre of these clusters are also two circular stickers from Cardstock Stickers #3.


For my title I have used a wood veneer piece which says 'Smile' and I've painted it with a Shimmerz Paint in 'Anchors Away'. (Shimmerz are new to Papermaze so if you haven't already checked them out, I highly recommend you do!)


I felt that the layout was a bit bottom-heavy so decided to create a small cluster in the top left corner to help balance the page out. I added the same blue ink to my background, and added a fussy-cut leaf cluster with a gorgeous tag from Cardstock Tags #3


I then finished my layout by drawing an outline border, in white, on the wheel to help add a bit more detail and make it look slightly more realistic. And that is my layout complete! This page came together VERY quickly for me - it only took 45 minutes to create. It definitely helps that this collection is so beautiful - the pages just seem to fall together effortlessly!

If you'd like to watch the process, there is a video on my YouTube channel, which you can find Here

Officially, that's me done for March! I do have some bits left from this collection so I’m sure I’ll manage another couple of layouts at some point!

You’ll notice that a lot of this collection has sold out on the website - it literally flew off the shelf! But fear not - restocks are on their way, along with a few more P13 collections so keep an eye on the website!

Take care,

Rebecca x

Wednesday, 24 March 2021

P13 Paper Products - Forest Tea Party - My World

Hello!

Claire back with you today and I'm here with my second layout using the beautiful P13 Paper Products Forest Tea Party collection.

Given my last layout was very woodland themed, today I thought I would focus on the beautiful floral elements in the collection, using the pastel pinks and blues which are just so pretty.


I started with a piece of Coastal Blue Bazzill cardstock from the Matchmaker Pack and cut a strip of Paper 04 to run along the left edge of the paper.

Now I have to admit these two photographs of my dog are some of my favourite ever pictures of her - she just looks so happy to be out on another adventure - if I could bottle that euphoric feeling that she's showing (particularly in the top photo), I absolutely would!

I used the 'My World' cutfile from Peartree Cutfiles as she really is the centre of our world, so it was perfect for this layout.  I backed it in Paper 06 which is a really beautiful peachy pink paper with a very feint scripty font design.


To back the flowers, I used Paper 02 (blue) and Paper 03 (pink and leaves). I also added some Nuvo Drops in Duck Egg Blue and some Nuvo Dream Drops in Love Potion.


Next, I set about creating three large floral clusters, using flowers I fussy cut from Paper 07 and Paper 03.


To each of the clusters, I added some Chipboard Embellishment #4 leaves and painted them with Shimmerz Paints - Inklingz Miner Miner 49er.

I added a small tag from Cardstock Tags #3 and a larger tag from Cardstock Tags #2 to the top right and complemented this with a chipboard banner from Chipboard Embellishments #7 and some stickers from Cardstock Stickers #1.


To finish off the page, I added a few small splatters of Shimmerz Inklingz Oakie Bear Blue around the globe and a few small drops of Nuvo Crystal Drops in Bright Gold.


There are still some of these beautiful papers available in the store, along with two other stunning collections from P13 Paper Products, so do head on over and check them out whilst stocks last.

See you soon.
Claire xx