Hi There, it's Anita here with my last post for January ( Crikey where HAS that month gone??)
Before Christmas I bought a few sheets of one of the recent Simple Stories collections, Love and Adore....they are really vibrant and rather funky!
I have got some of the sheets put by for creating a class I have got in mind, but I wanted to make an extra Christmas present for my Daughter and her Fiance and this Collection was perfect for it.
I bought an 8 x 8 box frame and some Scrabble letter tiles and just picked out a few crystal embellishments from my stash to use.
I covered the back of the frame using a sheet of Hello Beautiful.
The black background is covered with a mass of teeny tiny brightly coloured hearts and I felt this worked perfectly to combine with the letter tiles.
I started off by picking out all the letter tiles I needed to complete the words I wanted to create and set upon linking them all together. When I had them how I want them I them transferred them to the frame and stuck them all down.
I also had a sheet of 3 x 4 Journalling Card Elements, there are many different little panels and bits that can be cut up, so I picked the panel I liked which I stuck in the top left hand side of the frame and also cut a few teeny hearts, which I raised on foam pads and added under the tiles.
I then just popped on a few crystals in random places to finish it off.
I was delighted on Christmas Day when they opened it and said how much they liked it!
Well that's it from me for January.....I look forward to seeing you all in Feb!
Warmest Wishes
Anita xx
Monday, 30 January 2017
Wednesday, 25 January 2017
Bo Bunny - Sweet Moments - Little Boxes
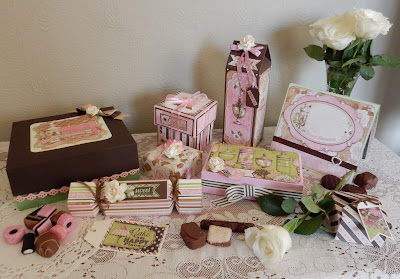
Here is the full collection I made using the papers together with Bazzill Basics Cardstock, the We R Memory Keepers Envelope Punch Board and Crop-A-Dile, and a Score board.
I used papers called Confectionery, Delish, Delectable, Allure and the Combo Sticker sheet.
I searched the web for instructions for different boxes and found plenty of You Tube videos to help. I have linked to an example tutorial for each box, but bear in mind you may want to find others and / or adjust sizes.
I found a tall slender tie top box and adjusted the measurements to accommodate these lovely images from the papers. As with all the boxes I embellished this one with Distress Ink, paper roses, ribbon, gems and pearls.
This Cracker box is made with the envelope punch board and again the size can be varied.
This square tab tie box, can be made from any size square with the envelope punch board and would make brilliant wedding favours.
This next box is an easy form of explosion box, the scoreboard is useful here.
This larger custom sized box I made to take cup cakes. I made the base deeper than the lid so the contrasting card would show.
I used a Martha Stewart border punch to trim the lid.
The lid also features a bow I made using the envelope punch board.
This easy box is made by scoring and folding a square of paper or card for the lid and the base in the same way, just made the base slightly smaller.
This envelope punch board box is made to measure to take a box of Maltesers, again the dimensions can easily be changed.
I also made a twist and pop up card with these papers.
Thanks for looking, enjoy experimenting with some tutorials - there are so many available.
Lynn x
Monday, 16 January 2017
everything prima....Look forward, never look back
I loved Lynn's post on an altered embroidery hoop and how she put 3 different sizes together. When shopping locally i found a large hoop and wondered how i could go about making something different but be inspired by Lynn's post.
I decided to cover my hoop in a heavy weight canvas and use the back of the hoop to create my layout. Armed with prima products, Id bought in the sale, Rossibelle papers and note cards, 2 sheets of old book paper, blue fern studio chipboard and an old watch face i went about creating may layout.
Then time for messy fun with inks and mists to create a coloured background on my canvas
Again drying time took ages, which meant i could go about cutting flowers, with my dies and choosing metal embellishments and leaves to my page. I adhered these to the right hand side of the frame placed my photo to my page. I had some old prima letters bought in the sale and wanted to use these for my title. I spent ages placing them on the page but they didn't look right somehow. It was then i remembered that id kept some of the bark off my eucalyptus tree. tucked this under my photo and flower cluster, which added more texture and a platform on which to add my title.. Finally an old prima blossom branch added.
(close up of flower cluster) Loved how this turned out and thank you Lynn for inspiring me.
Friday, 13 January 2017
2017 Crop Time!
Firstly I'd like to wish you all a Happy New Year! I can't believe we're at our January crop already - when we had our Christmas one it seemed such a long way away! But here we are, and we'll be at Otley Village Hall as usual tomorrow from 10am until 5pm, with homemade cakes, biscuits and drinks... And don't forget it's our January Sale, so there'll be 20% off everything in the shop :)
This month's layout uses the beautiful Pink Paislee Papers Take Me Away, and gives you a chance to play with Faber-Castell gelatos!
If you can't get to this month's crop, but would like to join us in future, here's a list of this year's dates:
January 14th
February 18th
March 25th
April 22nd
May 20th
June 17th
July 15th
August 19th
September 16th
October 21st
November 11th
December 2nd
Wednesday, 11 January 2017
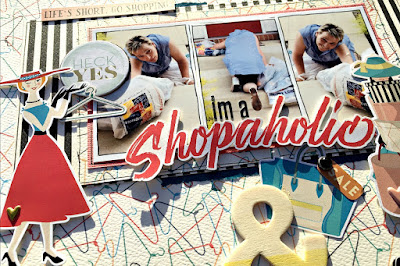
I'm a Shopaholic scrapbook layout with Carta Bella
Hi Tracee with you for the first time in 2017, I hope everyone had a great Christmas, I certainly did.
Today I am sharing a layout I created using the Metropolitan Girl by Carta Bella.
Today I am sharing a layout I created using the Metropolitan Girl by Carta Bella.
I have been waiting for the perfect papers to go with these pictures from Summer 2015. I went to visit my good friend and fellow scrapper Debbi this was the result of a 3 hour trip around Hobby Lobby!
The Metropolitan Girl collection is all about shopping with retro colours, I love it!
I used one of the ladies from the Metropolitan Girl 12 x 12 sticker sheet, she is pointing to the "Heck Yes" chipboard sticker that is from the Pink Paislee collection Take Me Away. I love to add funny elements to my pages and there are lots of different embellishments that Vanessa sells in the shop.
I hope you enjoyed my tongue in cheek page today. There is 20% off everything over in the shop so hurry on over and grab some bargains.
Monday, 9 January 2017
Snow Day.
Hello Again
It's Anita....and here is my last offering using the Winter Wonderland Collection from Simple Stories.
Many collections from various manufacturers have a sheet or 2 of woodgrain paper within it and this collection is no exception. I really like woodgrain and I think it leans itself well to scrapping various different themes on. For this page I decided to team together a sheet of Wonderland and a sheet of Blizzard together for the base of the layout.
I trimmed about a centimetre from the top side and the left hand side of the Wonderland sheet and gutted the centre square out of it, I then roughed up the edges all the way round to create a more rugged and distressed appearance. This was then stuck down onto the Blizzard sheet, leaving an even border all the way round.
I then chopped up bits and bobs from one of the 3x4 Journaling Card Elements
and combined it with some stickers from the Combo Cardstock Sticker Sheet.
I also layered in some elements from the lovely choice of die cuts in the Bits and Pieces selection bag, this includes the SNOW DAY title.
This really has been a lovely collection to work with and I would highy recommend it for all your wintery or snowy layouts.
Warmest Wishes
Anita xx
Friday, 6 January 2017
Meeting Santa
Hi there, It's Anna with you today.
I have a Christmas layout to show you today which uses some Echo Park and Authentique. I used the Papermaze Christmas crop kit to create this layout (along with a couple of added extras).
The Christmas Challenge Kit invites you to create your own layout using the contents of the kit rather than following a design. So I thought I'd show you what I did with it.
I really liked all of the bits that were included.
Here's where you can find some of them along with lots of other lovely Christmas goodies on the website:
I hope you're inspired to get Scrapbooking with your Christmas photographs!
Thanks for looking!
Anna
X
Wednesday, 4 January 2017
Cold Hands Warm Heart .... a quick and simple layout with Simple Stories Winter Wonderland
Hi There and a Very Happy New Year to you...
It's Anita here today with a quick and easy layout that will get you using multiple photo's and is a great way to either break into a new set of papers or, if you prefer, use up an old one and some bits and bobs of scraps.
I absolutely LOVE Winter, especially when its snows and both my girls have always felt the same way. Each winter since they were very small we hoped and wished for some snowy days so we could play out in it.....even if it was only a thin layer!
When I saw the Winter Wonderland Collection I knew I had to get my hands on some and set about hunting down some photos from a few years ago, 2005 infact!
I based the layout on a sheet of Oh What Fun
I gently inked all around the edges with an old dark brown inkpad and then chopped into various sheets of paper including Journalling card elements , Bundle Up and Snow Cute
I made one of the sections into a little pocket.
I took 3 photos and cut them into the same size as the paper panels and inked each photo and all of the panels around the edges.
I then used various elements from the Bits and Pieces pack to decorate some of the panels before finishing with a little tag to go in the pocket panel with some journalling on. I stapled some layers of organza ribbon onto it, to make it easy to pull in and out of the pocket
So, have you been crafting yet now we are into the New Year....and if so, have you made any New Year Crafting Resolutions?
Warmest wishes
Anita xx
Monday, 2 January 2017
Happy new Year!
Happy New year everyone and welcome to my first post of 2017!
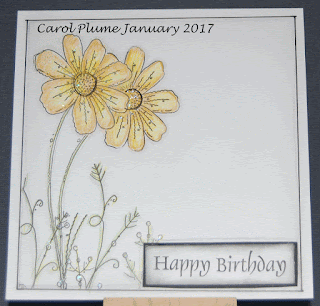
Whilst on a recent holiday in Cuba there were loads of canvas' for sale; all of them very similar in style, but, oh boy all so different. There was loads of texture and were very feely feely but the colours were either so vibrant you needed sunglasses or, the ones that I loved, were all black and white with a bright streak of colour…I am going to try and copy one of these textural canvas' but for today I have tried to copy the style and make a Birthday Card:-
With today's postage being so incredibly expensive I'm making more "flat" cards with shading and masking used to give the impression of definition.
For this 6"x6" pre-scored card blank, I measure around the edges and edged with black ink. I then added "post its" before stamping the flower from the Kay Carley set for paperartsy, I then created a mask using a post it note and with it in place restamped the flower again, once the post it was removed it gave the impression of the flower peeping from behind. By adding some shading it makes the flowers pop from the card.
The flowers and foliage were coloured in using pencils. Happy Birthday, which on reflection might be a bit too big, was stamped and matted onto black card.
TFL xx
Subscribe to:
Posts (Atom)


