Monday, 31 July 2017

Sunshine & Happiness with Simple Stories

Today I am here to share with you a layout I created on a lovely Summer's day, and now sharing it on a cold wet rainy day in the Great British Summertime!

Park Life scrapbook page tracee provis papermaze simple stories sunshine & happiness

I love the summer colours in the Sunshine & Happiness collection by Simple Stories, I am loving all things brightly coloured right now.
There is something slightly different about this layout, in the fact that it is actually an 8 x 8 page for an album I am scrapping of my time, in the USA 2017.


I used some of the 6 x 6 paper pad to cut out some journaling and also add some smaller elements to my page. The 6 x 6 pads are great for detailed elements and I love some of the smaller patterns that they have in them.

I used the sun shape from the Bits & Pieces pack and added a brad from my stash to give it some dimension. I even managed to sneak a bit of Ric Rac on my page, I have a ton of the stuff from an age ago but it makes a cute decorative border every now and then.

Hope you all have a Happy Scrappy Monday (with added sunshine!)
For supplies for my page please head over to the shop


Wednesday, 26 July 2017

Photoplay ~ Summer Bucket List

Hi all, 
It's Anna here today. This month I've been working with Photoplay's Summer Bucket List collection. This collection is right up my street, with bright colours and a fun elements sticker sheet.  It's perfect for documenting your summer adventures. 

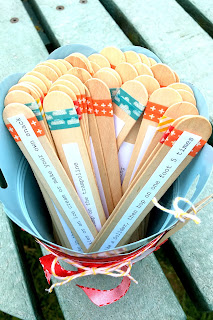
With the summer holidays now here, for my first project with this collection, I have made a 'summer holiday bucket'. I have seen similar projects on Pinterest, and have been keen to make my own. I am very fortunate to work term time only, which I love because I get to spend the holidays with my son. The summer holidays are lovely and we get the chance to do some lovely things together. But there are times when the words 'I'm bored' get said. So this is what inspired me to make this bucket. 

It works like this; the bucket consists of 4 different types of activities:
1. Indoor at home. 2. Outdoors at home. 3. An Outing Outside. 4. An Outing Indoors.

Some examples of this could be: 1. Make a treasure map. 2. Have a water fight. 3. Go to the park. 4. Go to the library.

The reason for having different categories depends on what the situation is that day. Such as the weather and how much time we have. 
Of course you could adapt it to suit your own situation. There are also other types of similar jars or buckets that you could make, for example a date night jar, Christmas etc. But the principle is the same, choose something to do from the bucket or jar when the time or need arises. 


So for this project you will need:
1. Some wide lollypop sticks, I brought them from the Range for £1.
2. A bucket, jar or something similar. 
3. Photoplay summer bucket list collection. 
6. Some ideas for what you want to do. I printed them out but you could also write on the lollypop sticks instead. Pens


 I began by coming up with lots of different activities. I typed these out and printed them. I cut them all into strips and adhered them to the lollypop sticks. 
Next I sorted them into the four different categories, as listed above. I used a different colour washi tape for each category and stuck to the top of each stick. 


The next job was to decorate the bucket. You can do this however you choose to, to suit your type of bucket. I played with various options from the Summer Bucket List collection and decided on using a doilie, a journal card from the collection, some tags and element stickers from the collection.


I made labels to remind us what each category was on the back of the bucket.


Thanks for looking! 
Anna 
X

Monday, 24 July 2017

Authentique & Mixed Media layout

Always Perfect by Tracee


Happy Monday to you all. I'm here today to share a layout with you, that is a little different to my usual style. I used the Always collection by Authentique along with some Dusty Attic chipboard and a whole host of different mixed media supplies.


In my DT pack this month I was sent the Always Collection by Authentique to play with, this is a  monochromatic, distressed kind of dark collection and not my usual style. I was a little perplexed to start with and then an accident with some black gesso gave me the push that I needed.
After I had spread my "big blob" of black gesso into some kind of shape I applied some white texture paste through a stencil to try and tone it down a little and make it look like I might have planned this all along!


The Wrought Iron Trim chipboard set has 3 pieces and I used the 2 smaller pieces for my page. I first inked them both with black, I added some aged gold embossing powder to one and the other I painted with some black pearl paint. I added more chipboard with my 2 word title and I gave those similar treatments.


I am not known for flowers on my pages, I usually avoid them as I can never seem to get them to look right, but once again climbing out of my comfort zone I created a little cluster at one side of my photo. I went crazy splattering inks, mists, and paint to give my page a really distressed look. I decided that this still wasn't quite enough so I added some micro beads and glass bead gel too!

I had quite a lot of fun creating this proving that it good to step out of your comfort zone every once in a while. For supplies for my page please pop over to the shop, There is a Sale on right now to so even more bargains to be found!


Friday, 21 July 2017

beautiful story (tando heart)

this post uses the left over tando letter tray heart As you remember it comes in parts the heart base and 3 frames that sit on top of each other to make the heart. 
 I have covered my heart base in canvas/ burlap and left to one side. Adhered 2 of the frames together but cut out the grids, painted this in a dark slate paint. Once dry added crackle medium and topped with another coat of paint in a light stone colour.
The crackle allows the darker colour to seep through.
Adhered a black and white photo to my frame and then started placing die cut leaves from an old small paper pad to the base of my frame plus other paper embellishments which i distressed with distress ink. 


Added a metal number plate and used my left over chipboard piece i had tucked away from the Bo Bunny layout i did over a month ago. The chipboard was primed in gesso and then used my distress crayons to add colour. Placed my heart on a wood grain effect paper that was distressed with a distressing tool and then adhered to a dark grey piece of card stock.


close ups


Wednesday, 19 July 2017

Graphic 45 - Vintage Hollywood - Part 3

Hello All, Lynn back with a few cards I made with the last of my Vintage Hollywood collection by Graphic 45. The large detailed images from these papers make them ideal for card making.  I have had fun designing with these papers together with a few embellishments and tools from my stash, and the shop.


All cards were made using Bazzill Basics Cardstock in Black, White, Kraft or Cream and gold Miri card.

This first card was made with pieces of  'Star Studded' paper and an image from 'Silver Screen' paper. I added gold gems, a black feather, a small gold doily. and one small sticker from the Cardstock Sticker Sheet.


Next came a 6" x 6" card using some 'Dazzling Diva' paper and a Spellbinder die (Wagon wheel). In addition I used some Crafters Companion dies for the greeting and stitched square.
To finish - a feather, gems and ribbon.


This next card simply uses a set of Memory Box nesting hexagon dies to cut a section from the 'Dazzling Diva' paper, and another in miri card. 
The background paper is 'Glitz and Glamour' paper.
Decorated with black gems, Crafters Companion die for greeting and ribbon.


The tall card was made with 'Star Studded' paper for the background and images from 'Silver Screen' paper. I also used a sticker from the Cardstock Sticker Sheet.
Black card and the Sizzix Tim Holtz Alterations Sizzlits Decorative Strip - Filmstrip Die to create an image down the right-hand side of the card.
I finished this off with black and amber gems.


For this smaller card I took this fun image from 'Silver Screen' paper, and a piece of  'Tinseltown' paper.  Another greeting created with a die from Crafters Companion and two different ribbons to decorate.


Lastly I made this card using a diamond fold.
I used paper scraps for this one from 'Glitz and Glamour' and 'Star Studded'.
A large Ticket sticker from the Cardstock Sticker Sheet was mounted onto black cardstock.
Sizzix Tim Holtz Alterations Sizzlits Decorative Strip Mini Filmstrip and ticket Die was used to cut kraft and black card to add images to tuck into the top of the large sticker.
Lots of tiny flat-backed pearls were used to decorate the panels.
The 'Good Luck' greeting was another Crafters Companion die.
The photos show the card folded and unfolded.


That's my third and final post using these amazing papers.
Back with some new Bo Bunny papers next month.

Thanks for looking
Lynn x

Monday, 17 July 2017

A little something different from Carol….

Hi, Carol with you today, and today I'm sharing something very different for me. Those that know me, and for all of you that have followed this blog and seen my creations, know that I'm not one to scrapbook!  But, there are occasions when you just have to record those special moments.

Last Wednesday, we said goodbye to our son, Josh.  He's off to Australia for a month before commencing work in Japan for 3-11 years! so, our last selfie is a must to scrap….

(The problem is…. I don't have any photo paper lol, so the photo will be added later, but, for the purpose of this post, here is the layout)


So, the base paper is Carta Bella Transatlantic travel - travel gazette, to this I added some watered down acrylic paint in white and brown/gold…. I then stencilled using gesso, marks of the same paints were added using an old store card and using cut and dry paint was added to the edges of the page…. along the top I dripped watered down paint…..  I then cut up strips from the borders page and added these to my page adding depth by adhering using silicone get… some edging was added using a water colour pencil….. some elements from the ephemera set was also added.

TFL xx

Friday, 14 July 2017

July Cropping

We're round to crop time again and this month the kit uses pretty pink papers from Pebbles Simple Life collection...


This one's a nice and clean layout with only a little bit of stamping!  As usual we're at Otley Village Hall from 10am until 5pm, so if you'd like to join us, just drop us an email!

Wednesday, 12 July 2017

Using a Travel Collection on a Non-Themed Project


Hi all!

It's Chloé here again, with my last project using the Crate Paper Oasis collection. As you can imagine, after already creating several projects, it took me a little while to decide on what I wanted to share today. 

I thought it might be fun to show you how I used papers and stickers from a travel-themed collection, on a non-themed project in my creative journal.


Now, I may have cheated a little, as I used the non-themed bits of the collection and also pulled a few stickers from my own stash (the floral puffy stickers are by Pebbles, previously available at Papermaze)... but, it just goes to show that you shouldn't disregard a collection simply because it's marketed with a certain theme. Of course, some things (like palm trees and bikinis!) are mainly travel-friendly, but there are also a lot of fun papers and more generic embellishments in this collection.

I used the leafy paper (ironically named "retreat") as a background, as this page documents a woodland scrapbook retreat. We all stayed in fabulous cabins and it was in the middle of the countryside. There were also several leaf/floral stickers on the 6x12 sheet that I made use of on this spread.


My favourite technique in scrapping and in my creative journals, is layering. I layer up different textures to create a more interesting look; on this small cluster alone there's cardstock, die cuts, torn edges and washi tape. I always finish my layouts by dotting around some stickers (in this case the puffy florals) and adding the date with one of my roller stamps.

I hope you enjoyed having another look into my creative journal!

Chloé


Friday, 7 July 2017

Be Grateful .... Golden Grove from Kaisercraft.

Hi There Anita here with my first post for July....gosh its been almost too hot to scrap the last few days!! I have been having a play with some of the very latest collection from Kaisercraft, this one is called Golden Grove and its a stunning set, filled with the gentle sunshine hues of summer combined with the rustic charms of country style flora and a sprinkling of rich fruits and golden blooms.


I used a sheet of Vanilla cardstock for the base and I inked gently round the edges with an old dark brown inkpad. The centre of the layout was simply a die cut sheet from the set called Orchard and I cut of lots of random flowers out that matched and layered them up for some dimension.

I really love this photo, its of my youngest daughter a few years ago with some of her cousins, sat on the flower banks at our local reservoir. I knew as soon as I saw the papers EXACTLY what photo to use and I think it works perfectly.

Rather than matting the photo I decided to dry brush with a cream acrylic to create a softer edge.


So....lots of fussy cutting later and the addition of some pretty half pearls, Stickles and raising some sections up on foam pads to create some dimension and I am really pleased with the result.


I have used the following items :

Half Pearls
Prima paper Butterflies
Cream Acrylic Paint

Thanks for looking and make sure you treat yourself to some of this collection......its fabulous!

Wednesday, 5 July 2017

Graphic 45 - Vintage Hollywood - Part 2

Hello - Lynn back today with the next two layouts I made using the 'Vintage Hollywood' collection from Graphic 45. Part 1 can be found HERE.

Both layouts have been created with just two sheets of paper from the range, together with cardstock and other embellishments.


Electric Picture Palace

This layout features photos of the Electric Picture Palace in Southwold, Suffolk.

The base cardstock is a metallic bronze (sorry I'm not sure where it came from!). This was gutted to make a 1" frame.

A sheet of 'Dazzling Diva' was trimmed down to measure 11" x 11" and the corners rounded with a punch. This piece was then cut into two pieces measuring 11" x 8" and 11" x 3" making sure the images run in the right direction. I used the teal side at the top of the layout and the images side at the bottom. Later the join was hidden under a strip of teal, velvet ribbon. 

All the edges were inked with 'Gathered Twigs' Distress Ink

A piece of cream Bazzill 9" x 6" was placed over the teal patterned paper and another piece in bronze was cut to 3.25" x 6.5" and layered over the cream. The top two corners of both pieces were rounded off.

My photos were trimmed to fit the cardstock and added to the page. With strips from the cardstock sticker sheet to decorate the bottom edges.


I used two circular stickers from the same sticker sheet, and because I feel embellishments often work well in groups of three, I cut a third image from the reverse side of 'Tinseltown' paper (this was gutted from the next layout featured below). 

I used letters and numbers from the sticker sheet for part of my title, and the word 'Electric' was cut on the Cricut using black Bazzill cardstock and the 'Nouveau' font from my PC.

The chipboard corner is from Dusty Attic and called 'Ornate Corner #2'. I embossed this with Stampendous Frantage - Aged Teal Embossing Enamel.


Hollywood

This layout features a selection of snapshots from our visit to Hollywood a few years ago.

I started by layering up the background, having chosen a sheet of 'Tinseltown' paper, I picked Bazzill in colours to match - a black, kraft and tan. 
The Black was 12" x 12", the tan was cut to 11.75" x 11.75" and both were gutted to leave a 1" frame. The Tinseltown was cut to 11.5" x 11.5", with an area of 6" x 9" gutted from the position shown in the photo (about 2.5" down from the top and 1" in from the left).


The tan Bazzill was cut to 9.75" x 7" and the kraft card to 4" x 11.75".

Using a strip of black I cut one film strip and a strip of tickets using the Sizzix Sizzlet die - Mini Filmstrip & Tickets. I cut these up so I could edge the tan Bazzill with the filmstrip and the kraft Bazzill with the tickets. 

I printed off nine small photos and trimmed these down to 2.5" x 2.5" in size. They were arranged onto the left side of the tan card - the right side was decorated with more of the cardstock stickers - borders and tickets. The title was cut with the Cricut and some leftover teal cardstock, the font is 'Art Deco'.

Other embellishments included a frame sticker backed with black Bazzill and number stickers. Word stickers and bling in the form of black flat-backed gems.

Back later with some cards using this collection later in the month.

Thanks for looking

Lynn x