Friday, 30 August 2024

Help!!! No Time To Scrap!!!


 Do you also find this time of year so difficult to create?

Everyone is busy and when the weathers good you just want to get outside.

But as we are all busy making memories and doing fun stuff, it's tricky to find the time to create.


Lisa here by the way and today I'm sharing some quick tips on how to create quick fun pages when you are struggling to find the time.


I do also have a video here if you want to watch this one come together.

I decided to go with 3 photos that I already had printed (that saves time already, just pick photos that you already have to hand rather than choosing what to go and print off).


I also went with photos that didn't have a mega story to go with them.

Originally when I thought that I was going to grab 15mins at my desk, I took a bunch of photos from our travel day to Orlando, but then quickly realised that I had so many stories to tell, so many photos to work with and then memorabilia to go and find, that would NOT be a quick page.

This one is simple.

My FAVOURITE DISNEY SNACK, and that's it!


And the other tip is to grab for a collection of something.

I took the Simple Stories 'Pack Your Bags' collection here.

When you have something that completely coordinates, it takes out al that procrastination time. No picking and choosing of what to use and what goes with what. It all works.

This saves so much time.


I made the most basic of pockets today, no time for anything fancy during this 15 min journal session LOL
And this 12x12 here helps you create the quickest journal cards.


The bits and pieces are fun to use too.

I even stapled a flag here as a tab top for my journal card. 

And then I used them to add some quick fun touches to this spread.


And the favourite piece of mine out of this collection is the wordy 12x12 here.


I wasn't that fussed with the images so much as I LOVE the words. This is one of those pieces I wish I'd grabbed 2 pieces. Maybe I need to grab another piece next time I order LOL.


I love using a long ruler to trim these words down to use as a title.

So fun!


I really hope you can squeeze in 15/20mins here and there over the Summer to get your scrappy time in.

Don't forget the video I have here if you'd like to watch this page being created.


Enjoy the rest of your Summer.

Hugs

Lisa xx

Wednesday, 28 August 2024

Summer - Simple Stories - Summer Snapshots Collection

Hi everyone, it's Rebecca with you today, back from the gorgeous Isle of Wight and sharing my second layout of August with you. This month I've been working with the cheerful Summer Snapshots collection by Simple Stories. It's a fabulous summer-themed offering, perfect for all your beach and holiday layouts. You can find the full collection in the shop here.  


I started with a 9 x 6 inch strip of the 'Keep it Sunny' patterned paper and a 10 x 4 inch strip of the 'Take the Shot' paper (both B sides). I tore the top and bottom edges of both pieces, and positioned them, layered, in the centre of a sheet of Premium White Cardstock. I love tearing the edges of papers as it helps to introduce some texture to the page. 

In the centre of the layout, I added my 3 x 4 inch photo and one of the tags from the 'Tag Elements' paper. I usually use the tags as layers behind my photos, or like on my previous layout, sticking out behind layers, however I really liked the image on this particular tag so placed it square on the page, with a metal eyelet through the top.


Underneath my photo and tag, I added my title. I've gone for a large title from the Bits & Pieces to make a statement. I liked the way the shadowing matched the colours in my photo. Just underneath this, I added a small Foam Sticker to extend my title.


With all of these larger elements in place, I focused on embellishing with the smaller elements in the collection. I've used elements from the Sticker Book (which is amazing value for money and includes 469 stickers!), the Layered Chipboard, the Bits & Pieces, the Journal Bits and Pieces and the Cardstock Stickers


I then finished the layout off with some of the Glossy Enamel Dots.


Thanks so much for reading. I hope you've enjoyed the layouts I've created with this collection. I've got a whole heap of fresh holiday photos to scrap so you'll definitely be seeing more of this collection!

Take care

Rebecca x

@preciouspagespapercraft


Monday, 26 August 2024

Echo Park ~ Sunny Days Ahead #2 ☀️

Hi all, it’s Anna back with you today. 
I’m still working with the wonderful bright and cheerful Sunny Days Ahead collection by Echo Park. You can find it in the shop here


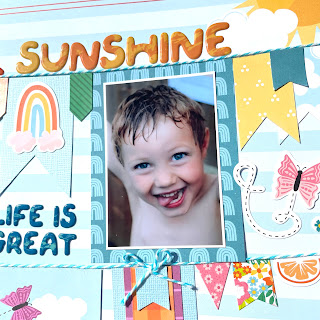
For my second layout I began with the b side of ‘Shine on Sunshine’ as my base. I was inspired by the bunting on the element stickers in this collection to create a bunting style layout. 


I mounted my photographs on the reverse side of two of my spare 3x4 journaling cards from my previous layout. I placed them where I wanted them on my page and then added twine across the page. 


From there I added my remaining bunting pieces - I find it easier to do it this way than adding on the twine at the end - this way you can ensure your bunting is lining up evenly.  


To make my other bunting pieces, I created three different sized templates with scrap paper and used them to draw around various patterned papers and coordinating cardstock in the collection. 


I added a title at the top and in the middle of my layout using Pebbles Fun in the Sun Puffy Phrase Stickers.


I added various stickers from the Element Sticker Sheet to embellish my bunting, including adding the small bunting stickers. 


Thank you so much for looking! 
See you next month with a new collection. 

Anna

@acraftylifewithanna

Friday, 23 August 2024

Vicki Boutin's Bold & Bright for American Crafts - Capture it All

Hello, How are you doing? I hope you've had a great summer. Karen here, and today I have a new collection to share with you - Bold & Bright by Vicki Boutin for American Crafts. As the name suggests, the colour palette of this collection is wonderfully colourful and vibrant. It is perfect for so many scrapbook layouts. The layout I have to show you today is a multi photo layout inspired by the Mixed Tags sheet of paper.


For the base of the layout I chose to use a sheet of paper from one of Vicki's older Painted Backgrounds Paper Pads but you could also create your own mixed media background or use a plain sheet of cardstock or tone-on-tone patterned paper. I trimmed 1cm from one edge of the background paper and stuck a piece of black cardstock behind to add a bit of interest,


The 5 largest tags on the Mixed Tags paper were cut out and cascaded down the centre of the layout. Onto each tag I mounted a 3" x 1.5" photo. 3D foam was placed beneath each photo for dimension. 


Some of the tags were threaded with black and white twine.


From the Bunches of Fun paper I fussy cut two huge flower clusters and tucked these behind the top and bottom tags.


From the Spinning Wheels paper I cut lots of the wheels and also tucked these behind the tags, making sure that the colours were evenly distributed throughout the layout.


On each tag, beside the photo, I added a word strip printed on the computer and a butterfly from the sheet of Mini Puffy Stickers. This pack of puffy stickers contains 110 tiny stickers which are so versatile and great for scattering on layouts. I think they're great value for money.


In the bottom right corner I added my title. I used one of the Puffy Title Thickers and some Mini Foam Thickers and beside the title I added a cute puffy sticker camera from my stash.


Finally, a few enamel dots were added and I doodled a line round all the paper elements using a black gel pen.

Thank you for dropping by today, I'll be back again next month with another project.
Take Care

Karen x x


Wednesday, 21 August 2024

Pretty Little Studio - You Are My Sunshine - Game Day Ready!

Hi everyone and welcome back to the Papermaze blog!

It's Claire here today and I have a layout to share with the brand new collection from Pretty Little Studio called You Are My Sunshine. You can find the full collection in the shop here

As you might expect from the title, this is a beautifully bright and cheerful collection with lots of bold colours, fun patterns and ephemera. 


I started with a piece of Premium White Cardstock and the Sunlight paper.

I was crying out to be fussy cut and I layered one section on top of the other, adding stitching around the outer edge of each piece for extra interest.


Before adhering to the page, I used a Vicki Boutin star stencil and coloured each section with corresponding ink using a blending brush. 


To make sure my photo sat in the curve of each section, I printed my photo in a circular shape and mounted it with the Snowcone Wrapper paper. I love this paper. It has all the colours of the collection on just one sheet. It's perfect for framing both my photo and the outer edge of my layout.


Next, I reached for the stars - quite literally! The Under the Stars die cut pack is so much fun!! Lots of stars in all colours, sizes and patterns. I selected a good variety of each, colour blocking in each section. Some are raised on foam for extra dimension.

I also added a few butterflies from the Butterfly Wings Die Cut Pack.


To create my title, I opted for some Simple Stories Color Vibes alpha stickers, curving the title around my photo. 

As a final touch, I used one of the Pet Lovers Word Stickers to act as a small subtitle and that was the page finished!


I hope you like it. It's been a super fun page to make and I can't wait to sit down and make another! 

Until next time, happy scrapping! 

Claire xx

@scrappysoulmate 

Monday, 19 August 2024

August Papermaze Kit - Part 1

Lynn here today with the first of my layouts made using the August Papermaze Kit. This kit is full of bright and colourful scrapbook papers, embellishments and cardstock. Ideal for summer and seaside layouts. The first two layouts feature lots of doodling.


Here are the details of what you will find in the kit:


Patterned Papers:
Vicki Boutin - Bold + Bright collection - Light of Day & Spinning Wheels
Paige Evans - Adventurous collection - #21
Echo Park - Sunny Days Ahead collection - Shine on Sunshine
Pebbles - Fun in the Sun collection - Picnic Plaid & Get Away

This photo shows both sides of the papers:


Embellishments:  Sheet of P13 alphas, selection of Pebbles puffy thickers, 5 Rosie's Studio puffy stickers, 6 Simple Stories ephemera, 5 
AALL & Create labels, 6 water droplets and a strip of enamel hearts.


Bazzill Basics Cardstock: Avalanche and Granny Smith (included in main kit).
Evening Light, Princess Pink, Mexican Poppy and Sea Water (in extra Bazzill pack).

Sandy Toes + Salty Kisses - My girls on the beach at Joss Bay, a hot August day way back when they were just 3 years old.


For this layout I used both sheets of
Vicki Boutin - Bold + Bright paper. I used Light of Day for the base, and with a fine black marker pen I highlighted and doodled around the colourful circular design on the paper. I cut a photo into a circle (about the same size as the orange printed circle), and stuck this within and overlapping the circles.


With Spinning Wheels paper I cut a selection of wheels in different colours and sizes from about half the sheet of paper (keeping the rest for another layout - shown below). I cut some circles in half and placed them around the edges of the page. Then with four large wheels I created flowers along the bottom of the layout. Back in with the pen, more doodling and highlighting!
I placed some large enamel dots (from my stash) into the flower centres.


I made my title with the puffy thickers from the kit, and a little journalling.

Vacay Vibes - Another photo from the early summer days with the children, Aboard Glisser in Woolverstone Marina. This is inspired by a layout from Paige Evans.


For this layout I used the sheet of Avalanche Bazzill as the foundation. Then I cut 5.5cm Hexagons from a selection of papers from this kit and a few from previous kits so that all the hexagons were different. I used both sides of Picnic Plaid, one side of  Spinning Wheels, Adventurous #21, Get Away. I used a die from a Memory Box set. the edges of each paper shape was distressed before adding it to the page.  I also cut a photo using the die for the centre of the arrangement.


I embellished the hexagons with a variety of words and phrases cut from the papers, and embellishments from the kit. I started with a puffy thickers phrase for the title. Then one another hexagon I added three of the AALL & Create labels from the kit, added my own journalling to these.


I cut phrases from the Get Away paper, and some labels from Adventurous #21 paper adding these to the hexagons.


I bunched some labels together, and stuck them to one of the hexagons with some twine through the holes. I added more journalling to these labels.


With a black pen I added doodling to the edges of the hexagons. Then I drew lines around each of the phrases to reflect the doodling on the AALL & Create labels.


Finally, I scattered the water droplets from the kit, over the page.

That's all for today, I'll be back with more from this kit soon.
Thanks for looking
Lynn x