Monday, 30 November 2020

November Papermaze Kit - Part 2

 Lynn back today with part two of the November Papermaze Kit.The lovely soft colours in this collection are ideal for creating layouts displaying photos of russet, wind swept foliage, fallen fir cones, berries and fields of pumpkins. With this in mind here are my second pair of layouts.

Before looking at the processes involved in making these layouts, here is what is in the kit:

Patterned papers:
Cocoa Vanilla - Day Dream - Daisy Days and Sweet Serenity
Pebbles - Jen Hadfield - The Avenue - 2nd Avenue and 3rd Avenue
Vicki Boutin - Story Teller - Memoir
Pinkfresh Studio - Days of Splendor - My
Favourite

Bazzill Basics - Coconut Swirl and Blackberry Swirl

The reverse side of the papers:

Embellishments:

Tando Creative Mini Tags pack, 6 dew drops, mini black doily, strip wooden dots, Cocoa Vanilla Puffy Heart, 5 paper flowers, 24" Twine and Prima layered heart sticker

Extra Bazzill Pack:

Fawn, Guacamole, Coral Cream and Sea Water.

Autumn Leaves - This photo shows Emily during her red hair phase. She was visiting Hall Place, Bexley to do an autumn photo shoot together with a fellow A level photography student. The photo reminds me of the line about autumn leaves from the 'Windmills of your Mind' song. Although I slightly changed the words for my long title, otherwise it would have been even longer!

For this page I cut pieces from two sheets of patterned paper, cutting a piece at an angle from the top of '2nd Avenue' (before cutting I chose a few images from the flip side for later). I set aside the floral heart for this page and the little house for the next layout.

I dripped some Antique Bronze Distress Paint along the angled edge of the
'2nd Avenue' (fawn side), and allowed it to dribble down the page. Once dry this was placed onto a spare piece of 12" x 12" paper, then I cut a piece from 'Sweet Serenity' to fill the gap at the top of the page.

With the Sizzix 'Vintage Lace' Sizzlit die I created some lace from the Black Bazzil, and placed this along the join between the two papers. Then I added two strands of the twine from the kit.

The kit contains a whole pack of Tando leaves, and after coating these with Gesso, I dipped them into a mix of autumn shades of Distress Oxide Inks. Once dry I decorated with patches of Gilding flakes to give them some shimmer.


I chose a selection of frames from the 'My Favourite' paper. These were carefully cut out and arranged in clusters above and below where the photo would be and also on the bottom right of the page. 

My photo was backed with Black Bazzill, raised with foam and stuck into position. The leaves were scattered, cascading down from the photo, saving one for the frames at the top of the photo and another for the cluster at the bottom of the layout. 

I added the paper flowers from the kit to each area where the frames had been placed. For the cluster at the bottom I added the heart saved earlier, and a tiny bow made from left over twine. I added some journalling in this area too. 

I raided my box of letter stickers and from many different packs I put together my long title.


Finally the Dew Drops from the kit were placed among the leaves. 

The Prior's Pumpkin Patch - For my last page I selected this photo of my little niece. She is sitting on the doorstep proudly showing off the carved pumpkins the family picked and carved the day before.  


This layout makes good use of the patterned paper left over from the previous three layouts. The base is the sheet of Fawn Bazzill. Then I did a lot of layering by cutting the scraps of papers as listed below.

Horizontally:
27xm x 11cm Sweet Serenity (colour wash side)
16cm x 15cm My Favourite (candy stripe section)
30cm x 4.5cm 3rd Avenue (Wood panel side including the manufacturer's strip with houses)
17cm x 4cm 3rd Avenue (houses side)
13cm x 2cm and 12cm x 4 cm Daisy Days (daisy side)

Vertically:
30cm x 8cm Sweet Serenity (dotty side)
28cm x 3cm Memoir (orange side including manufacturer's strip with script)
10cm x 3cm 2nd Avenue (fawn side)

I mounted my photo onto white card and placed it over the layers of paper, without sticking the edges down, to allow me to tuck elements underneath. 

I cut a few more of the frames from 'My Favourite' paper and used these in various places, including one for a little journalling. The black mini doily was tucked under the corner of the photo with a circular frame and the puffy heart layered on top.

I added in some phrases from the '2nd Avenue' paperwith the wooden dots and the layered heart sticker from the kit. 

My title was made from several different Basic Grey alphabet sticker sheets. I made them pop by outlining them with a fine black pen.

Finally I placed some paper leaves from my stash around the photo.

That's all for the November kit, although there is still plenty left over as usual. I'll be back with the December kit later in the month.

Thanks for looking
Lynn x

Friday, 27 November 2020

Pumpkin and Spice Explosion Box

 Hello,

 It's Anita with you today and I have an Autumn inspired explosion box to share with you.

I haven't made one of these for quite a long time, but they are so simple and great fun. You can fill them with various layers if you wish and add lots of photos too. They make great gifts for people and can be created in any theme and for any occasion. They make a great mini album if photos are added or a really extra special card for whatever occasion.


The Pumpkin and Spice Collection from Prima is absolutely beautiful, I have really enjoyed creating with it and I also added a sheet from another Prima Collection to make the lid ( Finding the Way from the Lavender Frost Collection)


I followed this basic plan, measuring in cms. You need to cut and remove the shaded areas on the top diagram to make the drop down base. The smaller diagram is for creating the lid to pop on the box. You will need to follow the dotted lines to crease and fold in the right place for a good fit.


I cut various panels to decorate the outside and inside of the box and little elements here and there to decorate with. Here is a list of the sheets used

Get Cozy

Fall for Fall

Sweater Weather 

Crunchy Leaves


I popped a lovely ivory velvet pumpkin in the centre of the base and then fussy cut some elements from the sheets and added around it, also popping in some tiny dried flowers and a couple of mulberry paper Sunflowers.


A small log slice made the perfect centre for the top of the lid, which was decorated using some blossoms 

Floral Ephemera 

dried flowers and some rustic twine to make a handle


This has been a really enjoyable project to make and as I said before, these boxes can be themed to fit in with any occasion. If you haven't had a try at one of these then please do give it a go xx


Thank you very much for looking at my post, I hope maybe it inspired you a little. Everything you need is available over on the SHOP
And don't forget, there is a huge AUTUMN SALE on over at the shop too....so grab a bargain whilst you can!!
HappyCrafting!
 
Warmest wishes
Anita xx

Wednesday, 25 November 2020

Thank-fall For You - Simple Stories - Cozy Days Collection

Hi everyone, Rebecca here with you today. I can't believe how fast November is going - I feel like I'm going to wake up tomorrow and find out it's Christmas already! Whilst there's still a few days of Autumn left, I thought I'd share another layout I've created using the 'Cozy Days' collection by Simple Stories.


Before starting this layout, I drew myself a rough sketch. I knew I wanted to have the patterned paper strips coming in from the edges, with mixed media behind it, but at the time of starting - I had no plans beyond that!

I've used white, textured cardstock for my background and have applied acrylic paint with a dry brush. I've used a dry brush, rather than adding water as I wanted the brush strokes to be more visible around the edges. I've then layered strips of patterned papers on top of the paint. I've used a longer strip of the '2x2 elements' paper (B-side) and a shorter strip of the 'Falliday' paper (also B-side). I've distressed the edges of both papers, adding some texture to my layout. I adhered the Falliday paper flat to my background using double sided tape, and used a layer of foam behind the floral paper to add some dimension.


I matted my photo onto white cardstock to help give it some separation from the page, and added a layer of green bazzill cardstock behind it from the Matchmaker Pack - distressing the edges, of course!

I absolutely adore the 'Tags' patterned paper in this collection so decided to use several on this layout. I've placed one either side of my photo, and two peeking out above my photo. I've made more of a statement piece of the 'Happy Fall Y'all' tag and kept pretty much all of it visible, as opposed to just using it as a layer as I have the others. I punched a hole through all of the tags and threaded a different colour embroidery thread through each one.


I fussy-cut a large fox, a couple of squirrels and two small floral clusters from some of the remaining tags and placed these around the base of my photo - keeping back one of the squirrels and one of the floral clusters. 


I added a few elements from the Journal Bits & Pieces pack - a round piece of ephemera which reads 'have a cozy day', an oval piece which says 'gather' and a couple of small word sentiments. I also spent a bit of time fussy-cutting lots of the leaves from the 'Harvest Wishes' patterned paper and clustered them around my photo, making sure that the colours were distributed evenly. 


I added more leaves behind the 'gather' piece to create a cluster towards the bottom of my layout and also positioned the remaining fussy-cut squirrel in this cluster too.


I added my title using two different alphabet thickers. I initially wanted to solely use the grey 'Aria' thickers, but they were a little bit too big so I found a smaller alphabet thicker in my stash which matched the collection perfectly, and also added a bit of sparkle to the page.


I finished my layout by adding a couple more fussy-cut leaves cascading down from my title along with the remaining fussy-cut floral cluster. 


If you'd like to watch how this layout came together, there is a process video up on my YouTube channel, which you can find here.

I hope you've enjoyed seeing the layouts I've created with this collection. There's still a few days left before we officially hit winter, so I may try and sneak another one in before we are all living, breathing and sleeping Christmas! I feel like before I know it, it will be upon me so I'd better start getting a bit more organised! 

I'll be back next month, by which point I'll be in full-on Christmas mode (snuck the 'C' word in again there!!) as I'm working with Simple Stories 'Jingle all the Way'.

Until then, take care and stay safe,

Rebecca x


Monday, 23 November 2020

Doodlebug Designs ~ Pumpkin Spice #2

Hello everyone! Welcome back to the Papermaze blog, I hope you're keeping well?
Today I'm sharing my second layout using the Pumpkin Spice collection by Doodlebug Designs. Take a look at the full collection in the shop here.


For this layout, I have used a Paige Evans cutfile, which I have backed using a selection of the patterned papers from the Pumpkin Spice collection as well as some coordinating cardstock. Some of the patterned papers that I used were 'Autumn Weave', 'Cutie Pie' and 'Forest of Friends'.

I mounted the finished cutfile onto a circle of teal cardstock, which made it stand out more.


I mounted my photograph onto the reverse side of 'Harvest Berries' and centred it in the cutfile.


I then had so much fun dotting a variety of the very cute stickers around the leaf wreath cutfile, I used the 'Icon Stickers' as well as the 'Happy Fall Shape Sprinkles' to do this.


Lastly I added a simple 'hello' title using the 'Doodlebug Sunshine Alphabet Stickers'.


Thank you so much for reading!
Take care, I'll see you next month for some Christmas fun!
Anna
X

Friday, 20 November 2020

Simple Stories - Winter Cottage -Thankful for You

 Hi everyone!

So brace yourselves....! It's nearing the end of November and I've jumped right into Christmas mode! I'm full of hope, excitement and of course, a little sparkle.

Today, I'm using the gorgeous Winter Cottage collection from Simple Stories.  Whereas last time I focused on those beautiful pink and green tones, today I'm throwing myself into the traditional red, green and gold colours which hold a special place in my heart.


I started my layout with some Premium White Cardstock which I offset and mounted on to a sheet of green Bazzill from the Matchmaker Pack

I put some Cosmic Shimmer sparkle texture paste through the Carta Bella Let It Snow stencil which I picked up in the Big Autumn Sale.  Unfortunately, it's sold out now but there's one specially made by Simple Stories as part of this collection which you can find here. 


I used this beautiful festive frame from the Layered Chipboard Frames which was the perfect base for two photos, and mounted it onto a piece of Season of Wonder paper, distressing the edges for texture.

The frames are larger than I imagined and are beautifully embellished which makes for a real eye catching element on your page.


Next, I fussy cut the stockings from the 4x6 elements paper and the gifts from the 4x4 elements paper. I placed a small tag from the Journal Bits & Pieces and small holly sticker on the other side of the photo for balance.


At the top of the photo, I added a tag from the Tag paper and added a heart sticker from the Sticker Sheet.

Now, it can't be a proper Christmas layout without a bit of sparkle, right?! So, out came the sequin ribbon from my stash which I ran along the edge of the white card and I added the 'Thankful for You' title from Pebbles 2nd Avenue Puffy Stickers.

As you can probably tell, I LOVE Christmas and revert to a 5 year old around this time of year so I'm really excited to share more festive layouts next month!

Until then, stay safe and take care

Claire 

xxx

Wednesday, 18 November 2020

Paige Evans Go The Scenic Route - Mini Album

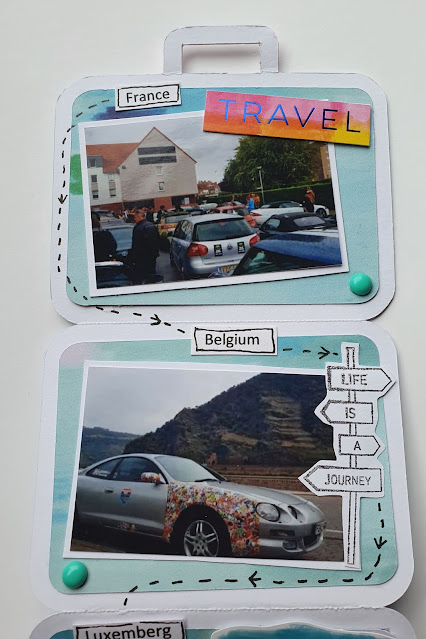
Hello, Karen C here again with another project using the Go The Scenic Route collection from Paige Evans. This collection is a travel themed collection so after creating three layouts with my design team kit I decided to create a travel themed mini album with what was left over. Last year my eldest son and a friend took part in a European car rally. It was quite an adventure as they visited 9 countries in 8 days. My son kindly shared his photos with me so I could create this album.


I found a cut file for a suitcase shaped mini accordion album in the Silhouette Studio and cut this from white cardstock. I then covered the front and back of the album with paper #21.

I strung a couple of the die cut tickets from the Journal Ephemera Pack and a camera charm from my stash onto some Bakers Twine which I used at the end to tie the album closed. I used some clear alphabet stickers to add the date and name of the car rally to the tickets.

A small wood veneer car from my stash was also stuck to the cover of the album. 

I used papers #2 on the inside pages of the album and stuck a 2x3 photo on each page. 

The pages of the album were kept simple and were embellished with stickers from the collection, travel themed images stamped onto white cardstock using some stamps from my stash......

and enamel dots.

I printed the names of the countries my son visited onto some white cardstock. The names of the counties were attached in the order of the trip and don't necessarily match the photos they are next to. I didn't have photos from every country as some countries were only visited for 30 minutes or were just a whistlestop visit to get some lunch en-route!

Finally, I doodled on the pages using a black gel pen.

I think the mini album is a nice keepsake of a memorable trip and the Go The Scenic Route collection was perfect for documenting this.

I hope over the last couple of months I've shown how versatile this collection is and inspired you to pop some of the collection into your basket when you next visit the shop.

Take Care, 

Karen x x


Monday, 16 November 2020

November Papermaze Kit

Hi Crafters, Lynn here today with the new Papermaze kit for November. Beautiful soft autumnal colours this time. Here are my first two layouts using the kit.


Just before looking at the processes involved in making these layouts, here is what is in the kit:

Patterned papers:
Cocoa Vanilla - Day Dream - Daisy Days and Sweet Serenity
Pebbles - Jen Hadfield - The Avenue - 2nd Avenue and 3rd Avenue
Vicki Boutin - Story Teller - Memoir
Pinkfresh Studio - Days of Splendor - My Favorite

Bazzill Basics - Coconut Swirl and Black

The reverse side of the papers:

Embellishments:

Tando Creative Mini Tags pack, 6 dew drops, mini black doily, strip wooden dots, Cocoa Vanilla Puffy Heart, 5 paper flowers, 24" Twine and Prima layered heart sticker

Extra Bazzill Pack:

Fawn, Guacamole, Coral Cream and Sea Water.

Grateful - This layout features a photo I scanned from an old photo of the children just off to Harvest Festival Service, with their decorated mushroom baskets filled with fresh fruit and vegetables. They are standing infront of the house and the row of potted giant sunflowers we grew that year.

The base of this page is the sheet of Coconut Swirl Bazzill from the kit. I splattered some Distress Paint (acrylic paint) lightly diluted with water over the page; I used Black soot and Spiced Marmalade.

Using the 'Daisy Day' paper, I gutted a frame 2cm deep and set this aside for the next layout. Then I fussy cut the wreath, which is quite fiddly as some pieces are very fine and you end up with three different sections. Using 3D foam pads I added two thirds of this onto the card in a circular formation. The photo was positioned, before applying the last piece of wreath upside-down at the base of the photo.


With the Funky Floral #2 Sizzix Thinlits die set, I cut some fronds with scraps of white cardstock and some of the
Guacamole and Sea Water Bazzill, these were tucked in around the wreath.

My title and the heart are stickers from a set of Thickers Puffy Phrase and accent stickers - Truly Grateful.

I embellished the larger flowers in the wreath with Nuvo Glitter Drops. Then added tiny drops of Nuvo Glitter Drops and Crystal Drops scattered on and around the wreath. 

Happy Halloween - This page shows my nephew and his family at Tulley's Farm, up to their ankles in mud picking out pumpkins for halloween.


With the frame cut earlier (daisy side up), I added a piece of 2nd Avenue paper measuring 27.5cm x 27.5 cm with the wood planks running horizontally, centrally over the top. I gutted a piece from this paper from the position and just less than the size of the photo. Set this aside as it will be used for another layout. Then I cut two strips of loosely woven burlap and stitched them in place with some DMC embroidery thread.

I used the black Bazzill and a cut file from Handipaper to cut out some pumpkins. I backed the hollows with Bazzill in
Guacamole (leaves) and Sea Water (flowers), with some tiny scraps of Kraft for the stalks. I used paper scraps left over from Daisy Day and some of the Memoir paper for the Pumpkins. 

After mounting the photo onto more of the Black Bazzill and placing into position raised on 3D foam tape, I tucked a cluster of pumpkins under the top right of the photo, and more over the bottom left.  

With a paint brush and a little Vintage Photo Distress Ink, I painted in some shading on the Pumpkins, leaves and flowers.


My title and date were made with a selection of old Basic Grey letter stickers from my stash.

that's all for today, but I will be back with two more layouts from the November kit in a few weeks.

Thanks for looking.
Lynn x