Monday, 20 February 2017

Naturally Beautiful.....Cherry Tree Lane

Hello, it's Anita with you today and I have been having a go at making my first decorated book.
 I have been working with Kaisercraft's beautiful Cherry Tree Lane Collection which has a wonderful vintage feel to it and combines with the age old art of letter writing, sending telegrams and old fashioned typewriters plus natures finest blossoms. This really is such a pretty collection!


I started with an old book that I had bought from a boot sale back in the summer and leaving the very first and last page out, I folded back 2 pages at a time, folded in half to the centre of the book. I carried this on right throughout the book and then gently inked the edges with an old ink pad.I also stuck the first and last pages down flat onto the front and back inside covers of the book.


Next I set about cutting pretty elements out from a sheet of Cherry Tree Lane - Letters (perforated) 
This is a heavier weight than the standard sheets and is indeed perforated into several sections 


I used the floral elements at the top and bottom of the book on alternate sides and then tucked various other letters, postcards and other ephemera in various places.
I used a sheet of Cherry Tree Lane - Leather to make a couple of Rolled Roses, you can see a youtube tutorial here 
and then added a few other paper flowers, along with some scattered punched out sprigs.


And to finish it all off I also added some wooden buttons and some pearly swirls, lace and and a pearly spray. I really quite enjoyed creating this, so I will probably try another one sometime with another collection.

Warmest Wishes
Anita xx

Friday, 17 February 2017

Seeing stars for February's crop...

We're around to February's crop already!  And this month there's lots of stars on the layout... so a photo of my eldest performing with his cousins seemed very appropriate!  The papers are a mixture of Crate Paper, Photoplay & Simple Stories.  


If you'd like to join us, it's £4 for the day, from 10am until 5pm, with free drinks and homemade cakes, punches & dies to use and a discount in the shop!  Just drop us an email :)

Wednesday, 15 February 2017

2016 captured

This post uses multiple photos capturing times of 2016. At the last papermaze crop i sat and spoke to Shelia and her lovey friend she sits next to (cannot remember your name but you know who you are).  well it always intrigues me as to how they compile there pages as they use lots of photo's on one page to create the story. So i decided to challenge myself after being inspired by these ladies and use as many photos as i dare to capture 2016.
Firstly i printed off lots of black and white mini photos and one large photo as my focal point.
Grabbed my prima  rossibelle paper pad and one 12x12 piece of Kraft paper.
Originally i wanted to do some stitching but i remembered some time ago a bought a set of stamps from Vanessa made by 49 and market. It was the Gabi's stitch line set ( Vanessa hasn't got any in at present but I'm sure she could get some)
I used this around the edge of my 12x12 sheet and then distressed my edges. I then went about adding lots of texture with gesso and masks, background stamps, strips of patterned paper and then sealed with clear gesso. Then i could go to town flicking paint and inks 


lots of messy fun as you can see. Each of my photos has been filled back which gives me a thin white edge. I finally added word stickers, small amount of hessian, and some delicate chip board by Scrap FX.


Here are some close ups


Monday, 13 February 2017

Crafter's Companion Gemini - A Review

Hi Lynn here today....  My Christmas gift this year was a Gemini die cutting and embossing machine - due to unforeseen circumstances I have only recently been able to go to the Papermaze store to buy it - so I am excited to finally introduce my new toy to you all.


I will run through what you get in the box, how to use the machine and what you can do with it.


What you get inside the purple box:

The machine itself (called 'Gemini' because of it's twin functions of cutting and embossing) and the mains cable. This machine is designed to exert a lot of pressure, making it excellent for intricate dies. The amount of pressure can be adjusted depending on the combination of plates and shims used (see below).


A selection of 16 dies


Three embossing folders (which coordinate with the dies).


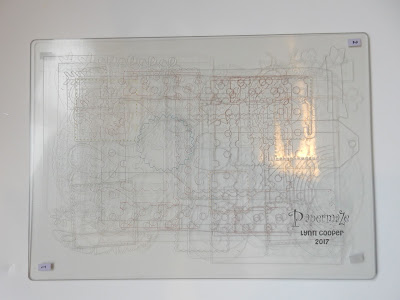
The 9" x 12.5" plates needed to cut and emboss & the user guide with photos of how to put the cutting plates together for the different functions. The combination of plates is referred to as a 'sandwich'.


The user guide has all the information and good illustrations for putting combination of plates and shims together to get the desired results, depending on what you are cutting or embossing.

OPERATING the Gemini is simply achieved using just three buttons.
Power, Pause / Resume & Reverse.
The motor will start automatically when you offer the sandwich into the front of the machine.
The motor will stop automatically when the sandwich has passed through the machine.

CUTTING PLATES
Clear (Top) and a Purple (Base) Cutting Plate. These two plates will always for the outer layers (the bread) of your sandwich, whatever function you are carrying out. 

It is best to keep the purple plate as the base of the sandwich and the clear plate as the top.
You will notice the cutting plates will bow over time due to the high level of pressure. This will not affect their performance. However the bowing can be reduced bu rotating and flipping the plated each time they are used. Replacement plates are also available and the top cutting plate will be the one that needs replacing most often as the dies will cut into this plate with each use. The plates are available from Papermaze.

TIP - to help you remember which way the plates are used each time it is useful to number to top left had corner of each side and end of the plate. I used tiny number stickers for this.


SHIMS
Magnetic Shim - This is used beneath the metal dies as a positioning plate, holding the die in place. It should not be used above your die or against the cutting surface of the die as the die will cut through it!

Metal Cutting Shim - This is a very thin metal plate and can be used at any level of the sandwich to increase the pressure. When used above the material being cut it will produce a stronger cut, so is ideal for very intricate dies.

Plastic Shim - This shim is used under the magnetic shim to increase pressure. 

Rubber Embossing Mat - for use when embossing with Crafter's Companion dies. After cutting the die, this mat is placed on top of the material which has been cut. The magnetic shim is removed as the cut shape is now in the die and will not move. The Sandwich is then run through the machine a second time to achieve the detailed embossing. I have found this is not always needed, as due to the high pressure, I am getting good embossing while cutting.

SNAP, CRACK & POP!!
Just a quick note about the noises of cracking plastic you may hear when the sandwich is travelling through the machine - It has not broken!!  This is normal due to the amount of pressure being applied to the plates.
 The machine itself will sound a lot deeper when you use larger and more intricate dies. 

Here are some of the results I have achieved:

These were all cut using the dies included with the Gemini. It is difficult to she how well they are also embossed.


I tried cutting a variety of dies from different manufacturers just to see how well they worked - no problem with any of them. I used QuicKutz, Sizzix Thinlet, Spellbinders, Marianne Dies, X-Cut, Elizabeth Designs, Hero Arts, WPlus9, Pink Paislee, free magazine dies, DIE namics, Lawn Fawn, Whimsey, Britannia, Impression Obsession, Little B, Memory Box, Creative Dies, Cuties, Lil inker and of course Crafter's Companion.


Next I experimented with different materials, most of these cut easily and the guide says you can cut up to 2mm in thickness. I tried cork, felt, self adhesive glittered foam, funky foam, self adhesive burlap, furnishing fabric (cuts up to 6 layers of thin cotton fabric), corrugated card, grunge board, glitter card, velvet effect paper, patterned scrapbook paper, water colour paper, mesh, lace, cardstock, vellum (an extra shim of copy paper can be used with very fine materials, but I didn't need it.), acetate, miri card, magnet, wadding, mulberry paper, embossed foil, hand made paper, Fablon and a doily.


EMBOSSING
When using embossing folders, you only need to use the two plates (clear and purple).
The embossing folder itself adds pressure. 
I tried out all three embossing folders supplied and then several more from my supplies.
I used Sizzix, Tattered Lace, Couture Creations, Crafts Too and Cuttlebug.


I found the machine very simple to use, everything needed is in the box. It has been made with intricate thin metal dies in mind and getting a good clean cut and embossed effect where relevant. Therefore it will not take thicker dies like the Sizzix Bigz dies. I will be keeping my Big Shot handy for cutting thicker dies. 

There is a PDF of the user's manual available HERE.

After trying all the functions, and because tomorrow is St. Valentine's Day, I decided to make a card and tag using the embossing folders and dies included with the Gemini.


I hope you have found this helpful and please comment below or ask any questions you may have.

Thanks for looking
Lynn x

Friday, 10 February 2017

Lets journal!!

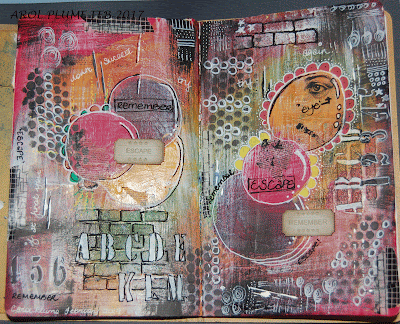
Hi, Carol with you today… I suppose in this month of Love, and so near to Valentines my blog post should be about love and cupid…well, its love in another way!! I love to art journal so I'm going to share a disaster and a recovery with you.

For my last blog post, which didn't happen, I decided to do a journal page.  The base was prepped, using a dress makers pattern and pages from a dictionary adhered with multi medium…more texture was added using ranger texture paste and a brick stencil by Tando.  Dylusion paint was added using my fingers, creating large circles which overlapped… I then decided to add some paperartsy infusions… they wouldn't come out of the jar so I tapped a bit hard and then added water and ended up with a right mess! (shock took over and I forgot to take pictures lol) - so, gesso sprung to mind, added a layer and left it to dry over night… this is what I woke up to!


The infusions have come thro the gesso and so have one of my circles (there were three!) ummm not to be beaten I started again by adding some texture to the base...


 I then added some dylusion paint, once again using my fingers…. some stencilling, doodling with the fab dylusion paint pens in black and white (ring Vanessa she has them in store just not on the website yet), some Tim Holtz rub ons, I then added washi tape and some lovely ticket embellishments from Dusty attic and here you have one recovered art journal double page spread….


TFL xx

Wednesday, 8 February 2017

Photoplay ~ My Imagination


Hi, it's Anna here today. I have a layout to show you using photoplay - my imagination. I had lots of fun with this lovely paper and it really inspired me to create this layout of my son.
He loves Lego so I just had to use this patterned paper.


I cut around the pieces of Lego and then cut out some individual pieces and layered them up with some 3D foam pads to achieve a Lego effect.


Wednesday, 1 February 2017

Valentine Cards with Simple Stories Love & Adore

Hi I'm here to share with you some Valentine cards with the Simple Stories Love & Adore Collection,  this collection celebrates all things love and so with that in mind I used one of these cards for my dear hubby's birthday today. 


Before I share the cards, I just wanted to share a very simple way to pretty up a gift.


I wrapped the box in some brown paper, added a string bow, then I simply added one of the tickets that came in the ephemera pack....... there I told you it was really easy, I think it looks really effective for minimal effort.


I love to mix old with new I used some pieces from the chipboard pack to create part of my sentiment and then I found some older thickers to make up the rest. I'm sure lots of us have some packs that have been sitting around for ages, if you don't you can just pop over to the shop HERE and there is a massive selection in stock.


I kept with the same theme of my first card, with the Love title and this time I cut it from one of the sheets of paper in the collection I added another cut apart piece from the 6 x 6 pad and joined it together with a little washi tape. I also cut one of the XO's from another sheet leaving a small white edge so they stand out a little.

Some of the pieces I used on my cards were remnants of a layout made with the same collection that I will be sharing later in the month. 
Happy Crafting 
Tracee x