Tuesday 30 July 2013

Bo Bunny Mama Razzi final projects

For my final project with this gorgeous paper I created another layout & a card

I love the film strip paper and cut a thick strip and placed down the left hand side of the page along with some smaller strips of the other 
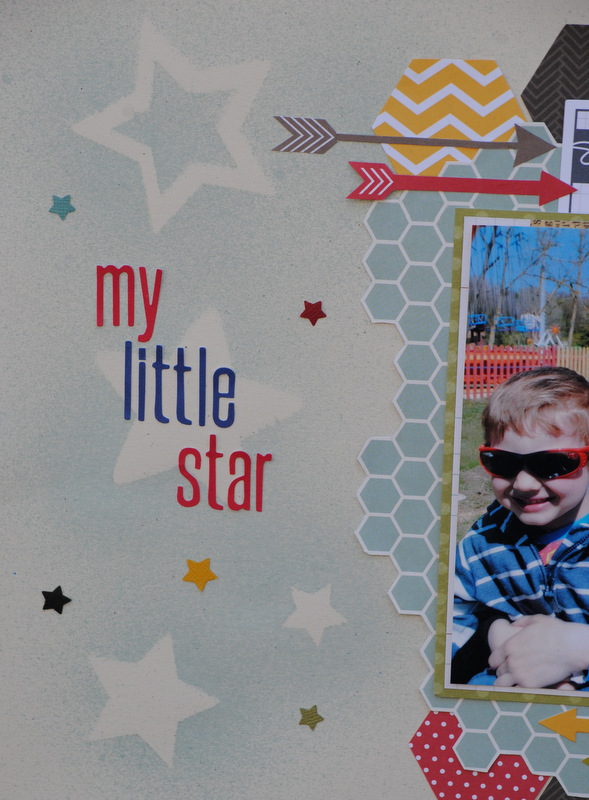
papers. The right hand side of the page I left quite clean and just added stickers and light stamping & misting. For my photo mount I used the packaging from the stamp set, nothing goes to waste!

I still had some scraps left over and I made a quick card using the same masculine design as I used on this card
I added some of the Bo Bunny etc collection that you can find in the Summer Sale right now. Again using some vellum to create the shadow effect of the car, I can see me using this design for a few more cards yet!

I hope you enjoyed my projects with the Mama Razzi2 collection, they were certainly fun to create


Thursday 25 July 2013

Take a look at July's kit

July's kit is full of gorgeous fresh colours and features papers from Fancy Pants and Jillibean Soup, with popular designs such as chevrons, butterflies and journaling cards! 


The backs of the papers are much plainer, in greys, creams and blues, and so ideal for backgrounds...


With the embellishments we have included a whole pack of die-cut shapes - there are loads of lovely designs in this, from tickets, and butterflies, to arrows, polaroids and titles:


The other embellishments include washi tape, chipboard clouds, some stylish stix from Queen & Co, a Prima butterfly clip, some twine, lace and dewdrops. 


July kits are available for sale here - check back soon to see what we're creating with it!

Monday 22 July 2013

An altered photo frame and Bo Bunny

For my second project with these papers I wanted to create a little altered project as the sticker sheets from the Mama Razzi2 collection were perfect for little word and camera accents.
I found this frame at one of the cheapy stores (it was £1.49) and thought it would work for a series of pictures I had, so I set about altering it.


I took some sandpaper and just sanded off the surface of the frame so that the glue would adhere to it better, then I distressed the edges to give it a more shabby look
I cut 3 strips of paper after measuring the sections and then used the actual frame as a template for the openings. I cut these out, on the middle section I left one covered so that I would have a larger area for a focal point.
I added a camera cut from my cameo in black cardstock a wood veneer camera and added the oh snap and smile sticker underneath to create a "title" for the frame.

When I had finished adding this was the result

I love how these papers work so well together adding pops of orange and red for contrast.
I still have one more project to share with you later in the month, meanwhile why not grab yourself some of this great collection at the shop
Plus there is a SUMMER SALE on right now perfect for some great bargains!
Tracee x


Friday 19 July 2013

July Crop

Already its that time of the month where our local ladies all gather in the Otley Village Hall for a day of cropping and socializing!
Tomorrows kit has been kindly designed by one of our regular ladies, Janet, and involves some texture paint, inks, misting and masking...so prepared to get dirty fingers!


Janet has used some stamps from Dylusions, which are very much suited to a masculine layout but the page leaves the option to replace these with your own stamps if desired. There are also some additional products added to the kit which Janet has not used on her page.

We welcome all crafters, new and old so if you are looking for a day out with a friendly group, somewhere where you stay out of the heat we are having at the moment then either send us an email to reserve your place or simply turn up...we'll soon make a space for you :-)

Crop times: 10am-5pm
Price including refreshments all day £4
Optional Kit Available
Venue: Otley Village Hall, Otley, Suffolk.

Wednesday 17 July 2013

Prima Lifetime

Hi everyone, Today I would like too show you a layout I created using a new Prima line we have had in for a little while called 'Lifetime' and show how I altered a plain title to match the papers.

So heres my layout.... I love the style of these papers with their doodled edges and watercolour effect elements.

However, I couldn't seem to find title stickers that I was completely happy with, so I chose to alter a plain white die-cut title.
I spritzed a little of some Glimmer Mists that coordinated with the papers into a watercolour paint tray and added plenty of water to lighten them. I used a large brush to build up the watered down mists on my title until I was happy with the colours. I then took inspiration from the subtle stamping on some of the elements on the papers and used a small text stamp and light grey Memento inkpad to add some texture.  


Here you can see the finished title a bit closer. It is almost a perfect match to the flowers I cut out from the Blue Bayou paper:-)

Sunday 14 July 2013

Fun with the June Kit - Part 2

Hi, It's Anna here today. I'm back with my second layout that I have created using the June kit, which you can find here in the shop. 


 For this layout, I have used some glimmer mist and misted around the chipboard stars. I placed them randomly on the left hand side of my page and used them as a mask. 
Again, I used the lovely hexagon shapes in the patterned papers that are great for cutting out and layered them together before mounting my photo and placing it in the center. 


I used glimmer misted star side of the page to add the title, followed by some punched out stars using the coordinating cardstock. 


Thanks for looking, I hope you enjoy using your June kits! 

Wednesday 10 July 2013

Bo Bunny Mama Razzi2 and a Sketch for July

Hi Tracee with you today, back from my trip to the US fully refreshed
This month I will be sharing with you some projects I created using the  Mama Razzi2 collection by Bo Bunny
I don't know how I didn't already own this Mama Razzi2 collection  but it certainly is one not to be missed.
It has all sorts of patterns related to photography in a great colour scheme with some super embellishments and stamps to match
My first project is a layout and a sketch. I chose an older sketch by Page Maps for this month
I flipped it and this was the result

I used some Gesso to create my strip across the page. Gesso has become an essential tool in my kit.
I cut up one of the stickers from the Photo Op sheet to make a smaller sub title in a banner shape. A handy tip is if you don't like a sticker quite the way it is then just cut out the part you want to use, rather than disregard it (or you can cut it in half to make it last twice as long!).
I used a cut file on my cameo for the hearts flourish at the side of the photo and used some of the Oh Snap sheet to add in a little red
Finally I added the word FOCUS directly onto my photo using the Combo sticker sheet

 All supplies for this layout can be found in the Shop

If you would like to play along please share your links in the comments below. We would love to see.

Tracee x

Saturday 6 July 2013

Fun with the June Kit...

Hi, it's Anna here to show you my first layout for this month using the June kit. I've had fun using this kit, there are several sheets of patterned paper included where various elements can be cut out and some lovely embellishments...here is my page...


I used a sheet of cardstock as my base and cut out several hexagon shapes from the 'Hello' paper. I used Lou's mask 'today' by tracing around it on to the 'cork' paper and then used a craft knife to cut it out. It was a bit fiddly to do, but I was pleased with the finished result, it looks as though it could have been done on a circuit machine. 


I also cut out some of the arrows from the 'good stuff' paper and layered them on top of the hexagons. I then added some wood veneers and the brads randomly as well as stamping some arrows. 


I'll be back soon with another layout using the June kit, you can find the June kit here on the website. 
Thanks for looking. 
Anna