Monday 31 October 2022

Pockets, Tags & Layers

 Hello, Lisa here with pockets, tags and layers.


I'm creating in my Disneyworld journal today.

It's not a disney page though it's more of a memory page. 

We went back to the resort that we used to stay in years ago and it's also where we got married in 2007. So it's more of a 'then & now' page. 


I've used the 'Garden Shoppe' collection from Paige Evens here.

It was this paper here that inspired me and caught my eye.

I layered some of the frames from this paper with some of the coordinating die cuts.

I took some green embroidery thread and sewed around the frames to add more texture and colour.

I also used some alphabet stickers from Doodlebug Designs.

These are my favourite alpha stickers.


Over the side I had a few photos and some stories to tell, so I created a pocket and some little journal tags.


I distressed the edges and stapled a loop from scrap paper to the top of each one. 

This way they pull out of the pocket easily.


The tags flip over and I've journaled and added more die cuts.


I've also cut up some word strips from one of the patterned papers and added too.


I'm so happy with this page and love how easy this collection made it all come together.
I do have a process video to go with this page here.


Happy scrapping

Lisa x

Friday 28 October 2022

Hitchin Lavender - Paige Evans’ Garden Shoppe Collection

Hello, it’s Rebecca with you today sharing my final layout created with Paige Evans’ Garden Shoppe collection. I’ve used this collection to document a few summer photos now, as the bright colours are perfect - but I also think this collection could work for Autumnal layouts too - so that’s my next challenge! You can shop the full collection here.


I started with Paper #19 and cut a strip about 7 inches wide, tearing it diagonally along the bottom to add some texture. I placed this centrally onto a sheet of Premium White Cardstock - sticking the top flat, but raising the torn edge up on foam pads. To the top of this, I added the flower border sticker from the Accent and Phrase Stickers. I then replaced all the internal flowers, but raised up on foam to add a bit of interest. 


I matted my photo with a layer of the B Side of Paper #19 to coordinate with the colours in my photo, and placed it onto the layout, raised up with foam. 


I then moved on to embellishing the layout. The photo I’m documenting today is of my little boy sat among a field of lavender - so I wanted lots of florals on this page. The Floral Ephemera pack was perfect for this - I added a few flowers to the page, arranging them in  three clusters to create a visual triangle around my photo, and curled the edges up to add dimension. 


For my title, I selected some of the alphabet stickers from the Sticker Book. I went for a mixture of colours for ‘Hitchin’ to coordinate with the background paper, and then focused on the purples for the word ‘Lavender’. (The Lavender Farm is in a place called Hitchin!)


To complete the layout, I added a sprinkling of sequins among my floral clusters to add a bit of sparkle. 


Thank you for reading! I hope you’ve enjoyed this layout and the previous 2 I’ve created with the Garden Shoppe collection. I’ll be back next month, creating with Simple Stories ‘Harvest Market’ collection. 


Take care,


Rebecca x

@preciouspagespapercraft

Wednesday 26 October 2022

Vicki Boutin - Print Shop - Hey Friend!

Hi everyone,

Claire here with you today, sharing my second layout with the wonderful Vicki Boutin Print Shop collection. 

I mentioned in my first post that this collection is incredibly versatile, and true to form, my second layout is completely different to my first.

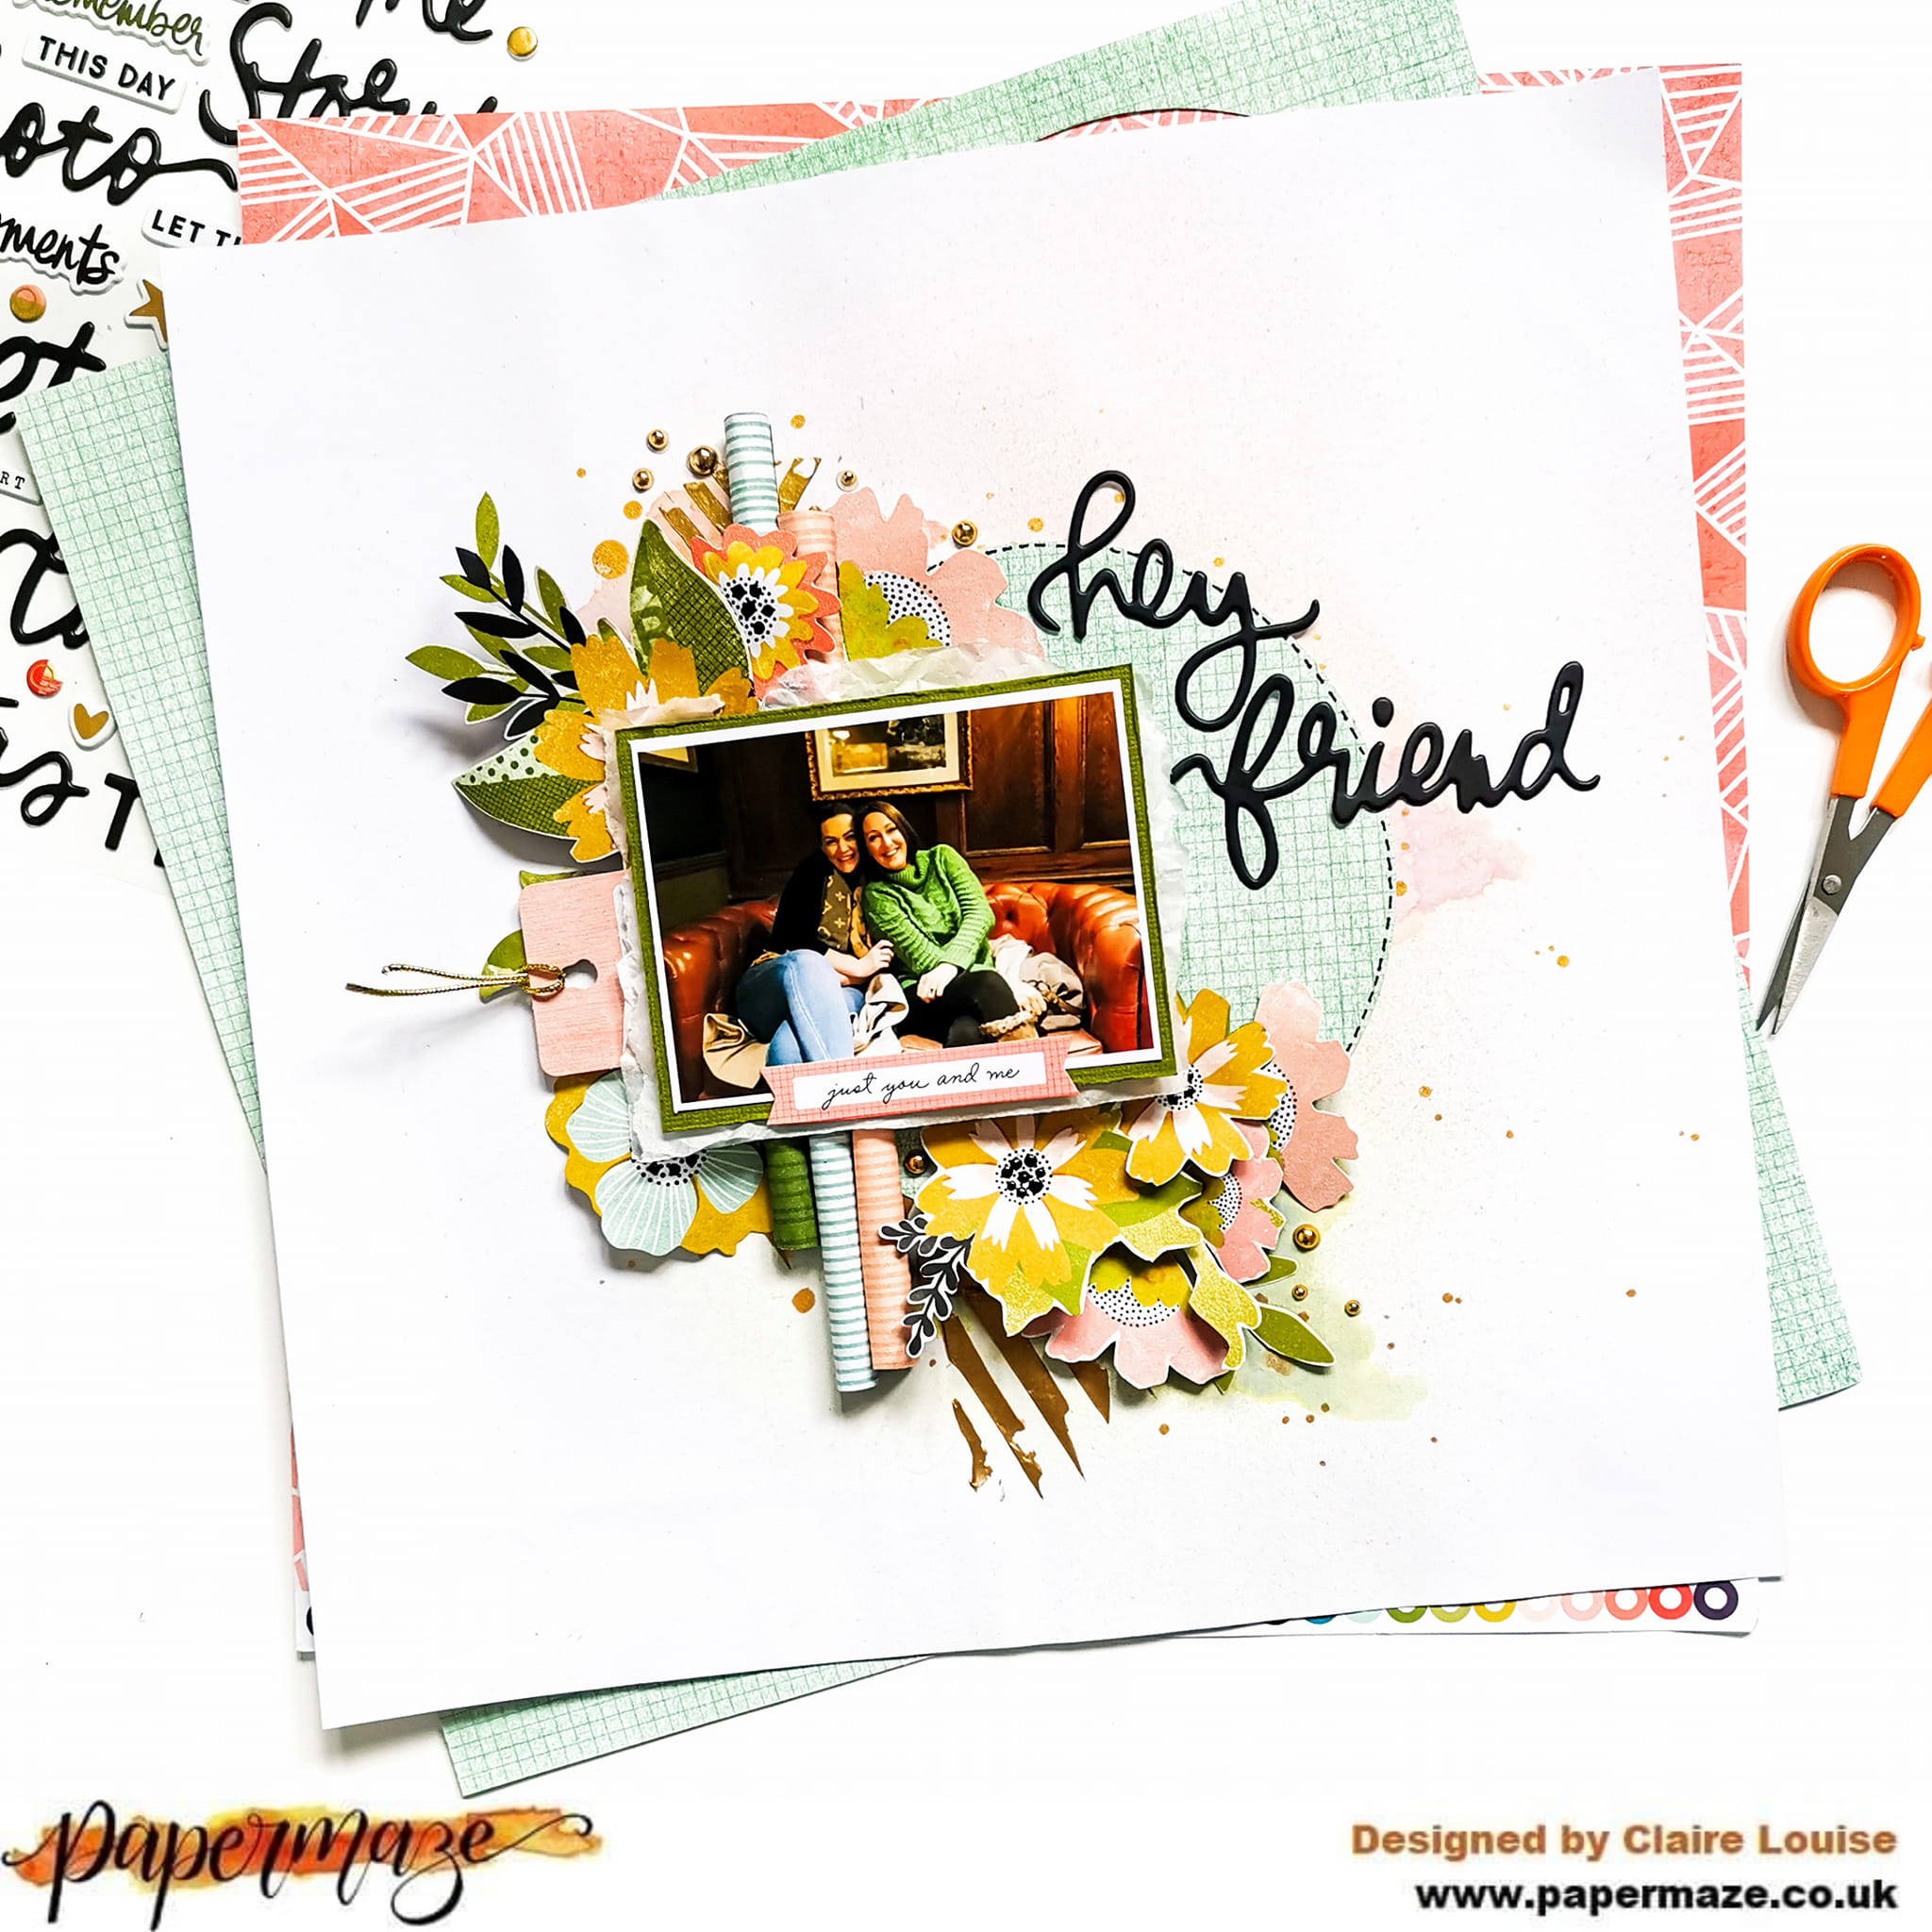
This time I am focusing on the soft pinks, teals and yellows to create this beautiful floral layout.


As usual, I started with Premium White Cardstock and applied a generous coating of gesso as I planned to add ink to my background.

I left it to dry overnight before applying Distress Oxide Spray in Tattered Rose and Bundled Sage. I also added some gold splatters to the background before building the layout.

I love the stencils in this collection, and used one that almost has chevron lines to create extra texture by applying gold texture paste on to of the distress oxides.


Next, I cut a circle of patterned paper from the b side of the Star Gazer paper. It's a beautiful soft teal colour with a grid pattern on top. 


I stuck this flat to my page on top of the mixed media to act as an anchor. To help give it more definition, I added a dotted black line in black pen to the outer edge.

Next, I made three paper rolls using strips cut from the Etched paper, adhering them to the patterned paper circle with Glossy Accents.


I mounted my photo using Bazzill cardstock from the Matchmaker Pack and some tissue paper from my stash. I lay the photo on top of the paper rolls, adhering with glossy accents to ensure a strong hold.


Around the photo, I created a diagonal line of florals. I picked out any yellow and pink flowers from the Floral Ephemera Pack, a cut some extras from the Flourish paper. To create extra dimension, I curled the petals of the flowers before sticking them down just in the centre.


For an added touch, I added some black Nuvo Drops to the centre of some of the flowers, giving them a high gloss look. I also used a beautiful pink tag under my photo for extra interest. This is from the Journaling Pack.

To my photo, I wanted to add a small tab from the Journaling Ephemera Pack, drawing on the pink tones from the flowers.


For my title, I used one of the Perfect Day Phrase & Accent Stickers. These are a real 'Must Have' as they do all the hard work for you. Such a great part of Vicki's collections.


As a final touch, I added some Pinkfresh Studio Essential Jewels in gold and that was the page done!


Hope you've enjoyed this layout, and it has shown how versatile this collection can really be! I have tons of papers and embellies left over so there's plenty of ideas still to try :)

Take care,

Claire

@scrappysoulmate

Monday 24 October 2022

Paige Evans ~ Garden Shoppe #2 🌸

Hi, it’s Anna back with you today! I’m sharing my second layout using Garden Shoppe by Paige Evans.
You can find the collection in the shop here

So for my second layout, I focused on using Paper #24
I selected twelve of the squares and arranged them on my cardstock forming a grid.


I printed a selection of small square pictures from when I visited Green Park in London last month to lay flowers in memory of the Queen. 
I adhered these onto the patterned paper squares. 


I then began to add embellishment to the remaining squares. I used floral ephemera, word and phrases sentiments from Paper #23 as well as some Paige Evans stickers from a previous collection.  
I also used some scraps of paper to hand cut some hearts, adding some Nuvo Drops in the centres. 


Thanks so much for looking! 

See you soon for one more layout using this collection! 

Anna 
X

Friday 21 October 2022

Carta Bella Welcome Fall - Hello Fall - Ephemera Frames & Tags

Hello again. Karen here with another scrapbook layout to share using Carta Bella's Welcome Fall collection. For this layout I have used a pack of the Ephemera Frames and Tags. The pack contains 34 coordinating die cut frames and tags which are perfect embellishment for autumn layouts and I used 12 of them on this layout.


I started with a sheet of the Fall Flannel paper and in the centre of this added an 11" x 11" sheet of white cardstock and a 10" x 10" sheet of California Poppy Bazzill Cardstock. To add some extra interest I then machine stitched round all the edges with white thread.

My 4" x 6" photo was matted on gold mirror card and placed in the top left corner of the red cardstock with some 3D foam underneath to raise it up.

I then selected some of the pieces from the frames and tag pack and arranged them in a grid on the red cardstock beside and below my photo. 

I backed some of the frames with some hessian to give some texture to the layout and added extra die cuts to the centres.

One of the die cuts was also matted with hessian. I think the hessian give the layout a bit of a 'country' feel.

Tags were threaded with some orange bakers twines.


A few sequins were glued to some of the tags for a bit of sparkle.


All the die cut pieces were glued to the layout and 3D foam was placed underneath them all for dimension.


Thank you for dropping by today. I hope you like this layout and feel inspired.

Take Care, Karen x x

Monday 17 October 2022

October Papermaze Kit - Part 1

Lynn here today, with my first two layouts made using the new Papermaze Kit for October. A beautiful collection in subtle colours. For my first post, I made a wedding layout and a heritage page.


 Before looking at how the layouts were made, here is a look at what's in the kit. 

Patterned Papers:
49 & Market - Serenity - Brief Glimpse & Fluttering Trio
Mintay Papers - Grandma's Attic - #05 & #06
P13 - Lady's Diary - #02
American Crafts - Vicki Boutin - Print Shop - Typeset

Bazzill Basics - Touch of Pink & Rain

Reverse side of papers


Embellishments:
12" cream lace, Mintay Clock Chippie, vintage label plate, pinch of clear gems, large Prima flower, 3 large pearls, resin flower, 4 pearl hearts, 5 wooden leaves, Thought Token, leaf charm


Extra Bazzill Pack - Aloe Vera, Blue Star, Almond Cream & Casa

Wedding Guests - My daughter and her husband at a friend's wedding earlier this year.


I used a spare sheet of 12" x 12" paper as a base for the layout, then set about building the background with papers from the kit. I trimmed the 'Typeset' paper to 15cm deep and tore along the bottom edge. At about 12cm in from the right, I tore up from the bottom by a few cm.

From the remaining piece of 'Typeset' I tore a turquoise strip from the flip side, and tucked this under the previous piece. The bottom area of the layout was filled with 'Grandma's Attic #05'.

There is already a flicked black ink design on the paper, I added to this by flicking Cosmic Shimmer, Shimmer Mists (Bronze Blush and Ocean Sunlight) over the page. 

The photo was mounted into a chipboard frame (Scrapiniec), and placed to the left side of the layout. I ran a length of pleated ribbon across the layout, 10cm down from the top. 


The large paper rose from the kit was fixed at the top of the tear in the paper, and I added three of the wooden ferns. With some embroidery thread I attached the leaf charm to dangle from the rose. 


I placed the resin rose at the base of the photo, together with the remaining two wooden fern leaves.

My title was created with some Authentique Petit Type letter stickers and some die cut letters, using more of the 'Typeset' paper. 


Finally I scattered pearls, sequins, gems and Nuvo Glitter Drops over the page. 


Herbert Claude Banks - A family history page made with this cute photo of Herbert as a small boy.

Using the P13 Lady's Diary paper, with the sage side uppermost, I used some Distress Mica Stain Sprays to age the backdrop.

From Grandma's Attic paper #06, I cut five of the frames, trimming around the shape of some with deckle edge scissors. Each of these frames were inked with Gathered Twigs Distress Ink. I arranged these pieces onto the background paper, then mounted my photo in the centre.


I took the clockface from the kit, inked it with more of the Distress ink, then placed it onto the bottom right of the layout.


Flipping the remainder of the #06 paper over, I fussy cut lots of the elements, inked the edges and arranged them on the layout. I attached some with glue and others with 3D foam pads.


I used the Vintage Label Plate from the kit to add the dates of Herbert's life. I backed it with a scrap of the patterned paper, then added numbers cut from Bazzill with the Tim Holtz Sizzix Thinlits Tiny Type set.


Using the Tiny Type upper and lower alpha dies, I cut the name and place titles. 


That's all for today, I will be back soon with more from this kit.
Thanks for looking
Lynn x