The rain is continuing here over Easter, but no time for crafting today, as we've been busy stocktaking! Still, I've found time to hide today's egg on the website, so here's your clue:
What is the Christian name of the actress who played DS Ellie Miller in Broadchurch?
Don't forget to come back tomorrow for the final clue and the details of how you can enter!
Happy hunting :)

Saturday, 31 March 2018
Friday, 30 March 2018
Day 5...
I hope you have all had a lovely Good Friday :) It's been wet and dull here, so plenty of time for some crafting! Anyway, onto today's clue and it's time for a picture to brighten things up a little! All you have to do is name this fruit...

Happy hunting :)
Happy hunting :)
Thursday, 29 March 2018
We're halfway!
It's Thursday and we're halfway through our Easter Egg Hunt! I hope the clues are helping you to find the eggs that are hidden around the website :)
So, without further ado, let's get on to today's clue:
Josh Gad provided the voice for which 2013 Disney character?
Happy Hunting :)
So, without further ado, let's get on to today's clue:
Josh Gad provided the voice for which 2013 Disney character?
Happy Hunting :)
Wednesday, 28 March 2018
Today's Clue...
Two eggs down, five more to go! Today's egg has been hidden on the website, so here's the clue you need to be able to find it!
What is the nut of an oak tree called?
Happy hunting :)
What is the nut of an oak tree called?
Happy hunting :)
Tuesday, 27 March 2018
Day 2...
Welcome back to our Easter Egg Hunt! Hopefully you managed to work out the first clue yesterday, in which case you need
to keep your answer safe until the end of the hunt. If you didn't
find it out, don't give up - you have until Sunday to locate it!
We've just hidden the next egg on the site and so we're on to the second clue:
What was the name of the American TV sitcom that featured the character The Fonz?
We'll be back tomorrow, in the meantime, happy hunting!
We've just hidden the next egg on the site and so we're on to the second clue:
What was the name of the American TV sitcom that featured the character The Fonz?
We'll be back tomorrow, in the meantime, happy hunting!
Monday, 26 March 2018
It's that time of year...
The week leading up to Easter is traditionally the time that we have our Easter Egg Hunt on the blog - and this year is no different!! Every day from now until Easter Day we'll hide an egg on our
website - and all you have to do is find it!

As there are thousands of products to look through, you might need a bit of help, so each day there will be a clue on the blog. Your job is to work out the answer and find the egg on the website :) Make a note of the manufacturer and product, then once you have all seven answers you can email them to me (details on Sunday). And, and always, there is a prize to be had. This year we'll be giving away a £40 gift voucher to one lucky person (whose name will be drawn at random) - and we'll also be giving away three £10 vouchers to three runners up!
So let's get started with your first clue:
According to the song, the mouse who lived in old Amsterdam lived in what sort of building?
Once you've worked out the answer, pop over to the shop to find the egg and keep a note of it. And remember to come back tomorrow to find the next egg!
Happy hunting :)
Friday, 23 March 2018
Simple Stories ~ Travel Notes
Hi, it's Anna back with you today to share my latest project.
This time, I have been working with one of the new Simple Stories collections - Travel Notes. I love Simple Stories and the latest releases certainly didn't disappoint. Take a look at the Simple Stories collections here and you can view Travel Notes in more detail here.
I have made a multi photo layout with this collection, it focuses on the patterned paper - see the world. I love the world map print on it and really wanted to create a layout with it.
My layout documents all of the countries that my son has visited so far, with a photo from each country. I wanted to buy a new world map print to go in his room to replace an old torn poster. But when I saw this patterned paper, it inspired me to create my own, which has made it more personal to him.


Thanks for looking!
Have a lovely weekend.
Anna
X


Have a lovely weekend.
Anna
X
Thursday, 22 March 2018
Let me introduce myself....
Hello everyone... Let me introduce myself for those who don't remember me. My name is Wendy and I live in Suffolk. I actually don't live that far from Papermaze which as you can imagine is truly horrifying for my bank account! I am married and have a teenage son.


I was one of the original members of the Papermaze design team when it first started. I took a break from scrapbooking to have my hand operated on when I developed carpel tunnel in my hands. But the break turned from 6 months to a few years! In fact I sold 90% of my scrapbooking room.

About a year ago I got the urge to re start again...and here I am...and I am not planning on stopping this time. And it's amazing how big your stash can grow in a year!

I had to give up work a few weeks ago due to a medical problem which you can read about here... so now I have lots of time and energy to scrapbook. So when Vanessa emailed a few weeks ago and asked me to come back I said yes.

My favourite scrapbooking supply has to be pattern paper, it is my most favourite thing to use.

The reasons I scrapbook have changed over the years. It started out as a way to document my sons life. But as he is now a teenager and in his own words 'I would be soooooo embarrassed mum if you put my photo on the internet' insert eye rolling and your there!!! lol.

Now I have moved on to trying to focus on other moments in my life. Or photos that have his approval!

Anyway...thats me. I am looking forward to being back on the team. Thanks for stopping by!
Tuesday, 20 March 2018
Live Out Loud with Doodlebug So Punny

My girls always take great "scrapping" selfies, and sometimes they're crazy like this one of them stood on decorating stilts! Live out loud seemed like a perfect title. I'm sorry the photo isn't quite straight, the Beast from The East has made life difficult for photos too!

I used a cut file from paper Issues for both the title and behind the cardstock. I cut both the stripey and the black polka dot paper out in a curve to save wasting too much. I filled the spaces around the title with the heart stickers from the Icon Sticker Sheet.

I couldn't resist adding the cactus stickers to the bottom of my photo, I also sneaked in a wood veneer word from my DT pack. I kept my layout fairly simple as the cut file was quite a busy one. I had fun making this page and I seem to have adopted the 8 x 8 format for all my scrapping. I had great fun making this page and I hope I have given you some ideas for your next layout.
For this page and all your scrapping needs please head on over to the SHOP
Friday, 16 March 2018
March Crop
This month's crop looks as though it may be accompanied by a dusting of snow... It seems quite appropriate, as the photo I've used in this month's kit is from the snow we had in February!

Cakes are being baked as I type, and there will be the usual refreshments, array of punches and dies, and a 10% discount in the shop :)
Wednesday, 14 March 2018
Leave room in your garden for the fairies...... Light up Box Frame using Fairie Dust by Graphic 45
Hello again,
It's Anita with you today with another project I have made using the beautiful and magical Fairie Dust collection from Graphic 45.
This deep box frame started out looking bland, black, empty and unloved, left on a shelf in my craft room ....but now takes pride of place on my lounge sideboard....with the addition of a string of tiny lights set inside it glows gently in the evenings and just looks lovely.


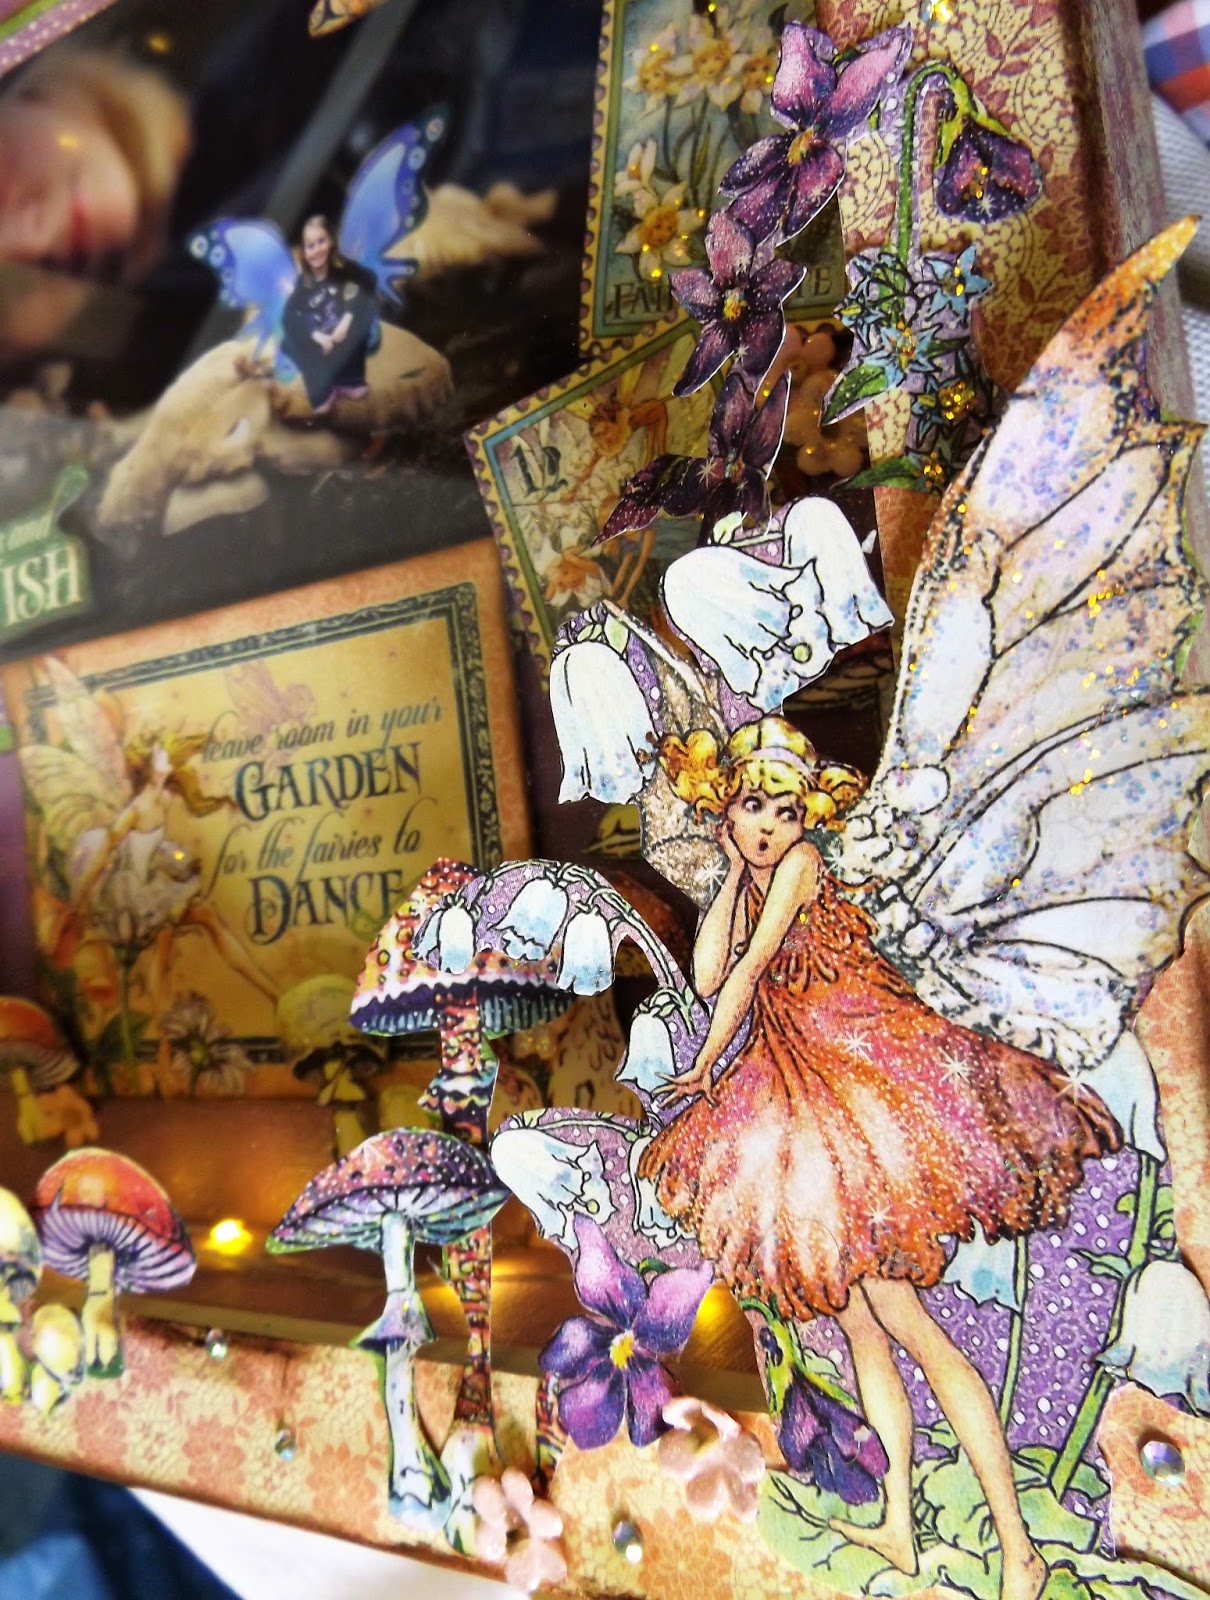
I then started fussy cutting.....not going to lie, it took forever with all of the little toadstools, mushrooms, fairies and blossoms etc but I do think it was worth it

These fab papers are covered in so very much detail, the more you study it, the more you see!
There are dear little fairies, pixies and enchanted flowers everywhere and so I cut as many out as I could manage and I placed then around the outer edge of the frame.


It really is pretty when its alight, but difficult to photograph to do it justice.

I added layers to the frame to create dimension and finished the whole thing off by adding a string of dainty copper wire lights to the inside edge.

Thank you for looking at my work and don't forget, if you want to have a look at some gorgeous scrapping and card making products then simply pop over to the SHOP and have a good look round, there is so much to choose from.
Happy Scrapping!
Warmest wishes
Anita xx
It's Anita with you today with another project I have made using the beautiful and magical Fairie Dust collection from Graphic 45.
This deep box frame started out looking bland, black, empty and unloved, left on a shelf in my craft room ....but now takes pride of place on my lounge sideboard....with the addition of a string of tiny lights set inside it glows gently in the evenings and just looks lovely.

I lined the back of the box and the inside of the frame with a sheet of lilac Bazzill, which I had given a liberal coating of Glitter Spray to, so it sparkles nicely when captured by the light.
I then covered the out side of the box frame using a sheet of Daisy Chain
which I gently swiped on the edges with a dark brown ink( fairly dried out pad)

This was closely followed by some rosette making, using some strips taken from a sheet of
Magic Wishes and running them through a Tim Holtz Rosette Die cut strip and popping a sparkly, textured cabochon for the centres

I then started fussy cutting.....not going to lie, it took forever with all of the little toadstools, mushrooms, fairies and blossoms etc but I do think it was worth it

These fab papers are covered in so very much detail, the more you study it, the more you see!
There are dear little fairies, pixies and enchanted flowers everywhere and so I cut as many out as I could manage and I placed then around the outer edge of the frame.
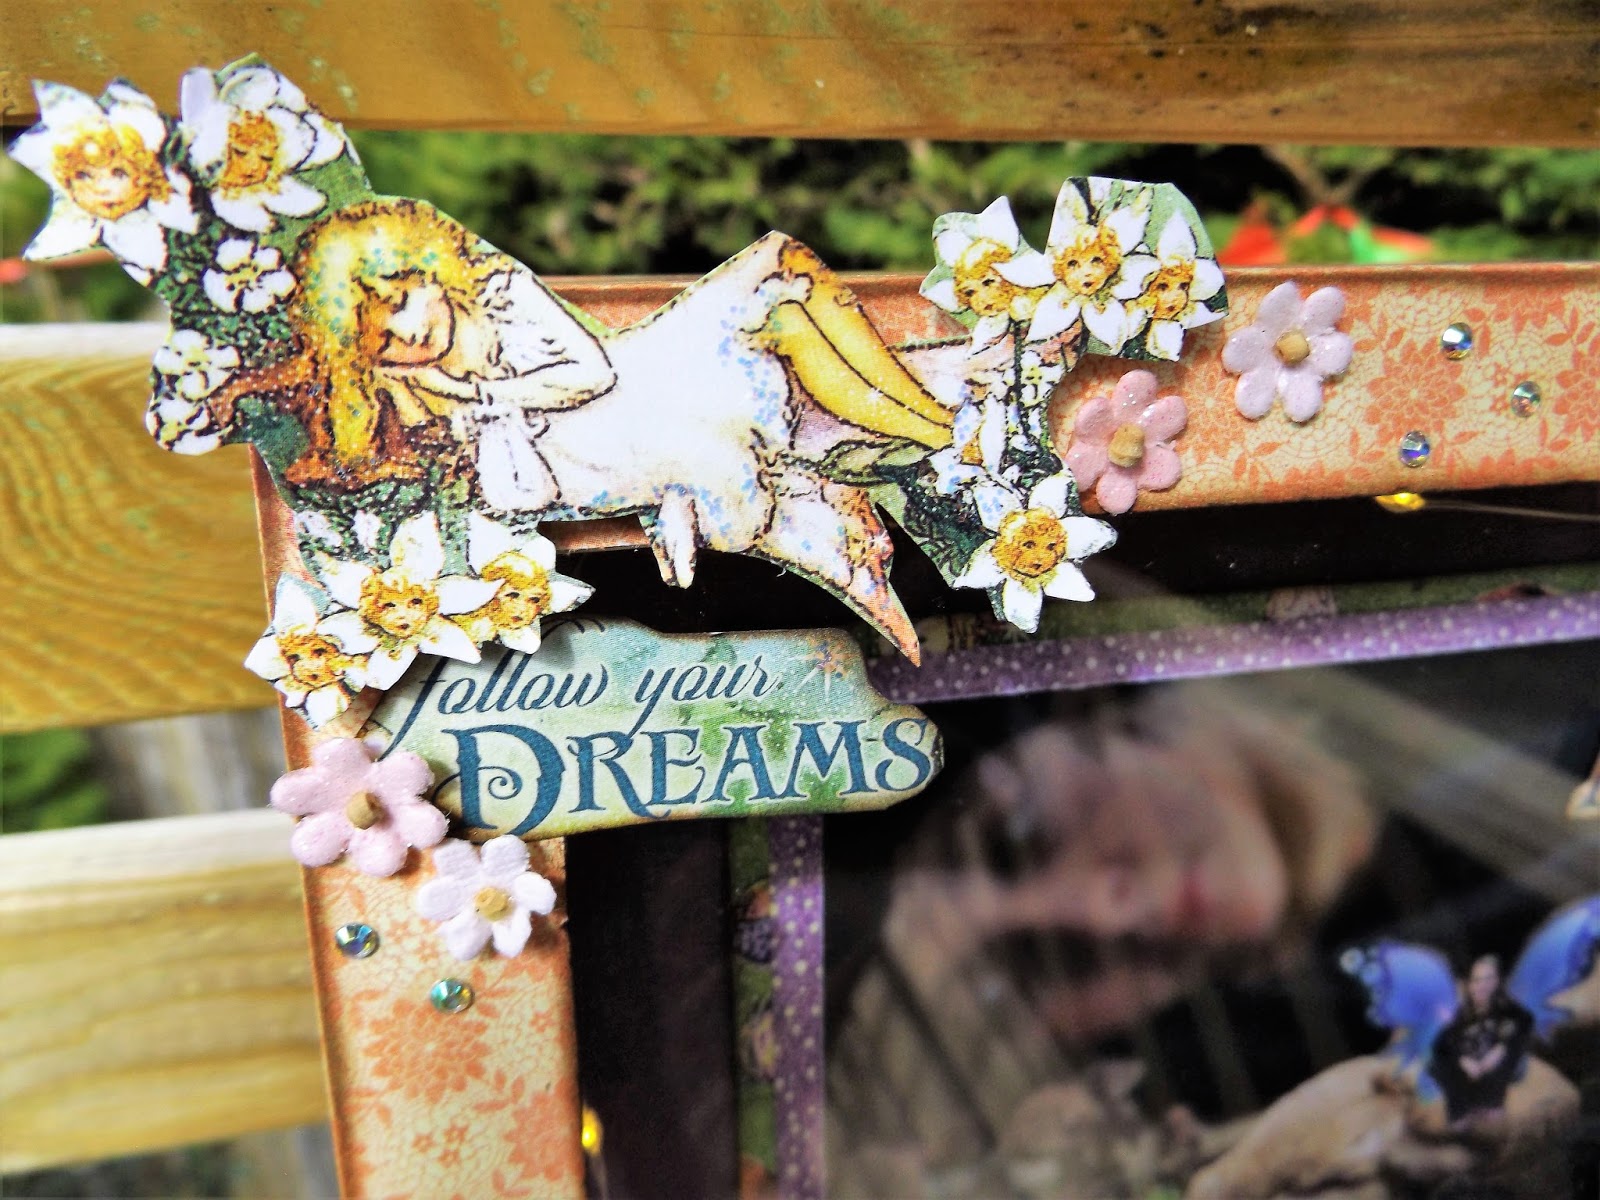
As one of the final finishing touches I added a sprinkling of teeny crystals, they capture the light beautifully and add a little extra magic to it. And I also added Icicle Stickles to the wings and some of the flowers too xx


Thank you for looking at my work and don't forget, if you want to have a look at some gorgeous scrapping and card making products then simply pop over to the SHOP and have a good look round, there is so much to choose from.
Happy Scrapping!
Warmest wishes
Anita xx
Monday, 12 March 2018
Kaisercraft - Romantique - Part 3
Hello, Lynn here to share a little more of the Kaisercraft Romantique collection. I really enjoyed working with these lovely papers for the design team, I simply had to buy some more!
I particularly liked both sides of the sheet called 'Boutique' so had to have two of these! This is the sheet I based today's layout on.

This layout is another for Emily and Jack's wedding album, and is all about the wedding cake I made for them. I wanted to dedicate a page to a photo of the cake, but there is a story behind the making of the cake, which I decided to tell using a Project Life style page. Otherwise there would have been several pages just for the cake!
Here is the page depicting the story behind making the cake, uisng a Project Life Page Protector.


The base paper is 'Parisian', I gutted this so I could use some for the story page. Then I trimmed down the 'Boutique' paper, distressed the edges and inked them with Hickory Smoke Distress Ink. I made some tears into this paper and treated them in the same way. I stitched around the edges with the sewing machine and black thread.
I used a Tim Holtz Layering stencil 'Gothic'. with texture paste in various places over the paper. The photo mounts were cut from 'RSVP' and 'Boudoir'. These were treated in the same way as the other papers.

I had a small kraft doily which I cut up and placed inder the corners and tears in the Boutique paper.

I took the two corner swirls from the Dusty Attic Baroque Frames Chipboard set, I painted them with Hickory Smoke Distress Paint and then a layer of Glossy Accents.

I cut several butterflies from the Acetate Butterflies sheet and a few Queen and Co. Silver Pearls to add to the layout.

Finally I added the title with some green felt American Craft Thickers and some old Provo letter stickers.

Thanks for looking and I will be back next month with some ideas using the new Distress Oxide Inks.
Lynn x
I particularly liked both sides of the sheet called 'Boutique' so had to have two of these! This is the sheet I based today's layout on.

This layout is another for Emily and Jack's wedding album, and is all about the wedding cake I made for them. I wanted to dedicate a page to a photo of the cake, but there is a story behind the making of the cake, which I decided to tell using a Project Life style page. Otherwise there would have been several pages just for the cake!
Here is the page depicting the story behind making the cake, uisng a Project Life Page Protector.

As you can see I used some of the same papers and techniques on the story page as I had used for the main page to tie it all together.

The base paper is 'Parisian', I gutted this so I could use some for the story page. Then I trimmed down the 'Boutique' paper, distressed the edges and inked them with Hickory Smoke Distress Ink. I made some tears into this paper and treated them in the same way. I stitched around the edges with the sewing machine and black thread.
I used a Tim Holtz Layering stencil 'Gothic'. with texture paste in various places over the paper. The photo mounts were cut from 'RSVP' and 'Boudoir'. These were treated in the same way as the other papers.

I had a small kraft doily which I cut up and placed inder the corners and tears in the Boutique paper.

I took the two corner swirls from the Dusty Attic Baroque Frames Chipboard set, I painted them with Hickory Smoke Distress Paint and then a layer of Glossy Accents.

I cut several butterflies from the Acetate Butterflies sheet and a few Queen and Co. Silver Pearls to add to the layout.

Finally I added the title with some green felt American Craft Thickers and some old Provo letter stickers.

Thanks for looking and I will be back next month with some ideas using the new Distress Oxide Inks.
Lynn x
Wednesday, 7 March 2018
Simple Stories - I Am ...
Hello, Karen here today with my very first project created for the Papermaze DT. I was thrilled to be able to work with the new Simple Stories I Am... collection. This is a is a soft feminine collection full of florals and butterflies as well as graphic designs and is a follow on collection to the original 'I Am' collection which was released three years ago.
I decided to create a 12x12 layout using a photo of my daughter and I taken on my birthday several years ago whilst on holiday.

For the base I trimmed roughly 5mm off of the edges of a sheet of white bazzil cardstock and matted this onto a black sheet. I then layered pieces of Living Vibrantly (pink ledger), Simply Me (script) and Choosing Happiness (foiled butterflies), which were all matted on more black cardstock and outlined in black pen. My 5x7 photo was double matted on white and black cardstock.

I used one of the cards from the sheet of 3x4 elements and a bingo card (from my stash) to create my title. Co-ordinating yellow bazzil cardstock was used to create a couple of rosette flowers with enamel dots used as centres. I fussy cut butterflies from the sheet of Choosing Happiness paper which were added to the layout as well as some lace and paper blossoms to soften the look. A tiny camera sticker from one of the 4x6 sticker sheets was added.

Some of the papers in this collection have beautiful copper coloured foiling so I added some copper coloured stickles to some of the butterflies and some copper coloured sequins were scattered around the edges of my layout.

Finally I printed my jounalling strips on the computer using a typewriter font and added the date and place with stickers.

I hope you feel inspired to use the I Am... collection. Thanks for looking. Have a super weekend.
Karen x x
Monday, 5 March 2018
Pebbles ~ Happy Hooray ~ Part 2 ~ Birthday Board
Hi, it's Anna here today to share with you my next project using the Pebbles Happy Hooray Collection.
I have something a bit different to show you today. As part of a new arrangement of photo frames on my kitchen wall, I decided that I wanted to make one of them into a birthday board. This collection of papers was just perfect for the job.
I have used an A4 photo frame for this project, (but if I were to do it again, then I think I would use a slightly larger frame).

I began by cutting out a piece of cardstock to adhere to the back of the frame. I then cut out 12 pieces of white cardstock of equal sizes to fit inside the frame. I added small letters to the top of each piece of cardstock for each month of the year. I then drew some black lines underneath and wrote on my friends and families birthday dates for the appropriate months.


I then added several elements from the Happy Hooray collection, in particular, from the party time paper. I cut a few pieces from this patterned paper as well as fussy cutting some balloon animals and words. I also cut out cupcakes from the eat cake paper and the word 'wish' from the hooray paper.


I also added some of these freckled fawn enamel stars and these freckled fawn paper clips. I love freckled fawn embellishments - take a look at Papermaze's collection here.

Thanks for looking!
Have a great week, see you soon.
Anna
X
Friday, 2 March 2018
captured (independent, photos matter)
this post is more of a home decor/mixed media piece. It started with a Kaisercraft MDF Polaroid frame that a purchased in a sale. I was a little undecided about painting it or covering it in paper. But i had sheets left from the Chesterville collection by blue fern studios.
The background sheet is Holmes and the foreground is Bretton. Sandwiched in between is a sheet of metal gridded wire (similar to chicken wire), the top and side corner are cut into using wire cutters and rolled back.

Under each rolled back piece of wire, i have adhered metal cogs from the Tim Holtz idea-ology range. Applied clear gesso to my foreground one to protect the paper and two to allow me to add mixed media. I have cut 2 tags from the patterned paper with sizzix framelits die one of which i have added a black and white photo and the other i have used a stencil and some structure paste to before i have added my photo. The stencil used was the Tim Holtz flourish stencil, but any floral type of stencil will do that many of us have amongst our stash. Added a word sticker to the tag, distressed the edges and looped through some ribbon

The bottom corner has had the same stencil treatment. And i have applied floral chipboard by scrap FX Magnolia branch, and a chipboard "Captured" by dusty attic. The chip board i have primed with white gesso and added some watered down distress oxides, in frayed burlap and tattered rose. Taken a textured stamp and stamped all over the chipboard flowers and frame in the frayed burlap.
The "captured" got given 3 coats of white gesso and then applied some matt accents over the top to give the word a glaze and to make it pop. Finally added a couple of rolled roses from the scraps of patterned paper.

My fabric photo strip is made using photo transfer gel. Firstly you'll need to laser/photocopy your Photo.. (note that you need to flip your photo something i didn't do). Apply a thick even coat of the gel to your photo and then apply to the canvas making sure its nice and smooth and leave for 24 hours. Yes 24 hours ( not great for an impatient crafter). After 24 hours apply water to the paper and rub the paper away. It leaves a transfer of the photos behind, and i can wait to use this on other different surfaces. Stitched around the edges of the fabric. Stamped om fabric and applied an eyelet. I have added another tag and charm i found at home and that completes the project

close ups

Subscribe to:
Posts (Atom)