Friday 19 June 2015

June Crop day

Its time for our Crop again tomorrow in Otley Village Hall, Suffolk. We always have refreshments including freshly homemade cakes, and a kit available to purchase if you would like. This month, the kit has been designed by Vanessa, and uses the new BoBunny Heritage papers, making it perfect for any genre.


 If you'd like to join us, just drop us an email - it's £4, and we're there from 10am until 5pm, plus you get a 10% discount on anything you buy in the shop :)

Monday 15 June 2015

snapshots - and its process

I have always wanted to try a mixed media page. Watched many You tube videos and read many blogs, so when I was given the opportunity to play with the new Blue Fern Studio chipboard it gave me a chance to play with some mixed media.
So I hunted around my stash of 12x12 papers and went for an old basic grey collection of patterned
paper from the figgy pudding range. I wanted to continue to see the effect of the paper but add inks to create more depth and texture. so after reading up on the usage of clear gesso I decided to prime my page with this using an old library card. it leaves quite a grainy texture on the paper, but dries completely clear.
Once dry I took a mask from prima (6x6 stone wall) laid it on the middle of my page and applied white gesso through it.
Allowed this to dry and then had some fun with my inks I have used the 3 below, applied drops of the denim and butterscotch and sprayed and a mist of water and let the ink drip and then applied some of the glimmer chalk mist, kept going till I had the  desired effect drying with my heat gun in-between.
 
 The great thing about the clear gesso is that the ink sits on top which doesn't cause the ink to seep through the paper and make it fragile. I did the same process to my chipboard (blue fern studios - circle flourish small) but also applied some brushed corduroy distress ink
Once my page and my chipboard was dry. it was a matter of choosing my photo and placing inside my chipboard frame. Added a die cut (memory box chloe stem) to the edges of my frame. A good friend then kindly cut snapshots on her cameo. I added this to my page as my title and applied glossy accents over the top.

Sunday 14 June 2015

Did someone say 'Summer Vibes'???

I can not get enough of this new collection from Simple Stories 'Summer Vibes'.

It's got everything that you want from a Summer collection. 
Using some of the papers and the stickers I made this LO here.

 
The yellows really call out Summer to me. There are so many gorgeous papers in this collection and they just work so well together when you want to layer up like I have done here.


I find that by teaming up the colours in your photos with your papers really works. These photos are just perfect. 

 
The stickers are so fun from this collection and really add the finishing touches to scrapbooking pages.  I love doodling around the edges to really help them stand out.


I have so many more ideas of what I want to make with these papers and stickers. I think this has to be one of my favourite collections.
 
Lisa x


Wednesday 10 June 2015

Dylusions paints and project life

Hello, Carol with you today. Those that know me know that I love my paints, inks and generally getting messy - so when the new Dylusions paints arrived in the shop a few of them fell into my basket, lol…  I've recently decided to give project life a go, but, I need to add my own touch to my pages…so with that in mind I spent a few happy hours creating…

So, I started off with some left over smooth white bazzil cardstock, (this is proving to be a new favourite of mine, its great to paint, using distress inks and stamp and colour on… its not listed on the online shop, but, give Vanessa a ring and she can sort out for you….) I cut my piece into two… using paints in bubble gum pink, fresh lime and turquoise:-


The sheet on the left had the paint added using a paint brush - white linen was also added in the middle…. the sheet on the right had paint applied using a children's paste stick and the idea was to have a rough covering…

Then using stamps from the Emma Godfrey Paperartsy range (I used elements from 02) and using a black ink pad I stamp various elements… the frames on the sets of stamps is the right size for project life inserts…


I then cut out all the elements…. all ready to go for new projects...


By taking a white grid journalling card  - I added some distress ink, doodling with black pen, washi tape and some elements from above I turned it into:-


All ready to add to my project…

TFL xx


Tuesday 9 June 2015

Masculine cards with Echo Park

Hi Tracee here today to show you a couple of masculine cards I created using the Jack and Jill Boy collection by Echo Park


fathers day card tracee provis papermaze echo park
 
The first card I made was for my Hubby, today is our 14th wedding anniversary I cut the globe from the Travel sheet, I mounted it onto a project life journaling card with some 3d foam pads. I layered up some Kraft cardstock and the remaining piece that I cut the globe from.
 
I just love you card tracee provis papermaze echo park
 
The next card is for my Father In Law for Father's day, this collection is so easy to whip up a masculine card, something I often struggle with.
 
 
I simply layered up the papers with some more Kraft cardstock, as an added dimension I cut apart a paper straw and added some stitches to hold them in place.
This is a fab masculine collection and I will be back later in the month to share some more projects with this collection.


Sunday 7 June 2015

Sunshine, Scrapping & Some Handy Tips

Hello!!

It's Lisa here today with Sunshine, Scrapping and some handy tips as the title says.

I've been making the most out of my Belle BLVD - Simply Spring collection.
It's bright, colourful and very happy. Despite the name Spring, to me it shouts Summer!!
Sometimes with the slightly themed collections, you have to make them work to your projects.
This one is Spring/Easter themed, but this can easily be over looked.
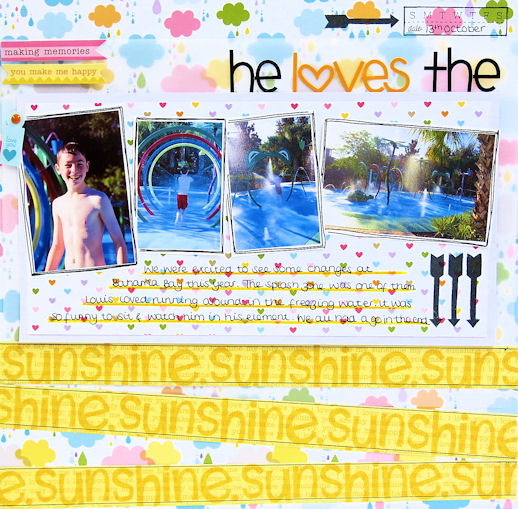
Here is my LO today.


 I just love clouds. I have a bit of a thing for them when it comes to scrapping. I'm working my way through scrapping our 2014 Florida photos and I'm thankful to say, we have no rainy photos. I still wanted to use this paper though. It's so pretty!!
I had a think and then thought it would make a perfect background to our splashy pool photos.

The paper is pretty busy though so I decided to lay a piece of clear vellum over the top of part of the paper to tone it down a little. This worked a treat as you can still see the pretty pattern through.

 
I also wanted to use the 'Sunshine' paper. I cut the word 'sun' out for a previous LO in the same scrapbook album so I wanted to try something different this time and this is what I came up with.
I cut the paper in to strips and stuck it down at angles. It also broke up the business of the cloud paper.
 
 
Adding a title I reached for my trusted Doodlebug alphabet stickers. I always keep a stock of these in a variety of colours. They are probably my favourite stickers of all time. They just go with everything and I love that they come in so many colours. Today I found that I was missing some letters that I needed (don't you just hate it when that happens?!) so I broke the black title up and used the orange stickers too and then realised that I needed 2 black 'e's and only had one. So I took a fresh new white set and coloured one in black. Problem solved!!
 
 
I love the Kaisercraft stamp set that I recently bought for my Project Life and Planner projects so I decided to use it on this LO too. A little tip. If your stamps don't print bold enough, colour them in.
 
 
I also wanted to help my journaling stand out a little and as I was planning to journal on the cute matching heart paper, I decided to add some bold journaling lines. I took a matching coloured pencil and ruler and everything fitted so well. 
 
 
I had a few of the coordinating Bella BLVD stickers left and wanted to bring them to life a little. 3d foam tape helped and I grabbed one of the My Minds Eye - Enamel Dots. Always handy to have to hand these little things.
 
So there you have it, a very non Spring/Easter like LO.


Thanks for joining me today.
Enjoy the sunshine.
Lisa xx