Monday 31 May 2021

DIY Easy Junk Journal - Safe Travels

 Hi, Lisa here!!

If you follow me online you will know how much we love to travel.

I know that we obviously haven't been able to do that for some time now, so instead I've been happily catching up with documenting my previous trips and also preparing for future trips.

Today I'm sharing how I'm creating a new journal to use as a Bucket List Journal.

I would like somewhere to keep all the places we wish to travel to one day and maybe also research these places and have everything all in the one place.


We love Dr Seuss so I picked up this secondhand book to upcycle and I used the Simple Stories - Safe Travels collection here to start my pages inside. 


I do have a full process video so you can see how this was created on my YouTube channel here.


I removed all the pages and spine to create an extra wide spine and then bound the pages back in again.

This will allow the journal to expand as I add bits and pieces to the pages.


I used the Simple Stories collection inside to make the blank inside cover and pages more fun.
The 4x6 elements here are so fun to cut up. I left the top part adhesive free so they can be used as a pocket. 


And I've done exactly the same at the back of the book.


The journal elements are so fun. I'm going to use this 'travel bucket list' to document our top wish list of places to visit.


I'm so looking forward to working on more pages now.


You can really see how perfect this collection is.


I hope you like this new journal of mine.

I'm really happy with it.

Thanks so much.

Lisa x


Saturday 29 May 2021

Disney Inspired Collections - Magic at Chef Mickey's

Welcome back to the Papermaze Blog! ScrappyAdam with you today with another layout using a mix of Echo Park and Simple Stories. For this layout, I have used an exclusive sketch from Dotty About Flair as my initial inspiration as it just grabbed me and I wanted to use that blue background!


I started off with the Happy Magic Memories paper from Say Cheese Main Street which was this fab ledger paper in blue with some red lines. The sketch basically called for a strip of patterned paper across the middle and then lots of little strips from the middle to the bottom. I used a variety of papers from the Say Cheese 6x8" Paper Pad and the Echo Park A Magical Place 6x6" Mega Pad. For the strips across the middle I used a strip of Smile Words, white cardstock, B Side of Balloons and B Side of Here We Go.


I have used two 4x4" photos which I have matted on Full of Smiles and then a longer strip of Here We Go, the red side once again and for this second mat, I have torn the top and bottom - I do really like the texture and look of torn paper on layouts!

The base of my layout done, it was then a case of embellishing!


I have used a combination of embellishments from both collections. I have used the Brads, Sticker Book, Ephemera and Elements Sticker from Echo Park as well as a Chipboard from an older Echo Park collection and then some stickers, foam stickers and ephemera from Simple Stories. I have also added two flair from Dotty About Flair and a puffy sticker!

I added my title with alpha's from the Echo Park sticker book and "Magic" was from the 12x12" Stickers from Simple Stories. 

Finally, I felt like the top right was missing something and so I layered five banner pieces from the collections with a scrap of patterned paper and two phrase stickers which pulled the layout together and finished it off!


This layout is part of an album/section all about our character dining at Chef Mickey's and so there isn't any journaling on this page as there is/will be on other pages. 

I am going to carry on with this Disney combo kit into June as I have so much left and I am working on a smaller album to share with you through June!

Thank you all so much for taking the time to have a read of the blog today! Take care, stay safe and see you all back here soon! Happy Scrapping!


Adam x


Wednesday 26 May 2021

Paint! - Vicki Boutin - Color Study Collection

Hello, Rebecca back with you today sharing another bright and somewhat busy layout I've created with Vicki Boutin's Color Study collection. I am really loving all the bright and bold colours this collection offers and I'm finding it works so well with black and white photos.


My initial plan for this layout was to stick to a blue and green colour scheme - but as I got creating this idea slowly adapted and I ended up introducing hints of other colours too! I started by tearing strips from the B sides of three of the patterned papers - Line DrawingJournal and Array of Colors. I tore wider strips for the left hand side, and slightly narrower strips for the right. I prefer to tear papers rather than use scissors or a trimmer as I love the texture it brings to the page. 

To help the blues and greens 'pop' on this layout, I selected a sheet of Premium White Cardstock for my background and added some paint splatters to it using distress inks in Blueprint SketchMermaid Lagoon and Mowed Lawn along with a metallic gold acrylic paint and a black acrylic paint to create a bit of drama.

Once my paint splatters were dry, I adhered my blue and green strips to either side of my layout. I then positioned my photos - two photos on the left and one on the right, to help draw your eye to both sides of the page. 

I then moved on to the fun part of embellishing my page. I cut out three of the tags from the Perspective patterned paper and arranged them behind my photos with some embroidery thread through them to add some texture and interest. 


I also cut three of the paint tubes from the Canvas patterned paper and rolled the coloured paint strips back around a plastic straw. This revealed hints of pink and orange, and so I decided to abandon my blue and green theme and introduce some other colours in! I cut out the rainbow and paintbrush from the same patterned paper and used it to add to the cluster I had building on the bottom right of the page.


I fussy cut some of the gorgeous pie-chart circles from the Speciality Vellum, and punched out some smaller circles from the background of the vellum as it has a gold foiled grid pattern on it and was way too gorgeous to throw in the bin! I added these circles to either side of my page in clusters of two or three to add pops of colour around the page.


I'd also fussy cut some of the butterflies from the Pretty Things paper for my previous layout, so decided to add two to this layout too. This worked really well as my photos are black and white, and there is a lot of colour going on on this layout, so the butterflies helped to tone it down slightly with the darker hints.

I absolutely adore the 'All This Happiness' chipboard stickers that come with this collection. They are truly stunning, so I added some chipboard black paint splatters, and also some phrase icons.


I finished off my embellishing with a paint tube from the Ephemera Icons, a couple of bulldog clip stickers from the Sticker Book and two gold arrow stickers from the Icon and Phrase Stickers sheet.


The only thing left to add was my title... I just had to find room for it!! I used the gorgeous Modern Art Chipboard Thickers. These are possibly the most stunning thickers I have ever laid my eyes on!


If you'd like to see how this layout came together, there is a process video up on my YouTube channel which you can find here.

I have really loved working with this collection, and thankfully I have plenty left so this won't be the last Color Study layout you see from me!

Take care

Rebecca x

Monday 24 May 2021

Simple Stories ~ School Life

Hi, it’s Anna back with you today and I’m working with a new collection - Simple Stories School Life for my next couple of blog posts. 

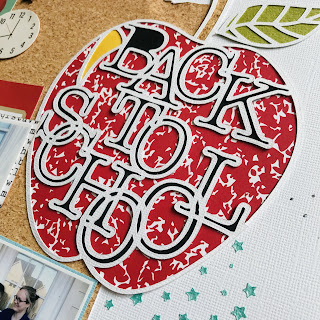
My first layout is all about the obligatory back to school photos in front of the front door! These were taken last September, after several months away from school...


I began with a sheet of white 12x12 bazzill cardstock as my base. I trimmed down half of the journal elements paper - using the corkboard ‘b’ side. 
I wanted to add some texture and interest to my cardstock before going any further. So I used an Echo Park star stencil with some Nuvo Embellishment Mousse (you can also use texture paste) to both sides of the cardstock. I waited for this to dry before sticking down the cork board paper, I also lightly distressed the edges. 


I’ve had this Paige Evans ‘Back to School’ cutfile cut for ages now and I lost one little part of it! As it’s been cut ages there was no chance of finding it, so I just went with it... but I may have to go back and change that at some point! I backed it with the ready. set. learn patterned paper and some black bazzill cardstock. 


I love the journal bits from this collection and chose a few of them to add to my layout. Including the journaling element below. I added our personal back to school journaling after I’d taken the photo. I added a few more of the journal bits around my layout too. 


To the left side of my photos I added a couple of tags tucked in behind the patterned paper and some Pom Pom trim from my stash. 
I painted some dusty attic chipboard stars with shimmerz paint and adhered them to the layout, I also added some enamel dots to my layout. 
To finish, I added some splatters of distress spray


Thanks so much for looking! See you next time. 
Anna 

IG - adisneycraftylifewithanna 


Saturday 22 May 2021

Paige Evans - Wonders - Hello there!

Hi Everyone!

Claire here. I've had so much fun this month I'm popping back in today with an extra layout using Paige Evans Wonders collection. You can find it in the store here.

For this layout, I'm focusing on the Floral Ephemera and Icon Ephemera packs. There are so many bold die cuts in these packs that with just a few pieces, you can create a really striking layout.


I started with a piece of White Bazzill cardstock from the Matchmaker Pack and selected some distress oxides that matched the ephemera pieces shown below. The shades I used were Wild HoneyPicked Raspberry and Tumbled Glass.


I used the packaging technique to create three colour blocks across the centre of the page. Once it was dry, I added some white glitter texture paste through a stencil to form the basis of my page.


Next, I started to layer up the ephemera, starting with the labels from the Icon Ephemera Pack , positioning them down the left hand side of the page, and adding the corresponding coloured butterflies from the Floral Ephemera Pack.


To complement the butterflies, I used some stickers from the Sticker book and hearts from the Chipboard Stickers to create some tone on tone clusters.

Next, I matted my photos using a some white tissue paper and Paper #22, distressing the edges for additional texture.


Behind my photographs, I used some of the foliage and florals from the Floral Ephemera Pack, creating height.


Underneath my photos, I created my Hello there! title, using this statement piece from the Chipboard Sheet. Again I went to tone on tone, layering this on top of the pink distress ink.  To secure this firmly in place against the mixed media background, I used Glossy Accents.


To finish the page off, I added some large black nuvo crystal drops and that was my third and final page done!

I hope you've enjoyed this layout - it's very rare for me to use mixed media and ephemera with so little patterned paper, but these statement pieces really are so fabulous, they make a real impact on the page.

I'll be back with a new collection next month.  Until then, take care.

Claire x


Friday 21 May 2021

Carta Bella Our Travel Adventure - Just Plane Fun

Hello again. Karen C here today with a second layout to share with you using Carta Bella's Our Travel Adventure collection. 

For this layout about a trip to an aviation museum, I started with the journalling cards cut apart sheet but choose to use the B Side which has a ledger design.  Near the bottom of the page I placed three horizontal strips of paper cut from the Travel Strips paper and also a border punched piece of navy spot washi tape.

Two 4x6 photos were triple matted as a block onto white cardstock, a piece of the Wanderlust paper and finally a piece of yellow cardstock and attached to the right side of the layout. 


I made a tag from one of the Multi Journalling cards , threaded this with a piece of red bakers twine and attached it next to the photos. The twine was secured in place with some wet glue to make sure it stayed put.


The layout was embellished with Chipboard Accents from the collection.


I wanted to include an extra touch of yellow to the embellishment clusters and managed to find in my stash a yellow word strip which matched this collection perfectly.


White foam mini alpha stickers from Pink Paislee were added to one of the photos.


The title was created using navy foam mini alpha stickers from Pink Paislee and the word 'Plane' was cut from a scrap of the red patterned paper using my Silhouette. I also added three airplanes cut from one of the branding strips and three yellow Puffy Dots from Doodlebug


Finally journalling was typed on white paper, cut into strips and glued underneath the title.

I hope I've inspired you with this layout and the Our Travel Adventure collection can be found in the shop here.

Until next time. Take Care.
Karen x x


Wednesday 19 May 2021

Simple Stories, Sunkissed - Creating and Using Layered Tags

Hello everyone! It's Meg here today sharing with you the newest collection from Simple Stories, called Sunkissed. It's a beautiful vibrant collection that has me so excited for summer and those long lazy, hazy days at the beach or in the garden! 

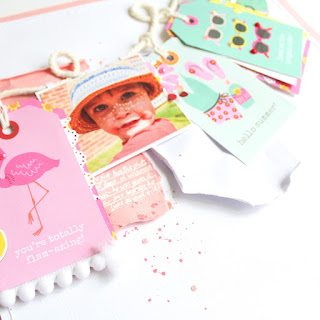
First of all I wanted to show you what I did with the Tags cut apart paper - honestly as soon as I saw these gorgeous tags, I immediately wanted to cut them all up and build them up so they are ready to go for future projects. I created a scrapbook layout (shown below) using the tags as large layered embellishment clusters - but they are also perfect as tags for presents, card toppers or even as mini albums on a ring! Huge bang for your buck here and they are lovely to play with if you don't have time for a big crafting session!

To start with, I cut the tags apart and I decided on which tags I would build up - I picked these 6 and have saved the rest for another time. I cut out coordinating coloured paper to go behind the tags (the pink Journal Elements for behind the flamingo and sunglasses tag, Fun + Sun behind the ice cream and seagull tags and Play All Day behind the crab and I Heart Summer tag), then I used a border punch on some offcut strips to add additional colour and texture, pom pom trim, chipboard stickers, these Shape Sprinkles from Doodlebug Design Inc and flat back sequins from my stash to decorate. All tags were popped up with foam to give lots of dimension.

Next, it was time to make a layout with them! I began my page by picking out my photo for my layout and the tags that I thought worked best with it - I chose the pink flamingo tag and the sunglasses as they were similar colours to my sons top and the green grass and then I also pulled out the 'hello summer!' tag as the colours tied together the green and pink. 

I was actually sent this Bazzill Blossom cardstock with my DT pack and it was a perfect colour match to my sons t-shirt, so I knew I would be using some of that. It also matches perfectly with some of the other pieces in the collection, including a few chipboard stickers! Bazzill Avalanche is the white cardstock base I used. 

I decided I wanted to 'hang' the tags, photo and some chipboard pieces across the page so I lined them up across the page using a piece of macrame string. Seeing them lined up helped me to decide there needed to be more interest behind the tags and I wanted there to be more of the Bazzill Blossom colour. I trimmed my page down and added a Blossom cardstock border (hand-stitched to add some detail to the edge of the page) and then tore and scrunched some of my remaining Blossom cardstock and did the same with a wide strip of white, which went behind the tags for the added depth and interest. 

I stuck everything down where I wanted it to 'hang' and carefully placed a couple of little stitches in the macrame so that it would stay where I placed it. Foam was added into the bigger gaps in the scrunched up paper to help it keep its shape and I finished by fussy cutting a couple of flower clusters from the floral Sunny Days paper and tucking them in, a little splatter of pink paint, a few more flat back gems and added my white journaling under the photo. 

And there we go - I hope you enjoyed seeing my layout and feel inspired to give this collection and the cut apart tags a try! I will be back again soon with my next project using Sunkissed and hopefully I'll bring some back sunshine with me!

Take care, 

Meg x 


Tuesday 18 May 2021

Paige Evans - Wonders - The Wonder of You

Hi everyone!

It's Claire here popping back in to share my second layout with you using the Paige Evans Wonders collection. You can find in the shop here.

For this layout, I'm focusing on Paper #6.
Its a really colourful, vibrant paper full of semi circles, which to me immediately looked like bunting, and ideal for scrapping celebratory photographs.


I whipped out my trusty scissors and started fussy cutting.... A lot!  Originally, I was planning a design along the right side of the page but it didn't look quite right. 


Instead, I decided to cluster strips centrally on the page, trimming them down to create a rough triangular shape.

I lay each row alternatively - the first flat, the next raised on foam pads and so on. This allowed me to add a bit of depth and create some movement.


Because the colours in the collection are quite bold, I've printed my photos in black and white, and backed them twice - once with Paper #22 and once with Paper #13. I've distressed the edges of both matting layers for a bit of extra texture.


Next came the embellishing! To the photos, I added some chipboard tabs from the Chipboard Sticker Sheet, a banner from the  Dimensional Banner Stickers and some puffy stickers, along with some flat stickers from the Sticker book.


I also scattered the Puffy Stickers throughout the banners for extra interest and dimension, along with some black and gold Nuvo Drops.


To add my title, I used a combination of the Alphabet Foam Thickers and Paper #19


I first backed the Foam Alphas on a piece of vellum and cut around each letter. This helped to mute the background colour of the banners so the letters were easier to read.

For the 'Wonder' part of my title, I cut each letter from Paper #19 and outlined it with a thin black pen to help it stand out. Each letter was raised on foam pads and placed on top of the banners along with the foam alphas. 

To finish the page, I trimmed a slight elongated semi circle from the top and the bottom of the page and mounted it on coloured Bazzill card from the Matchmaker Pack. A final splattering of gold ink and that was the page done! 


I love how this one turned out - it really was the perfect paper to use to document those wild sparklers on Mr Claire's birthday cake last year!

I have really enjoyed creating with this collection. So much so, keep your eyes peeled for an extra bonus layout which I'll be sharing with you in a few days time. 


Claire  x