Tuesday 30 November 2021

P13s Time to Relax, final layout by Meg

Hey all, I hope you're well and enjoying the winter weather we've been having - I absolutely LOVE this time of year and any excuse to get snuggly and festive!

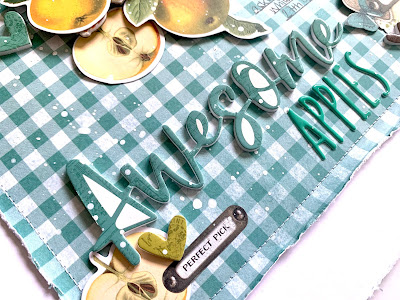
Today I'm here to show you my third and final layout using P13s Time To Relax collection. I've really enjoyed playing with these papers and this time I thought I'd try a bit more of a neutral colour pallette, with the gorgeous green foliage and natural cane peacock chairs (because my last two pages with Time To Relax have been pinks and purples). 

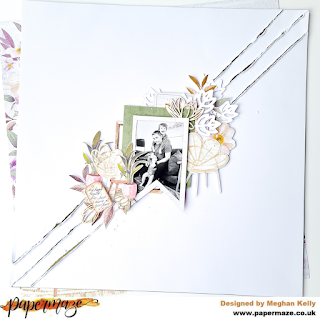
I wanted to build a central cluster with some sort of diagonal background behind it - I originally played with some mixed media and texture paste but it didn't really turn out the way I had envisioned, so instead I decided to rip my white cardstock page into diagonal strips, distress the edges and I backed it with the green Paper #4. You can just about see the green come through, but the effect is quite subtle and leaves lots of white space for your eye to 'rest'!

I then started building my cluster - first by cutting out a grey garland from the Banner Die Cuts, to create a banner shaped frame around my photo. I fussy cut elements from the Paper #7 (the cane chair, a wooden frame, cream flowers, a small journaling tag, some bronze foliage and a potted plant) and I also fussy cut a second cane chair with a rug and little side table from Paper #5

I cut out a square of the green Paper #4 to use to add some colour behind my black and white photo and I adhered my photo on top using some 3D dimensional foam. I layered the wooden frame behind, along with another grey banner from the Banner Die Cuts pack. 

I began tucking in the fussy cut ephemera, a few white foliage pieces from a wreath cutfile by Page by Paige and some SnipArt chipboard pieces from my stash. P13 have included some similar chipboard pieces in the Time To Relax collection, as they just work so well with the natural colours and foliage! I love using chipboard, it's always so good at making a layout just a little more interesting and adding a different texture to the page.

I finished by popping on the mini journalling tag with some more 3D foam and splattering the page with some white acrylic to make it look a little less neat! 

And that's it, my minimalistic and third layout using the beautiful Time To Relax. I hope you've enjoyed my layouts and that you have a lovely December ahead of you! 

Take care and I'll be back again soon, 

Meg x 


Monday 29 November 2021

Disney At Christmas

 Hi, Lisa here!

I wanted to start my new journal documenting our first Christmas experience at Disney.


 I received some of the Joyful Christmas papers from Cocoa Vanilla Studio Papers here.

They are just so pretty and I knew these papers would go so well with my new journal.

To go with this collection, although not Christmas themed, I thought it went really well, I picked out some Maggie Holmes papers from the Market Square collection here. 


I do have a full process video which you can watch here too.


I really love creating flip pages in my DIY journal. 
The 2 collections here go so well together.
I love how the yellow from the larger pages behind add such a fun contrast. 
With the green showing through I added a little green to my new pages so it all coordinated.

I added a paper bag on the left which flips out and the flip page on the right comes from the packaging of these stamps here.


These stamps are also part of the Maggie Holmes collection. Aren't they cute?!

I used the packaging and a few of the stamps too.


I loved this paper here.

I cut out some of the frames to use, but the inside of the frames didn't match my page so I stuck my photos over the top, like the castle pic here.

It went so perfectly.


I love how you can make any paper collection work for you, whether it's themed or not. There's always a way.

And let me let you into a little secret...


I tried to stamp the camera straight on to the page at the top.

But I forgot it was on to the glossy packaging and it smudged so badly.

I didn't fret, I just stamped again on the patterned paper and stuck it over the top.

I think it looks better in pink now anyway. 

There's always ways to cover up accidents.


I hope you like this page and enjoy the video.

Thanks so much.


Lisa x  

Saturday 27 November 2021

Awesome Apples - Simple Stories - Simple Vintage Country Harvest Collection

Hi everyone, it’s Rebecca with you today with a bonus layout! I’ve already posted my two for the month, but I love the Simple Vintage Country Harvest collection so much that I couldn’t resist a third! If you’d like to take a look at this gorgeous collection from Simple Stories, you can find it in the shop here


For my first two layouts, I focused on the pumpkin elements in the collection, so for today’s layout I’ve decided to create using the apples! I had a series of recent photos of my little boy pressing apples at a local village museum and this collection was perfect to get them scrapped! 

I began with a 9.5 x 9.5 inch piece of the 4x6 Elements paper (B side), distressed the edges and tacked it to the centre of a sheet of Premium White Cardstock using double sided tape, before using my sewing machine to stitch around the edge of it. 

I backed one of the Chipboard Frames with my two 3x4 inch photos and positioned it in the top right corner. The frame had some leaf embellishments adorning it, which didn’t really ‘fit’ my theme - so I covered them up using a die cut from the Harvest Bits & Pieces. This is a great way to make things work for you within a collection! I then added a couple of the apple die cuts underneath it to mimic apples hanging from a tree.


Wanting to have a cluster at the bottom of my page, I fussy cut a doily from the 4x4 Elements patterned paper and raised it up with foam pads. I also placed an apple sticker from the Foam Stickers sheet there. 


To the left of my cluster I placed the ‘awesome’ title from the foam stickers and added the word ‘apples’ underneath to complete my title. I placed an apple die cut with my title along with a foam heart and a banner sticker from the Sticker Book.


I selected one of the border stickers from the Sticker Book with apples on it and stuck it on the top of my chipboard frame to embellish the top of the page more. 


I added some finishing touches using smaller elements - some foam heart stickers, a sticker from the Combo Stickers sheet and then some white splatters. 

I finished the layout off by distressing the edge of the white cardstock and backing it with one of the sheets of coloured cardstock from the Basics Kit. I didn’t want a complete frame on the page, but felt like it needed something, so by distressing the edges I was able to reveal some of the coloured cardstock underneath in a few areas.


Thanks so much for reading, I hope you’ve enjoyed this layout. If you’d like to watch the process then there’s a video up on my YouTube channel, which you can find here

I’m working with another Simple Stories collection next month - Simple Vintage Rustic Christmas so make sure you check back for those layouts! 

Have a fab weekend and take care,


Rebecca x

@preciouspagespapercraft

Wednesday 24 November 2021

Colorful - Simple Stories - Simple Vintage Country Harvest Collection

Hi everyone, Rebecca back with you today sharing my second layout using the beautiful Simple Vintage Country Harvest collection from Simple Stories. I think this is one of my favourite Simple Stories collections - the colours and patterns are gorgeous and perfect for my (many!) pumpkin patch photos. You can find the collection in the shop here.


For this layout, I've gone with a grid design using four of the patterned papers. I've used the Give Thanks (B side)4x6 Elements (B side), Autumn Glory (B side), and Happy Harvest (A side) papers and have cut them into 4x4 inch squares. After distressing the edges, I arranged them in the centre of a sheet of Premium White Cardstock, leaving a slight gap in between them. I've used two landscape photos on this layout - which is something I don't do too often. If I'm using two portrait photos on a layout I like to overlap them slightly, but I'm never happy with the way this looks with landscape photos, so instead I've arranged them in a film strip fashion. I backed them with white cardstock to give them some separation from the grid and added two layers of coloured cardstock from the Simple Stories Basics Kit behind them. I offset the photos slightly to the left of the page and at an angle.


I added one of the Chipboard Clusters behind the photos as I loved the green doily and thought the colour worked really well with my photos. I added another chipboard piece on top, over lapping the photos slightly to introduce some dimension to the page.


Knowing that I wanted to use one of the Foam Stickers for my title, I got that in place before moving on to embellishing the page as they are quite large so wanted to make sure I had space for it! I selected the word 'Colorful' as I thought it worked really well with my photos and the colour scheme of the page. I placed it underneath my photo, offset to the right to help balance the page. 


I then moved on to the fun part of embellishing the layout with smaller elements. I have really enjoyed embellishing layouts with this collection as there is so much to choose from! I used a few of the foam sticker pumpkins on the bottom left quadrant of my grid, layering them up to achieve some dimension. 


I then moved on to the top right quadrant. I cut a phrase from the 3x4 Elements paper which says 'Pumpkin Kisses and Harvest Wishes' and arranged it in strips, staggering them slightly for more interest. I also added a crate of pumpkins which I fussy cut from the 4x4 Elements paper. I raised all of these elements up onto foam. 


I used a couple of the pumpkin stickers from the Combo Stickers sheet to embellish the bottom right quadrant, above my title, with a banner sticker which reads 'Pumpkin Everything'. 


I felt like I needed something above my photos to embellish the top left quadrant of the grid. I selected a die cut from the Bits & Pieces pack along with a tag and slotted them behind my photos. I threaded some embroidery floss through the hole in the tag to bring a bit more texture to the page.


I finished the layout with a couple of die cut hearts from the Bits and Pieces pack in coordinating colours, and raised these up on foam pads.


This layout came together really quickly and I really do credit this collection for that! I love the way that everything matches - the colours, patterns, bits and pieces etc. I sometimes find that collections can have a few 'random' elements such as pineapples and unicorns, but this collection has none of that and everything works perfectly together, which makes it a real joy to create with. 

If you'd like to watch this layout come together, I have a video up on my YouTube channel which you can watch here.

Thanks so much for reading. I hope you've enjoyed this layout and what I've done with this beautiful collection. 

And now on to December... wow! How on earth is it almost December already?!

Take care,


Rebecca x

@preciouspagespapercraft


Tuesday 23 November 2021

Hello Pumpkin! ...... Using Prima's Hello Pink Autumn

Hello, it's Anita 

 I am back with you today with my 2nd layout using Prima's Hello Pink Autumn ....my 1st layout using this can be found HERE The Nearlyweds Day

Very recently we went for a visit to our local National Trust Garden, Sheffield Park. Absolutely beautiful, full of rich colours in the trees, all shapes and sizes. We took along a few pumpkins in the hope we could maybe have a little photo shoot with my baby Grandson.

Because the Autumn colours were so vibrant in the photos it just wouldn't work with this paper range, so I printed it off in black and white instead. I shall have a look at other collections I think so I can do it in its full colour too....sooo many lovely Autumn ranges in the SHOP


 I took a sheet of Give Thanks which, like several of the other sheets in the range, has beautiful foiling details and I cut out 7 of the circles for making the wreath background. I kept the left over sheet to base the next layer on and leave a slim dark frame around the edge of the page. 

The checked background paper is the reverse side of a sheet called Hello Pink Autumn, the front side is beautiful with a gorgeous mix of pumpkins, lots of flowers and lovely foiling details, however for this photo I needed a less feminine design. I trimmed off 1 cm from the top and one side of the sheet and splattered some white, gold and copper paint across the page

I decided it needed a little bit more texture and used some Frantage Embossing enamel in a couple of colours. Sprinkled across the page and then heated til it melted from underneath the layout.

The circles were laid in the shape of a wreath and the matted photo popped, overlapping 2 of the circles. Initially I tried it in the centre of the wreath but didn't like that placement.

I had a few of the Chipboard Stickers in my DT kit and used some in various places. These are really lovely and some have the same beautiful foiling details on them to compliment the papers.

The Hello, Pumpkin and toadstool elements were cut from the sheets of Sweater Weather and Fall Hugs


I finished the layout off with a raffia bow and a little cluster poking out from under the photo ( then I made myself stop... as I do have a bad habit of literally splattering embellishments, ink, paint etc ALL over the page LOL!)

This has been such a lovely range of papers to work with and is actually quite versatile on what themes you can scrap because of the reverse side patterns.

Happy Crafting.....and don't forget the Autumn Sale is still on at the moment, so why not pop over and grab a bargain!!

Til next time....Anita xx


Monday 22 November 2021

Pinkfresh Studio ~ Holiday Magic

Hey!
 It’s Anna back with you today and I’m so excited to kick off the Christmas spirit on the blog with the latest collection I’m working with…
Over the next few weeks, I’ll be working with the bright and bold ‘Holiday Magic’ collection from Pinkfresh Studio

Just in time for the start of December, I have made an advent calendar for my first project… 


To create this calendar I used a diy fillable calendar box from hobbycraft. 
I then set about altering it using my Pinkfresh goodies. 
I began by measuring the squares and creating a template. I used the template to cut out a covering for every door using a variety of patterned papers from the collection.


I used various pieces from the ephemera pack to embellish each door, but you could also use the puffy stickers and die cuts to do this too. I adhered some of the ephemera using 3D foam pads to add some extra dimension. 


I embellished each door further by adding lots of Nuvo drops and enamel dots. I also added wooden numbers to each door. 


I filled each door with a little treat and I’m all ready for the countdown to Christmas with my very own diy advent calendar! 


I’ll be back soon with a layout using this collection! 

Thanks for looking, see you soon! 

Anna 
X

Saturday 20 November 2021

Carta Bella Welcome Autumn - Let's go for a Walk.

Hello everyone, Karen here today with another scrapbook layout using Carta Bella's Welcome Autumn collection. 

I started with a piece of white Bazzill cardstock which I trimmed down to 11.5" x 11.5", matted onto a sheet of the Crisp Leaves paper and machine stitched round the edge with white thread. The Crisp Leaves paper actually had a huge piece missing from the middle as I had already used some of it on one of my other layouts, and I also wanted to use some elsewhere on this layout. By matting the white cardstock on top of the Crisp Leaves paper you would never know it wasn't a whole sheet.

On the left side of the layout I layered several vertical strips of patterned paper. I used border punches on some of the strips to add a bit of interest.

My photo was then triple matted with white cardstock, some of the Crisp Leaves paper and the B side of the Journalling Cards paper. The matted photo was then added to the layout, overlapping the paper strips, and with some 3D foam underneath to add some dimension.

Using a free 'Let's Walk' cutfile from the Hip Kit Club, I cut the title from more of the B side of the Journalling Cards paper. I chose not to back the cut file and  instead left the open parts empty so the title really stood out on the white background. The cut file was placed beneath the photo and completed with the addition of some tiny foam alpha stickers from my stash.


I embellished the layout with a chipboard pumpkin from the Chipboard Accents sheet and some leaves which were fussy cut from the Crisp Leaves paper.

 
I also added a flair badge to the top left of the photo, from my stash.


Journalling strips typed on my computer and printed on white paper were added to the bottom right corner of the layout.


Finally, a few gold sequins were dotted here and there.

This is my last layout using the Welcome Autumn collection. I hope you like what you've seen and that you'll pull out your own autumnal photos and get them scrapbooked. The Welcome Autumn collection is available in the shop as well as lots more.

Take Care,
Karen x x

Friday 19 November 2021

Echo Park - Fall - Grateful for this Day

Hi everyone,

Claire aka @scrappysoulmate back with you today sharing my second layout using Echo Parks Fall collection. You can find it in the shop here.


For this layout I opted for mixed media, creating this stencilled background by brushing Distress Oxides across my page and layering more colour on top through a stencil to create a patterned background.

I printed my photo at 3"x4" and double matted it using the b side of the 3x4 Journaling Cards paper to show that beautiful blue gingham pattern, and a piece of brown Bazzill Cardstock from the Matchmaker Pack


I distressed the edges and layered onto foam for extra dimension.

Next, I opted for a cutfile from Peartree Cutfiles of some large pumpkins that were the perfect compliment to this collection and my pumpkin picture.

I backed the file in alternating colours of red and orange, using the Family Farm Floral, Patch Plaid and Whisking Leaves papers.


For the brown and yellow paper, I used the Matchmaker Pack and added extra texture in Nuvo Drops in Yellow Brick Road.

I embellished the page with pumpkins, leaves and a truck from the Element Stickers.


As a little extra detail, I fussy cut some tiny leaves from the Whisking Leaves paper, scattering them across the page to create a windblown look. Really love the feel this gives the page.


For my title, I fussy cut one of the phrases from the Journaling Cards saying "I will be grateful for this day" - a phrase which really spoke to me.


As a finishing touch, I added a sticker from the Element Sticker sheet and added a few splashes of gold ink.


This has been a fun collection to create with and is so perfect for all your pumpkin picking and fall layouts.

I hope I have inspired you to document your memories of the season and look forward to sharing more projects with you soon.

Claire x