Wednesday 27 July 2022

Doodlebug Designs - My Happy Place - Colour Me Happy

Hi everyone!

Claire here today, sharing my second layout using the My Happy Place collection from Doodlebug Designs.


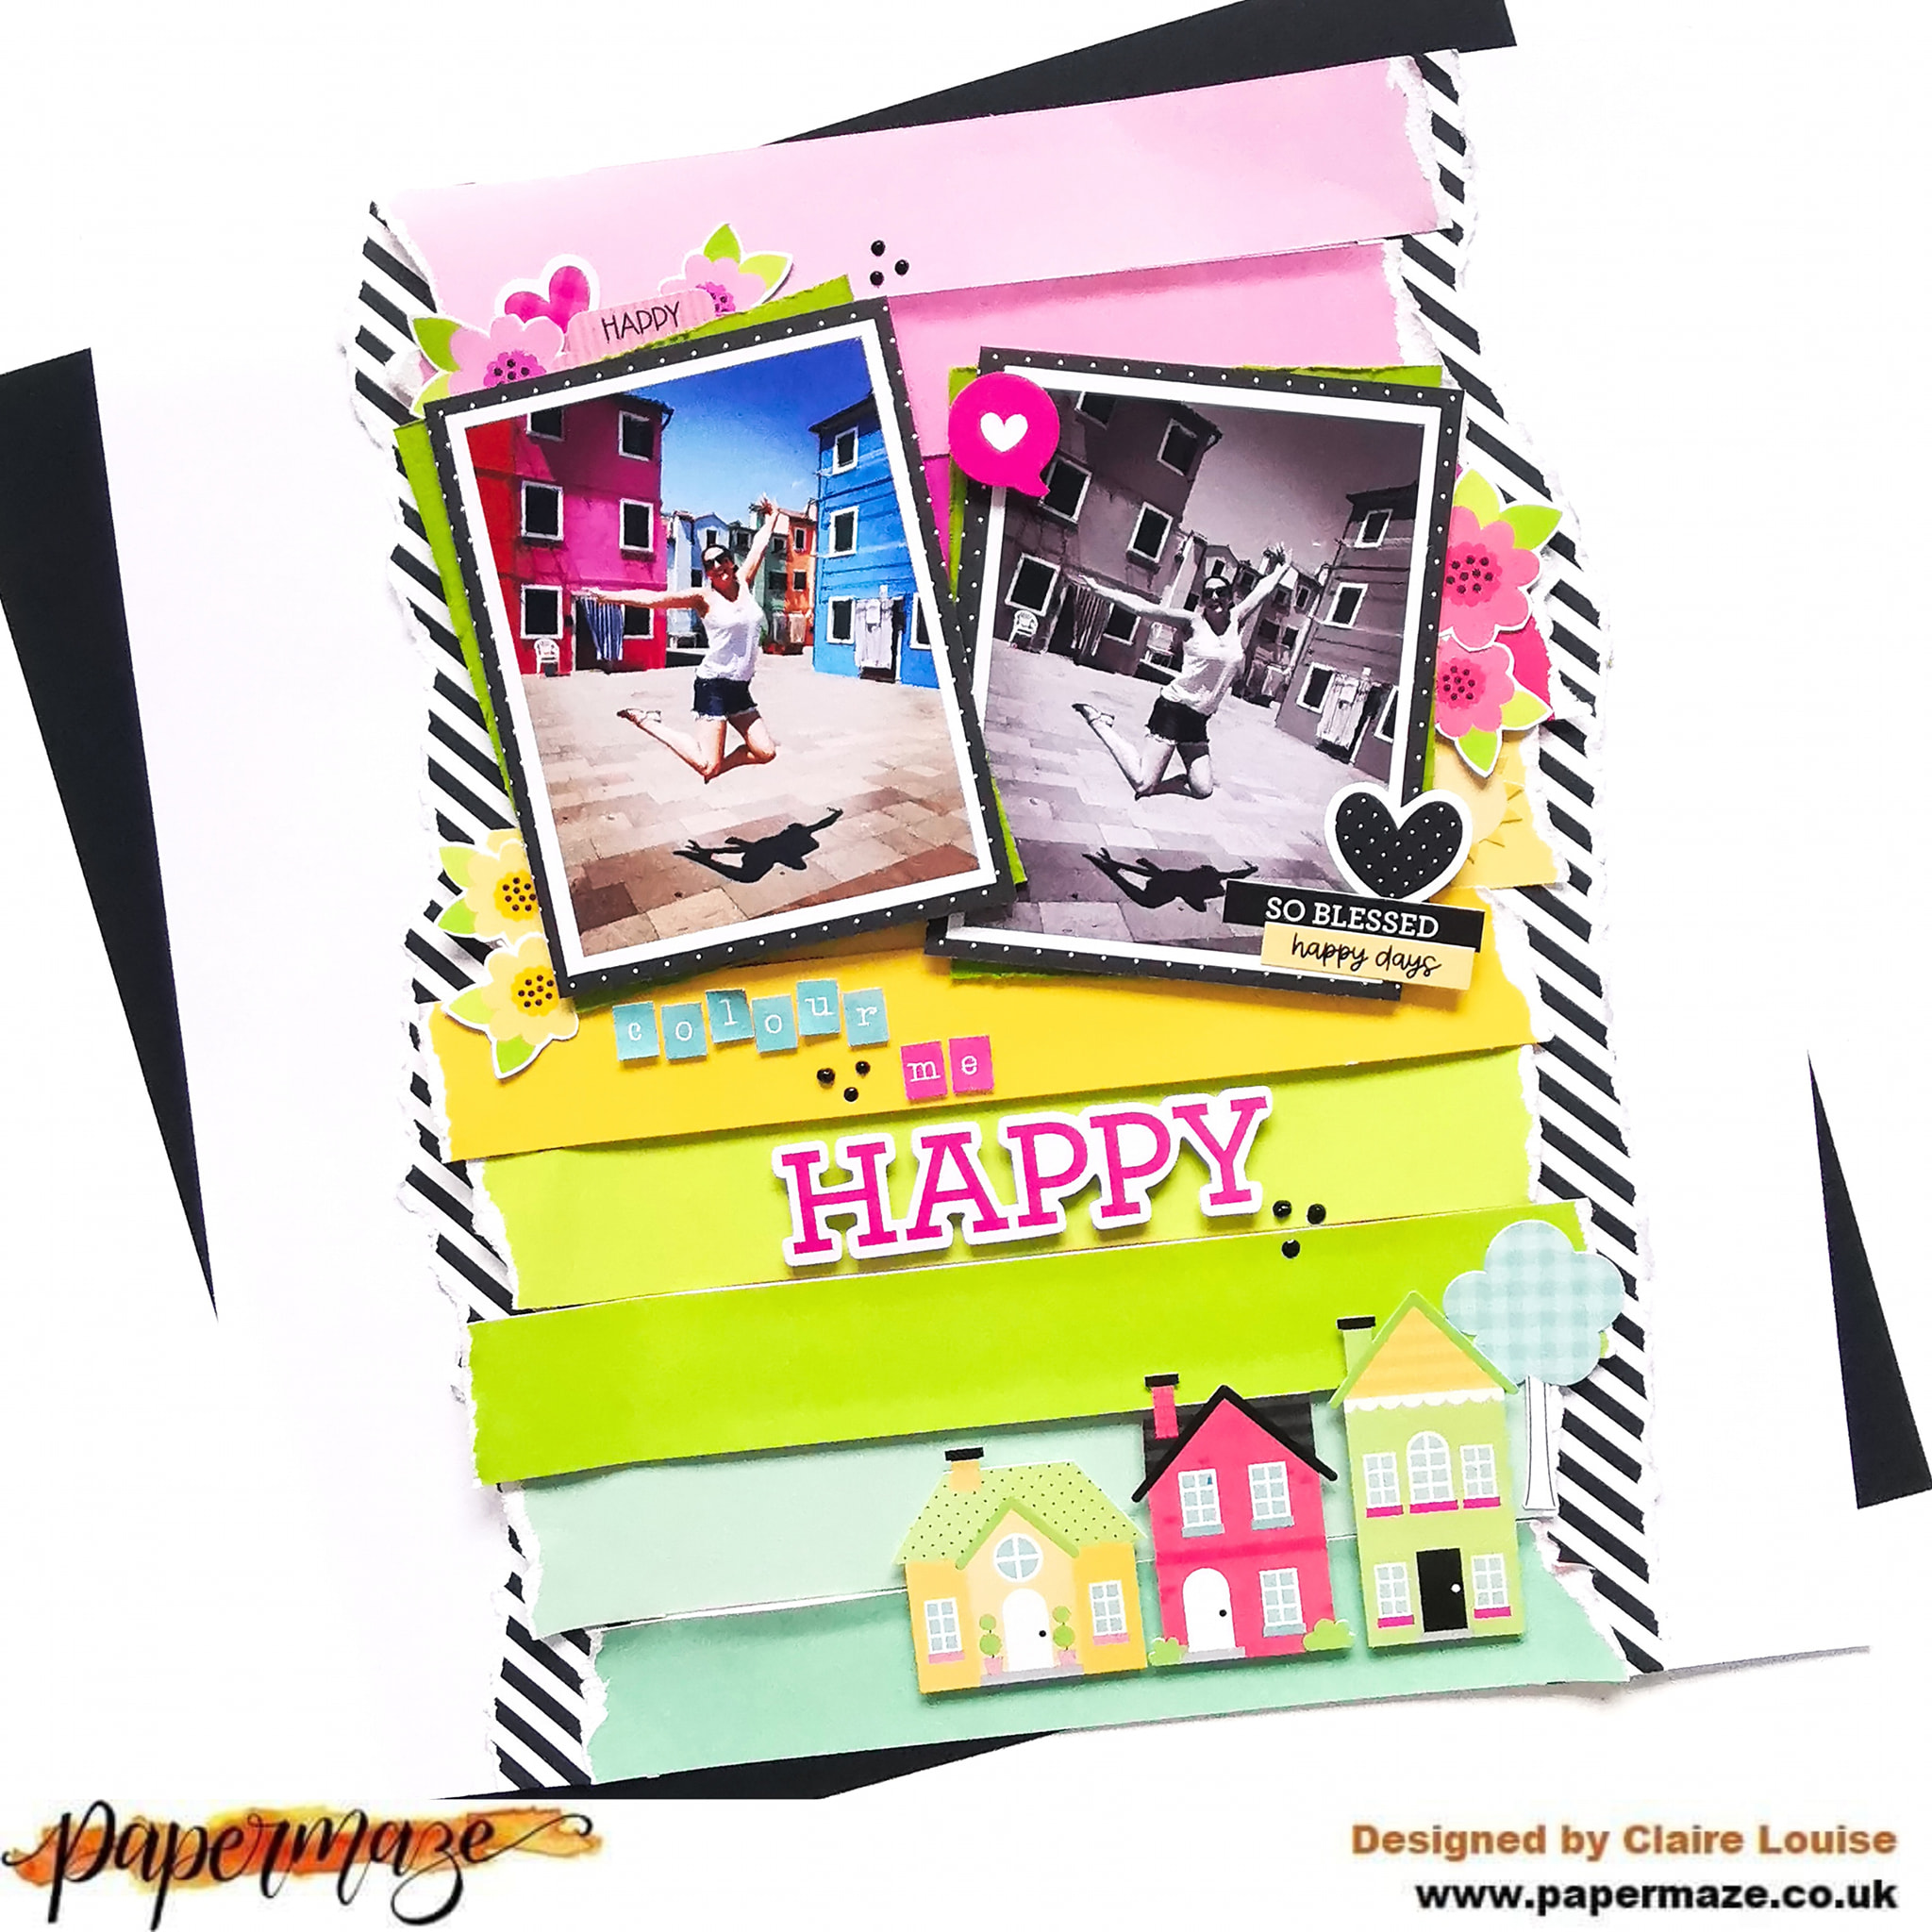
Last week, I was on holiday in Venice, Italy, and took a trip to Burano - Its full of bright coloured houses - each one painted a different colour. It's so vibrant and reminded me immediately of the cute coloured houses included in this collection.

I started with a piece of Premium White Cardstock  and the b side of the Garden Girl paper - it's full of bold colourful stripes. I tore different length strips, laying some flat and some on foam in an alternate pattern.

Under each side, I added a strip of Homeward Bound paper to help ground the colour.


I decided to print my photos twice. It's the same picture, just once in colour and once in black and white. I double mounted them on some green Bazzill cardstock and Cozy Spot paper

I created some small floral embellishments around the photos using flowers fussy cut from the Garden Girl paper.


I also added in some stickers from the Icon Stickers and This & That sticker sheet.


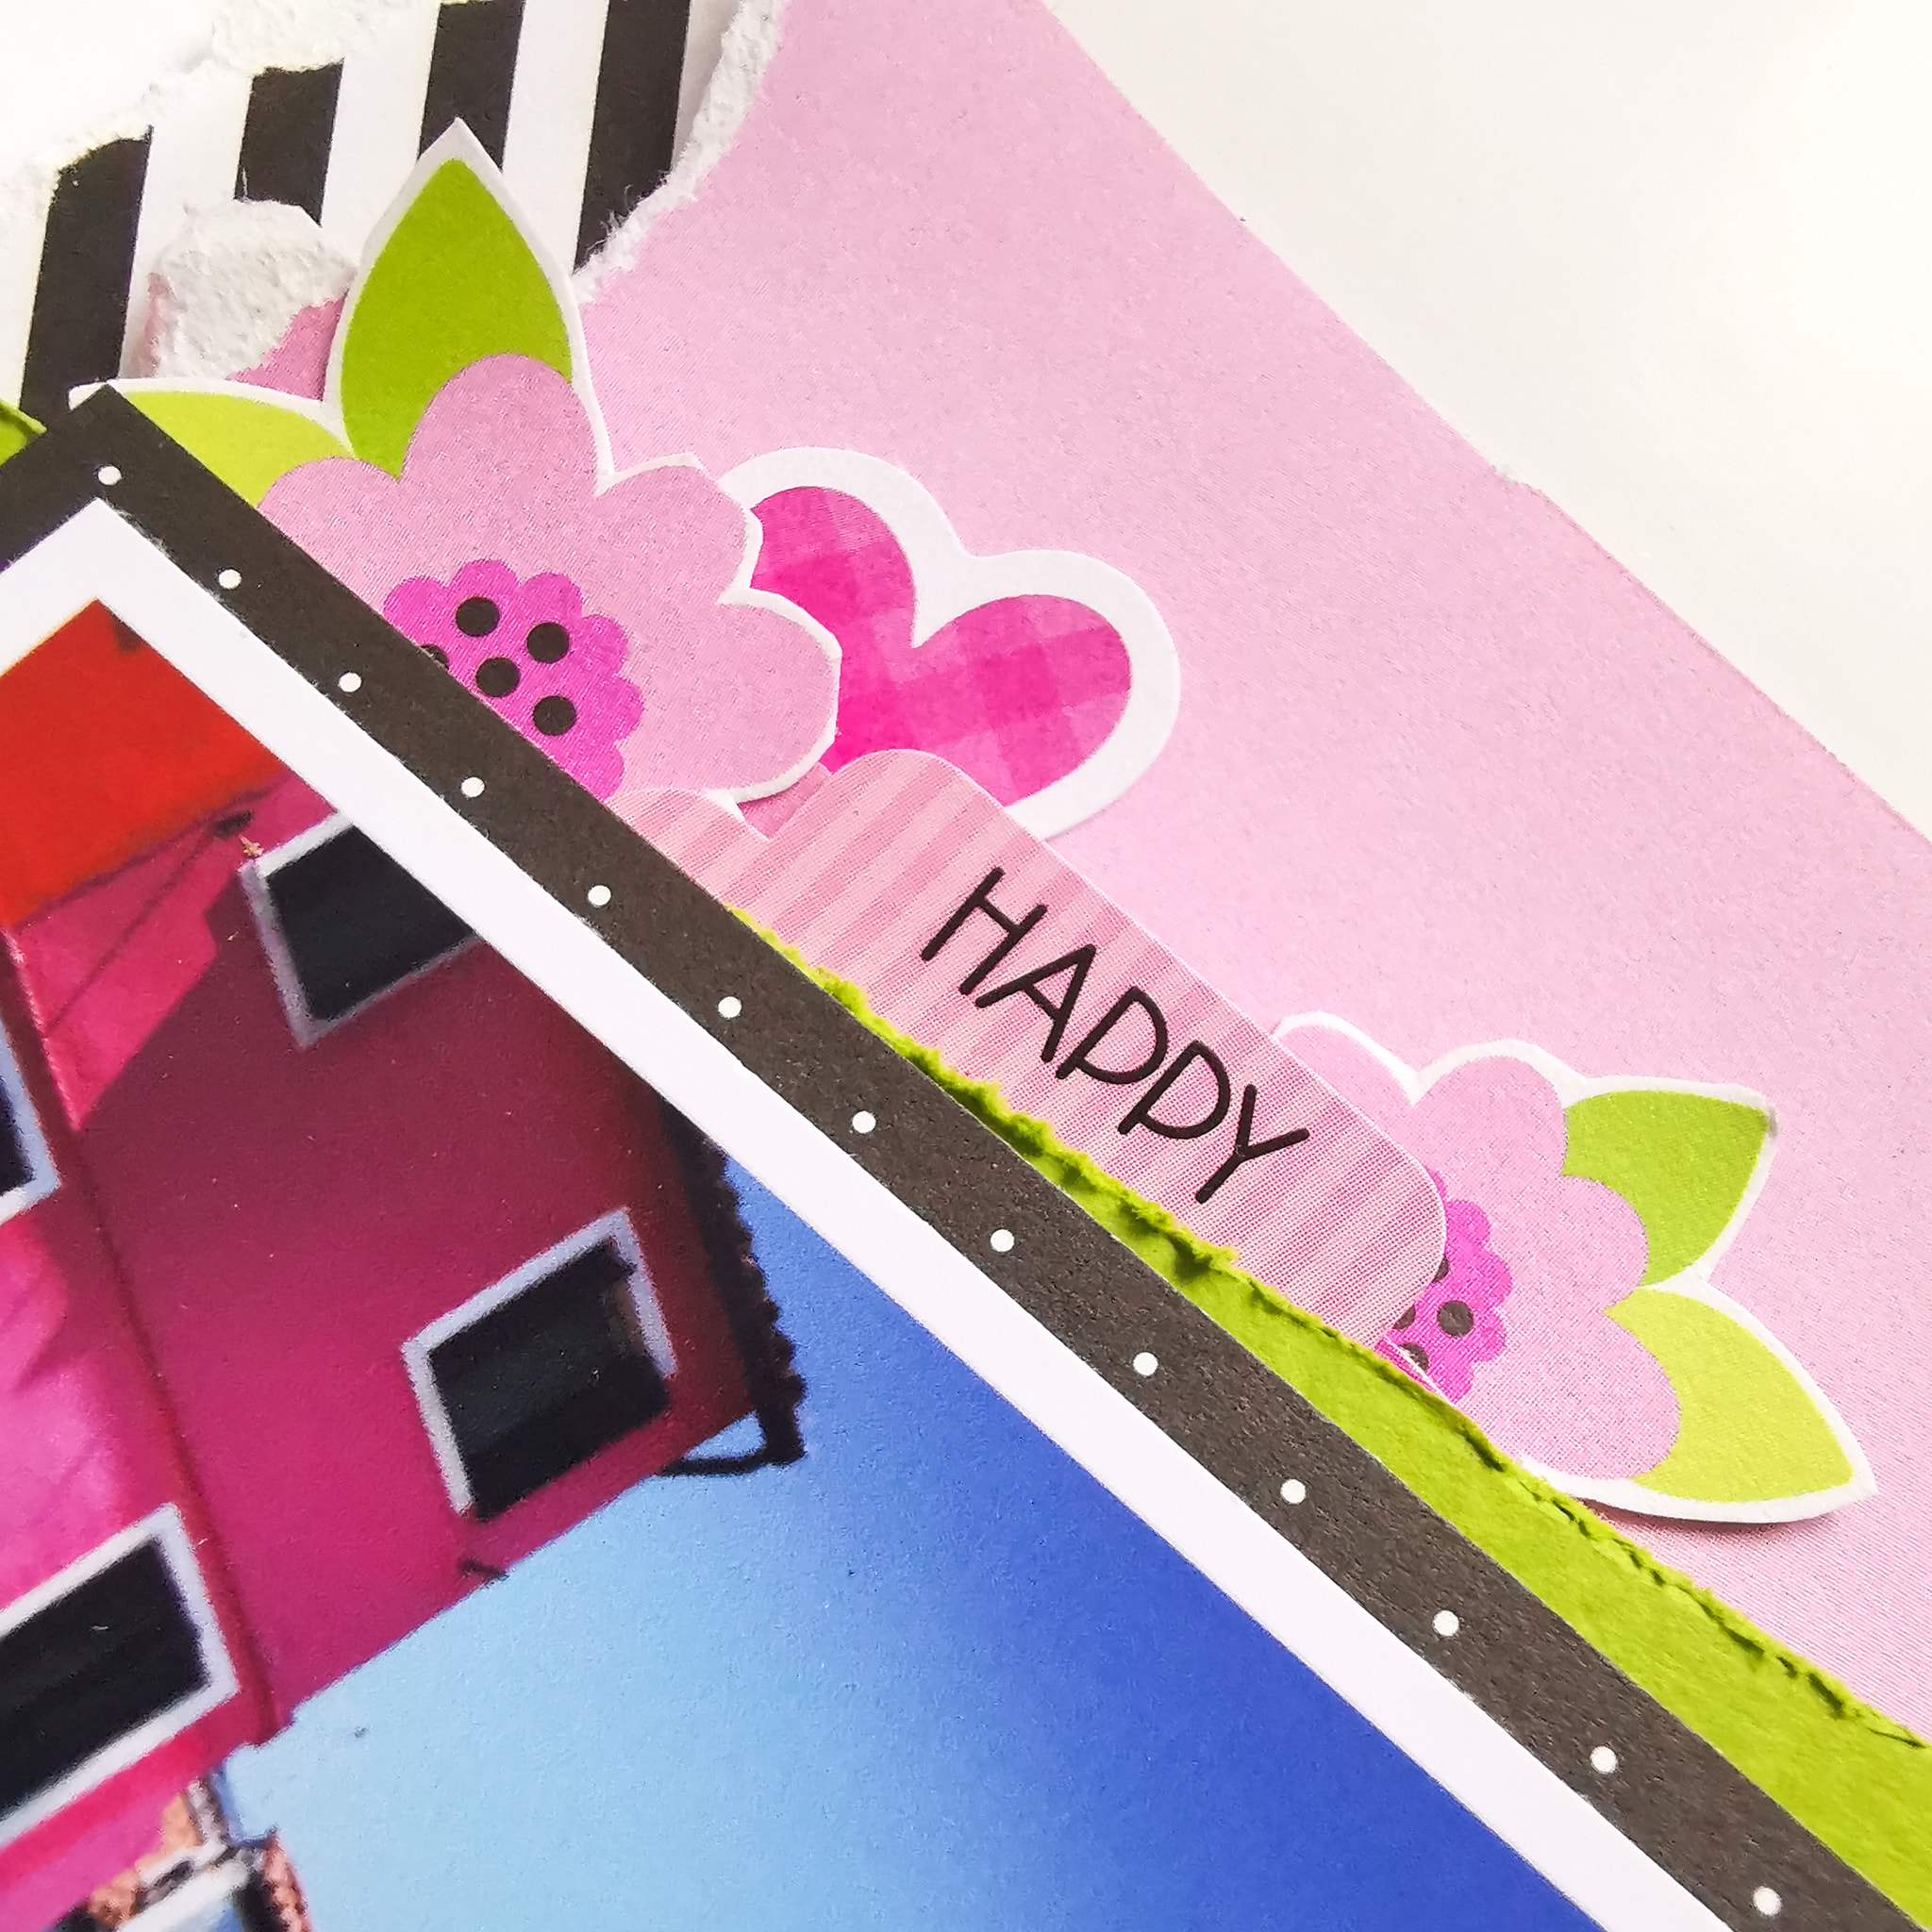
For my title, I used some small tile stickers from the Simple Stories Color Vibe Alpha Sticker Book and the word Happy from the Odds & Ends Chit Chat Pack.


At the bottom of this vertical design, I just had to use those gorgeous coloured houses from the stickers sheets - they represent the coloured houses in the photograph perfectly!


As a finishing touch, i added a few small clusters of Nuvo Drops across the design to bring in a touch more black, and that was the page complete!


I've thoroughly enjoyed this beautiful collection and hope my layouts have inspired you to create.

You can check out the full collection here.

Until next time, take care.

Claire xx

@scrappysoulmate


Monday 25 July 2022

Come Sail Away With Me - Simple Stories - Simple Vintage - Vintage Seas Collection

Hello, Rebecca back with you today sharing my second layout created using the gorgeous Simple Vintage Vintage Seas collection from Simple Stories. I had a series of photos of my little boy stood in front of a building with a huge lighthouse painted on the side of it on my pile and this collection was perfect to document the memory. You can find the full collection here.


I started with a sheet of Premium White Cardstock, and to it I added some colour using some stencils and inks. The collection comes with a 6x8 Waves Stencil, and I used this along with a Distress Ink in the shade 'Blueprint Sketch to add some colour to the bottom section of my background. I also have a starburst stencil from Bramble Fox which really reminds me of the way light shines out of the top of a lighthouse, so I've used this along with a Distress Oxide in 'Barn Door' to the top section of the page. 


On top of my stenciled background, I added my photo - raised up on foam and matted with a layer of the Surf, Sea and Sand patterned paper. I had originally selected two photos for this layout, but the colours in one of them weren't really working with this collection, so I decided to add that photo to the back of my layout instead. To the left of my photo, I've placed a die cut lighthouse from the Page Pieces


On top of that, I've layered one of the Chipboard Stickers - a little sail boat, which worked really well for this page because the photo was taken at the harbour, whilst waiting for our ferry to arrive. Around the base of the sail boat, I've placed two starfish from the Nautical Bits pack. I've built up this cluster further by adding some stickers from the Sticker Book - a ship wheel and some seaweed. 


Over to the right of the page, I've added my title. I've used a die cut from the Bits & Pieces pack which reads 'Come Sail Away With Me'. Because the text is in red, I felt like I needed some blue around it, so I've added some blue seaweed behind it, along with a ships wheel (both from Bits & Pieces)  - all things which relate to the memory I'm documenting. And this is one of the things I love about this collection - all the embellishments are so usable - there's nothing 'random' (you know I'm talking about llamas and bicycles here!!) 


I'd purposely built my layout over to the left of the page, but felt like I wanted to extend it over to the right slightly. To do this, I've used one of the long stickers from the Sticker Book. It has another little lighthouse on it so it was perfect for my photo. Underneath this, I've added another bit of die cut seaweed and a phrase banner from the Combo Stickers


Finally, I trimmed my white background slightly and mounted the whole layout on a sheet of the Gone Coastal patterned paper. I felt like by adding some colour around the edge of the page, it finished the layout. To hold this in place, I ran the layout threw my sewing machine, adding a white running thread the whole way around the edge. 


I hope you've enjoyed this layout and it's given you some inspiration. I really am in love with this collection, and as we are sailing over to the Isle of Wight in a week or so, I'm sure it won't be the last you'll see of it!

If you'd like to watch this layout come together, there is a process video over on my YouTube channel, which you can find here.

Take care,

Rebecca x

@preciouspagespapercraft


Sunday 24 July 2022

Simple Stories ~ Into the Wild #2 🐅

Hi, it’s Anna back on the blog today! 
I’m still working with Simple Stories into the Wild, which you can find in the shop here
I love this collection, it’s perfect for my Animal Kingdom photographs and would also be great for zoo days and safaris! 
For my previous layout I created a multi photo layout, which you can view here
For this layout, I have focused on using one of the chipboard frames mounted over my 6x4 photograph. 


I used bazzill Capèrs as my base and began adding layers of patterned paper at the top of the cardstock, tearing the paper randomly into strips. I used various patterned papers from the collection to do this, including welcome to the jungle, going on safari and wild one.


I positioned my photo in the centre of the layout and then began to add some embellishments around it. I used various stickers from the combo stickers sheet to do this.


The chipboard frames pack is really great value, containing 6 frames, suitable for various size photographs. 


Thanks so much for looking! 
I’ll be back again soon with another layout to share. 
Anna
X

Wednesday 20 July 2022

Doodlebug Design - My Happy Place - Forever Love

Hi everyone!

Claire here with you today. I'm a little bit later with my blog post this month because I've been busy moving house and setting up my new craft room - always a much bigger job than you think!

But finally, I'm in, and I've had the opportunity to create!

Inspired by my move, and the gorgeous colours and patterns, I have chosen to work with the My Happy Place collection from Doodlebug Design.

This collection includes lots of home and garden elements, perfect for scrapping those day to day stories, but it's versatility goes way beyond that. You really can lend it to any story, and that's exactly what I've done in my first layout.


I cut a variety of hearts in various sizes, roughly from 1.5" - 2.5". I did this on my Cricut but the effect would work just the same with punches or free-hand drawn hearts.

I used  multiple patterned papers from the collection including Garden Party, Hello SunshineLove This!, Mint to be and Homeward Bound. I also cut some in plain black cardstock to help the colours pop off the page.

I tried several arrangements of the hearts, vertically and horizontally, but couldn't quite get it to work. I settled on a corner design (one of my favourite designs), but I still wanted some extra depth.

I reached for some Black Soot Distress Oxide ink and brushed it across the page using a dry brush where the hearts would sit. 

I also stamped some crosses randomly across the page, from an old Vicki Boutin Stamp Set I have, but the effect would work just as well with the small dotted pattern stamp included in the Vicki Boutin Color Study Hello Clear Stamps.


I staggered the hearts around the corner of the page, lying some flat and raising some on foam pads to create height.


I decided to lay the pink hearts on a larger black heart, folding the pink paper in half down the centre to create a bit of extra interest and movement.

To help the black and white striped hearts stand off the page, I doodled a messy border around them.


The photograph is a picture of our new furbaby who joined our family last month. I printed it in black and white so the beautiful patterned papers could shine. It was double mounted using the pink and aqua papers used for the hearts.


To my photo, I added a tab from the This & That Stickers and a small speech bubble from the Chit Chat pack.


My title piece comes from the same Chit Chat pack, but I added a heart around the Forever piece , making it feel part of the heart design.


As a finishing touch, I added some small heart stickers from the Icon Stickers and Chit Chat pack, and added a few drops of coordinating coloured Nuvo Drops.


I really loved making this page and hope it's inspired you to check out the collection in the store and to get those stories documented.

I'll be back again next week to share another layout with this fab collection.


See you then!

Claire

@scrappysoulmate

Monday 18 July 2022

Mintay Papers Lavender Farm - Hitchin Lavender

Hello, Karen here and I'm excited to now be working with the gorgeous Lavender Farm collection from Mintay Papers. I'm loving the colours and images in this collection.

I'm lucky to live just a 15 minute drive from a lavender farm so had to use photos, taken from a visit, on my first layout.


I started with a sheet of 'Purple Pizzazz' Bazzill cardstock and onto this I attached, with machine stitching, a sheet of paper #1 which had been trimmed slightly on all four sides so that a narrow border of the purple cardstock still showed.


As I had two sheet of paper #1 I was then able to fussy cut part of the design from the other sheet and attach this on top of the first sheet (decoupage style) with 3D foam underneath to create some dimension.


A few die cuts from the die cut pack were also added.


My two photos were matted onto more of the purple cardstock and attached to the top half of the page.


I embellished the photo with a chipboard piece from Dusty Attic. The chipboard was coated in Gesso and then painted with white acrylic paint tinted with a tiny bit of Wilted Violet Distress Ink. When the paint was dry, a slightly darker colour paint was stippled on top to make the colour look less flat.


The chipboard was attached to the layout and a die cut bow was added to the top.


I stamped a sign post (using a stamp from my stash) onto a scrap of grey paper, wrote on it the name of the lavender farm and stuck this to the bottom of the layout.

Finally, I added some word strips from the chipboard stickers sheet.

Please do hop over to the shop to see this collection and all the other beautiful collections from Mintay Papers. I know you won't be disappointed.

Take Care, Karen x x


Saturday 16 July 2022

July Papermaze Kit - Part 1

Greens, blues and a touch of yellow is the colour scheme of this delightful Papermaze Kit for the month of July. Some wonderful patterned papers, Bazzill cardstock and a selection of embellishments including an exclusive honeycomb piece cut from chipboard.

Lynn here today with my first pair of layouts using this kit. 


 Before looking at how these layouts were made, here is what you will find in the kit:


Patterned Paper:
American Crafts - Vicki Boutin - Sweet Rush - Garden Variety & Sprinkles
American Crafts - Paige Evans - Splendid - #10 & #16
American Crafts - Maggie Holmes - Round Trip -  Documented

49 & Market - Spectrum Sherbet - Cotton Candy
Bazzill Basics Cardstock - Parakeet & Arctic

Reverse side of papers
Embellishments:
Sheet of petite type alphas, reel of mini washi tape, Prima flower, strip pearls, 2 - P13 tags, 5
Doodlebug heart sprinkles, exclusive hexagon honeycomb chipboard piece


An extra Bazzill Basics cardstock pack to match is also available with Jetstream, Whirlpool, White & Pollen

Holiday Memories - an early outing to Snape when my son was little. The colours were perfect for his outfit!

For inking the edges of the papers, tag, mats and chipboard I used Blueprint Sketch and Twisted Citron Distress Ink.

I used the Whirlpool Bazzill as the base for this layout. To add some interest to the cardstock I used some diluted Distress Paints, to flick over the surface - I matched the colours from the papers - Cracked Pistachio, Blueprint Sketch, Picket Fence and Twisted Citron.


With the 'Sprinkles' paper, I selected a large area and cut around the hexagons to create a piece for the lower area of the page. Then I cut smaller groups of hexagons to arrange elsewhere on the page and some single hexagons to superimpose over those already selected.


I used the Hexagon Layers dies from Memory Box to cut my photo and a photo mat from a scrap of white card. Once all this was ready, I placed everything into position together with the exclusive chipboard honeycomb piece and the tiny drop out hexagon pieces. I stuck everything in place, layering up some of the hexagon paper shapes with 3D foam pads. 


I made my title with the Authentique Petite Type alpha stickers and one of the tags from the kit. I tied two lengths of hemp twine to make a tie for the tag. 


I scattered a selection on Dew Drops (Clear, Aqua and Green) and some Nuvo Crystal Drops (Simply White Gloss, Apple Green Gloss and Caribbean Ocean) to finish off.


Happy Soul - My daughter on holiday in Lindos this summer for a friend's wedding.

For this design I used a mix of papers - choosing the denim side of Paige Evans Splendid '#16' paper as the backdrop.

I used both sides of Vicky Boutin 'Garden Variety' paper. I trimmed off the detail strip and saved this for later. With a template I drew the large frame shape onto the OXOX side and cut this out with my craft knife.


Stormy Sky Distress Ink was the colour of choice here to ink all the edges of my cut papers, I also distressed the straight edges of cut papers.

The large photo mat was cut from the OXOX side of the paper too, this measures 12.5cm x 16cm. I trimmed my photo to a square shape 10cm x 10cm and mounted it near the top of the mount.


From the scraps of 'Sprinkles' paper, used above, I cut a piece 9cm x 19cm. The frame, photo and papers were arranged and stuck to the '#16' paper. I cut a length from the detail strip, and ran this along the page under the photo.


I fussy cut some flowers form the remains of the 'Garden Variety' paper, curved the petals with the scissor blade and arranged them around the frame. I found a pearl swirl from my stash and placed this to the left of the photo.


For title and details I used the Authentique Petite Type alpha stickers and a phrase and hearts from my VB Storyteller Puffy Phrase Stickers


I used a die and the Parakeet and Whirlpool Bazzill, to add leaves to my flowers. I decorated the frame with aqua gems and the flower centres with Nuvo Glitter Drops - Blue Lagoon.


That's all for part 1, I'll be back with more soon
Thanks for looking
Lynn x