Friday 28 June 2019

the story

this scrapbook page uses papers from the spring farm collection from prima. Rather than using the large 12x12 papers i have used the 8x8 paper pad. 
Using a 12x12 cream card stock i have created a background on the top half of the sheet using various background stamps. One of which is from kaiser craft texture stains. It has the wonderful coffee stain circles and splodges and i mixed this with other stamps i have collected over the years


Grabbing the paper pad i have cut out interesting strips and squares. Used paper cut from the  sizzix die tangled twigs, which i attached to the bottom of the frame. The frame is something i had among my own stash of which i have held on for too long. Added tissue tape, chipboard flowers from scrap FX, metal clock face, and  stickers. Completed the page with stitching 


Close ups


Wednesday 26 June 2019

Belle Fleur by Photoplay - Timeless Moments Captured

Hello, Karen C here today with my first layout using the beautiful Belle Fleur collection from Photoplay.


I started with a sheet of the Pretty Peonies paper and from the middle, using my paper trimmer, I carefully cut a 10" x 10" square. The 10" x 10" square was then put back into the hole after turning it over so the B side showed. The square of paper was then gutted before a  piece of white Bazzill cardstock, which I had splatted with some pink watercolour paint, was stuck on top.

On the white cardstock I layered pieces of the Pretty Peonies (B side) paper, Choose Happy (B side) paper and You're Just my Type (B side) paper. I machine stitched with white thread round the edges of the papers.


 A 5x7 photo of my daughter was matted on white cardstock and placed on the layout using 3D foam with a white doilie tucked underneath the left edge.


I added some white lace to the bottom of the photo and a brad from Simple Stories Domestic Bliss collection was added to the bottom right corner. A clear heart sticker from my stash was stuck onto the brad.


I created an emelishment cluster on the left corner of the photo using some flowers fussy cut from a sheet of the Hello Gorgeous paper , some heart shaped pins, a die cut butterfly and a bow made from a scrap of paper.


I used chipboard words for my title.


Near the top of the layout I added some banners cut from the patterned papers, a scrap of lace, some words cut from the You're Just my Type paper and an enamel dot.

The layout was completed with a few more enamel dots and journalling strips printed on the computer.

This collection is so pretty and girly. Pop along to the shop to see the full collection and all the other beautiful supplies for scrapbooking, cardmaking and much, much more

Take care
Karen x x

Monday 24 June 2019

2 more layouts using Authentique Glamour

Hello, Rebecca here with another 2 layouts using the Authentique Glamour collection. I knew as soon as I saw the papers that I wanted to scrap a photo from my wedding as my mum’s dress had roses on and I thought it would match paper #1 Blue Roses perfectly.

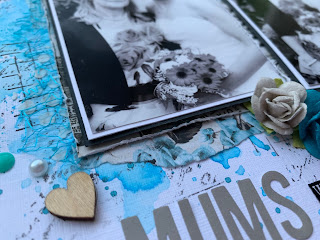
‘If Mum’s were Flowers I’d Pick You’

I was desperate to use the blue roses paper for this layout, but I didn’t want to use the whole sheet as I loved it and wanted to get several layouts out of it so I decided I would have it peeping put from underneath white card stock to provide a contrast and make the blue stand out. I tore my white cardstock at the top and bottom and distressed and rolled the edges slightly. I then taped strips of the blue roses paper underneath. 


To carry on the blue theme I used the packaging technique to add some Distress ink in ‘Salty Ocean’ to the centre of my page. I also added some splatters around the edge of the ink. I then selected several stamps and added them randomly using distress ink in ‘Black soot’ so that they would be peeping out behind my photos. I also used some white texture paste and a Tim Holtz layering stencil in a couple of places for added interest. 


I matted my photos first on white card, and then on black but decided this looked quite harsh against the blue background so I then backed them on paper #5 Vintage Labels which softened the appearance as the paper has blue and black tones in it. I also tore some more of the blue roses paper and added strips above and below my photos. I still wasn’t convinced there was enough on the page for me, so I added a paper doily and also some blue deco web from my stash. 


I finished the page off with some paper flowers in matching colours, some nuvo drops, some wooden hearts and my title. 


‘Sweet Memories’ 

When our little boy was about 3 months old we had a photo shoot taken at our 
home and I’ve been trying to scrap some of the photos ever since but have been struggling because some of the photos aren’t very colourful. This particular photo has sat in my pile for 2 years so I challenged myself to use it and I love how the layout turned out.


Again, I wanted to use the Blue Roses paper as it’s just so pretty, but i felt it was a bit too feminine for my little boy, so I paired it with paper #3 Black/Grey Damask . I roughly tore strips of both papers to sit either side of my layout. I wanted the main focus of the page to be on the left hand side, so I only used tiny strips of the blue roses paper on the right hand side. I wanted it there to bring some blue to that side, but I wanted it subtle. I also added some  Washi tape peeping out in a couple of places on both sides. 


I added some Tim Holtz distress ink in ‘Salty Ocean’ to my background behind where my photo would sit. I mixed the ink with water and used the packaging technique to give it a ‘controlled messy’ look. I then added some splatters to fill some of the white space. I decided I wanted some splatters on the black paper too, but distress ink just wasn’t showing up so I used a distress oxide in ‘Broken China’ instead. 

I had these 3 paper flowers I wanted to use but the turquoise one just wasn’t sitting right on the page as it was a much deeper shade of blue than anything else on the page, so I decided to colour a paper doily to match using a distress ink in ‘Peacock Feathers’. I used the doily to back my photo on and then wrapped some twine around the edge. 


I finished my layout off by adding my title - made up of alphabet stickers and a wooden banner piece backed on on the same washi tape I’d used earlier, and some nuvo drops. 


I hope you’ve enjoyed these layouts, thanks for reading!

Take care,

Rebecca x

Friday 21 June 2019

All About the Mini Books


Hi, Lisa here.
If you've seen any of my posts here in the past few months you will have seen a few Mini Books made by me.
I've been making them to document our US roadtrip that we took last Summer.
But I wanted to create something to store them together in as they feel really special.

 
I found a wooden crate in Poundland that was white. I thought this would be really fun to upcycle.
You can watch this video here to see how I decorated this crate.
 
 
I used these papers here from Pinkfresh Studio  - Out & About Collection:  They are so perfect for a Summer trip. And they covered this crate perfectly.
 
 
You can also find lots of other pieces to match this collection. I personally love the die cut packs.
 
The mini books look so cute in here now. And I love that I have somewhere pretty and safe to store them in.
 
 
Adding the papers made a huge difference.
 
I really hope you've enjoyed this new project of mine.
Have a lovely weekend.
 
Lisa x 
 

Wednesday 19 June 2019

Pebbles ~ Chasing Adventures #3

Hello and welcome back to the Papermaze blog. It's Anna with you today and I'm sharing with you a layout using the Pebbles Chasing Adventures collection. Take a look at the whole collection here.


 So I started with a sheet of white bazzill 12x12 cardstock, I cut two strips from the 'no drama llama' patterned paper to go down each side of the cardstock.


I mounted my photographs with the 'tropical delight' patterned paper and some blue bazzill cardstock.


I added a yellow doilie and some patterned paper punched strips. I cut out some of the florals from Fiesta Flowers and Tropical Delight. 


I also used a couple of the chit chat die cuts from the doodlebug sweet summer collection. I used the word stickers 'smile' from the Phrase & Icon foam thickers.

Thanks for looking!
See you soon!
Anna
X


Monday 17 June 2019

June Papermaze Kit

Hello! Lynn here today with the elegantly beautiful Papermaze kit for the month of June. It is available in the shop to purchase. This month's kit is suitable for masculine and feminine layouts.

Here are the first two layouts I made:


Before I explain what I did, here are the details of the kit:


Patterned Papers:
Kaisercraft - Scrap Studio - Worn
Stamperia - Sueno - Azulejo Sueno SBB605
Stamperia - Voyages Fantastiques - Air Balloon SBB599

Studio Light - Industrial 3.0 - SCRAPIN12
Studio Light - Ultimate Scrap Collection - SCRAPUS26
Simple Stories - Simple Vintage Traveller - Hello World
Bazzill cardstock - Natural and Lagoon


Reverse of papers


Extra Bazzill cardstock pack - Jetstream, Javelina, Safari and London Fog


Embellishments
Embellishments -
Cocoa Vanilla alpha stickers, Bare Basics frame, pearl brad, strip of Prima Hearts, 1m hemp cord, 18" lace, 12" ribbon, 3 flowers, 8 sequins and 6 dewdrops.

The Wedding Ceremony
- This layout has several small images of my daughter and son-in-law exchanging their vows. I really love this sheet of Stamperia paper which is divided into nine patterned tiles on each side. By cutting this up I was able to choose the designs I liked best from either side.


All the papers were distressed and inked with Gathered Twigs Distress Ink.

With the sheet of Stamperia called '
Azulejo Sueno', I cut all nine tiles from the sheet and then decided which side of each I wanted to use. I printed out eight small photos and arranged them on the tiles. I trimmed some of the patterns so they would flow over the photos in some places.
I picked the Jetstream Bazzill for this layout, it was very close in colour to the background on the patterned paper. I worked out the placement of the nine tiles and before sticking them down gutted a piece from behind where one of the tiles lay. I cut the large butterfly from one tile, and with the Bazzill square already cut, I trimmed this to lay over gap left by the butterfly and mounted a photo over the top. I also cut two small butterfly images, and used my photos to cover the resulting gaps. 

Once the tiles and photos were arranged and stuck in place I added some flourishes cut from a gold card using the Sizzix Thinlit die set - Adorned. I used the alpha stickers from the kit to create the title on one of the tiles.

I added the butterflies to the tiles with foam pads and made them shimmer with some Nuvo Glitter Drops - Silver Moondust. Then finally I added the 3D heart stickers and the flowers from the kit.


The Festival of Britain This photo was taken by my father at the festival in 1951 on the South Bank, London. A photo I have been meaning to scrapbook for some time, and these papers were perfect for the job

This layout was created by fussy cutting the images and words from the Voyages Fantastiques - Air Balloon paper. I distressed and inked all my papers using Vintage Photo Distress Ink.

I used a sheet of Lagoon Bazzill for the base, but gutted this first leaving a frame of about 1". I trimmed 0.5" off two adjacent sides of Kaisercraft Scrap Studio - Worn paper, and distressed and folded back all four corners. I mounted this over the Bazzill frame, green side up, with the print side showing at the corners. I used scraps of the Air Balloon paper to fill the corners back in again. 


From the left over bits of Air Balloon, I cut two more pieces about the same size as my photo, I used them to layer behind the photo - one striped side up, the other image side up. I then cut a smaller square as a journalling block.

I arranged all the cutouts and lettering from the Air Balloon paper onto the layout and glued them in place. My title was created with the alpha stickers provided in the kit.

Finally I cut cogs with the Sizzix Thinlits die set - Greahead and some of the Lagoon cardstock, these were coloured in varying degrees with the Distress Ink.


I will be back with more from this kit soon.
Thanks for looking.
Lynn x

Friday 14 June 2019

June Crop...

Can you believe we are already at our June crop?!  Although, it certainly doesn't feel like it weather-wise!  Our crop kit for tomorrow has been designed by Lynn and uses some Pinkfresh Studios paper... 


As usual there will be homemade cakes, punches and dies to use, and a discount in the shop on anything you buy!

Wednesday 12 June 2019

Grateful moments .... Stamperia Spring Botanic pt 3

Hello Crafters

It's Anita here with you today and I have my last layout for the DT using Stamperia's Spring Botanic range.

I umm'ed and ahhh'ed about what photo to use for this page,but eventually settled on this one of us with our youngest daughter on her Christening Day back in August 2000.


Based on a sheet of Spring Botanic with English Roses, I trimmed 2cms off the top and the left hand side and then inked around the edges with an old dark brown ink pad, just to define the edges.
I then placed it onto a sheet of Herbarium. I also used a stencil with some script on it and gently sponged some white acrylic through it to just add a little more texture to the background.


Using a circle cutter I took my 7 x 5 photo and cut a circle with a 5" diameter and framed it using some pretty trim that was in my DT kit. It didn't quite fit all the way round so I added some large blossoms from my stash to cover the gap.


I used the leftover part of the sheet of  Yellow Alpine Poppy and cut out the poppies and the bird on a branch and added to the bottom left and upper right of the page and a couple of the post card panels behind the photo.


I finished the page off by adding small letter stickers, Prima Planner Flowers, Prima Crystals and some chipboard word peices. I also picked a bottle of Stickles and Liquid Pearls from my stash and added large dotted circles in various places round the page.


It's been lovely working with Stamperia papers for my last few posts on here and you can find a lovely selection of them in the shop HERE along with lots and lots of other gorgeous goodies.


Happy Crafting everyone.

Waarmest wishes
Anita xx


Monday 10 June 2019

Pink Paislee's Horizon collection by Paige Evans - Eat Sleep Scrap Repeat

Hello, Karen C here with my final layout using Pink Paislee's Horizon collection by Paige Evans. I really love this bright colourful collection and am quite sad that I have come to the end of this DT kit.

Once a year I get together with a group of crafty friends for a weekend away. We spend the time creating, chatting, laughing (lots of laughing!) and enjoying each others company. I always look forward to our weekends away and thought that the Horizon collection would be perfect for scrapbooking photos taken during one such weekend. My layout is very busy and has 10 photos (+ one hidden photo) but I'm really pleased with it.


I chose three papers to use - #11, #14 and #15 and a sheet of Navy Bazzill cardstock. I also used a cut file called 'Eat Sleep Scrap Repeat' from Paige Evans.


I trimmed the sheet of #11 paper to approx 11" x 11" and matted this on the 12" x 12" sheet of Navy Bazzill cardstock which I had previously gutted. In the middle of this I mounted a square of the #15 paper which was roughly 8½" x 8½" and had also been matted on Navy cardstock. Using white thread I machine stitched  round the edges of both papers.


The cut file was cut from smooth white cardstock and backed with the #14 paper. The different patterned squares in this paper makes it perfect for backing cut files.


I made the heart in the cut file into a shaker packet using some acetate and some multi coloured sequins from my stash.

The backed cut file was then attached to the centre of the layout using foam underneath to give it some dimension. Ten 2" square photos were matted on more of the navy cardstock and stuck around the sides and bottom of the cut file.


When I fixed the #15 paper to the layout I made sure to leave a gap in the adhesive at the top so that I could tuck three tags underneath. The tags were cut from white cardstock and I attached reinforcing rings cut from scraps of the patterned paper and added pink ribbon to the holes. On the tags I added a photo of my friends and some journalling about our weekends away.


I embelished the layout with a scattering of sequins and some gorgeous pink layered Traveler's Journal Flowers from Prima. I had not seen these in the shop before but I just had to pop along and buy myself some more! They are also available as layered hearts and butterflies in pink or blue.

Do take a look at this collection in the shop  and all the other gorgeous new goodies which are regularly being added.

Take Care
Karen x x

Friday 7 June 2019

Crate Paper // Magical Layered Mini Book

Hello, Lisa here!! I have a really fun project to share with you today. I'm so excited about this.


Using this collection here, Sunny Days from Crate Paper, I've made a mini book with lots of layers, pockets and tags to document our Disney stories from Magic Kingdom from last years trip.
You can also watch the video of this book being made here to really see how it was made with additional tips..
 
 
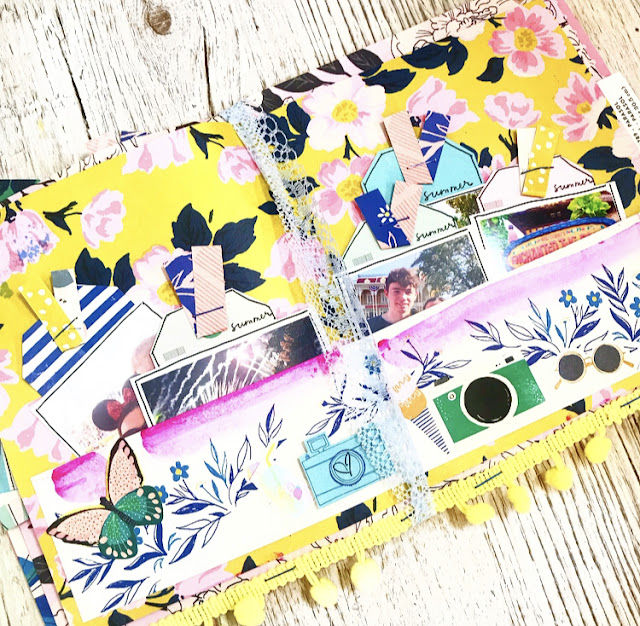
I cut the letters from this paper here to create the word 'happy' for my book title and then used watercolours to paint them.
 
 
I made sure when creating the book layers that all the pages worked well together. So the pink layer with the word 'happy' is a teeny page, but works well with the photo that peeps below from the next page. I didn't want just half a photo peering through. 
 
 
I used this paper and also this one here to cut up and use as pockets and tags throughout the book. By sticking down 3 sides of this 'Collect Moments' piece I could use it as a pocket and I stuck a photo on 2 tags to pop inside, journaling on the back of the tags.
 
 
For the centre page I made a larger pocket for several tags. I'm really pleased with this page. It's a great way to add lots of photos and stories. 
 
 
Here's a little close up! I d like to doodle around my photos and the tags and pages too. I cut some thin strips of paper and stapled on the tags which I think looks super cute!
 
 
I loved this paper with all the cameras and cut them out to add to each page.  I also added lots of water colour paint to the pages to add extra colour.   It really has made the pages POP!
 
 
I also added lots of stickers to this book. If you take a look at the collection, there's so many to choose from and die cuts too.
 
 
I'm so happy with how this book turned out. I love how colourful it is. I makes me smile just looking at it. I really hope you like it too.  
 
Don't forget the video here.
 
Have a great weekend.
Lisa x