Thursday 30 June 2022

Let's Talk About Hidden Journaling

 Hi,

It's Lisa here today chatting the why's and how's of hidden journaling.


I've created this page here in my journal using the Heidi Swapp collection - Sun Chaser here.

It's the first page of our June Disneyworld trip.

As much as I love telling stories, I don't always want them on full display for a variety of reasons, that's when hiddenly journaling comes in really handy.  


For this particular page I wanted my photo to be the main focus.

So I covered it with patterned paper from this collection so I could journal my story on the back and attached it with some clear tape on the left side creating a little hinge so the photo could open out and then the story can be read.


There's also a glassine bag on the right side. This would be perfect to add hidden journaling inside too, however I've popped an Animal Kingdom park map inside as we were there on this day.

I've added some bit from the papers to pretty it up a bit.


    On the opposite page I wanted to create a little pocket.

I've used an envelope and covered up with the coordinating papers. The top edge I've left torn as I love this look.

I've managed to create 2 pockets from the one envelope.

The top part which is the actual envelope has the receipts from our food that day and the second pocket I made using a smaller piece of vellum. Attaching it on 3 sides and leaving the top tape free.   


This way you can slide bits in to this second pocket.

I love the tags on one of the papers so I cut these for some more hidden journaling.


I stuck the tags to another of the papers which I knew would be perfect for extra journaling.
These little tags worked so well.


I shared a video process of this page being created here and I talk lots more about hidden journaling and the benefits. 

It's great if the journaling is personal or if you struggle to journal.

I love adding hidden journaling. I think it makes a page so much fun having to open flips, take our of pockets and bags. I love an interactive page.


I hope this inspires you today.

Thanks so much.

Lisa xx   

Monday 27 June 2022

Lovely Day - 49 and Market - ARToptions Viken Collection

Hello, it's Rebecca with you today sharing another layout using the beautiful Viken collection from 49 and Market. It took a little while for the last few bits of this collection to arrive in store, but they are finally here and uploaded. You can now find the full collection on the website, here.


I love how pretty the colours in this collection look on a white background, so I have opted to work on a sheet of Premium White Cardstock today. I started with a sheet of the Majestic patterned paper. I love the darker tones in this paper compared with others in the collection and thought it worked well with my photo. Yet again, I am scrapping a photo of my little man in the woods among the bluebells as the colours in the photos work so beautifully with this collection.


I cut a section of the paper 8 inches across, and then I tore a diagonal line across the bottom and distressed all the edges to introduce a bit of texture to the page. I placed the sheet of distressed paper in the centre of my background, and stitched it in place using my sewing machine. I've used a combination of straight stitch and zig zag stitch for interest. 


I matted my photo using a scrap of white cardstock to give it a nice crisp border, and then added a layer of green Bazzill cardstock. Once I'd distressed the edges, I then mounted the photo onto the B side of the Endearing patterned paper for contrast. I stuck my photo in place, with some craft foam behind it, in the top right corner of my page.


I took a floral wreath die cut from the Laser Cut Elements pack, cut it in half and arranged it behind my photo so that it peeked around the edges. This provided a base for my embellishments.


On top op the floral die cut, I added some tags from the Tag Set. I love that these tags come with white cord already threaded through them - it brings texture to the page and saves me a job!! I added a few more die cuts from the Laser Cut Elements pack either side of my photo, building up the clusters. Wanting to bring a little sparkle to the page, I tucked in a couple of twiddles of silver metallic thread. I used the WRMK Stitch Happy thread - it's my 'go to' thread as I love the way it maintains it shape when I wrap it around my fingers. 


I've used the word 'lovely' from the Laser Cut Elements pack for my title, and extended it by placing some small puffy alpha stickers (from my stash) on top of one of the chipboard frames from the Chipboard Set.


I popped on a couple of chipboard flair, and finished off with a dragon fly and butterfly from the Laser Cut Elements. 

I hope you've enjoyed this layout and it's given you some inspiration. If you'd like to watch the page come together, there is a process video up on my YouTube channel, which you can find here.


Take care,

Rebecca x

@preciouspagespapercraft


Friday 24 June 2022

Bella Blvd ~ Time to Travel ✈️ #1

Hi, it’s Anna back on the blog today! I’m back to share my third and final project with Bella Blvd Time to Travel and it’s a project life page…

I haven’t posted a project life page in a while, but I do use them a lot! I find them so helpful when making albums. They are a great way to add in extra photos that you may not have used or would have otherwise taken up lots of pages in your album. 
For this one, I’ve continued with documenting the travel day of our recent holiday. So I’ve used pictures of us and food etc on the plane that I probably wouldn’t have done a whole page on. It has also provided a whole pocket for journaling. 

You can find a variety of sizes of pocket pages in the shop here.

Lots of collections come with cut apart papers that are perfect to use in these pocket pages. Time to Travel is no different, so I cut apart a few pieces from the daily details paper.
I usually pair cut apart papers with project life cards, which come in a variety of designs and perfectly fit the pockets. 
You can find project life cards in the shop here


Once I’ve decided on the style of pocket page I’m using. I always start by laying out the photos I want to use and finding an appropriate card to mount them on. You can of course also use full 6x4, 3x2 etc photos without the need for any cards. I also like to leave a couple of spaces for cards on their own/ titles/ journaling boxes. 


Once I’m happy with the layout, I decide on any embellishments that can be added. 
I have used some of the puffy stickers from the collection to add in some extra detail.  I added in one of the little aeroplanes from the puffy stickers to the map to show our journey. In the bottom left pocket I added in a journaling box with the ‘travel’ alphas from the puffy stickers too. I will record details from our journey here. 


Thanks so much for looking!
 I hope this inspires you to have a go at a project life page.

See you next month, when I’ll be working with Simple Stories Into the Wild!

Anna 


Wednesday 22 June 2022

Simple Stories - Summer Lovin' - Hello Summer

Hi everyone!

I hope you've been enjoying the amazing weather we've been having! It has been the perfect inspiration for scrapping with the beautiful Simple Stories Summer Lovin' collection which is available in the shop now.


I really love the b side of the Bright and Sunny paper with its bold colourful stripes. I cut each stripe, distressed the edges and added machine stitching to some of the wider stripes. I laid them back in order to a piece of plain white Premium cardstock, raising them on foam pads for extra dimension.

Once I knew where to position my photos I added a big section of sun rays, made with a sunburst stencil and Distress Oxide Spray Stains in Squeezed Lemonade and Fossilized Amber.


I backed my photos with the Summer Vibes and Sweet Summertime papers, again raising on foam and overlapping one picture on top of the other. For extra interest, I slotted a few tags behind the pictures, cut from the Tags paper, letting the bright colours and patterns from the top of the tags shine through.


Next, the embellishing! I had so much fun! I used some Puffy Stickers including this gorgeous seagull :)


I also fussy cut some flowers from the Simply Paradise paper and added a few more florals from the Puffy Sticker Sheet and the Foam Titles pack.


For my title, I used a big bold blue statement piece from the Foam Stickers pack. These Foam Stickers are my favourite part of the collection. Such high quality, loads of title options and its packed with extra florals and bees too! Great value for money!


I really love the happy summer vibes this collection offers - It is so versatile and perfect to document your summer adventures.

I hope you've found the layout inspiring and I'll see you here again next month!

Take care,
Claire
@scrappysoulmate


Monday 20 June 2022

Echo Park Endless Summer - Summer layout

Hello. Karen here again. Today I have another layout to share with you using the Endless Summer collection from Echo Park and a digital cut file from Paige Evans. I was really pleased how this layout turned out. I think the colours in the papers and embelishments from the collection were perfect for my beach photos and the watery theme. 

I started the layout with a digital cut file called 'Waves Circle' by Paige Evans which I cut from some of my favourite smooth white cardstock from Craft UK. I sized the cut file to about 10" in diameter as I wanted it to fill most of my layout and then backed it with papers from the collection and some cardstock. I used the Ocean Friends and Sun Rays papers and Whirlpool Bazzill cardstock


Once the cut file had been backed I added some blue sequins using a wet glue. I thought the sparkly sequins looked a bit like fish scales and added to the theme of my layout.


I then mounted the completed cut file onto the centre of a sheet of the 3 x 4 journalling cards (B side), which I had already trimmed slightly and matted onto a sheet of white cardstock. 3D foam was placed underneath the cut file to raise it up and add some dimension.


Three 3x4 photos were double matted on white and blue cardstock and added to the layout on top of the cut file.


The layout was embellished with clusters of chipboard pieces from the Chipboard Phrases and Chipboard Accents packs. 


I used some sandpaper to distress the edges of the chipboard pieces to give them a worn look, and more 3D foam was added to the backs of the pieces to raise them up to different levels.


I also used some of the stickers from the Elements Stickers sheet. 


Finally I added the date to the bottom right corner of the layout using some white Pink Paislee Foam Thickers from my stash.

Thank you for dropping by today. I'll be back again soon with another layout using Endless Summer but until then, Take Care.

Karen x x

Friday 17 June 2022

June Papermaze Kit - Part 1

Lynn here today, with the first two layouts I have made with the new June Papermaze Kit. Please find it in the store or online. The very pretty colours in this month's selection, include two sheets of the beautiful Spectrum Sherbet collection. I have used both for my first pair of layouts.  The only problem is which side of these wonderful double-sided papers to choose!


Before looking at how the layouts were made, here is a peek at what you will find inside you kit.

Patterned Papers:
49 & Market - Spectrum Sherbet - Painted Foundations - Rainbow
49 & Market - Spectrum Sherbet - Classics - Splendored
Echo Park - New Day - Full Bloom & Perfect Day Plaid
Heidi Swapp - Sun Chaser - Happy Days
Pinkfresh Studio - Happy Hearts - Beautiful Moments
Bazzill Basics Cardstock - White & Pear

Reverse side of papers

Embellishments:
3 Tim Holtz Quote Chips, Sun Chaser Colourful Phrase Thickers, 2 49 & Market Tags, 2
Doodlebug camera shape sprinkles, Pinkfresh Studio set of chipboard frames, strip multicoloured puffy dots and a section of Heidi Swapp phrase thickers, 3 Rosie's Studio puffy stickers

Extra Bazzill Basics Cardstock Pack
Yukon Gold, Purple Palisades, Romance & Rain
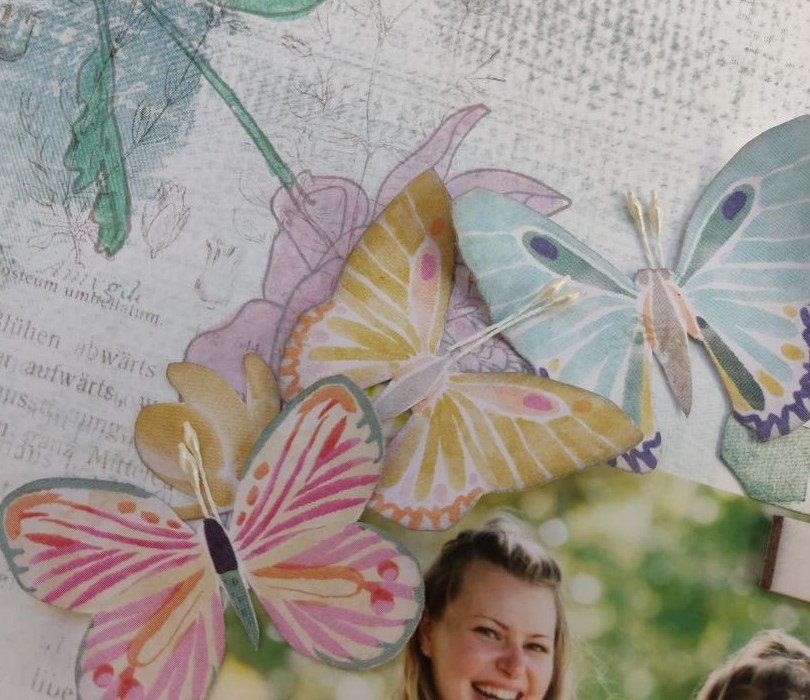

Life is Good - This photo shows my daughter and some of her old university friends at a wedding, they all turned up in long dresses, in solid colours, without any planning!

I really love the Spectrum Sherbet collection from 49 & Market and was so pleased to see two sheets included in this month's kit.

I started with the sheet called 'Splendored', and cut off the details strip from the bottom (however the design on this is too precious to throw away, so I kept it to use later).


I used my Tim Holtz Stampers Anonymous Flower Garden stamp set and stamped the blooms and stems onto the paper with a grey archival quality ink pad. Then with Distress inks, placed onto the craft mat and diluted a little, I coloured my blossoms to match the girls' dresses and the paper.


I placed the large photo in the centre of the page. With the detail strip trimmed and cut into three, I placed the pieces at the top and bottom edge of the layout and along the top of the page - matching up the colours to the area of the paper.  


From the kit I selected my title words from the Sun Chaser Colourful Phrase Thickers, and so the layout is called 'Life is Good'!


I chose and fussy cut a selection of butterflies and a few flowers from the Pinkfresh Studio - Happy Hearts - Beautiful Moments paper. I added flower stamen to these to create antenna for the butterflies. I curved the wings with the scissor blade. The butterflies were arranged onto the layout, and then the bodies were glued in place. I placed a small 3D foam pad under each wing to add a little dimension to the creatures.


Finally I placed one of the quote chips to the top area of the photo.
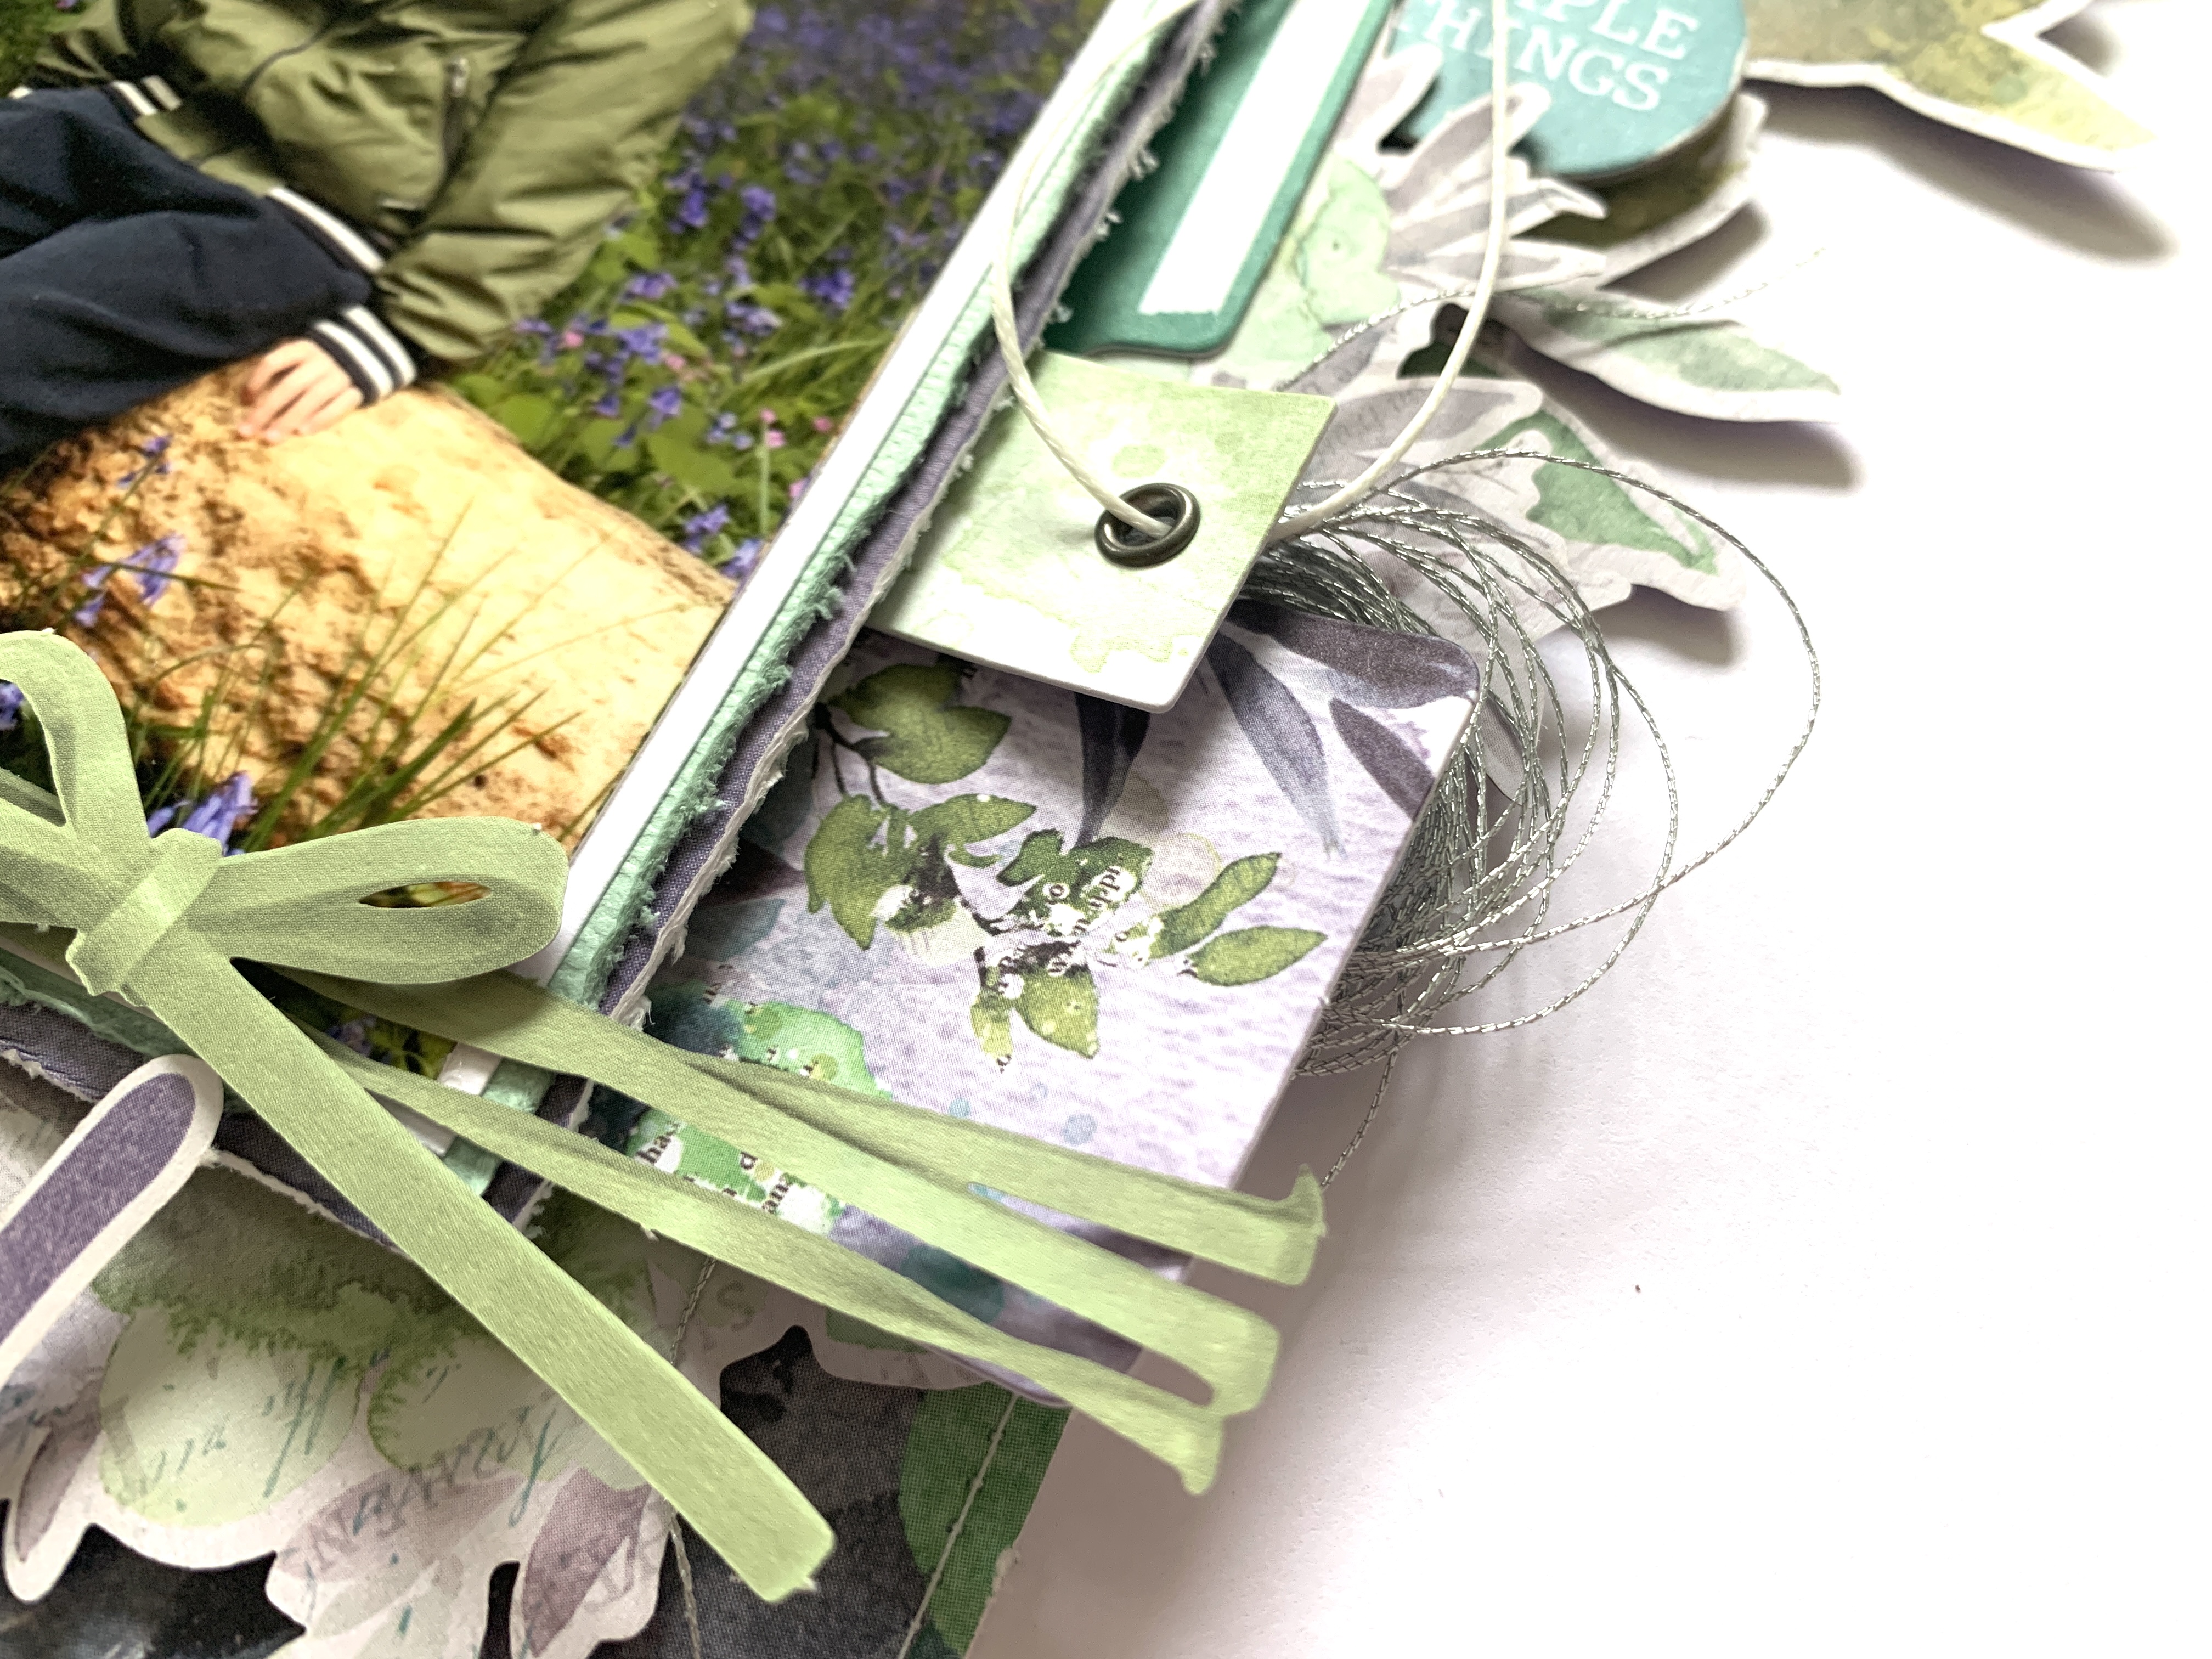
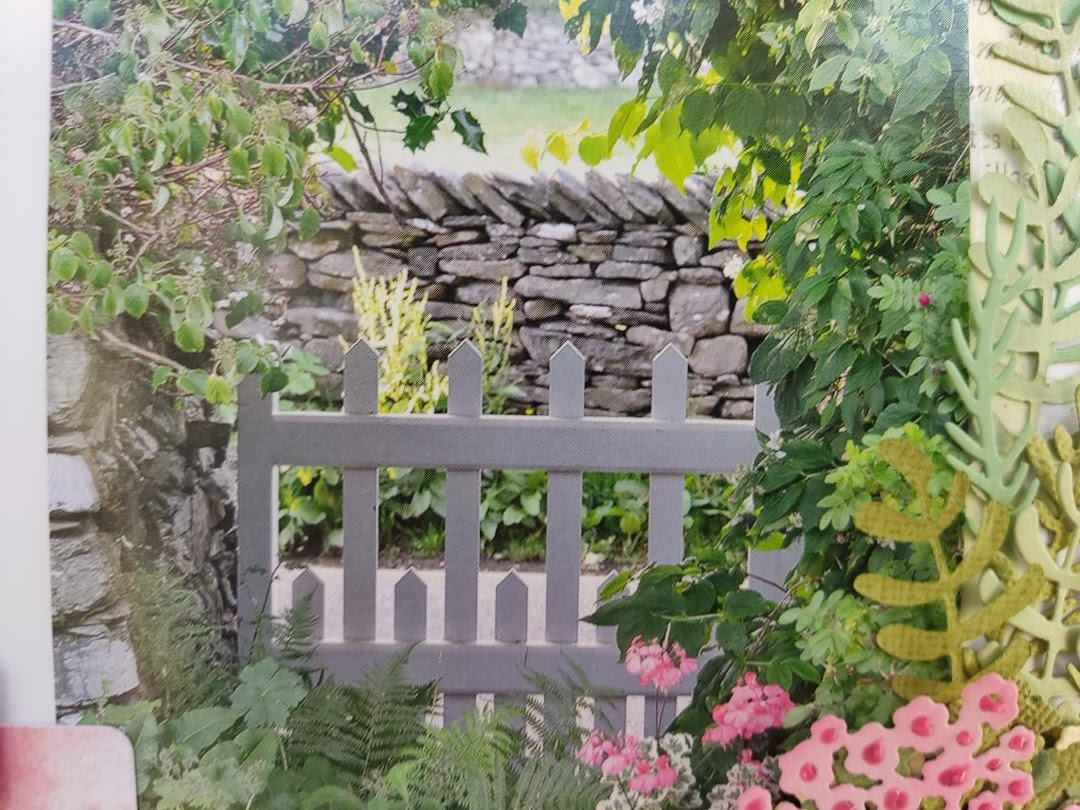

Tom Kitten's Gate - I was taken with this view through the pretty gate surrounded by foliage, dry stone walls and pots of geraniums, while visiting Beatrix Potter's Hill Top Farm last month. I later discovered this is the gate featured in The Tale of Tom Kitten.


This layout starts off with the sheet of paper called 'Rainbow' from the Spectrum Sherbet collection, I chose to use the side with the green brushstroke circles. There is a lot more subtle detail in the paper too.

I popped the photo in place - bottom right of the circle. With the detail strip from the bottom of the paper, I cut two pieces, trimmed the ends diagonally, and added them to the base of the photo.
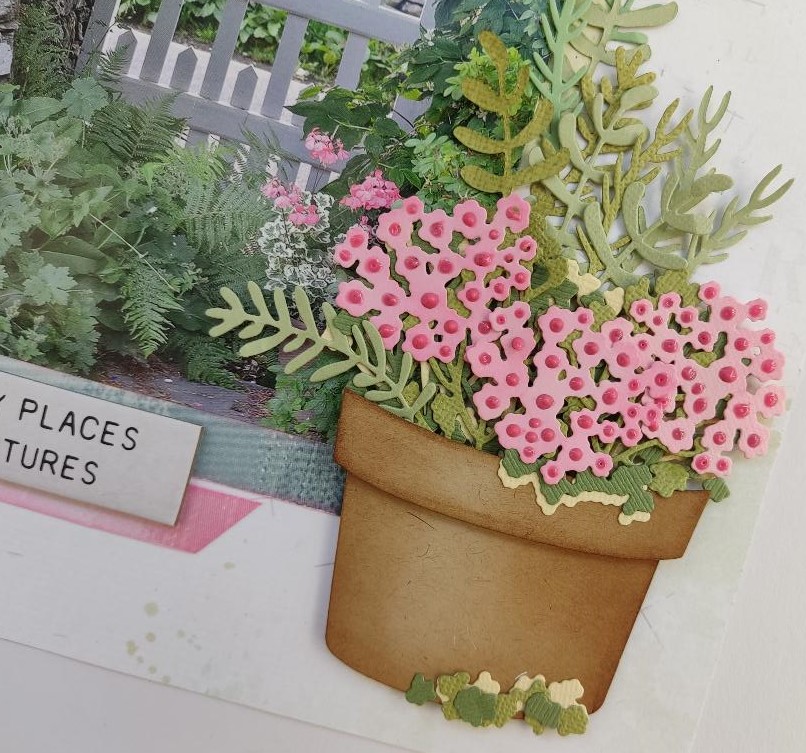

I created my pot of geraniums to mimic that in the photo, using some of the cardstock from the kit and adding some from my own stash. I used Kraft Bazzill for the pot and die cut the shape using Tim Holtz, Bigz Sizzix die - Potted. The pieces were shaded using Gathered Twigs Distress ink and a blending tool. The rim was added to the pot with 3D foam pads. I attached the finished pot to the layout with more 3D foam.


I created the flowers and foliage using the Tim Holtz Funky Floral Thinlits die set. Using cream and green cardstock I created the varigated leaves of the geraniums. I layered all these into the pot, and continued to foliage around the circle a little leaving room for the tags and title.


My journalling was added to the two Spectrum Sherbet tags. I exchanged the white cord for some pink jute twine and tied this into small bows. The first tag was glued to the page and the second one was raised with 3D foam.


The title was made with Pinkfresh Studio Happy Blooms mini puffy letter stickers, I arranged them to follow the line of the circle.

Using Nuvo Crystal Drops, I added centres to the flowers with Party Pink, and a few dots to my foliage with Party Pink and Apple Green.

Once again, I finished off with one of the quote chips from the kit.

That's all for part 1, I'll be back with two more layouts soon.
Thanks for looking
Lynn x