Monday 30 May 2022

Adding Colour & Texture to Pages

 Hi Lisa here,


Do you ever create a page and you know it's not finished but you can't quite decide how to move forward with it?

You come to a standstill.

My number one tip is always to walk away and come back with fresh eyes.

This worked so well for this page today.


  It was just missing something.


I'd used the Heidi Swapp Paper collection - Sun Chaser - and some Doodlebug yellow alphas, but I just felt the page wasn't finished yet.


   I decided it needed colour and texture.

So I made some tab tops and little banner embellishments.

You can watch the video of this page being made here.


I cut out some hearts and also used the negative that I would usually throw away as frames for my smaller photos.

It just added some good colour to what would have been a very plain part of my page.


By adding some tulle and embroidery thread and a coloured staple, it added some great texture to my page. I cut the words from one of the Heidi Swapp papers. Everything was layered together with a hot glue gun.


 I also cut some of the hearts from the Heidi Swapp paper.


I was so much happier with how this page ended up.
It really needed that added colour and texture.

How do you add colour and texture to your pages?

Lisa x

Friday 27 May 2022

Hello Sunshine - Vicki Boutin - Sweet Rush Collection

Hello, Rebecca with you today sharing another colourful layout created with Vicki Boutin's Sweet Rush collection. You can find the collection in store here.


It's been a long time since I've used a cutfile on my layouts so decided that it would make a nice change to use one. I chose a pie chart cutfile from Cut To You, and cut it twice. The first cut is from the B side of the Simple Pleasures patterned paper, and then I made the file slightly larger and cut it from black cardstock and layered the two together.


I wanted to make the hearts on the patterned paper 'pop' a bit more, so I used a black gel pen and drew around the outline of some of them to give them some definition.


Behind my cutfile, I added some colour using a Distress Oxide Ink Pad in the shade 'Mermaid Lagoon', to match the colour of some of the hearts, and the top my little boy is wearing in my photo. I used an ink blending brush to apply the colour, and then watered some of the ink down and added some splatters.


I placed my circular photo in the centre of my cutfile, raised up with foam and then added some die cuts from the Icon Ephemera pack, focusing on the tropical items to match my photo. I arranged these in two clusters, either side of my photo.


Next, I added my title - also from the Icon Ephemera pack, and embellished further with some flowers I had fussy cut from the Daisy Chain patterned paper. I love that there are so many opportunities for fussy-cutting and creating your own embellishments with this collection. It's a great way to make a collection go further.


I also introduced some of the Phase and Icon Chipboard Thickers - some sentiments and butterflies. 


I finished my layout off with some star stickers from the Sticker Book and a couple of the heart shaped Layered Embellishment Stickers.


I hope you've enjoyed this layout and it inspires you to create with the Sweet Rush collection. As always, I have lots left over so this won't be the last time I use it!

If you'd like to watch how this layout came together, there is a process video up on my YouTube channel, which you can find here.


Take care,

Rebecca x

@preciouspagespapercraft


Wednesday 25 May 2022

Bella Blvd ~ Time to Travel 🌎

Hi all, it’s Anna back on the blog today! 
For my next few blog posts I will be working with a new collection from Bella Blvd - Time to Travel! This was perfect for me as we’ve recently returned from a very much long awaited holiday! 
My first layout documents a couple of pictures of a few of us ‘ready for takeoff’.


Starting with a sheet of white bazzill, I cut the b side of ‘love this place’ paper diagonally adhering it to the left side of the layout. I then used my cameo to cut out an aeroplane cutfile using the b side of ‘baggage claim’ paper. 

I then cut a title cutfile by Bella Blvd and backed it with the b side of the ‘photo op’ patterned paper. I fussy cut a few of the tickets from the ‘baggage claim’ paper and mounted two photographs on to the b side of  the ‘road trip’ paper.


I fussy cut the passport and little aeroplane from the ‘daily details’ paper and tucked them in either side of my photos. I completed my layout by adding some of the puffy stickers from the collection. 


Thanks so much for looking! See you soon with another layout using this collection.
Anna
X


Monday 23 May 2022

Heidi Swapp - Sun Chaser - So Happy

Hi everyone,

Claire back with you today sharing my second layout using Heidi Swapp Sun Chaser.

If you've taken a look at this collection in the store already, you'll know there are some absolutely stunning papers to choose from, and this week, I have decided to focus on making the paper the star of the show.


It's called Chillax and it is absolutely gorgeous!

Because the paper is so colourful, I have reverted to my standard Premium White Cardstock, and have cut the paper to fill a cutfile (Peartree Cutfiles, Pinwheel Mandala).

I considered placing the design centrally, but thought it would be more fun to cut the design into two unequal pieces. I've positioned these off centre on either edge of my page, leaving space for my photograph in between the two sections.


Where the photograph would be placed, I created a mixed media backdrop for it to sit on.  Having prepped the paper first with Gesso, I added Distress Oxide Sprays in:

 - Abandoned Coral

 - Fossilized Amber

 - Squeezed Lemonade

And also some Shimmerz Vibez in Love Ocean #9.

Although I've had Distress Oxides for many years, I am new to Distress Oxides Sprays - I LOVE them!! I find them so much easier to work with as they swish around the page much easier once a few splashes of water have been added. I'm definitely hooked!

Once the ink was all dry, I took the Sun Chaser Clear Stamp Set and selected the phrase "so happy". It's the perfect sentiment for how we always feel when we manage to get away from it all.

I repeated the stamping across the whole section, ignoring any gaps which would be covered by my picture.


The stamp set also contains a small heart - perfect for filling smaller spaces in between stamping.

Once all the mixed media elements were dry, I placed my cutfile on ether side, raising on foam pads for dimension.


Next, the photo and the clusters.


I mounted my photo on a piece of Be Bold black scripty paper, along with some polka dot tissue paper from my stash. I layered it on top of a tag from the Ephemera Pack and a small sun sticker from the Sticker Book.


Next, I created a small pull out that sits under the photo, using another piece form the Ephemera Pack. This holds some hidden journaling.


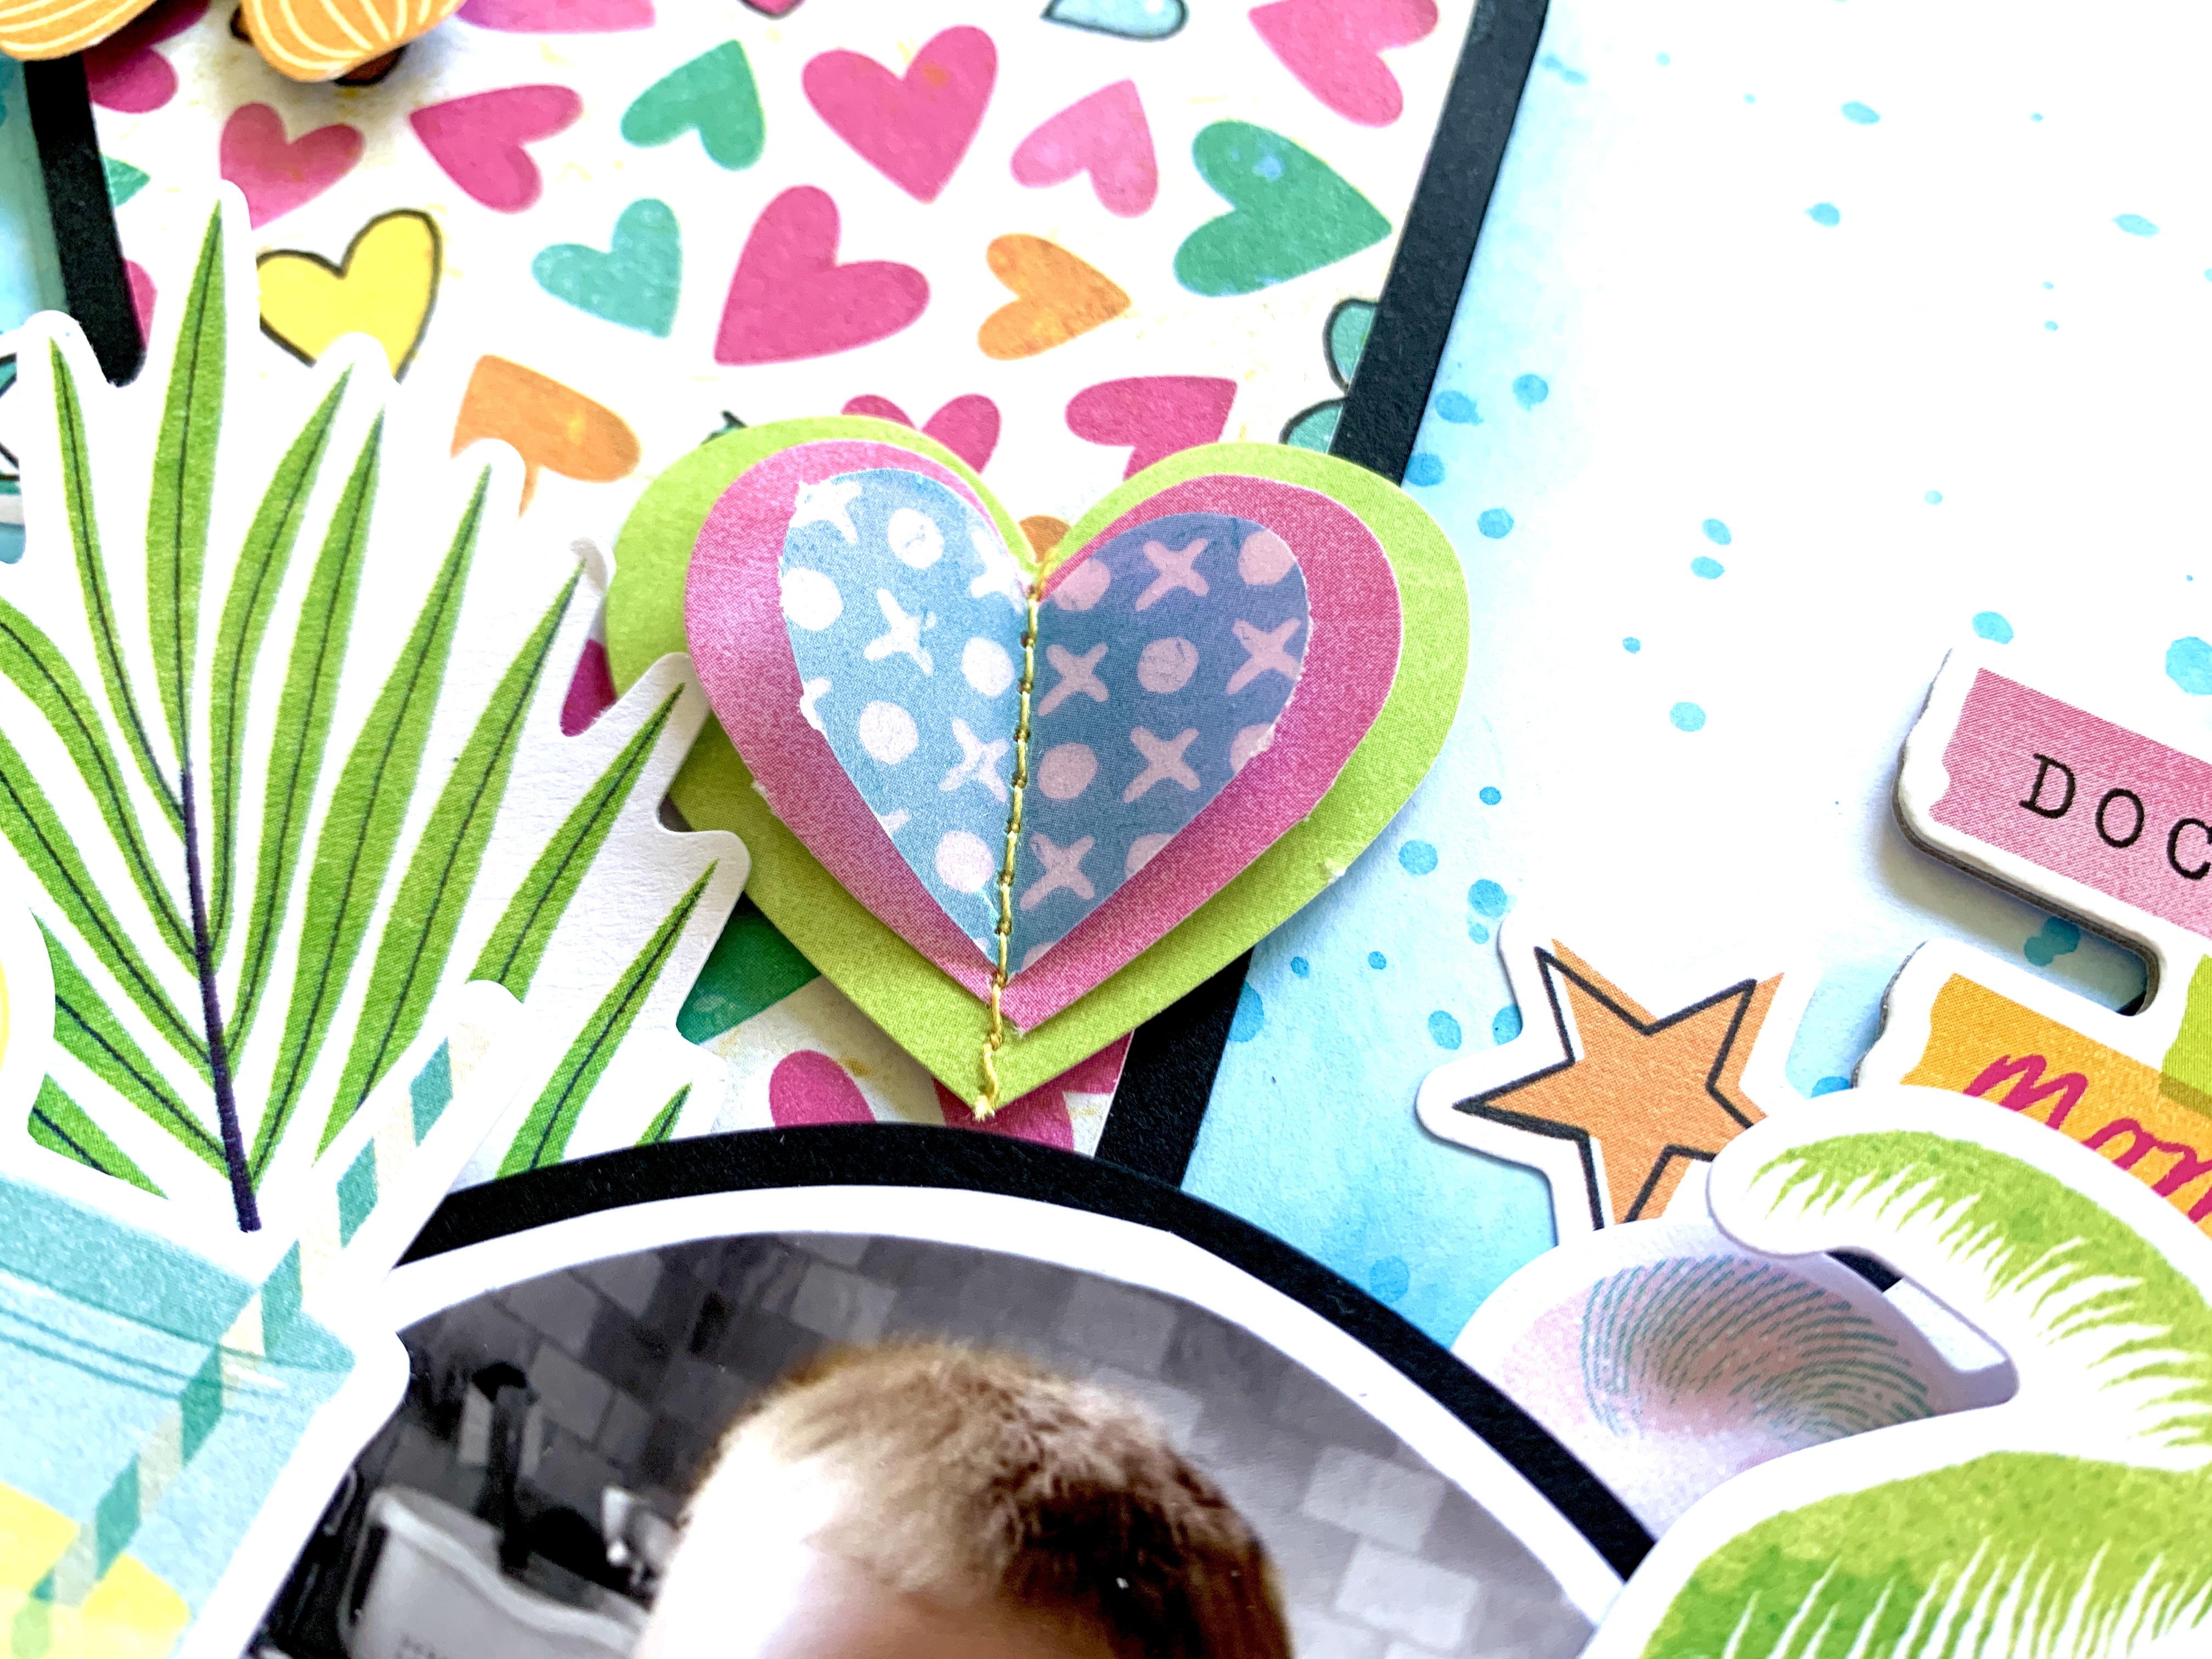
A small cluster to the bottom left of my photo created balance. Using black ephemera pieces helped tie in with the stamping and bring some grounding to this very colourful page. 

I used a circular tag, again from the Ephemera Pack, alongside some hearts from the Mini Puffy Stickers which feature in each cluster.


I decided, that with my repeated stamping, I didn't want a separate title, so ran with 'So Happy' as the title for my page. I used the remaining paper, left over from the cutfile, to cut some small 1" hearts, which I folded and scattered across the page along with some Pinkfresh Studio Jewels in Stargazer and Glacier.

As a final finishing touch, I felt like the page needed a little bit of foliage - in the photograph, we are in the Dominican Republic - so I cut a few leaves from the Juicy paper and added underneath my tag.


I really love how this page turned out.  These statement papers really do a lot of the work for you and need only minimal embellishing - especially with a splash of mixed media in the background.

I hope you've enjoyed these pages with Heidi Swapp Sun Chaser - It really is a beautiful collection to create with, and I hope it's inspired you to get your stories documented.


See you next month!

Claire xx

@Scrappysoulmate


Friday 20 May 2022

May Papermaze Kit - Part 1

 Lynn here today, with the new kit from Papermaze for May - lots of soft colours with a variety of themes. I have created two very different layouts for this first post. 

Before details of how to make the layouts, here is a look at what is in the kit:


Patterned Papers:
Cocoa Vanilla Studio - No Limits - Nebula & Latitude
Simple Stories - Full Bloom - Simply Spring & Snailed It!
Pinkfresh Studio - Happy Heart - New Beginning
Echo Park - It's A Boy - Mushroom Forest
Bazzill Basics: Whirlpool & White

Reverse side of papers:

 Embellishments:


1 clear stamp, 1/3 sheet foam stickers, 4 exclusive acrylic leaf shapes, 9" washi tape, strip of pearls, Sparkletz star gems, 2 strips of Rosie's Studio gold puffy sentiments stickers, 6 wooden stars

Extra Bazzill Basics Pack:


Wildberry Pie
, Yukon Gold, Apricot & Date Swirl

Sweet Baby Girl - To go with this pretty lacy paper I chose a black and white version of this photograph of my baby daughter - Emily.

I love the New Beginnings paper and felt it needed a delicate black and white photo of a baby or a wedding. I printed my photo to make sure it was just the right size for the centre square of the pattern.

I used the Date Swirl Bazzill from the extra Bazzill pack as a base, as the grey tone is perfect to peep through the cut shapes on the paper.

I used a craft knife to cut through the scalloped designs of the paper. I also gutted the centre square, cut the flower shape from it and set the piece aside to use later. 


The scalloped edges of the paper were all inked with Worn Lipstick Distress Ink. I curved the scalloped edges of the paper with the blade of the scissors. A 3D sticky pad was placed under each scallop before replacing all the pieces back in place over the Date Swirl Bazzill.


Once the paper was reassembled onto the cardstock, I placed the photo over the central square. The flower was curved and inked and placed to the bottom right of the photo.


I used some glittery foam alphabet stickers from my stash to add a title.


I decorated the page by covering many of the dots on the paper design, with flat backed pearls in several sizes. I also used Nuvo Glitter Drops in Silver Moondust and Nuvo Crystal Drops in Gloss Simply White.


Just Bloom & Grow - A treasured photo of the girls in my parents' front garden - wish I could remember what it is they are so intent on studying!


For this layout I chose to use the white Bazzill from the kit.  With a Vicki Boutin Stencil from the Fernwood Bountiful set, I created a flowery corner in the right bottom corner with some Dried Marigold Distress Ink.


I tore a strip from both the Simple Stories papers - the bird side of Simply Spring and the plaid side of Snailed It! I placed these strips down the left side of the page.


The photo was double mounted using the orange and the snail side of the same two papers used before.

I used an old favourite - Tim Holtz Wildflower Stems #1 Thinlits die set to cut daisies and some leaf stems. I used Whirlpool Bazzill for the stems and white cardstock for the flowerheads. The flower centres were coloured with some Dried Marigold Distress Ink, and stippled with some Forest Moss Distress Ink and a dry stencil brush. These were arranged around the photo.


Each kit contains some Simple Stories - Full Bloom - Foam Stickers, I used mine to create the title. The bird and bee and the quote at the top left are from the same set. I added an '&' sticker from my own stash and wrote some journalling under the title.


Finally I fussy cut three snails from the 'Snailed It' paper and place them on the layout.


That's all for today, I'll be back with two more layout soon.
Thanks for looking.
Lynn x

Thursday 19 May 2022

May Crop

 Our May crop is this coming Saturday, 21st May - as usual we're at Otley Village Hall between 10am and 4pm.  This month's kit uses the Maggie Holmes Round Trip collection... 


There will be a delicious selection of home-baked cakes, tea & coffee, a variety of punches and dies to use and of course a discount in the shop.  If you'd like to come along, just drop us an email at enquiries@papermaze.co.uk.


Monday 16 May 2022

Super Simple Scrapping ..... Simple Stories Vintage Lemon Twist

Hello

It's Anita here with you today and I have a very quick and simple layout to share with you.

I have been working with the gorgeous, zesty Vintage Lemon Twist Collection from Simple Stories.

Sometimes it's nice to literally just pop a layout together in a few minutes, without any faffing, shuffling papers or spending a few hours fussy cutting and designing....this was one of those occasions!


In all of their Vintage ranges there is at least one sheet of paper that is completely gorgeous and literally ready to just drop a photo onto it and no need to do much else! In the Lemon Twist range it is a sheet called Sunshine and Lemonade and it has the most stunning detail and design on it. 


I wanted to grunge it up, but just a little bit, so I used a small amount of black acrylic paint on a piece of  sponge and gently swiped it around the edge of the page  to create a smudged frame. 


I had some bits and pieces left from a sheet of Journal Elements and so I cut a few butterflies out to scatter about and also a section from one of the panels, which I popped underneath the lower photo to just journal the date on.
I always love a little bit of bling too....so just popped 3 different colour gems on!


I thought that was it....but kept looking at it and then realised I felt it needed a little something else on it....to tie in with the black. Using some different glasses and a roll of tape as a stencil I made some circles of dots using a bottle of Black Nuvo Drops
 
That was it, didn't take long at all but I think its a really pretty page. Sometimes its good to just let the paper do all the hard work for you!
 
I hope you have enjoyed seeing my page . Maybe you have already got some of the Simple Stories Vintage ranges , but if not, why not pop over to the SHOP and have a look...there are so many lovely things available and more arriving day by day.

Happy Crafting

Warmest wishes
Anita xx

Friday 13 May 2022

Pinkfresh Studio Happy Heart - Hand Stitching

Hello, Karen here again with another scrapbook layout to share using the beautiful Happy Heart collection from Pinkfresh Studio. For this layout, which is inspired a great deal by a layout by Paige Evans, I used just two pieces of paper - Celebrate You (2" Squares)  and Keep Growing (Blue B Side), some words from the Ephemera Titles Pack, a few sequins and lots of hand stitching.

The sheets of 2" squares which a lot of manufacturers have started producing are very versatile and can be used in many way. You can use them in their entirety (like in this layout I created a couple of years ago using Simple Stories), use a few of the squares either whole of fussy cut as embellishments, or as I have with today's layout, use some of the squares in a grid design. You could also cut your own 2" squares from patterned papers if the collection you're using doesn't include a sheet of squares.


I started with a sheet of the pale blue Keep Growing paper and then chose 19 of the 2" squares from the Celebrate You paper which I arranged in a grid with six 2" square black and white photos. I distressed all the edges of the squares and arranged them so that the colours were evenly distributed throughout the grid. The photos were mounted on 3D foam to raise them up and make them more prominent.


I then took a few words from the Emphemera Titles Pack and with 3D foam underneath I placed these on top of some of the squares.


I almost left the layout at that but decided to do some hand stitching on the layout. Firstly I stitched over some of the designs on the squares.


Then I poked a serious of holes into the layout where I wanted to stitch grid lines and using 6 strands of pale blue embroidery thread I stitched the lines using a chain stitch. This was a real labour of love and took a long time to complete but I really like the finished effect and the added texture it gives the layout. It would have probably been easier to stitch the lines before I glued down the squares, but as the stitching was an afterthought that wasn't an option.


Finally, I added a few sequins to a couple of the squares and called the layout done.


I hope you like the layout and may be tempted to have a go at hand stitching on your own layouts. 

Until next time, Take Care
Karen x x