Monday 30 May 2011

Monochromatics

There is something about monochromatic projects - they are somewhat challenging, but look oh-so-delectable when finished.

** click on image to enlarge **

I always find that if you do not restrict yourself too much within the boundaries of monochromatic design, such as adding one other colour (i.e. black or white) for titles and accents it can be so much fun to create a project using varying shades of a specific hue.

For the above layout I have been playing with October Afternoon and as soon as I saw the 5 & Dime collection I knew which colour scheme would work perfectly: brown as it would suit the vitage look of the papers.

I dug deep and found a picture of my from 1974 (in those days most photographs turned out with a brownish tint, so very perfect for the look  am trying to achieve) and started spraying my background paper with a helping of Cosmic Shimmer. After this dried, I outlined some of the bigger slashes of colour with a black pen and added some pearls as accents.

Now I could start to shuffle layering the tags, journal cards and my picture until I was happy with the arrangement and using some adhesive such as Herma, stuck everything in place.


Have you tried your hand at monochromatic projects yet? If you want to recreate the above layout, you can purchase the product used directly from Papermaze:

Wednesday 25 May 2011

bo bunny...


I had so much fun making this layout .. i love the fact that there are so many wonderful things to cut out and use on your layouts with this collection of papers...

STEPS

1 Start off by gluing your patterned paper onto brown card stock pealing back the scalloped edges to make this raised.

2 cut two different size patterned papers and glue into your background , roll the edges of your patterned paper as shown.

3 glue your photo into place cut your flourishes out of the patterned paper and place as shown

4 cut a few flowers from the patterned paper ,, using white flowers stamp scripted writing to give them more detail sew buttons into the middle to complete the effect

5 take three large fabric flowers fold them over to get your desired effect as shown

6 finish off the layout by adding butterfly's your title and stick pins ..

Monday 23 May 2011

Take Note...

My last creation with BoBunny's Gabrielle line was very masculine (despite all the beautiful butterflies) so for this piece I wanted to go totally feminine.


I started with a 7 Gypsies album but I took it apart by pulling back the wire binding and gently taking the pages off the wires. Whilst the front and back covers were off, I had the chance to cover them with one of the sheets of BoBunny paper. I cut it to size, stuck it down with wet glue, and then sanded the edges when it had dried. I repeated this for the reverse of the covers too, but in different coloured paper. I then used acrop-a-dile to make holes and set eyelets where all the original holes had been on the covers.


I then started decorating each of the pages inside, and constructed the book back together with bookrings instead of the wire binding.


For the front cover I embossed the edges in a copper colour, then grouped together some Tim Holtz metal embelishments, with some prima ribbon and pearl swirl, and a butterfly cut from one of the gabrielle papers. I embossed the butterfly with UTEE so it was more durable, and added a sheen.


I decorated two pages (four sides) with each of the design. Some were a little more plain like these ones...
Some had Maya Road kraft envelopes for storing appointment/contact cards.....


...and others were really spritzed, inked, stamped and distressed. I always made sure the shade of background was kept light enough to write over.


I also added some Fancy Pants note cards, cut down to size.


And for the back, a small message with a few embelishments that echo the front design.


Friday 20 May 2011

River Side

A quick 8.5x11 page, using up the leftovers from the Jillibean soup papers. I wanted to remember this gorgeous photo I took during the Easter holidays when the sun was blazing and it felt like high summer. The bright green backing paper was perfect as a backdrop, and I used Kraft cardstock to provide a basis for the title and some journalling.

I used EK Success border punches to add interest to some of the cardstock edges, and used Autumn Leaves alphabet stamps for part of my title - American Crafts foam thickers were used for the rest.


The hearts were handcut from one of the papers, and embellished with gems. A few stickers and some ric-rac finished off the page nicely.
Posted by Picasa

Tuesday 17 May 2011

A little note...

Just to let you all know that we are updating this blog in the next few weeks....so if you click on here and things look funny...bear with us...thanks!

Monday 16 May 2011

Jillibean Soup

I had never used Jillibean Soup papers that much before receiving this little lot in the post from Papermaze, but I have to admit to becoming fairly smitten with them! The Dutch Mustard soup papers are gorgeous browns and greens and oranges - some of my favourite colours to scrap with. If you haven't checked out Jillibean soup before, go and take a look - all of their ranges are lovely!

This page was made by layering up a number of the papers, along with a scrap of notebook paper and some lovely adhesive trim in a floral design.

The butterflies were punched with Martha Stewart punches, and the title is made using American Crafts chipboard thickers.


Posted by Picasa

Friday 13 May 2011

Three Cheers for Jenni Bowlin

Hi,

Today I am raving about Jenni Bowlin Studio products.
These products seem to get better and better.
I have made this LO below using mostly Jenni Bowlin proucts to show you what a wide range of products this company has to offer.


Have you seen that you can now buy Acrylic Paints from Jenni Bowlin?
I have quite a few of these now and love them. I can't recommend them enough.
They are so smooth to use. I don't tend to use the dabbers, but prefer to remove the lids and use with a brush.
You can see the collection of paints here.
My favorite has to be Seed Packet.


To make the flower above I have used some pages from the little Memo Note Books.
The note books come in a variety of colours, lots of pages inside with 4 different styles and a page of stickers too.
To make the flower I have hand cut 3 circles, roughed up the edges and spray misted. They have been layered and finished with a button.

The tickets are one of the most well known products I think from this company.
There are so many to choose from now. I just love these.


I have backed the larger Alpha stickers onto some card to help them stand out a little and used 3d foam tape on the back so they are slightly raised.
There are lots of the Alphabet Stickers to choose from that coordinate well with everything else. You get alot for your money too.

I have also used a Butterfly on this page. These come in a pack of 5 and there are a few colours to choose from. Each one has a sticky pad on the back so they are really easy to use.


If you aren't overly familiar with the products, I recommend you take a look.
I highly recommend them. You can see all that we have to offer from Jenni Bowlin here.

Thanks for stopping by today.

Lisa x

Wednesday 11 May 2011

BoBunny 'Gabrielle'


Recently, Papermaze has started stocking four new fabulous lines from BoBunny, and today I want to show you something with the 'Gabrielle' collection.


These papers are filled with delicate butterflies, but this page proves you don't have to save these gorgeous papers for your girly pages...


The colours are perfect for more masculine pages, especially when combined with distressing techniques and twine.

To cretae the fence, I diecut the shape from cardstock, then applied a thick layer of crackle paint. Once this had dried and cracked, I brushed a thin layer of brown distress ink over to highlight the cracks and age the white paint further.


Soon I shall be back with a feminine side to these papers!

Monday 9 May 2011

The First Cut Is The Deepest

Hello everyone, it is Kim here with you again.

Today I would love to share with you another obsession of mine: fussy cutting.
Give me a sheet of paper with bold patterns and a pair of scissors and you have one happy scrapper :)

I used to shy away from bold, bright patterns in the past as I just could not see me making use of a "loud" pattern such as these examples (all available from Papermaze)

Crate Paper - Emma's Shoppe Quilts
Cosmo Cricket - Snorkel Current
Usually I would just roll my eyes, push the paper aside and scrap with something completely different and subtle instead.

But these days, I see the potential in busy patterns - you can make your own embellishments just by cutting along the different patterns. See that Cosmo paper up there ^^ ? I don't just see waves, I see circles, which I can layer and create my own flowers, I see dinosaur outlines...I see endless possibilities and that one sheet of paper can last me for a number of different layouts, just by using bits and pieces of the pattern.

For today, I have chosen to go with a combination of The Girl's Paperie and Crate Paper and used subtle and busy patterns to create this layout.

** click on image to enlarge **

If you want to try your hand at fussy cutting, you can purchase the products used to create the above layout through Papermaze.
Papers: Girl's Paperie - Vintage Whimsy "Birds Of A Feather"; Crate - Emma's Shoppe "Quilts", Portrait "Something Blue"
Stickers: Jenni Bowlin - Chalkboard Alpha Red, Circle Reverse Brown
Journaling tags: My Mind's Eye - Little Miss Muffet Journal spots
Mists: Cosmic Shimmer - Candy Pink, Angel Mist

Sunday 8 May 2011

June Workshops

Here are the  June workshops:

First workshop is done using some gorgeous Fancy Pants...

this is being held on the 1st June...7.30pm at the shop..bring with you 2 photos portrait ( i used 6 by 4 but cut them a bit smaller) and your normal cutting tools

The next workshop is a card one...

You will be making three cards using fancy pants paper...you will need normal cropping tools for this workshop.It will be held on 15th June at 7.30pm at the shop.

The last class is done using Cosmo Cricket paper.. 29th June......this starts at 7.30pm and is being held at the shop...

These will go up on the website to buy in the next week..any more details needed please email me at wendy@bbbweb.com

Friday 6 May 2011

Play Misty For Me

Hello, everyone - this is my first post as part of the Papermaze Design Team and I am very excited to share my tips and tricks with you on misting.

There are a number of companies who offer you a variety of coloured mists, I have two favourites Tattered Angels and Cosmic Shimmer. Tattered Angels' Glimmer Mist dried incredibly fast, while Cosmic Shimmer offers more vibrant colours at a very economical price.

So, what exactly is Glimmer Mist/Cosmic Shimmer?
Just water mixed with coloured pigments - that is pretty much all there is to it, but if can give your projects just that little bit of extra "oompfh".

Can it be used on any surface?
Paper, cardstock, cardboard, fabric, canvas, wood and chipboard will receive the best results but I have used Cosmic Shimmer successfully on metal as well - even though the coverage is not that intense.

How do you store the bottles?
I store mine upright but I know some like to store theirs lying on the side. Either way works fine but for me the upright storage gives me quicker access to the different colours - I store them by colour group

How do you shake the bottle to mix the colour and water?
When you first get your bottle you will notice that there is a lot of substance at the bottom and the water looks kind of flat.

You will need to shake the bottle to allow the pigments and the water to mix. See how different the colour looks now?

NEVER shake it up and down, that can result in the spray nozzle being "clogged up" after a few uses with pigments and you won't be able to spray at all. I roll the bottles between my hands until the pigment residue has completely mixed with the water.
You cannot roll the Tattered Angels bottles in your hands so the best way to mix them is to shake the bottle from left to right.

What to do when the spray nozzle is clogged up?
There are some pigments that will clogg up the nozzle no matter how careful you are, but you can easily get this cleaned up. You will need to remove the nozzle from the bottle (be sure to store the now open bottle out of reach) and submerge it into very warm soapy water. Leave it in there for about 30 - 40 minutes and then start spraying (leaving the end of the tube submerged in the water). 90% of the time you will find that your nozzle is working perfectly again, but sometimes it may need up to 2 hours in the water to completely unblock.

How do I use the mists on my projects?
It really depends on the level of coverage you would like - the closer you spray onto your base the more intense the colour will be, but it will also restrict the coverage. The further away from your project you spray, the finer the mist will settle on the base and coverage is much wider. I also found that if I press the nozzle only tentatively the colour will come out in splatters ( which I love), whilst if you press it down firmly it will spray more evenly.

How do I make sure the mist only settles on my projects?
I have my own "misting studio", i.e. an old pizza box in which I place all my projects when misting. The 12 x 12 boxes will catch the fine mist and your other surfaces will be protected.

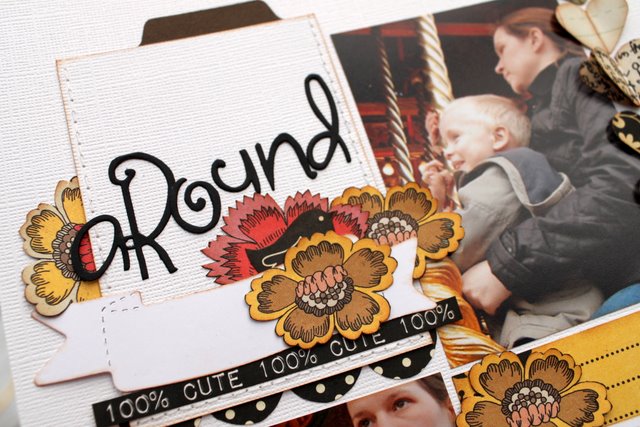
Now, let me show you a project which uses subtle misting - I like to make use of this method when I have a piece of cardstock or patterned paper, which is too bright and would stand out too much on a layout or other project. I will first look at the overall colour scheme of my project and choose the misting colours accordingly.

Can you see where I used the mists in the below layout? It is the mat underneath the photo - this used to be white cardstock and I needed to tone the brightness down to work with overall design of the page. Mission accomplished, would you agree?

** click on image to enlarge **

If you would like to try your hand at misting, you can purchase the products used for the above project directly from Papermaze.

Cardstock: Bazzill Basics
Papers: Crate Paper - Emma's Shoppe "Sweets"; Girls Paperie - Vintage Whimsy "Birds of a Feather"
Mists: Cosmic Shimmer - Aqua Lagoon, Ancient Copper; Tattered Angels - Olive Vine
Stickers: Jenni Bowlin - Black Tiny Dot, Circle Reverse Brown
Beads/Pearls: Prima - Pearls & Crystals; Dew Drops - Clear;
Pens: Zig - Writer Pen
Pins: Maya Road - Antique Gem
Journaling Spots: My Minds Eye - Little Miss Muffet, Life Stories
Punches: Woodware, Fiskars - Effervesence

Monday 2 May 2011

5 Cards in 30 Minutes

Hi Lisa here!
Some super fast cards to share with you today.

When hubby rang me this week from work just 30mins before I had to collect the kids from school, saying it was his parents wedding anniversary and he didn't have time to buy a card could I make one ready for him to take around after work. I wasn't overly impressed. I then decided, if I was making 1 then I may as well make a few using the same ideas.

So taking one set of papers (My Minds Eye- Stella and Rose 'Hattie'), 1 edge punch, 1 butterfly punch and a black journal pen, I quickly made these.


The idea was to keep them the same to save time. Using the same paper collection so I didn't need to woryy about matching up papers. I covered the front of each card. Cut a wide strip and used the edge punch on each one and stuck near the bottom of the cards. A thinner strip was then added to this using another co-ordinating paper from the same range.


A heart was hand cut for each card. I lightly folded the papers, so not to make a crease and cut half a heart. So when opened up you are left with a full symmetrical heart.


The small circles on some of the cards were made from my large punch on the big bite.
And on each card I've used a black journal pen to roughly edge everything.

All the wording has been printed on the pc and cut into strips and inked before sticking into place.


And butterflies have been added to some of the cards too.


I do like having a little stash of cards at home. This is a great way of doing that.
Really going with the thought of, if I'm cutting 1 rectangle of paper to make a card, then I may as well cut 5. Cut 1 heart, may as well cut 5.

Thank you for stopping by today.
Lisa x