Friday 25 October 2019

Living on the Edge........ Ciao Bella


Hi There

It's Anita here with you today and I have a layout to share using the last of my Ciao Bella Sound of Autumn papers.
I have had an absolute blast with this page and I have let loose with everything grungy, inky, sparkly and sticky! And to top it all the photos are not even loved ones of my family or friends....oh no....it's just a lowly little snail who was minding his own business in our back garden!!


I only used 2 sheets of paper for this page, for the backing sheet I used the reverse side of a sheet of  'All at Once Summer Collapsed into Fall'
And for the front page I used the reverse side of a sheet of 'The Sound Of Autumn' 
I cut a random and uneven wavy edge all the way round the outside edge of the sheet and used a Distress Stain in Brushed Corduroy that I dragged all around the edges of the paper.


I also used it to dab large random splats across the page and then let loose with various Tattered Angels Glimmer Mists using Olive Vine, Coffee Shop and Walnut Gold. 
    I sprayed them randomly and also into small puddles, then I tipped the paper to create drizzles down the page.


In my DT kit there was a Creative Expressions Mini Stencil, it was the Shabby Harlequin design and I used this combined with some Tattered Angels Glimmer Glam ink in Expresso Bean that I dabbed through the stencil using some sponge.


I also sprinkled lots of Gold UTEE in patches and heated from underneath to melt it.
After matting the 2 photos on cardstock I used gilding flakes around the edge and also in patches on some blossoms to make them co-ordinate.


I cut the title using the Big Shot and some Sizzlets in mixed fonts and then after sticking them on the layout I decided to use Ranger Stickles in Unicorn over the top of them.....it reminded me of the sparkly snail trails you see after they have climbed a wall!!


I added a metal buckle, some lace and a small wooden pennant.


And finished the whole page with a generous splattering of crystals, Dew Drops and blobs of Distress Stickles and Liquid Pearls in various colours.


I have really enjoyed getting messy with this page....and even though the photos were not of anything special or meaningful I very much appreciated the creative process involved. Sometimes its just nice to let loose a little.

Wishing you a super scrappy happy weekend!
Warmest wishes
Anita xx

Wednesday 23 October 2019

Pink Paislee Truly Grateful - Altered Clipboard

Hello, Karen C here again. Today I have an altered clipboard to share with you that I have created using Pink Paislee's Truly Grateful collection by Paige Evans. Whilst I love scrapbooking, I felt I wanted to do something different this month with my design team kit and this is what I came up with.


I started with a cheap A5 clipboard and to make the project easier my husband carefully removed the clip from the board for me taking care not to damage the clip.


I then covered the board with a piece of the #17 paper and then put a slightly smaller piece of the #15 paper on top.  I machine stitched round the edges of the smaller piece of paper with white thread and distressed the edges before gluing it down. I also added some texture paste using my favourite script stencil, but I needn't have bothered because most of this was later covered up! 😏


Two smaller pieces of the #19 and the #06 paper were then layered on top. The edges of these papers had also been machine stitched and distressed.


My 4x6 photo was matted onto white cardstock and mounted on the clipboard with a piece of foam underneath to add some depth. I was then able to start embellishing.


Some thin white lace was added to the bottom of the photo and tiny alpha stickers were used for the date.


I layered some of the die cuts from the pack of Floral Cardstock Embellishments and Ephemera in the bottom left corner and also added a sticker from the Accent and Phrase Sticker Sheet.


More Floral die cuts and a butterfly journalling spot from the pack of Journalling Spots were fixed to the top right corner. Foam was placed underneath some of the pieces to give lots of dimension.


On the top left corner of the photo I placed a banner die cut and some more florals.

The layout was completed wit a few enamel dots and the clip was reattached to the top of the board. As the clip wasn't going to be functional I attached it with a couple of large silver brads.

I really like how the clipboard turned out and the colours of the Truly Grateful collection let me create something bright and colourful which I can display in my craft room. I hope you feel inspired to create something yourself using this collection which is now available in the shop.

Take Care
Karen x x

Monday 21 October 2019

October Papermaze Kit

Welcome to the Papermaze October KitLynn here today with the very pretty, subtle colours of the latest kit put together by Vanessa. It's as if the kit was designed for my daughter's wedding which was in July! So here are my first pair of wedding layouts, made using this month's kit.


Before explaining how I made the layouts, here are the details of the kit itself:


The patterned papers are:
Pink Paislee - Indigo & Ivy - 03 & 08

Cocoa Vanilla Studio - More Than Words -  Precious
Cocoa Vanilla Studio - Midnight - Moonlight
Kaisercraft - Two Souls Collection - Leafy
American Crafts Dear Lizzy - It's All Good - Seek Magic


Reverse side of the papers
 Bazzill included - Coral Cream & Bazzill White

Embellishments included -

Pinkfresh Studio phrase stickers, 3 large pearls, 1 kraft die-cut butterfly, 6" x12" American Crafts acetate, 1m twine, 2 Tando chipboard butterflies, 1 prima flower, 2 paper flowers, 12" frayed ribbon, 5 cream buttons, 1 mini butterfly stamp, 1 strip mini pearls.

Extra Bazzill Pack


Four sheets of Bazzill - Powder Blue, Pinkini, Beewax & Stonehenge.


This is Your Moment


I took the sheet of paper from the Indigo and Ivy collection - No. 03. I used some Distress Oxide Ink pads (Spun Sugar, Worn Lipstick, Hickory Smoke and Gathered Twigs), and with a blending tool applied them over the centre of the paper, in an area just larger then my matted photo.

The photo was matted onto a piece of Stonehenge Bazzill and then a piece of Vellum, all the edges were torn and distressed. Before attaching the photo I trimmed and frayed the piece of linen ribbon from the kit and layed this across the page. On top of this I used the manufacturer's strip to add a thin banner of the contrasting pattern.

Once the photo was in place, I tucked a tiny piece of lace from my stash under the mat.


The cascading leaves were die cut from Stonehenge Bazzill and Tim Holtz, Sizzix Thinlits set - Skeleton Leaves and tucked under the photo. 

I used the two paper flowers from the kit, as they were the same cherry blossom flowers I had used for a lot of the table decorations at the wedding, I added a few more from my stash, along with some other flowers.

I didn't add a big title as the layout will be part of an album and the little Pinkfresh Studio phrase stickers said all I wanted them to. There seems little point in putting the wedding details on every layout within the album. 

#happilyevermarshall


This layout involved some painting with Distress Oxide Inks and the White Bazzill. I used a palette of five colours to match the flowers on the 'Precious' paper and arranged them in rainbow order. I swiped each colour onto the craft mat and spritzed it with some water. Then with a wide, flat paint brush, I applied a strip of each colour across the page. Then making the ink a little wetter I dripped some more colour onto each strip and over the ends.

The colours of Distress Oxide Ink I chose were - a mix of worn Lipstick and Spun Sugar, Dried Marigold, Fossilized Amber, Tumbled Glass and Hickory Smoke.


The next job was to fussy cut flowers from about half the sheet of patterned paper. I placed my photo onto a mat cut from the reverse of the other half of the 'Precious' paper. This was stuck into place and the flowers were arranged down the left side of the layout overlapping the photo. I curved the flowers with a scissor blade to give structure and raised them using 3D foam pads for extra dimension.  Sparkle was added to the flower centres with Crystal Stickles. The leaves were die cut using scraps from the 'Precious' paper and the same leaf die as before. These were inked with some of the Worn Lisptick Distress Oxide Ink.

The two Tando chipboard butterflies from the kit were also treated to some of the distress Oxides, then a coat of Glossy Accents. I added flower stamen from my stash to each butterfly. I added smaller butterflies with the tiny stamp in the kit and some Hickory Smoke Oxide ink.


The title was added with two layers of die cut letters using Tim Holtz Sizzix Thinlits Cut Out Script set. They were cut from Bazzill and inked with Worn Lipstick Oxide.

That's all for today, back with more from this kit soon.
Thanks for looking,
Lynn x

Friday 18 October 2019

October Crop

We are cropping tomorrow, and our monthly kit is a lovely delicate layout, designed by Lynn, using Simple Stories Simple Vintage Botanicals papers... 


As usual, there will be homemade cakes, and a discount in the shop, so if you would like to join us, just drop us an email! 

Monday 14 October 2019

'You Rock' Scrapbook Layout using Shimelle's Field Trip Collection

Hello, Rebecca back again with another layout created using the colourful Field Trip Collection by Shimelle. I'm still loving this collection and really enjoy working with it.

This month I've created a layout titled 'You Rock'. I've used a photo of my little boy and as the main colour on his top is green, I decided to use some green bazzill cardstock for my background, with a layer of white on top, but off-set at an angle.


I then decided to hand stitch along the edges of the white cardstock using embroidery thread. I've used two colours for a bit of extra interest.


I really wanted to use the Break It Up patterned paper as I love the colourful (not quite!) circles on it. I decided to fussy cut these 'circles' out leaving a small white border around the edge. I then placed them randomly across the centre of my layout and propped some up on craft foam to add dimension.


I wanted the green to flow throughout the layout so I matted my photo on white and green cardstock and then also placed a layer of tissue paper behind it. I also propped the photo up on craft foam.

I cut out some of the words from the Hear Me Roar patterned paper, matted them on the green bazzill cardstock and placed them under my photos. Seeing as the 'circles' aren't quite circles, I decided I didn't want anything straight on this layout and so stuck them down at wonky angles.


I also matted some of the words from the Accent and Word Phrase Stickers sheet and stuck them down on some of the circles.

I added my title, 'You Rock' from the Genius Puffy Phrase Stickers sheet, and printed my journalling and adhered using pritt stick so that the paper didn't get too wet and wrinkly.

I finished my layout with some brightly coloured Nuvo Drops around the two edges of the green cardstock.


I hope you've enjoyed this layout. The collection is still available in the shop so head on over to have a browse.

Take care,

Rebecca x

Friday 11 October 2019

Out and About with Lisa

Hi. I've been so looking forward to scrapbooking with my new trip photos.
We got back last month from a mega trip in the US. I have so many adventures to document.

I already had some of the Pinkfresh Studio papers before I left. I knew the 'Out & About' papers here would be perfect for documenting travel. I also had some of the 'Joyful Day' left over which I've also used.


The papers do all the hard work themselves.
I didn't have huge amounts of time but really wanted to scrapbook (know that feeling?)
So the base paper was perfect to get me started.
I usually like creating my own backgrounds, but it made a lovely change to just use a beautiful papers and have it all done for me.


I did lots of cutting from the papers too and layering to use as page embellishments.
I like to add my own touch by adding doodled lines. You can see them here on the photos and the hearts.
I also added some embroidery thread in contrasting colours. I love the colours and the texture this adds. 
 

I absolutely loved this paper below with all the frames from the 'Joyful Day' collection. I cut loads out to use for journaling.
One little tip....


See the part frames on the edges? I like to cut those out to use on the edges of my LO's.


I really enjoyed making this page. It's been a while since I've just created. Usually I'm creating for videos and concentrating on techniques and making fancy backgrounds.  
This one though was just for me and I loved it.
 
I really hope you've enjoyed this.
Have a lovely weekend.
 
Lisa xx

Wednesday 9 October 2019

The Pumpkin Patch ...... Ciao Bella 'The Sound of Autumn


Hi There

It's Anita with you today and I have been lucky enough to work with some glorious papers from Ciao Bella and their stunning 'The Sound of Autumn' collection.
Autumn is my absolute favourite time of year! I love the crispness in the air, changing of the leaves , the earthy scent and the gorgeous rich colours everywhere All the best of this is depicted in this paper collection and more besides..

I had this large photo of my youngest daughter taken back in 2014 at our local Pumpkin Patch and I am so glad I hadn't scrapped it before now. These papers are perfect for it and literally do all the work for you.


 I based the layout on a sheet of 'The Sound of Autumn' and I gutted the calendar sheets from the centre of the page to use as an embellishment on the photo. I used gilding flakes all around the edge of the photo to create a soft metallic mat and i fussy cut around the cartwheel and popped the photo in slightly behind it.


I added some cotton lace trim under the bottom of the photo and then layered the calendar pages and some fabric leaves together and held them in place with some antique copper brads and a pumpkin clip

 I added a few wooden buttons, cork washer, paper flowers and some garden twine.


and I cut out the copper book plate, added brads and raised it on foam pads to add dimension and make it look a little more real.

 The book plate and toadstools were cut from a sheet of Autumn Cards
I cut a long slice along near the base of the layout, popped a long scrap of paper behind it and gently rolled back the edges to create a long torn section and then I used garden twine to over sew along the section just to finish the page off.


I really think this has become one of my favourite collections for a long time and its been a real pleasure to create with.
You can see all the latest Ciao Bella papers here

Don't forget there are lots of lovely new goodies in the shop and you can see them all here
and still lots of crafty bargains in the Summer Sale too!

Happy Scrapping!

Anita xx

Monday 7 October 2019

September Papermaze Kit - Part 2

Hello, Lynn back today with the second part of the September Papermaze kit. Beautiful soft shades of fawn and blues and a mix of paper styles.
Here is my second pair of layouts both with photos of my great niece - Scarlett:


Before looking at how the layouts were made, here is a list of what you will receive in the kit.


Patterned papers:
Authentique - Poised - #1 Dress Form
Bo Bunny - Bee-utiful You collection - Charming
Ciao Bella - Broccato Estense - Rinascimento Estense
Kaisercraft - Journey collection - Globe Trotter

Pink Paislee -Indigo & Ivy - #02
Stamperia - Blue Land - Flower

Bazzill Cardstock - Twig and Wildberry Pie

Reverse side of patterned papers
Bazzill Cardstock
Admiral, Candle Glow Medium, Brown and Stonehenge

Embellishments
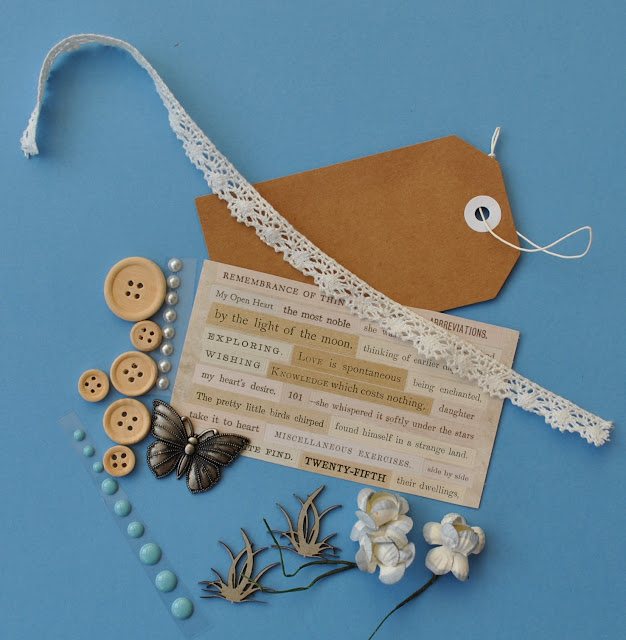
1/3 sheet of Tim Holtz clippings, 1x kraft tag, 6 wooden buttons, 3 paper flowers, 12" lace, 2 Dusty Attic chipboard pieces, strip of Doodlebug enamel dots, strip of pearls, Tim Holtz metal butterfly. 

Rain Girl
A few months ago Scarlett was kitted out for the rain with a new coat and boots and wanted to wear them indoors!


This layout was based on the sheet of patterned paper from
Bo Bunny - Bee-utiful You collection - Charming. The dilemma here being that I liked both sides! So I worked out the area which would be covered with other elements and gutted a 5.5" x 6.5". I used the fawn dot side for the background. Keep a piece aside (at least 2.75" x 2.75") for the next layout.


With Distress Oxide Ink in Blueprint Sketch, I heavily inked the edges by applying the ink to the craft mat and adding some water, then applying to the paper with a wide brush. Then I allowed the ink to dribble in all directions. Once dry I stamped the trellis and daisies using stamps from 49 and Market - Gabi's Daisies set. I then flicked some more of the watered ink over the page and set it aside to dry.

I filled the gutted gap with some scrap cardstock from behind. Then I cut strips from various papers and Bazzill and also used various washi tapes from my stash to cover the gap. I applied these horizontally and vertically.

I arranged my photo over the left of the strips and added the kraft tag to the right of the photo. I added a blue organza ribbon to the tag. My journalling was created with a white gel pen. With various blue and white paper flowers from my stash I added a few small blossoms to the top of the tag. I placed three large daisies to the bottom right of the photo surrounded by smaller blue blossoms. Then I added a few more strips of paper and washi tape to the bottom left of the layout, added a few flowers to this as well.

My title was created with corrugated cardboard and a Sizzix Bigz XL alpha die - 'Handmade'. I inked the letters with the Blueprint Sketch Ink and flicked some water randomly over the top. Once dry I coated the letters with Glossy Accents.


Daddy's Girl

This lovely photo of Scarlett with her Dad was taken just before Christmas last year. The layout is inspired by the beautiful work of Anna Komenda


The base of this layout is the Twig Bazzill. I worked out a grid system to give me nine blocks, these were lightly pencilled onto the card. They were about 1" in from the edges, with a gap of 0.5" between each block, the blocks themselves are about 3" x 3". Once this was worked out I rubbed the lines with an eraser so that they were very light. Then with a selection of blue Distress Inks I painted around eight of the blocks, overlapping the pencil lines. Then I flicked some watered ink over the whole page and set it aside to dry.

With wavy lines, I machine stitched around each of the eight painted blocks.
The ninth block was for the photo which I trimmed to 3.25" x 3.25".

I trimmed five pieces of patterned paper (both sides of Indigo & Ivy and the reserved piece of Charming) and three pieces of Bazzill (Wildberry Pie, Admiral and Stonehenge) to 2.75" x 2.75". I inked the edges of the patterned papers and stuck them into place centrally over each painted and stitched block. For the Bazzill squares I used a Tim Holtz layering Stencil (Tracks) and inked through the stencil onto two of the pieces. On the Wildberry Pie piece I used the stencil as a stamp to transfer ink onto the card. I inked the edges of the Bazzill squares, then stuck these into place too.


Then I treated each of the squares differently - 1 to 8 (left to right top to bottom).
1. A Scrapiniec Chipboard piece left over from a previous kit, and three clear Dew Drops.

2. Three enamel dots and a clipping sticker from the kit, together with a small foam heart from my stash.
3. A chipboard cloud inked with Distress Ink, and four clear Dew Drops from my stash. One of the chipboard grass tufts (inked) and a clipping sticker from the kit.
4. Nuvo Crystal Drops and blossoms from my stash with pearls and a clipping sticker from the kit.
5. The title made from Admiral Bazzill and Sizzix Thinlits Cutout Script alpha set. A little Baker's twine threaded through a wooden button and clipping sticker from the kit.

6. Another inked chipboard tuft and clipping sticker from the kit.
7. A daisy cut from the Sizzix Thinlits Wild Flower Stem #1 die set and scraps of Bazzill.
Three enamel dots and a clipp
ing sticker from the kit.
8. Admiral Bazzill and the Wild flower dies together with another clipping sticker and the metal butterfly from the kit.

That's all for the September kit, back with the October kit soon.
Thanks for looking
Lynn x

Friday 4 October 2019

Pink Paislee Truly Grateful - Be Amazing

Hello, Karen C here again. This month I'm working with Pink Paislee's Truly Grateful collection by Paige Evans as well as paper from the earlier Horizon collection (left over from a previous design team kit). The Truly Grateful collection has an autumnal vibe but its bright colours are perfect for lots of subjects. I choose to scrapbook a smiley photo of my daughter taken in 2012 in the Isle of Wight.


I decided to use paper #08 from the collection. This paper is very similar to paper #03 from the Horizon collection which Lynn and I used on layouts which can be found here and here


I started by trimming a quarter of an inch off of the four sides of the paper and then cut a large circle from the centre. The different coloured paper sections were then cut along the straight edges, the edges were distressed/roughed up with my scissor and then reassembled on a sheet of white Bazzill cardstock.  I lightly glued the pieces onto the cardstock before  machine stitching them with white thread.


Using my finger nails I then flicked up the edges of the paper to give the layout some dimension.


I punched tiny stars for matching scraps of coloured paper and glued these round the edge of the circle.

My 5x7 photo was double matted on black and white cardstock and attached to the layout with 3D foam to raise it up.


I cut a journalling card in half and tucked the two pieces underneath the top of the photo.


The title, which overlaps the photo and is partly mounted on 3D foam, was die cut from both white and black cardstock and by offsetting the black piece underneath the white I was able to give the impression of a shadow and make the title more prominent.


I created an embellishment cluster on the bottom corner of the photo using words punched from a sheet of paper #17, flowers fussy cut from paper #02 from the Horizon collection, some punched and die cut leaves and pink layered Traveler's Journal Flowers from Prima. Some of the elements were raised up with 3D foam to the same height as the photo. Tiny self adhesive gems were attached to the centres of some of the fussy cut flowers.


Finally I added where the photo was taken with tiny which alphabet stickers and doodled a border around the page using a black pen.

I hope this layout inspires you to create your own layouts using the Truly Grateful collection which if now available in the shop.

Take Care
Karen x x