Saturday 31 October 2020

Happy Halloween (2) - Simple Stories - Boo Crew Collection

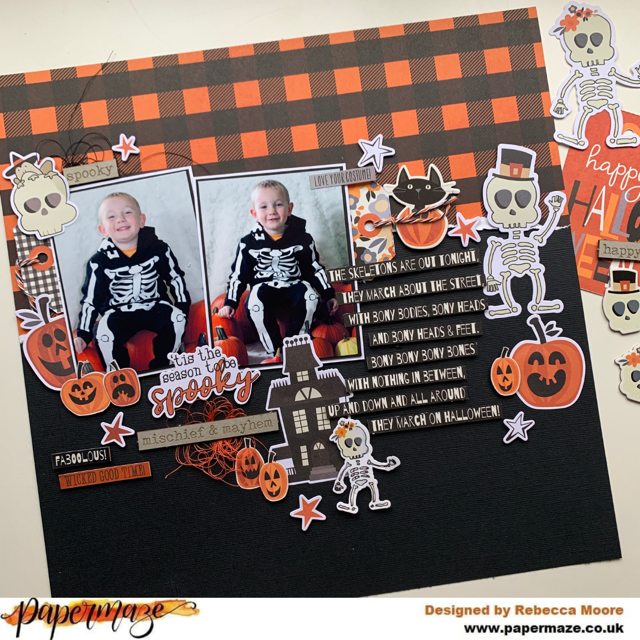
Hello, it's Rebecca here - I couldn't resist popping by to say HAPPY HALLOWEEN and to share another layout I've created using the Simple Stories 'Boo Crew' collection. I am still really enjoying this collection, and think I'll be creating layouts with it for weeks to come!


I started this layout with a sheet of 12x12 textured ivory cardstock, and added some mixed media by colouring my texture paste with distress inks, and pressing it through a stencil by Echo Park (the stencil can be found here). This has given me a gorgeous orange and black star background to build my layout upon. I also mixed the two distress inks with a little water and added paint splatters using a paintbrush. The background did't take very long at all, and it was very simple - but its added a lot more interest to my layout. If you are new to trying out mixed media, using texture paste and a stencil is a really great way to dip your toes in!

I mounted my photos first onto white cardstock, and then onto black to help frame them and placed them in the centre of my page towards the top. I selected four tags from the 'Tags' patterned paper, distressed the edges and added some embroidery thread and placed two just peeking out either side of my photos.


For my title, I've used the 'B' side of the 'Happy Haunting' patterned paper. I hand-drew the letters to spell 'Halloween' and cut them out. I drew a black border on each of the letters using a black fine liner pen to help give them a more defined edge, which I think helps them to pop off the page a little more. I adhered the letters under my photos using foam pads to add dimension. I then placed the word 'happy' from the Bits & Pieces pack above to complete my title.

I felt like my layout needed something dark at the top and bottom as it was looking a little stark with just the ivory cardstock. So I tore some strips of the 'Happy Haunting' patterned paper - using both the 'A' and 'B' sides. I layered these on top of each other with the darker 'A' side being more dominant, and the orange 'B' side just peeking out from behind it.


Next, I set about embellishing my layout. I still had the female skeleton left over from my last layout so she finally found a home on this page! She's from the Bits & Pieces ephemera pack. I am really impressed with this pack- I don't think I've ever had an ephemera pack with so much in it, and I love every single bit! The little cat riding the broomstick is also from this pack, as is the 'Hey Pumpkin' banner flag at the bottom. I also fussy-cut a little dancing skeleton from the 'Tags' patterned paper.

The Combo Cardstock Stickers sheet in this collection is just as amazing as the 'Bits & Pieces' and is jam-packed with so much! I've used several stickers on this layout - The 'A Wicked Good Time' sign at the top left, the male skeleton, the banner under my title, the pumpkin and also the word stickers at the bottom! And I still have soooo much left on the sticker sheet! It's a bit like Mary Poppin's handbag... never ending!


I finished my layout by adding a male skull face from the Chipboard Stickers and several thread clusters in orange and black. 


When I started this layout I had no plan other than wanting to have the orange and black texture paste stars on my background! And from those stars, the layout just grew and came together really quickly.

If you'd like to watch how my layout came together, there is a process video up on my YouTube channel which you can find Here

Wow, that's me done for October! I can't believe how fast this month has gone. I still have loads of this collection left so I'm sure there will be more layouts here and there once we have some photos from this evening! Can you tell I love Halloween?!

I'll be back next month with some more layouts. I'm sticking with Simple Stories and working with the 'Cozy Days' collection so I can't wait to get creating some Autumnal layouts.

I hope you all have a fabulous weekend, and if you celebrate Halloween then I hope you have a wickedly spooky night, and stay safe.

Take care,

Rebecca x


Wednesday 28 October 2020

Prima Pumpkin & Spice

Hello There

 It's Anita with you today and I have another Autumnal inspired layout to share with you.

I am lucky enough to be playing with the stunning Pumpkins and Spice Collection by Prima

The papers are beautiful, adorned with flowers, leaves and pumpkins along with some vintage patterns and have some very pretty, gentle copper foiled designs on them.

We used to go to our local PYO farm every year at various times throughout the year when our girls were younger, my favourite visit was always the one with the pumpkins though, especially if we were lucky enough to have a nice warm sunny day too!


This particular visit we met up with my sister and some of her children....we had a really lovely afternoon.

 Here is a list of all the products used to create this page:-

Fall Flowers

Get Cosy 

Fall For All 

Sweater Weather 

Crunchy Leaves 

Cozy Evening Flowers

Floral Ephemera


I spliced together a piece of Fall Flowers and Crunchy Leaves to create the background and then splattered and dribbled various metallic paints and shimmer mists across the layout...I love a bit of shimmer and sparkle me..... and I normally manage to incorporate into most of my layouts.


I tore a piece of corrugated card to create the photo mat and gently rubbed some Metallic Wax Patina in copper and some gold paint along the edges to highlight them. I also dry brushed with the gold paint all around the edges of the layout

The pumpkins, signs and leaves were fussy cut  from the sheets of  Get Cosy, Fall for All and Sweater Weather before rubbing the edges round with gold and copper paints. Along with these I added some elements from the Floral Ephemera pack

I popped some up on foam pads to add depth and placed them round the page, layering up and creating little clusters of interest. Some paper twine was added to the Give Thanks sign before adding it to the page. I also popped on a couple of Chipboard Flair pieces from the Pink Fresh Studio Days of Splendor range along with some paper tea roses from the Cosy Evening Flowers, these had also been dabbed with gold and copper paint.


I finished embellishing the layout by adding a couple of heart cabochons and making raised dots using Stickles and Distress Stickles 


Please do pop over to the SHOP and have a look around. There are new products being added all the time.


That's it from me for October, but I will be back in November with other projects using this beautiful Prima range xx


Happy Crafting!

Warmest Wishes 

Anita xx

Monday 26 October 2020

Tis the Season to be Spooky - Simple Stories - Boo Crew Collection

Hello everyone, Rebecca here with you today.  Happy Halloween week! (Yes, it's a whole week affair for me!) I love Halloween so much so we usually find lots of local events to go to and things to take part in during half term, leading up to the big day itself, however this year is obviously very different. Although there are still lots of events happening around where we live, we have decided to stay home and make our own Halloween entertainment this year and stay safe.

Today's layout documents the start of our 'at home Halloween fun' - a pumpkin photoshoot in our living room! And what better collection to use than the new Simple Stories 'Boo Crew'?! I am loving this collection - it's probably one of my favourite ever Halloween collections. I love that the whole collection is made up of really only four colours. I've found that it's helping layouts come together really easily - which is always a bonus for me as I'm a notoriously slow scrapbooker.


This entire layout was inspired by a section of the 'Cast a Spell' patterned paper. It's a poem about skeletons and bones and instantly I had an idea for the back bones of my layout (pun intended!). My son has a new Halloween tracksuit set with skelly bones on it so these photos were perfect to go with the poem. The ideas were flowing and I ran with them...

Since it's Halloween, I've gone with a black bazzill cardstock background and have torn a section of the 'Treat Yo'self' patterned paper for the top half. I've matted my photos onto black, and then white cardstock to give them some separation from the black background. I knew I wanted the photos to sit on the left of the layout with the poem cascading down to the right. So then I just had to decide on the rest of the layout. 


I pulled some tags from the 'Tags' patterned paper and tucked them either side of my photos with some Halloween Devine Twine threaded through them. 


I then begun to pull out alllllll the skeletons from the collection. I spent ages faffing and trying to fit as many skeletons on the page as possible. In the end I had to reign myself in because I was getting carried away! I placed the large male skeleton from the Bits & Pieces ephemera pack to the right of my poem. I felt that the ivory skeleton with the white border was getting a bit lost against the dark background of the layout, so I drew around the outline of all the bones with a black fineliner pen and I was so much happier with him. I tried to get the female skeleton on the layout too but in the end decided she was one skelly too far!


In my photos, my little boy is sitting among all SIXTEEN of our pumpkins (told you I love Halloween!!) and so it felt very appropriate to have lots of pumpkins on the layout. I took a couple from the Bits & Pieces pack, and fussy-cut the smaller ones from the 'Hey Pumpkin!' patterned paper, and scattered them around the layout. 


I placed a skull with a frog sat on top to the top left of my photos. He's from the Bits & Pieces pack and just had to make it onto the layout as my son's nickname is 'Froggy'! Next I added a scattering of stars around the layout and a smaller version of the female skeleton from the Combo Cardstock Stickers - again drawing around the bones with a black fineliner to help her stand out more. I also added the large haunted house from the Bits & Pieces pack - the photos were taken at home and it's a house - so that works for me, and also a cat sat in a pumpkin from the Chipboard Stickers.


I used the 'Tis the Season to be Spooky' ephemera piece as my title and again drew around each element with a black pen. 

I finished my layout with a phew of the phrase stickers from the Combo Cardstock Stickers, two pieces of laser cut chipboard from Dusty Attic ('Wordpl@y #6' set) and tangled some thread behind both of them.


I decided to stop there before I tried adding any more skeletons onto the page! I hope you've enjoyed this layout - I think it's one of my favourites of 2020. I'm enjoying this collection so much that I've ordered a whole lot more of it. Don't fear though - there's still some left in the shop if you'd like to pop over and place an order.

If you'd like to watch how this layout came together, you can find the process video on my YouTube channel here.

I'm sure I'll be back with some more Boo Crew layouts over the next couple of weeks as I get more Halloween photos to work with. I just can't help myself!

Until then, take care and have a Happy Halloween!

Rebecca x


Friday 23 October 2020

Pinkfresh Studios ~ Days of Splendor #2

Hi, it's Anna back with you today, sharing my second layout using the Days of Splendor collection from Pinkfresh Studios. Take a look at the whole collection here.

I used the large chevrons from the moments that matter patterned paper, I cut a few of them out and adhered them to some cream cardstock. I also cut out the camera from the same paper.


I cut some leaves from the grateful heart patterned paper as well as some Paige Evans leaf cutfiles. I also added a piece of floral ephemera from the collection that I worked with last month - Pebbles The Avenue.


I used the journaling bits from the collection to embellish my layout, alongside my photograph, I also added a photograph into one of the journaling bits and I added some hidden journaling in the purple envelope.

I used some of the chipboard flair and enamel dots to further embellish my layout too along with some drops of ink spray.


Thank you so much for looking!
Have a great weekend, see you soon.
Anna
X

Wednesday 21 October 2020

Pebbles - Spooky - Happy Halloween!

Hi everyone,

Claire here back with you sharing my second layout with the Pebbles Spooky collection. You can view the whole collection here.

Given my last layout was a bit of a scary one, you'll be pleased to know I thought I'd explore the cuter option this time around. I decided to share this picture of my 9 year old Springer Spaniel in her ghostly get-up. She is so laid back and seemed to do very well in securing more 'treats' than 'tricks' in her outfit! 


I started with the aptly named Treats Please paper and gutted the inside, just leaving a border that I used to mat a piece of black premium cardstock, trimmed and distressed.

To really make the most of these superb papers, I opted for a grid layout, with one side positioned slightly higher than the other - there's probably a proper name for that, but I don't know what it is?!

I cut 4" squares from the Monster Mash paper using both the A and B side. The other two squares were made with the B side of the Bad Luck and October 31st papers. I again distressed the edges for a bit of texture.


Starting from the top left, I layered my photo with a tag from the Eeeek paper and cut a tab from the B side. I added some Devine Twine to the tag and added a cluster of houses from the Icon Ephemera pack. I cut the 'Boooooo' sentiment from the cut apart elements of the Eeeek paper and raised all these elements on foam pads along with some tiny bats from the branding strip of one of the papers.


Next, I used the 'eeek' tag from the cut apart elements of the October 31st paper, distressed the edges and added a moth from the Icon Ephemera pack and another one of those cute mini bats. I also added a laser cut chipboard strip from the Dusty Attic Wordplay #6 set - I really loved those, they're definitely worth a look for adding a bit of something extra to your layouts.

Directly underneath, I just had to use the 'If you've got it, Haunt it' cut apart from the Eeeek paper - it really made me laugh when I saw it so it had to feature on my page. I framed it with a few pieces of Icon Ephemera and a mini bat.

And then there's the final square - and that AWESOME Halloween title - fussy cut from the Eeeek paper - isn't it just fab! So impactful! It really didn't need much else on that square, so I just added a few spider webs from the phrase stickers and a mini bat.


To finish the page off, I added white zig-zag stitching around the outside and a row of black and orange nuvo drops in between each square.


And that's me done for Halloween this year. I hope you've enjoyed these layouts - I certainly had a lot of fun playing with them!

See you next time.

Claire 

xxx


Monday 19 October 2020

Paige Evans Go The Scenic Route - Autumn's Harvest

Hello, Karen C here again with another layout using Paige Evans' Go The Scenic Route Collection. I like to scrapbook with the seasons and felt like scrapbooking some pumpkin photos this month. Although this collection is primarily a travel themed collection I was able to select papers which were the right colours for my autumnal layout. The layout is very similar to this layout I created earlier in the year. A layout with horizontal strips is often one of my go to designs  when I want to scrapbook a horizontal block of photos and can be varied with different papers, embellishments and title position to give a different look.

I layered horizontal strips of papers #22 and #7 and narrow/border punched strips of black cardstock onto a piece of white 12 x 12 cardstock. I then typed my journalling on the computer, printed it onto another 12" strip of white cardstock and added this to the lower half of the layout.

Using my Silhouette I cut a pumpkin cut file from smooth black cardstock. My Favourite smooth cardstock to use for cut files is the Crafts UK Premium cardstock which is available in the shop in packs of 20 sheets of black or white. 

I backed the pumpkin with a piece of paper #21 and backed the leaves with some olive green bazzill cardstock. Extra leaves were cut to add to the cut file so that it stretched right across the layout.

The backed cut file was then stuck to the layout with 3D foam underneath.

I dotted some Doodlebug Shape Sprinkles around the cutfile. These are multi-coloured self-adhesive glossy enamel accents and I chose the yellow ones from the pack. Some black sequins were also added.


I tied some orange Divine Twine around the layout for added texture.


The word harvest was die cut from smooth black cardstock and added to the bottom of the layout. The rest of the tile was made with some American Crafts Foam Thickers and was nestled inside the 'h' and the 't' of the word harvest.

I'm pleased how the layout turned out and I hope I've inspired you to scrapbook your autumn photos and to have a look at the Go the Scenic Route collection.

Until next time, take care.
Karen x x


Friday 16 October 2020

October Papermaze Kit

Hi, Lynn here today with the October Papermaze kit. Lots of bright colours this month and several papers ideal for recording your experiences during the Covid 19 pandemic lockdown.

This is the first pair of layouts I have made this time.

 
Before looking at how I made the layouts - here is what the kit contains:

Patterned Papers
Pink Fresh Studio - Let's Stay Home collection - Better Things Are Ahead and Kind Hearts
Paige Evans - Go The Scenic Route collection - #12 and #17
Pebbles - Live Life Happy collection - Happy Rainbows
Photo Play - Can We Just Stay Home collection - Pillow Fight
Bazzill Avalanche and African Daisy

Reverse side of papers:

Embellishments - exclusive laser cut file, strip Pebbles puffy dots, yellow doily, strip Dusty Attic chipboard hearts, 2 puffy camera stickers, Pinkfresh chipboard frame, wooden word, 3 mini tags and 2 paper flowers.

Extra Bazzill Pack - Lava, Petunia, Ocean and Whirlpool


Making Rainbows - This layout shows my daughter with her rainbow pin, and some smaller photos of the pins and magnets we made to cheer family and friends during the earlier stages of the lockdown. 


For both these layouts I used a thin sheet of 12" x 12" paper from my stash as an unseen base. They are papers I had decided I wouldn't be using for scrapbooking.

I inked the edges of my paper and card with Worn Lipstick Distress Ink. The larger part of the base for this layout is cut from ‘Go The Scenic Route  #12’ – cut to 30" x 24cm and stuck to the right of the paper. Then I cut a strip of the striped side of ‘Pillow Fight’ for the left side of the page.

With the rainbow side of Happy Rainbows, I gutted the sheet to leave a frame 2.5cm deep, which I set aside for the next layout. From the remainder I cut a piece 15.5cm x 25.5cm which I mounted onto Petunia Bazzill, making a narrow border. I placed this panel approx. 3.3cm in from the left side of the layout.  

The manufacturer's strip from the Happy Rainbows was also mounted onto the Petunia Bazzill and used to cover the join between the two papers.

My photos were mounted in the same way as the papers, then arranged on the page together with the yellow doily. I wrote my journalling onto a scrap of the #12 paper and placed this to the right side of the page. I added one of the clay rainbows at the base of the photos. 

My title was created with some glitter foam letter stickers, and Pinkfresh Studio Mini Puffy Alpha Stickers.

I used a few heart stickers and scattered some sequins over the page. A dot of Nuvo Crystal Drops was added to the centre of each sequin. 

New Rules - This photo shows my sister and her colleagues with their visors and masks, following the new rules from the Health and Social Secretary's Covid 19 Alert. 


This page starts with the already gutted sheet of 'Happy Rainbows' paper from the previous page. Over this frame I mounted a 26.5cm x 26.5cm piece of African Daisy Bazzill. I blended Candied Apple Distress Ink on the edges of all the card and paper.

Across the middle of the page I applied an 11cm deep piece of 'Pillow Fight' (blue side), and then a 3.5cm deep strip (striped side).  I ran a length of ribbon across the top of these strips, and tied them on the right of the layout, over the knot I added a red button from my stash and the heart button from the kit. The buttons were tied together with some thread.

I cut a heart shape from Whirlpool Bazzill, then a second smaller one from the '#17' paper. The smaller heart was mounted onto the first and they were glued to the centre of the layout.

The photo was mounted onto more Whirlpool Bazzill and positioned over the heart. My journalling was written on a scrap of the '#12' paper, which I made into a tag with a large brad added through the hole. The tag was attached to the page with 3D foam tape.

I cut some quote tickets from the '#17' paper and arranged these around the left side of the heart, alternate tickets were raised with 3D foam tape.

Finally I made a title using the Sizzix Bigz XL Wonderland Alphabet die. I cut the letters from Petunia and Lava Bazzill, and offset the pink letters over the red ones to give them some definition.

That's all for today, I have more to share from this colourful kit soon.
Thanks for looking.
Lynn x

Wednesday 14 October 2020

Amazing Autumn

Hi There
It's Anita back with you today and I have my 2nd layout using Simple Stories Vintage Autumn Splendor collection.
I love EVERYTHING about Autumn......the breathtaking colours of Mother Nature making her changes, the earthy scent and nip in the air, the softer golden rays of sunlight, the chance to start to snuggle up under jumpers, blankets and layers after being way too hot through the summer. But more than anything, I love the magnificent sunrises and sunsets.
 
In 2017 we celebrated our 25th wedding Anniversary, we spent 10 days travelling up one side of the UK and back down the other, seeing beautiful places and making lots of happy memories. But its always nice to come home isnt it! So at the end of our break we got up nice an early and drove up onto The South Downs looking out over the sea at Eastbourne and watched the sunrise together...it was beautiful....but very cold!


I backed the page on a sheet of Russet cardstock from my own stash and then took a sheet of  Fall Blessings, this has a lovely wood panel effect in the background. I followed the lines of the panels and made a few little slices in random areas using a craft knife. I picked at these a little bit to distress the edges and create a bit of *weathered* effect and texture.


I also used 2 other sheets from the collection for this layout:

2 x 2 Elements

4 x 4 Elements


I cut out various elements from both sheets and then layered some around the page, tucking some behind and some infront of the photo and leaving some elements single layer too. With so many to choose from there is no shortage of lovely little bits and pieces you can use on your page.


I popped some antique copper brads onto the 4 corners of the page and finished the layout off by tying 3 lengths of dark brown paper twine across the page, knotting it on one side.


Simple Stories Collections really are lovely to work with and there are so many fabulous ranges, covering all sorts of themes. You can see the superb choice Vanessa has available in the shop HERE.

I will be back later in the month, this time with some divine Prima papers that I am off to play with shortly.

Happy Crafting!
Warmest wishes
Anita xx