Friday 29 January 2021

Papermaze January Kit - Part 2

Lynn back with part 2 of the January Papermaze Kit. I'm really loving working with these beautiful, wintery papers. Here are my second pair of layouts, another snowy page and a heritage layout.


A reminder of what you will find in the kit:
For full details pleas see my earlier post HERE.

St. Joseph's Oratory - this photo was taken on a very cold snowy day in March when we visited Canana. It is St Joseph's Oratory, Mount Royal, Montreal.


For this page I used the Bazzill Bling - Blind Date, and gutted it to create a 2.5cm frame. Then with the Stamperia paper I trimmed 1 cm from all four sides. I inked the edges with Tumbled Glass Distress Ink.

Next I prepared my photo, by layering up on some white glitter foam and more of the Bazzill Bling. I worked out where the photo would sit pencilled round the edges, then gutted some paper from underneath. Then the papers and photo were stuck in place.

I then strung a selection of beads and a snowflake charm across the top of the photo.

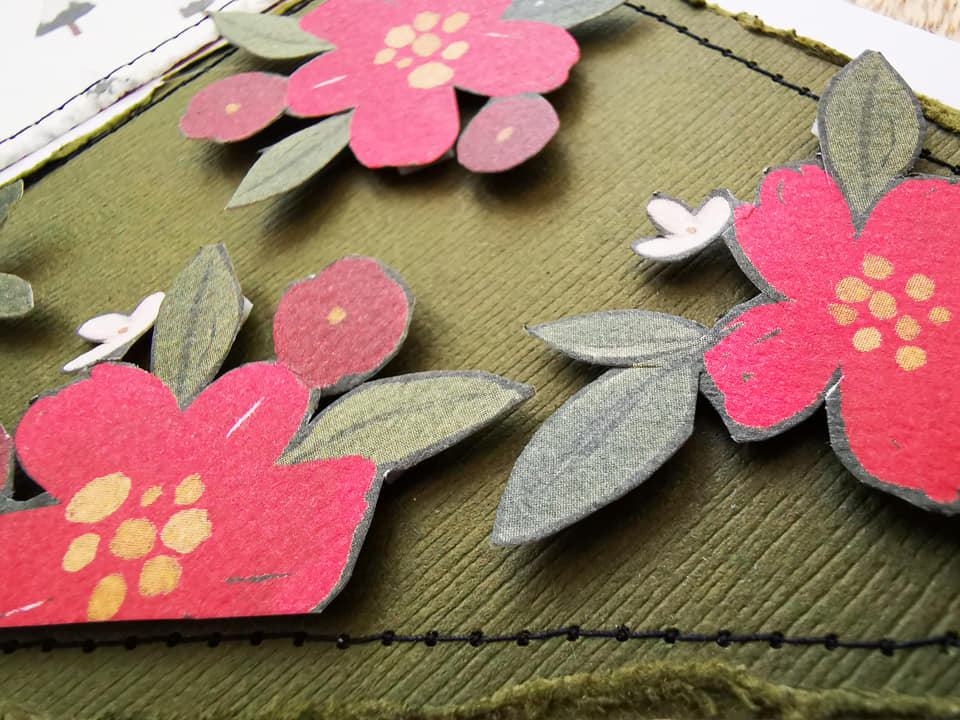
From the gutted paper I fussy cut the flowers and leaves, including incomplete images. These were then shaped and inked. before being arranged around the photo and stuck in place with 3D foam tape, tucking the incomplete parts under the photo.

With a Sizzix Thinlits die from the Holiday Greens set, I cut some fir tree branches from pearlescent paper to arrange among the flowers. 

The title is made up of the Simple Stories Sn@p letter stickers from the kit and some Pinkfresh Studio Mini Puffy Alpha Stickers.

Finally I embelliehed with sequins, Diamond Stickles and Nuvo Glitter Drops - Blue Babe.

Lustell Thursa Everista Alouise Banks - This recently acquired family history photo was sent to me via Ancestry recently. Lovely photo of this girl with quite a mouthful of a name!

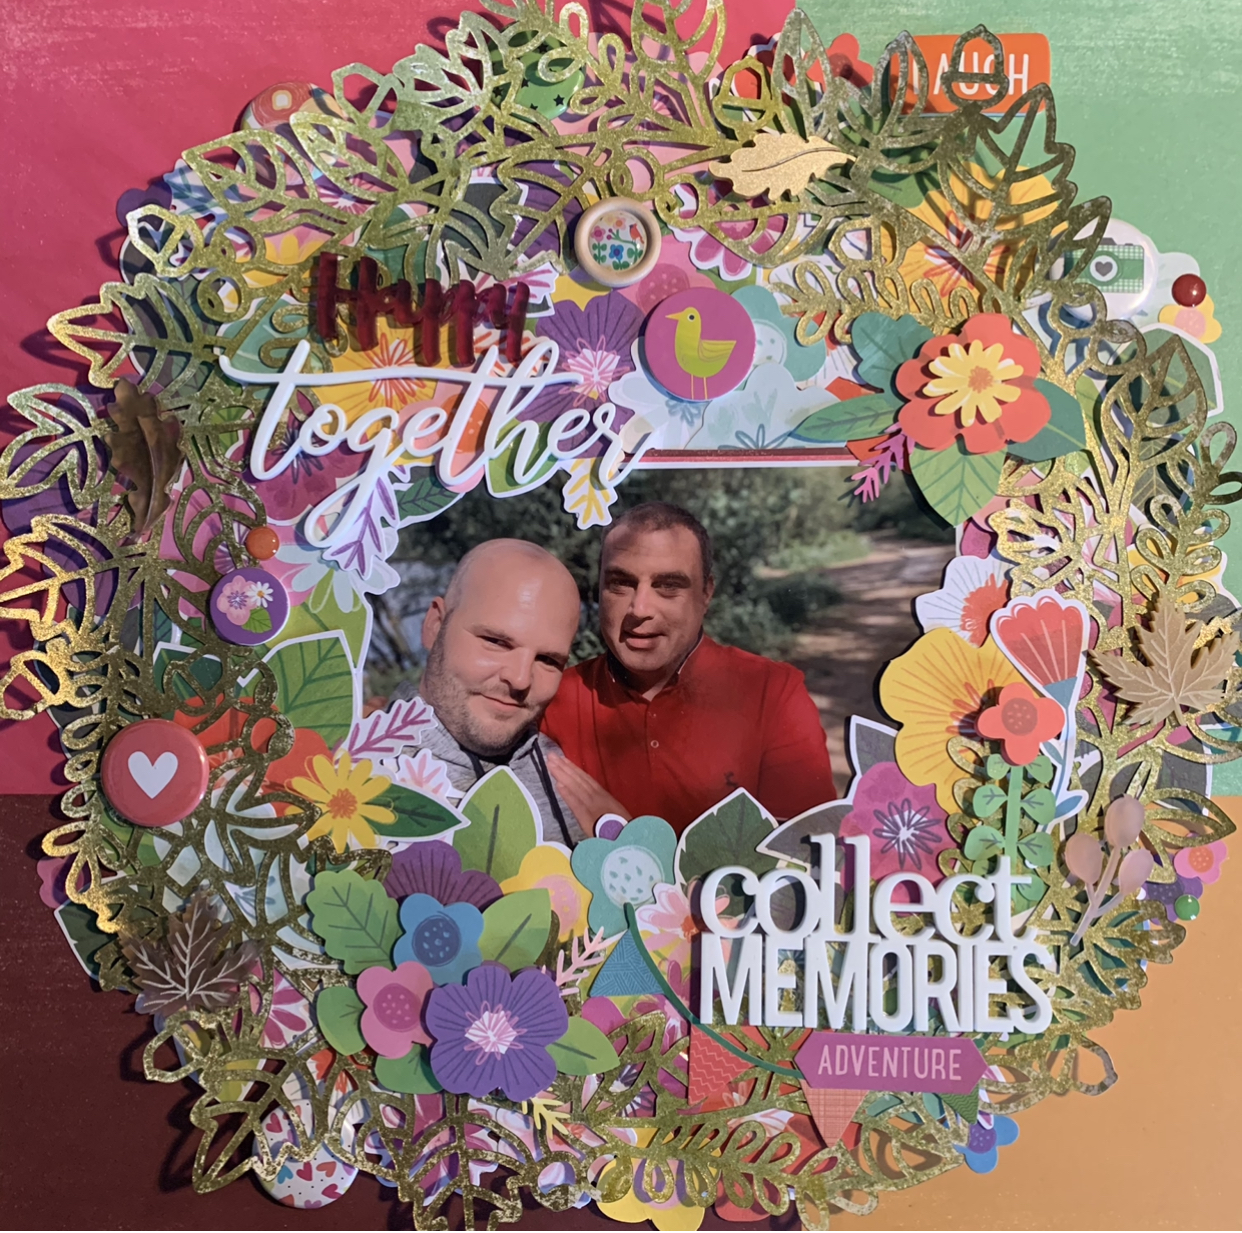
I chose the beautiful Studio Light paper as the background of for this layout. There is a lot of detail on this paper, so I only wanted to complement it with my embellishments.

The large photo was backed with Ivy Bazzill and the left side was trimmed with some of the lace from the kit.

I selected two doilies from my stash and applied them to the background to partly show above the photo. I cut my title from white glitter foam using the Sizzix Alphanumeric Classic Lower Case die set.

I decided to embellish the three wooden butterflies from the kit together with two chipboard butterflies from my stash. I painted them with some white acrylic paint, then once dry I heat embossed them with Distress Embossing Powder. I used Weathered Wood and Peeled Paint, I love the way this gave a glazed pottery effect to the pieces.
To add antenna I threaded some stamen through the holes in the bodies of the wooden butterflies. 

With the roses from the kit and some tiny paper flowers from my stash I created a large flower cluster at the bottom right corner of the photo. With the addition of a decorative pin and some flat-backed pearls to complete the arrangement.

With a few more paper flowers and some ric-rac braid I made a small cluster in the top right corner of the layout, adding a couple of paper flowers among the title.

Thats all for today, but I have a lot of this kit left so plan to make some more layouts to share.

Thanks for looking
Lynn x

Wednesday 27 January 2021

Winter Walk - Carta Bella - Winter Market Collection

Hello, it's Rebecca with you today to share my second layout created with the 'Winter Market' Collection by Carta Bella.


I was in the mood to create a grid layout so I printed my photo 4x4 inches as a starting point. I then selected several of the patterned papers (Frosty Plaid (A and B sides), Stay Cozy4x4 Journalling Cards (B side), Winter Florals and the 3x4 Journalling Cards (B side)) and cut several pieces in both 2x2 inches and 2x4 inches.


I used the blade of my scissors to distress the edges and then pierced holes, before hand-stitching around all the pieces of patterned paper using the WRMK Silver Metallic Thread. This is my favourite thread to use on my layouts because it has a wiry texture so it's easy to stitch with, and manipulate into thread clusters and adds more texture and interest to the page.


The photo I've used on this layout is of a recent walk with my little boy. It was -3 degrees and boy did it feel it! The ground was all frosty and icy and the lake was completely iced over. Sadly there was no snow, but it was a real wintery day - so I wanted to translate that onto my layout. I watered down some white gesso and added splatters to a sheet of Bazzill Basics Cardstock (in 'Coastal') from the matchmaker pack to resemble ice and snow. I'm really pleased with how this simple addition of mixed media elevated the layout.

Once the gesso had dried, I adhered all of my patterned paper pieces flat to my layout using double sided tape, and added more gesso splatters, before adding my photo raised up on a layer of foam.


I added my title to the bottom 2x4 rectangular section of the grid using silver glitter thickers from my stash, and then went to town on the 'Elements Stickers'

There are so many stickers on the elements stickers sheet - the more I looked at it, the more I seemed to see! So I thought I would really showcase them on my layout. 

I've added all of the tiny trees from the sheet, and raised them up onto foam pads to add some dimension to the layout. On our outing, we had to walk down a very long path to the lake, and the path was lined on both sides with trees - so I lined the tree stickers up to imitate that.

I added a floral sticker to the bottom right corner, and needed something in the top left corner to balance it out, so I fussy-cut a small cluster from the 'Winter Floral' paper. I stuck them down with thread tangles underneath.

I finished my layout by adding some silver splatters using a Tim Holtz Distress Spray Stain in 'Brushed Pewter' and a white doodled border around the edge of my background cardstock using a Uni-ball signo white gel pen.

Thank you very much for reading. If you'd like to see how this layout came together, there is a process video up on my YouTube channel here.

See you next month!

Take care,

Rebecca x

Monday 25 January 2021

Simple Stories ~ Hello Today #1

 Hello! Welcome back to the Papermaze blog! 

It’s Anna back with you and today I’m sharing a new scrapbook layout. I’m working with the ‘Hello Today’ collection from Simple Stories. This collection is great for documenting the year, with papers themed to each month. But the reverse can always be used for everyday photos with lovely bright colours - its right up my street! I also like to use the cut apart papers with each month on to add into project life pocket pages to document little stories each month. This also provides a clear divider in your album each month throughout the year. The sticker and chipboard stickers are lovely too! You can see the whole collection in the shop here.

For my first layout with this collection, I began with some bazzill for my base and a cut file from cut to you. This layout is documenting the first photograph of year that I took during a New Year’s Day walk and will be the first page in my 2021 album. So the cut file was perfect for this page. 


I backed the cut file using various reverse sides of the patterned papers, along with some coordinating cardstock


I used a variety of the combo stickers  and the  chipboard stickers  to embellish around the cut file along with some dots of Nuvo Drops  too. I added two thin strips of the reverse side of  'January' on each side of the layout as I felt like it needed balancing out.

Thanks so much for looking! 
See you soon,
Anna
X


Friday 22 January 2021

Carta Bella - Hello Christmas - Cosy & Warm

Hi everyone,

Claire back here with you today sharing my third and final layout using the Carta Bella Hello Christmas collection.

For this layout, I'm scrapping a photograph taken on Christmas day.  I am ALWAYS cold - so much so that in my earlier years (when I was in my 20's), I earned myself a nickname of 'Granny' because I would sit at work with multiple layers on and even a coat over my knees if someone had the windows or doors open!

Things haven't changed much - so Santa brought me a fabulous furry sloth hooded blanket to keep me warm :)


I decided to focus on the beautiful papers this collection has to offer and so chose a starburst design for this layout. There are many varients of this type of design but most of them I've seen have been on 6x8 layouts. So... I decided to really challenge myself and make it in 12x12. Go big or go home, right?! 😉

I started with a rough template - it confirmed everything I already knew - I am definitely not someone who measures anything! I much prefer a trial and error approach! I cut a piece of scrap 12x12 white paper into segments, trimming each of them down to create my sections and then used them as a guide to cut my photograph and papers.


I chose to use the B side of the 3x4 Journaling Cards and Snowflakes paper, both of which are wintery patterns. I sewed around each segment in black thread and distressed the edges for texture.

In addition to the patterned paper, I also used some of the dark green Bazzill cardstock from the Matchmaker pack.  To this, I added some fussy cut flowers which I cut from the gorgeous Poinsettia paper. This worked really well and added a whole new layer of interest and dimension to the page.


My final segment was made from my photograph which I raised on foam pads for dimension. I left this very plain and just added a small banner from the Frames & Tags Ephemera pack to tie in the red from the flowers.

This left me with three white segments not yet used. To add interest, I decided to fill the top segment with sequins to give the layout a bit of extra sparkle (it was Christmas Day after all!) I adhered these with Glossy Accents.

The final two segments were positioned at the bottom of the page and left the perfect gap for my title. I used the Simple Stories Color Vibe Foam Alphas in red. These are soooo awesome - so bold and easy to use. I may or may not have started a collection to get all the colours!


To embellish the page, I cut a large snow globe from the Journaling Cards paper and raised it on foam pads so that it lay flat on my photo segment. 


Either side of this, I fussy cut some houses from the Christmas Village paper and added them flat across the centre of the page.

Finally, I added a tree and a bow from the Chipboard Accents pack to the middle embellishment cluster, a banner in the top corner and a few small chipboard phrases to the bottom left corner.


And that was the page complete!  

I love using multiple patterns on a layout and I hope you've enjoyed seeing these beautiful papers in the collection. You can check them all out here.

I'll be back next month and look forward to sharing some more scrappy projects with you then.

Take care,
Claire
xxx

Thursday 21 January 2021

Papermaze January Kit - Part 1

Lynn here today - A big welcome to 2021 and a new Papermaze Kit for January. This month's kit is full of wintery papers and embelishments, however they could be used for other themes too.

In the kit you will find:

Patterned Papers
American Crafts - Vicki Boutin Stroyteller collection - Stardust
Kaisercraft - Whimsy Wishes collection - Snowfall
Stamperia - Winter Tales - Poinsettia
Bo Bunny - Family Heirlooms collection - Traditions
Echo Park - Winter Magic collection - 4 x 4 Journalling Cards
Studio Light - Jenine's Mindfull Art Collection -
Bazzill Cardstock - White and Bazzill Bling - Blind Date

Reverse side of papers:

Embellishments - Simple Stories Sn@p alpha stickers, 3 wooden butterflies, pinch of sequins, 12" jute twine, Tango tag, 3 paper roses, 3 Tim Holtz stamen, Crate paper silver heart, pearl swirl, 12" lace and 3 lines of puffy word stickers. 

Extra Bazzill Pack - Vanilla, Date Swirl, Ivy and Admiral


Winter Solstice - This photo may appear black and white but is infact in full colour. Lack of light during the winter day time in the north of Iceland, the black volcanic beaches and the snow covered black mountains, create a dramatic effect. 

For this layout I used the Date Swirl Bazzill as the base. I cut three banners from the B side of Echo Park's 4" x 4" Journalling Cards paper. These were cut to measure 3" x 10" each, inked with Chipped Sapphire Distress Ink and they were arranged across the Bazzill.

My photo was mounted onto some of the Admiral Bazzill and attached to the left side of the page. I added a bobble trim across the layout under the photo.

The title is a cut file (PearTree Cutfiles), I cut it twice - in white and Admiral Bazzill. I filled the white outlines with the solid blue letters. This was attached to the base of the photo, raised on 3D foam squares.The blue part of the letters had a layer of Glossy Accents to make it shine. The snowflakes had Nuvo Crystal Drops - Silver Moondust to add sparkle.

For the journalling I used my own handwriting, but emphasised a few words with letters cut from white and silver glitter foam, Admiral and White Bazzill. The Sizzix Thinlits I used are Tim Holtz Alphanumeric Label die set.

Finally I added some sequins from the kit and snowflake stickers from my stash. 

Frozen - This photo was taken in 2015 on a trip to Euro Disney. 


I wanted to use both sides of the Snowfall paper, so I made a frame using the foiled script side by gutting the sheet to make a 1" frame. I then flipped the gutted centre (grey with snowflakes) over and distressed the edges of both pieces. Once prepared I glued them to a spare sheet of 12" x 12" scrap paper. 

I used a Carta Bella stencil - Let It Snow and a mix of texture paste mixed and ultra fine white glitter to create snow on the background. This was set aside to dry.

I backed the large photo with some silver paper from my stash.

I cut a variety of snowflakes using the Cricut from White Bazzill and some scraps of vellum in white and aqua. Some of these were inked with Tumbled Glass Distress Ink. The title was cut in four layers using Bazzill cardstock and the Cricut.

With some white ribbon and a selection of fibres tied across the layout, I set about applying the photo, title and the snowflakes to the page.

There is a subtle sparkle added by dusting the lettering and snowflakes with some Cosmic Shimmer Shimmer Shaker powders.

The layout was embellished with a variety of gems from my stash and some Nuvo Crystal Drops.

That's all for part one, back with more soon.
Thanks for looking
Lynn x

Wednesday 20 January 2021

Pinkfresh Studio Oh What Fun - Winter Magic

Hello, Karen C back again with a final layout using the Oh What Fun collection from Pinkfresh Studio.

My layout today is a wintery layout using the papers, etc in the collection which are mainly blue in tone.


On a sheet of 12x12 white cardstock I smooshed some blue watercolour paint and when this was dry I splattered some white acrylic paint on top to create a snowy background. Using my sewing machine I then stitched round the outside edge of the layout using gold metalic thread.

I layered pieces of the Merry Everything and  Home for the Holidays papers as well as a piece of the packaging from the pack of chipboard stickers in the centre of the layout and then added my 6x4 photo on top. My photo was double matted with white cardstock and gold glitter card. More machine stitching was added to the papers and the edges were roughed up with my fingernails.


From the Good Tidings cut apart sheet I fussy cut a house and used this as an embelishment. 


I printed my journalling onto a label from the cut apart sheet and added this to the layout. A matching frame from the Merry Everything paper was tucked under the left side of the photo.


Using the word 'magic' from the sheet of Puffy Phrase Stickers and some navy blue Pink Paislee Foam Thickers I created the title below the photo.


A chipboard sticker was added to the top right corner of the photo.


I felt the layout needed an extra pop of gold so I added torn strips of gold glitter card on the edges of the layout and some cut strips to the central cluster.


The layout was completed with the addition of the date using die cut gold glitter numbers and some snowflakes also punched from the glitter card.

Thank you for dropping in and looking at my layout. The Pinkfresh Studio Oh What Fun collection and lots more wintery collections can be found in the shop here

Until next time, Take Care.
Karen x x


Monday 18 January 2021

Hello! ScrappyAdam Here!


Well this is exciting! I’m so happy to be joining the amazing design team at Papermaze and can’t quite believe it! Papermaze was my first go to store when I was getting into scrapping and I loved browsing the store and the blog - and now I’m contributing to it alongside some of the most amazing scrappers! 

I’m Adam and I’m originally from North Wales but have lived in Manchester and Cheshire for most of my adult life and have lots of adventures with my partner and two of the best guys in the world - you’ll see all three of them on most of my layouts/projects! I do scrap other people but I don’t share everything I scrap, just because not everyone wants me sharing their photos across the World Wide Web! I love to travel (although like everyone else, we haven’t been able to do much this last year!) and experience new things. 

I first got into scrapbooking about eighteen months to two years ago now - a special trip to Disney sparked it off - I began searching online and it spiralled from there! Then I made a wedding album scrapbook for a relative as a Christmas gift and I’ve never looked back. I find that shopping for stash is a hobby in itself and I love scrolling through the online store here at Papermaze and seeing all the new arrivals! I’ve lurked in many Facebook groups for most part of the last eighteen months but never had the confidence to get involved with chat let alone share a layout! In reality, I’m quite a shy guy really! Once I got chatting to different people, I plucked up the courage and scrapping really has become a huge part of my life now - it’s been a saviour during the last year for sure! I can’t believe how much my confidence has grown - I never thought I’d see the day that I’d be on a design team, on Instagram and actively getting involved with all you creative, talented people! But I’m so glad I took that first step! 

I don’t scrap in any particular order at all. I’ve got thousands of photos and I’ll never be “up to date” and I’m fine with that - I scrap because I love it and to document memories, so every page I do records another memory and another adventure. 

It’s fair to say I’ve been blown away by the support and kindness people have shown me since I started sharing and to now be joining another design team, I’m incredibly grateful and so excited! 

For those that have seen the layouts I’ve shared, you’ll know that I don’t really have a style at all - apart from, perhaps, a more is more approach! I struggle with white space, for sure! I’ve learnt so much over the last few months and I’m still learning every day - and, like many of us, probably always will! Whilst I love and admire mixed media, I’ve not (yet) really got into it! I love mixing collections, stash diving, using cutfiles and lots of bits and bobs and really embracing the more is more way of scrapping! I really enjoy adding interactive elements to my pages as well as making mini books and little albums so I’m sure there’ll be one or two of those along the way!

To kick start my Papermaze design team journey, I thought I’d share a few layouts to give you an idea of what to expect from me in the coming months as I share my creations with you all! 

So the first layout I’ve chosen was one I actually made as a Christmas gift. I’ve used a cutfile along with actual lights! There are 50 micro lights in total on this! I love the effect so much, I’ve made three with lights now - it’s just something a little bit different! 


This is just me - bright and colourful and very little blank space! The cutfile was a labour of love but so worth it! Paige Evans just does bright collections so well! I can’t wait for her new collection to arrive into stock here! 


This one is about as far as I’ve got with mixed media! I cut the wreath cutfile from white cardstock and used ink pads and a spray to colour it! As is usual for me, I went to town with ephemera and bits and pieces! 


I do enjoy scrapping Disney! I’m sure you’ll see plenty of Disney photos coming up... for this ‘Storyteller’ layout, I made use of the cutfile rather than it just being a part of the background. Vicki Boutin, along with Paige Evans and Shimelle are probably my top three AC designers! 


Like I said, I love to include interactive elements and this page, using Cocoa Vanilla Studio’s ‘Daydream’ was one where I included a waterfall - a great way of including more photos... I’ve got six on this one layout!


Finally, this is one that shows that I really don’t have a style! Unusually for me, I embraced some white space and kept it real simple! It’s also unusual for me to scrap a photo of just me! 


I’m so happy to be here and can’t wait to share the first of my design team projects with you in February. Until then, enjoy all the incredible creations from the design team here and stay safe. 

Thank you! 
Adam 😁