Monday 30 January 2023

Creating A Pocket Page With Jumbo Tags

 Hello,

Lisa here working in my Disney journal.

And I'm using the Pink Fresh Studio collection here - Delightful.


This is the paper that inspired this page here.

I started by making a huge pocket almost the size of my page.

I cut the paper to the size I wanted.


To make it look more obvious as a pocket, I took a small hole punch and punched 2 half circles.


 I fancied doing some fussy cutting, so took this paper here.


And I placed the leaves behind my photo. I went around roughly with with a black pen to help them stand out.


Moving in to the jumbo tags.

I cut them out from that piece of patterned paper that originally inspired me.


I used a corner punch to give them a more finished look and added photos.

I loved these puffy alpha stickers from Rosie's Studio.


They look cute and are such great value too.

And on the reverse of the tags.


I'll be adding my journaling.

I'm so happy how this page turned out.

There's a video coming to my YouTube channel so you can see it being made if you wish.


Thanks so much.

I hope it's inspired you.

Have a lovely day.

Lisa x


Saturday 28 January 2023

Candy Cane Cottage ........ Mintay Merry Little Christmas

Hi There

 It's Anita here and today I have a project to share using some more of the gorgeous papers from Mintay and their Merry Little Christmas collection.

Every now and again I like to break away from scrapping and alter things instead. So this is the latest thing I have done. It's all based on an MDF birdhouse blank and an old glass candlestick and was inspired by one I created a few years ago.

I used bits and pieces from 3 different sheets of paper, those were :

Merry Little Christmas - 02

Merry Little Christmas - 04

Merry Little Christmas - 09

I also used some Ivory and Red Acrylic paints, red and white Bakers Twine

 and some pearly beaded trim.

foam dimensional pads

Cherry Red sparkly nail varnish


I covered the main part of the house with pretty pale pink reverse side of the 02 sheet. It has lovely little red dashes on it that look almost like stitches. I cut the heart shaped aperture out the front and popped some finely shredded raffia inside to look like nesting materials before covering the roof and fascia with the lovely red checkered pattern, found on the reverse side of sheet 04

The base of the birdhouse was painted with Red acrylic paint to co-ordinate with the papers. I wanted to use some flat backed pearly trim to decorate around the base, however it looked a bit stark being all white, so I found a lovely sparkly Cherry Red nail varnish and blobbed it onto the centre of each pearl. It really worked well and pulled the design together.

Lots of fussy cutting then ensued, taking elements from sheets 02, 04 and 09. So many pretty little images to choose from. I layered some up on top of each other and others were just raised on foam pads for extra dimension.

 The teeny tiny bunting was cut from the top of sheet 02 and then glued to lengths of Red and White Bakers Twine before suspending it fro the front of the bird house base.


I painted the whole of the glass candlestick with an Ivory Acrylic paint and when dry, I dry brushed some of the red paint that was used for the base of the house. Its really effective I think how its picked up the faceted patterns cut into the glass. A small piece of chiffon trim was fixed near the top of the candlestick with a length of the Bakers Twine wound round and then tied in a bow at the front.


I finished it all off by using some of the floral and leafy images that I fussy cut from the sheets and added to the bottom of the candlestick. I am so happy how this turned out in the end and although it was too late for me to use for Christmas decor this year , I can hardly bring myself to pack it away in a box for next year.....so I think I will keep it out for a little longer!

I hope you have enjoyed seeing my post and maybe you will have a try at altering something that you have sitting around at home.


warmest wishes

Anita xx

Friday 27 January 2023

Warm Up - Simple Stories - Simple Vintage Winter Woods Collection

Hello, Rebecca with you on the blog today - not quite believing how fast January is going! Today I'm sharing my second layout created with the Simple Vintage Winter Woods collection, which you can find in the store here.


Back in December, we took our little boy to our local 'pop-up' Christmas Ice Skating Rink and afterwards, we hung around to have some lunch and a festive hot chocolate. As soon as I saw the 'Warm Up' title in the Foam Stickers pack, I thought of this photo of him stood against a really photographic backdrop with his hot chocolate.

Also in the Foam Stickers, are a few circular stickers and these inspired my idea for a circle layout. Using a set of metal nesting dies, I cut circles in different sizes from several patterned papers from the collection. I arranged these on my background with the larger circles clustered in the centre and the smaller circles spreading out towards the edge of the page. This is the second layout I've made this month without a single sheet of white cardstock in sight! For this layout, I've used one of the coloured cardstocks from the 12x12 Basics Kit for  my background.

I wanted to add a little bit of sparkle to my page, so I've used a Nuvo Glimmer Paste through the Winter Snow stencil and added snowflakes all around the edge of my circles. 

I fell in love with one of the images on the 4x6 Elements patterned paper so fussy-cut it and arranged it next to my photo. The circular centre works well with all the other circles on the page.


I added my title, 'Warm Up' and then added in two of the circular stickers all from the Foam Stickers. 

I love the way my circles look arranged on the page, so I didn't want to cover too much up - but I did want to embellish a little. I selected some of the Bits & Pieces that worked with my photo to help tell the story - I'd had my eye on the pair of ice skates since I first saw this collection!


I finished the layout with some wooden hearts, which I painted with a Nuvo Glacer Paste and some sequins.

I've really enjoyed creating with this collection and thankfully, I have some left so I will be continuing to enjoy it for a bit longer yet!

Thanks for reading,

Take care

Rebecca x

@preciouspagespapercraft


Wednesday 25 January 2023

Carta Bella ~ Bon Voyage ☀️

Hello, it’s Anna back with you today, and I’m sharing a second layout using Carta Bella’s Bon Voyage collection, you can find the whole collection in the shop here.

This collection is brilliant for any cruise holidays or alternatively there are non cruise related patterns on the ‘b’ sides of the papers, which would work well for bright summery pages too. 

Here is my second layout: 


I used a sheet of smooth white 12x12 bazzill cardstock as my base, I then used some distress ink in the shade Tumbled Glass to create some pale water colour on my background mimicking the water in the jacuzzi in my photographs. 
I used the packaging technique to achieve this, using a mini mister to water down the ink. 


I then cut four squares of cardstock in coordinating colours from the matchmaker pack. I arranged these in a four by four grid. I wanted to create more depth and interest to the squares, so I double mounted my two photos, again with coordinating cardstock. With the second two squares, I added some extra details, using strips of cardstock/patterned paper as well a boarder sticker and image stickers. I added ‘the Caribbean’ from the multi journaling cards


I felt that the rest of the layout needed a little something else, and it looked a little bare around the edges. So I tore a piece of my white cardstock from both top and bottom, backing the spaces with the ‘b’ side of Buoy Bash and adding stickers and some enamel dots for extra detail. 


Thanks so much for looking! 
See you next month, 
Anna 


Monday 23 January 2023

Echo Park Snowed In - Let it Snow

Hello, Karen here sharing my first layout using the new Snowed In collection from Echo Park. I LOVE the colours in this collection - lots of different shades of blue with a little bit of brown and green mixed in. It includes images of snowflakes, snowmen, sweaters, skis and ski chalets. It is perfect for winter scrapbooking. Where I live we've not had much snow yet this winter to photograph but I have lots of snowy photos from the past and this collection was perfect for scrapbooking those photos.

I started my layout by trimming 1 cm off of each edge of a sheet of white 12x12 cardstock and after distressing the edges I mounted this onto a sheet of black 12x12 cardstock and machine stitched round the edges with white thread.

Using a 2" square paper punch I punched squares from several sheets of paper - Polar Plaid, Blizzarding Blue and Frosted Flurries. I then cut each square in half to form triangles, distressed all the edges and drew a line round the inside edges of each triangle using a black gel pen. The triangles were then arranged in the centre of the layout making sure that the different papers were evenly distributed. Once I was happy with the layout of the triangles I glued them to the layout and then machine stitched horizontal lines across them with white thread. This added some texture and also made sure the triangles didn't move. Finally, before going further with the layout, I splattered some watered down white acrylic paint across the layout to mimic the snow in my photo.

I matted my 5x7 photo with the Blizzarding Blue paper and placed this on top of the triangles with 3D foam underneath to add dimension. One of the Phrases from the Chipboard Accents was attached to the bottom right corner of the photo.


To create a title I used my Silhouette Cameo to cut the word 'Snow' from some black cardstock and also some white cardstock. Layering the black and white word created a shadow and made the word more prominent and the title was finished with some small die cut black letters nestled above the word 'Snow'.

Snowflakes were die cut from some white glitter card and used to embellish the layout.

Snowflake Circles from the Chipboard Accent sheet were dotted around the layout and sequins from the Metropolis Sequin Mix from Picket Fence were sprinkled here and there. The Metropolis Sequin Mix isn't a winter themed mix put the white iridescent sequins int he mix were perfect for this layout.


Finally I added the date using black die cut numbers to the bottom of the layout.


I hope you love the Snowed In collection as much as I do and it can be found here in the shop.

Take Care,
Karen   x x

Friday 20 January 2023

Simple Stories - Simple Vintage Christmas Lodge - Hello 2023

Hi there,

Claire here and today I'm sharing my final layout with the Simple Stories Simple Vintage Christmas Lodge collection.

You may remember, this month I'm challenging myself to use up all the scraps and see how versatile a Christmas collection can be.

For this layout, I'm focusing on the green and woodgrain elements of the collection to create a wintery layout with no sense of Christmas in sight! (apart from a very small amount of Holly, but I hope you'll let me off!)

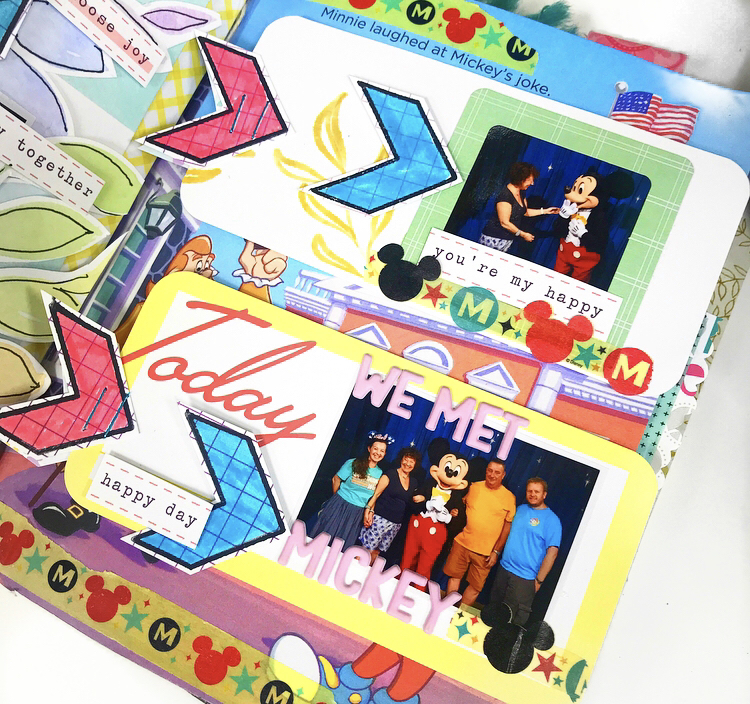
Here's how it turned out.


I prepped my 12x12 Premium White Cardstock with clear gesso, leaving it to the side to dry.

In the meantime, I cut the Leafy Frame Trio cutfile by Pinkfresh Studio, sized to about 9" wide. You can download the file for free in their Facebook group.

I backed the square frames with the Jolly St Nick paper, making sure to include some of the white holly and distressed pattern for extra interest.

Next, on to the leaves which I backed with a combination of the Christmas Wishes Paper and some Parakeet Bazzill Cardstock.


Once all the leaves were backed and the gesso dry, I added quite a lot of water to the background before spraying Distress Oxide Spray in Bundled Sage and Antique Linen. This helped to dilute the ink, resulting in a light colour wash rather than bold mixed media.

Whilst waiting for the ink to dry, I set about printing my photo. I resized it to 2.5" (including the white border), mounting it on a piece of the b side of the Boughs of Holly paper with a layer of white tissue paper behind. 


For extra interest, I also added a tag from the Bits & Pieces pack.


Next, I created some clusters on top of the file, mainly using the Bits & Pieces Ephemera and Woodland Bits & Pieces.


Alongside the cardstock ephemera pieces, I added extra dimension by using some of the foam pieces from the Foam Stickers which have really helped lift the layout.


For my title, I again reached for the Foam Stickers. Remembering this was not going to be a Christmas layout, I needed to find something more generic. Luckily, there is a sticker saying Hello which provided me with lots of options to create my title.  As this was one of the first layouts I made this year, I reached for some older gold Thickers from my stash and added 2023.


I scattered some heart ephemera pieces, raising some on foam and some flat for extra dimension, and added a few splatters of gold ink to finish the page.


I'm really pleased with how this turned out. I don't feel like it says Christmas at all and has a much more wintery feel. I hope it will inspire you to get more from any Christmas collections you have and push the boundaries to see what else you can create. 

Have fun!!


Claire xx

@scrappysoulmate

Wednesday 18 January 2023

Snow Wonder - Simple Stories - Simple Vintage Winter Woods Collection

Hello, and Happy New Year! It's Rebecca with you today with my first layout of 2023. I am so excited to be working with the beautiful 'Simple Vintage Winter Woods' collection from Simple Stories this month. It's a beautiful, wintry collection, and perfect for some recent photos I took of my little boy in the snow. You can shop the collection here.


In my photos, my son is wearing a coat that matches this collection really well - so I decided to use this to my advantage and use it to inspire my colour palette. I've gone for the soft browns and minty colours which feature in the collection. I started with the Frosty Friends patterned paper, and cut a section about 8 inches wide, tearing the bottom at an angle to bring a bit of texture to the page. I matted this patterned paper with a sheet of the minty coloured cardstock from the 12x12 Basics Kit. I also chose to matt my photos with this same cardstock. 

Knowing that my title would likely be the biggest piece on the layout, I wanted to get it in place early on. I've used one of the Foam Stickers and some thickers from my stash. I absolutely adore the foam stickers in the Simple Stories collections. The titles are always written in lovely fonts, and they are so easy to use.


With my title in place, I moved on to embellishing. There are two ephemera packs in this collection - the Bits & Pieces and Woodland Bits & Pieces. Both packs are full of beautiful die cuts, perfect for any winter layout. I've used lots of the snowflakes from the Woodland Bits & Pieces, arranging them going diagonally through my title and photos.


I've placed a couple of the calendar-style cards behind my photos - distressing the edges to make them a bit more 'rustic', and also stapling them together. I love using staples on layouts - they bring a new texture to the page and it's much more interesting than just gluing things together! 

I've further embellished the layout with some tree stickers from the Combo Stickers sheet, and some birds and branches from the Woodland Bits & Pieces.


I got to this point in my creative process, and couldn't decide if to adhere everything to a white background or a coloured cardstock background. I tried both out, before deciding on the darker, coloured cardstock. To this cardstock, I added some subtle stencilling using a distress ink and the Winter Snow stencil and some white splatters.


Thanks for reading! I really love how this layout turned out. It's a beautiful collection and one of my recent favourites. If you'd like to watch this layout come together, there is a process video up on my YouTube channel which you can find here.

I'll be back later in the month with my second layout using this stunning collection.

Take care

Rebecca x

@preciouspagespapercraft


Monday 16 January 2023

January Papermaze Kit - Part 1

A new Year! and a new kit for January 2023! A mix of subtle and some brighter colours. the kit contains patterned papers, Bazzill cardstock and embellishments there is even a clear stamp included too. Here are my first two layouts.


Patterned Papers:
Simple Stories - The Simple Life collection - Tags & Gather, Eat, Laugh
Pinkfresh Studios - Simply the Best collection - Worth the Hype
Mintay Papers - Blissful Time collection - #09
American Crafts - Paige Evans - Garden Shoppe collection - #08
American Crafts - Vicki Boutin - Print Shoppe collection - Floral Display
Bazzill Basics Cardstock - Capers & Fig Swirl

Reverse side of papers


Embellishments:
Woodware clear stamp, strip heart pearls, Dusty Attic chipboard trim, Floral Bits & Pieces, Twine, Prima Flower, Type print phrases, 49 & Market Vintage Bits Essentials - Sage


Extra Bazzill Basics Cardstock - Aqua, Stonehenge, Quartz & Pear


Lady in Red - My daughter at a friend's wedding a few years ago.

Using the Pear Bazzill as a base, I stencilled the centre of the page with some texture paste and a Vicki Boutin Stencil from the Fernwood collection. 


While the texture paste was drying, I tore two strips from the Garden Shoppe paper and applied these to the top and bottom of the page. Then I cut hearts using my Cricut. I took a basic heart shape (approx. 9cm wide and 8cm tall) and duplicated it so I had two the same, then I cut a smaller heart from the centre of one, to give me a heart shaped frame. I cut five solid hearts and four heart frames. I used more of the Flower Shoppe paper (both sides), plain white card, Caper Bazzill and some acetate.


I placed the frames over the top of the solid hearts for three of these pairs. For the fourth heart I created a shaker box with white card as the base, the frame was backed with the acetate and the two sandwiched together with foam pads. I popped beads and sequins inside before sealing up the edges completely.


I placed the photo in the centre of the layout and arranged the hearts around it. Then set about adding clusters of daisies. With the Tim Holtz, Sizzix Thinlits, die set - Funky Foliage, I cut flowers and leaves from cardstock scraps to represent those in the Flower Shoppe paper.


Finally, I added my title using Rosie's Studio - Hearth & Home - Puffy Alphabet Mini Stickers.


New Home - This layout records our house before we purchased it, using the photos taken for the Estate Agent, which I changed to black and white to work better with the photos. I think I will make a second layout with photos taken in the same rooms five years later, to show how much the place has changed.


I started off with the Stonehenge Bazzill, and three 2.5cm x 28cm strips of the 'Gather, Eat, Laugh' paper. I stitched the strips to the Bazzill using the sewing machine and black sewing thread, to create pockets to hold the tags later.

My title was placed just under the second strip of paper. I used some chipboard alpha stickers with a glitter finish.


I cut all 15 of the tags apart from 'Tags' paper, and inked the edges with Forest Moss Distress Ink. I wanted to use some of the images as they were, others I added mini photos to. I used the blank or lined sides of the tags to write my journalling and add the date.


Holes were punched in the top of each tag and eyelets attached. I used the twine from the kit, plus more from my stash to thread through the eyelets to make ties.

I placed all the tags into the pockets, and then fussy cut some of the tiny butterflies from the 'Gather, Eat, Laugh' paper and arranged these onto the layout.


That's all for today, I'll be back with two more layouts soon.
Thanks for looking.
Lynn x