Hello everyone! It's Meg here today sharing with you the newest collection from Simple Stories, called Sunkissed. It's a beautiful vibrant collection that has me so excited for summer and those long lazy, hazy days at the beach or in the garden!
First of all I wanted to show you what I did with the Tags cut apart paper - honestly as soon as I saw these gorgeous tags, I immediately wanted to cut them all up and build them up so they are ready to go for future projects. I created a scrapbook layout (shown below) using the tags as large layered embellishment clusters - but they are also perfect as tags for presents, card toppers or even as mini albums on a ring! Huge bang for your buck here and they are lovely to play with if you don't have time for a big crafting session!To start with, I cut the tags apart and I decided on which tags I would build up - I picked these 6 and have saved the rest for another time. I cut out coordinating coloured paper to go behind the tags (the pink Journal Elements for behind the flamingo and sunglasses tag, Fun + Sun behind the ice cream and seagull tags and Play All Day behind the crab and I Heart Summer tag), then I used a border punch on some offcut strips to add additional colour and texture, pom pom trim, chipboard stickers, these Shape Sprinkles from Doodlebug Design Inc and flat back sequins from my stash to decorate. All tags were popped up with foam to give lots of dimension.
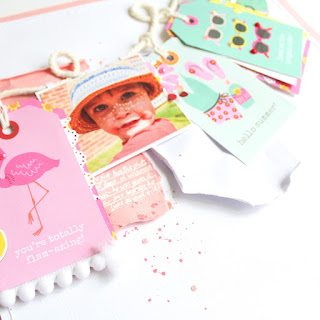
Next, it was time to make a layout with them! I began my page by picking out my photo for my layout and the tags that I thought worked best with it - I chose the pink flamingo tag and the sunglasses as they were similar colours to my sons top and the green grass and then I also pulled out the 'hello summer!' tag as the colours tied together the green and pink.
I was actually sent this Bazzill Blossom cardstock with my DT pack and it was a perfect colour match to my sons t-shirt, so I knew I would be using some of that. It also matches perfectly with some of the other pieces in the collection, including a few chipboard stickers! Bazzill Avalanche is the white cardstock base I used.
I decided I wanted to 'hang' the tags, photo and some chipboard pieces across the page so I lined them up across the page using a piece of macrame string. Seeing them lined up helped me to decide there needed to be more interest behind the tags and I wanted there to be more of the Bazzill Blossom colour. I trimmed my page down and added a Blossom cardstock border (hand-stitched to add some detail to the edge of the page) and then tore and scrunched some of my remaining Blossom cardstock and did the same with a wide strip of white, which went behind the tags for the added depth and interest.
I stuck everything down where I wanted it to 'hang' and carefully placed a couple of little stitches in the macrame so that it would stay where I placed it. Foam was added into the bigger gaps in the scrunched up paper to help it keep its shape and I finished by fussy cutting a couple of flower clusters from the floral Sunny Days paper and tucking them in, a little splatter of pink paint, a few more flat back gems and added my white journaling under the photo.
And there we go - I hope you enjoyed seeing my layout and feel inspired to give this collection and the cut apart tags a try! I will be back again soon with my next project using Sunkissed and hopefully I'll bring some back sunshine with me!
Take care,
Meg x


1 comment:
Awesome content
Post a Comment