Monday, 17 March 2025

March Papermaze Kit - Part 1

Welcome to the March Papermaze Kit, and I'm kicking off with a double layout for a change. Both of these layouts can be independent of one another, they can also be arranged either way around. The March kit is full of pretty spring papers, embellishments and cardstock colours. The photos show my baby granddaughter and friends, at the sensory group they attend weekly, celebrating World Book Day, Flo's favourite book of the moment being a Peek-A-Boo Book with a strawberry character on the front, so she is dressed in strawberries!


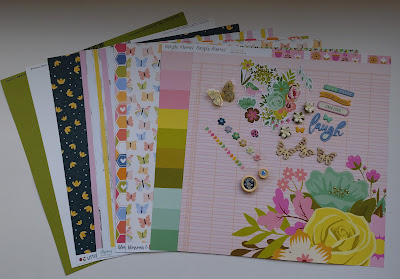
Here is the kit, showing the 6 papers, 2 sheets of cardstock and a selection of matching embellishments to try. Don't forget there is also a pack of 4 sheets of cardstock, selected by Vanessa, to go with the kit as an extra purchase (see all six sheets of cardstock in a photo below).


Patterned papers:
Simple Stories - Tea Garden collection - Lovely Day & Be Happy
Echo Park - Blossoms & Bees collection - 4 x 4 Journalling Cards & Bright Hexagons
Echo Park - Little Things Mean A Lot collection - Free Spirit Fireflies
Mintay Papers - Blossom Serenity collection - #04

The photo below shows both sides of the papers:


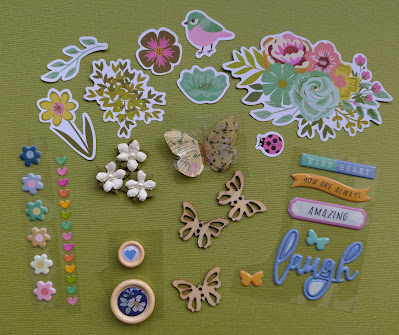
Embellishments: SS 8 Tea Garden Bits & Pieces, Rosie's Studio butterfly, 2 Rosie's Studio Button Embellishments, 3 wooden butterflies, strip of puffy flower stickers, selection of Rosie's Studio puffy sentiments, 3 mini flowers, strip of Doodlebug enamel heart sprinkles.


Bazzill Basics Cardstock:
CS White & Parakeet (included in main kit). Yukon Gold, Twilight, Petalsoft & Lagoon (in extra Bazzill Pack).


World Book Day - Left-Hand Side


For the left-hand layout, I used the 
Lagoon Bazzill as the backing. I wanted to use the photo of Flo and her friends as the main feature, so printed it A4 size. Then with the sheet of EP Bright Hexagons, I set about cutting a frame of hexagon shapes, cutting the center of the paper away in an irregular pattern. (I set aside the centre of this sheet of paper for use on the right-hand side.)

I set the frame of hexagons over the Bazzill, and arranged the photo to the left side of the page, leaving room for the details and title. I cut three tags using scrap white card and the Sizzix, Tim Holtz, Tag Collection die set. With a little of the
Yukon Gold Bazzill I cut the rings to reinforce the tag holes and threaded them with some orange ribbon from my stash. I placed the tags to the top right of the photo and added my journalling.


I made the title with several different fonts on the Cricut, and cut with various scraps of Bazzill from the kit and my stash. I placed the title to vertically to the right of the photo.


To embellish this page I used the Rosie's Studio Button Embellishments, strip of Doodlebug enamel heart sprinkles and some of the Tea Garden Bits & Pieces, keeping some back for the next page.

Peekaboo - Right-hand side

For this page I purchased an extra sheet of Lagoon Bazzill as the backing, to match the first layout. From the left-over piece Bright Hexagons paper, I cut three irregular panels of hexagons. These were placed vertically onto the Bazzill. 


On the Bright Hexagons paper many of the hexagons have several layers and a heart in the centre, I wanted to recreate this as a large shape, to use for the title. I created these shapes using my Cricut - two hexagons in Yukon Gold Bazzill, one with 9cm sides and the other with 10.5cm sides. Then I cut another hexagon from some white scrap cardstock measuring 9.45cm.  These were layered up, then I added a heart shape cut from the same white cardstock, 11.5cm across. I placed the finished shape over the three strips of paper.


I placed my four photos across the layout, leaving enough white space to add a title later.


I used the Cricut to cut the date, in more scraps of Bazzill from the kit and my own stash. I placed the date in the bottom left corner of the page. I also made the title and place this over the white heart.


I embellished the page using the same elements as for the left side (Rosie's Studio Button Embellishments, strip of Doodlebug enamel heart sprinkles and some of the Tea Garden Bits & Pieces).

That's all for today, I'll be back later with two single layouts made from the same kit.
Thanks for looking
Lynn x

Sunday, 16 March 2025

Simple stories ~ Tea Garden 🌸

 Hello everyone - it’s Anna back with you today and this month I’m working with Simple Stories Tea Garden - which you can find in the shop here. 

This collection is great for all of your spring adventures, with florals, butterflies and birds, with a tea element to it as well. 


To create this layout I began with a sheet of white bazzill from the matchmaker pack, I trimmed it down by about an inch on each side and mounted it on to ‘All Smiles’. 


I used the floral bits to create a wreath shape in the centre of my layout and placed the two vines, also in the pack on opposite corners. I then hand stitched with white thread around the edge of the bazzill cardstock. 
You could recreate this layout design using any of the simple stories floral bits packs which you can find here.


I mounted my 6x4 photo on to coordinating cardstock from the matchmaker pack


I added a few stickers from the cardstock stickers around my wreath. 


Finally I added a title using some alpha stickers


Thanks so much for looking! See you later on this month with a second layout using this collection. 

Anna

@acraftylifewithanna

Wednesday, 12 March 2025

Beautiful - Simple Stories - Simple Vintage Flower Shoppe Collection

Hi Friends!

Rebecca here, sharing my first layout of March with you today. With Spring just around the corner and the weather starting to warm up, it felt like the perfect time to create with one of the latest collections from Simple Stories—Simple Vintage Flower Shoppe. It’s a stunning collection that truly captures the essence of Spring! You can find the full collection in the shop here.


I was immediately drawn to several of the journal card images on the ‘Journal Elements’ patterned paper, so I decided to cut them out and layer them behind my photo. To add texture and depth, I distressed all the edges—one of my favorite techniques to elevate a page. I matted my photo with a soft pink patterned paper from the 6x8 Paper Pad and arranged these elements in the centre of a sheet of Bazzill White Cardstock.

At this stage, I still felt like something was missing, so I knew I needed to add a little more behind the photo. I chose two patterned papers—the B side of the '2x2 / 4x4 Elements' and the B side of ‘Memories’—and cut them down to 7x5 inches. I then used a paper punch to add a notebook edge along the tops. Once I arranged these elements at angles behind my photo, I was much happier with the layout.


With the larger pieces in place, it was time to move on to embellishing. I selected some beautiful floral pieces from the Floral Bits & Pieces and layered them around my photo, allowing some to peek out from behind the patterned papers. 


I also added a couple of tin buckets filled with flowers from the Cardstock Stickers sheet to bring in more texture and detail.


For the title, I chose the word “beautiful” from the Foam Stickers and placed it just beneath my photo for a balanced look.                                                                                                                                   


To add the finishing touch, I fussy cut a couple of butterflies from the 'Dreamer' paper and adhered only the centres, letting the wings flutter freely. This gives the impression that the butterflies have just landed on the layout, adding a bit of movement.


Thank you so much for stopping by to check out my layout. I hope it inspires you to create something beautiful of your own! This collection is absolutely perfect for Spring, so be sure to head over to the website and grab it before it’s gone!

Take care, 


Rebecca xx 
@preciouspagespapercraft

Monday, 10 March 2025

49 & Market - Birdsong - Sweet

Hello!

Claire here, and today I'm creating with the Birdsong collection from 49 & Market

It's such a pretty range with a soft colour pallette featuring lots of fresh colours perfect for Spring. 

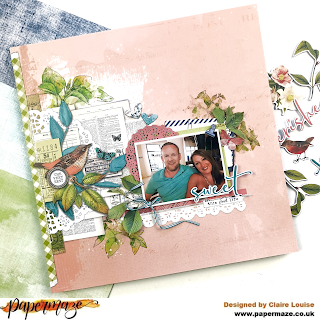
I'm using the Sweet Notes paper as my base. The beautiful printed cluster on the left of the page provides an anchor from which to build my design.

Extending across the page, I layered several pieces from the Ephemera Bits, further complemented by two pieces from the Laser Cut Elements.

I placed my photograph on top, embellishing with laser cut leaves and a title from this Chipboard Mixed set.


For an extra layer and pop of colour, I also added a leaf from the Blendable Rub On Transfer Sheet under my photo cluster, helping extend the design from theeft to the right of the page.

Thanks to the beautiful paper, this layout came together so quickly, and I love how it turned out. 

I hope you've enjoyed this post. I'll be back in a few weeks with another fun project to share.

Until then, happy scrapping! 

Claire x

@scrappysoulmate 

Wednesday, 5 March 2025

Mintay Paper Blossom Serenity - Spring Snapshots

Hi, Karen here. I'm so excited that meteorological spring began on Saturday, and I've been celebrating by crafting with Mintay Paper's beautiful Blossom Serenity collection. The pastel colours and lovely spring-themed images, like flowers, birds, and butterflies, are just perfect for scrapbooking my spring memories.

To start my layout, I took a pink sheet of cardstock from the Bazzill Matchmaker Pack and  placed a trimmed-down sheet of paper #5 on top, ensuring a thin border remained around the edges.

Using my sewing machine I stitched a straight stitch round the edges of the paper with white thread to add some texture.

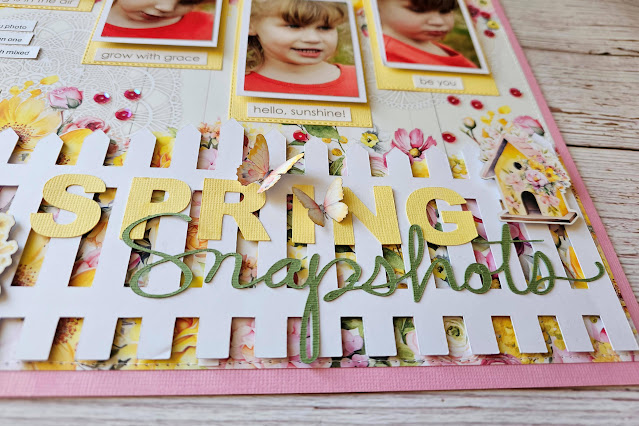
With my Silhouette, I cut a long white picket fence from smooth white cardstock, designed to stretch almost the full length of the layout. I then mounted it along the bottom edge of the layout using 3D foam to create a raised effect.

I embellished the fence with flower and birdhouse die cuts from the Paper Die Cuts Pack. The Paper Die Cut Pack contains 60 die cuts so there were lots to choose from.

A two-part title was cut with my Silhouette: 'Spring' in yellow cardstock and 'Snapshots' in green. These were then arranged and affixed to the top of the white picket fence. Two die cut butterflies were also added to the title.

I printed four 2"x3" photos, matted them with white cardstock, and stuck them to yellow cardstock tags using 3D foam for dimension. The completed tags were then attached to the layout, and strung on white twine.


From the Paper Sticker Words sheet, I chose appropriate words and added them to the tags.


Journaling strips were typed on my computer, printed onto white cardstock, and then glued along the left-hand edge of the layout.


To finish, I added a sprinkling of pink sequins.

I'm really happy with how this layout turned out. The flower border peeking from behind the picket fence is a favourite. If you're inspired to use the Blossom Serenity collection, check it out here at the Papermaze shop. 

Take care until next time! Karen x x

Monday, 3 March 2025

February Papermaze Kit - Part 2

Hello, Lynn with you today, and the second pair of layouts made using the beautiful February kit from Papermaze. Pretty romantic papers, together with Bazzill cardstock and embellishments. This time I am using some old family. black and white photos.


Before seeing how these layouts were created, please see below, what you will find in the kit.


Patterned Papers:
Mintay Papers - See You in Paris! collection - #04 & #05
P13 - Love Stories collection - #01 & #05
49 and Market - Vintage Orchard collection - Solids Paper 1
Echo Park - Marry Me collection - Blush Floral

The photo below shows both sides of the papers:


Embellishments - P13 Light Chipboard Embellishments, P13 Dear Love Stickers, Craft Consortium 2 Belle Fleur butterflies, P13 Stitched With Love labels, 3 Prima flowers, Doodlebug Designs 5 puffy heart stickers, Little Birdie 3 heart stickers, 12" Pink Mesh ribbon, Papermania Bare Basics wooden dots.


Bazzill Basics Cardstock - Sweetheart and Stonehenge (included in kit). Peach Creme, Dusk, Tutu Pink, Guacamole (in extra Bazzill match kit).


Our Wedding - This layout shows The wedding of family members Gerty and Bill, taken in 1931.


For this layout I used a sheet of Classic Smooth White Bazzill, and the sheet of Mintay Papers - See You in Paris! collection - #04. The first task was to cut a large heart shape from the #04 paper. I worked out where the heart would sit on the cardstock, and with TH Layering Stencil (Ornate THS079), I stencilled with Kitsch Flamingo, Spun Sugar and Worn Lipstick Distress Oxide Inks. I also flicked some of these inks over the page.

 
Using DMC embroidery thread, I worked chain stitch about 1cm in from the edge of the heart shape. I trimmed the outer edge of the heart with some pretty white lace.


The heart was then stuck down onto the centre of the cardstock. I mounted my photo to the right side of the heart. Using scraps from the P13 - Love Stories collection - #05l, I fussy cut a circular, floral element and tucked this into the left side of the photo.


From the kit, I chose the flowers, phrase stickers and butterflies to embellish the page. 


Using my own stash, I used the 'Our Wedding' sticker from Echo Park - Just Married - Element Stickers. My journalling was written under the title.


Finally, I added the tiny white heart stickers from the kit.


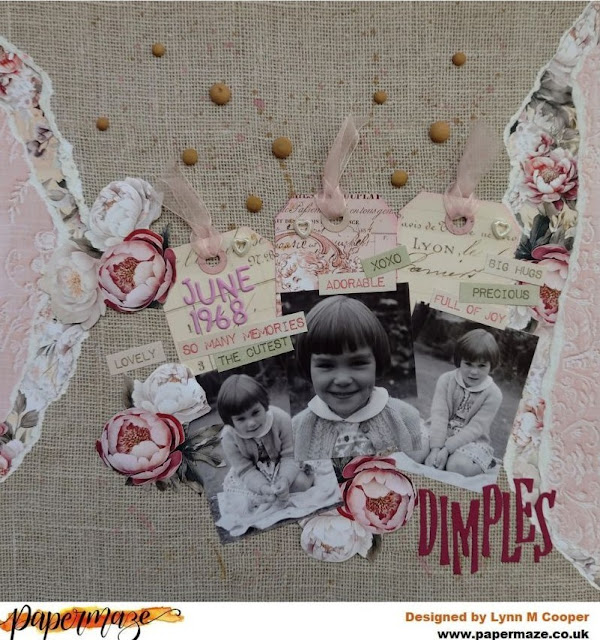
Dimples - I recently found these photos of my little sister from the 1960's


For the background, I used the 49 and Market - Vintage Orchard collection - Solids Paper 1. Then, with scraps of Mintay Papers - See You in Paris! collection - #04 & #05 I tore pieces to add to the sides of the layout, using both sides of the paper.


I flicked some of Distress Oxide Inks over the page.


I used both Mintay Papers - See You in Paris! collection - #04 & #05 to make three tags. The tags were cut using the Tim Holtz, Sizzix Thinlits, Tag collection die set. I tied some ribbon into the top of each tag, and arranged them across the centre of the page. The three photos were mounted over the tags.


With some flowers fussy cut from the scraps, I placed these around the layout, mounted with some 3D foam pads.


I made some letters for the title using the Sweetheart Bazzill, and a Sizzix Bigz die. I used the P13 phrase stickers from the kit to add the layout.


The date was made with Alphabet Soup stickers from Doodlebug Designs.


I used the Papermania Bare Basics wooden dots on the page above the tags and photos.


Finally, I used the three heart stickers from the kit.

That's all for the February kit, back with the March kit soon.
Thanks for looking,
Lynn x