Thursday, 30 May 2019

May Papermaze Kit - Part 2

Hello, Lynn here today with the second part of the Papermaze kit for May, this lovely collection is currently available in the shop.


As always, before we look at how my layouts were made, here are the details of the kit:


May Papermaze Kit
Patterned Papers:
Simple Stories - Little Princess Collection - Believe in Fairy Tales and Enchanted
Kaisercraft - Paisley Days Collection - Retro and Good Vibes
Kaisercraft - Greenhouse Collection - Yucca
Authentique - Poised Collection - Poised Five
Bazzill cardstock - Rain and Bazzill White


Reverse side of papers

Extra Bazzill Pack
Jetstream, Guacamole, Glow and Petunia


Embellishments
5 Prima flowers, 1 paper flower, 1 resin flower, chipboard heart, lace, 2 heart pins, 2 heart stickers, wooden word, sequins, strip of gems, 5 butterflies, twine.

Successful Succulents is my first layout, featuring a photo taken in the poly tunnel at Henstead Exotic Garden earlier this year. 


All the inking for this layout was done with Brushed Corduroy Distress Ink.
I gutted the
Guacamole Bazzill leaving a 2.5cm frame. Then I trimmed (about 1cm from top and one side) and distressed the edges of the Kaisercraft - Greenhouse - Yucca paper. This was mounted over the Bazzill. (I gutted a piece from this paper, from where the photo will lie).

With Stampers Anonymous Entomology stamps I stamped script and insects over the Yucca paper with Archival ink.


I used a length of burlap from the shop across the centre of the layout. Over the top of this, I used several lengths of raffia, I tied knots at intervals to help keep the strands together. 


I made a double mat for the photo with white and Guacamole Bazzill, distressing and inking the edges.

A barrel tub was created using the Potted Sizzix Bigz die, white Bazzill and Distress Ink.

The plant was made with a Sizzix Thinlits die from the Wildflower Stems #1 set. Two brads were used to join the straps around the barrel.
 
The title words were mounted on scraps of the Yucca paper, which I gutted from under the photo. Jillibean Soup stickers were used for the word 'Successful'. For 'Succulents' I used
Guacamole Bazzill and Tonic Studios Windsor upper and lower case dies. The words 'Henstead Exotic Garden' were cut using Sizzix Thinlits alphabet die set - Alphanumeric Label. The year as made with some Tim Holtz Idea-Ology Metallic Alphabet Stickers (left over from a previous kit).

I also added a few appropriate words from the manufactures strip taken from the Yucca paper.


Finally I added the gems from the kit.

I Love My Cat - my second layout has a photo taken back in the 1960's transferred from a coloured slide. It is a picture of my sister with our pet cat - Caligula.


For this layout I used the two Kaisercraft - Paisley Days papers. First I took the sheet called Good Vibes and with a craft knife I cut away the pale blue area, leaving the flowers and the wooden frame.

I trimmed the Retro sheet to 25cm x 25cm and used it to back the gutted area. I added my photo tucking the bottom under the flowers. Then used all the flowers from the kit and arranged them among the printed flowers. I added leaf fronds cut with a Martha Stewart punch and the remains of the Retro paper. 

I used the two heart pins to the right of the flowers. The wooden word was painted with Picket Fence Distress Paint and stuck to the right of the photo, forming part of my title. For the rest of the title I cut letters from the pale blue paper gutted from Good Vibes earlier. I used
Tonic Studios Windsor upper case dies for these letters.

Finally the two heart stickers and the sequins from the kit were arranged on the layout.

That's all for the May kit. I will be back with the June kit later in the month.
Thanks for looking.
Lynn x

Friday, 24 May 2019

Imagination ....... Stamperia Voyages Fantastiques

Hello again, its Anita with you today.

For this post I have worked with some more Stamperia papers, this time from the Voyages Fantastiques range. A beautiful steampunk collection combining vintage aqua, creams and browns.
I chose a photo taken back in 2006 of the four of us, we were actually taking an autumn walk on a local beach.


I based the layout on a sheet of Wallpaper 
and then took a sheet of Air Balloon . I tore the left hand side off at approx 5.5 inches and inked all around the edges, then stuck it too the left hand side of the backing sheet.
From the remainder of the sheet I cut out the balloons, wings and the adventure quote.


I love using Cosmic Shimmer Sprays and I had a good old squirt all across the page, pooling the ink in some areas and then letting them run down the page. When this dries it gives a beautiful metallic shine.

I cut various bits and pieces of paper and inked the edges, then layered them behind the photo. Some cream cotton lace was laid across the bottom of the photo.


I had a rummage through my collection of Stickles and Liquid Pearls and chose 3 colours, Dark Chocolate, Rose Gold and Platinum. Using a selection of pots and lids of different sizes to work round I added dots of each of the colours and created decorative circles in random places about the page.

In my DT kit I had a few bits and pieces of chipboard shapes, so I picked some out and then sprayed and dabbed them with Cosmic Shimmer Mists too as I felt that on this page they didn't really work staying plain.

As you can see, by adding some colour to the chipboard really makes it co ordinate with the papers.


Stamperia produce a stunning range of papers, many of which are in stock in the shop and would be great for scrapping various photos or creating beautiful cards.....why not pop along and have a look and treat yourself.

Have a great Bank Holiday Weekend..
Hapy Crafting
Anita xx

Monday, 20 May 2019

May Papermaze Kit

Hello, Lynn here today with a great Papermaze kit for May, creatively put together by Vanessa and available in the shop from today.

Here are my first two layouts made with the kit.


As always before we look at how my layouts were made, here are the details of the kit:


May Papermaze Kit
Patterned Papers:
Simple Stories - Little Princess Collection - Believe in Fairy Tales and Enchanted
Kaisercraft - Paisley Days Collection - Retro and Good Vibes
Kaisercraft - Greenhouse Collection - Yucca
Authentique - Poised Collection - Poised Five
Bazzill cardstock - Rain and Bazzill White


Reverse side of papers

Extra Bazzill Pack
Jetstream, Guacamole, Glow and Petunia


Embellishments
5 Prima flowers, 1 paper flower, 1 resin flower, chipboard heart, lace, 2 heart pins, 2 heart stickers, wooden word, sequins, strip of gems, 5 butterflies, twine.

Happy Birthday - my first layout features my daughter on her 5th birthday. This layout is a scraplift of one of my own layouts, created in 2016, which in turn was scraplifted, from the work of Brenda.
 

All my inking for this layout was done with Worn Lipstick Distress Ink.

With the Cricut, I designed an image which I cut from the Simple Stories - Little Princess - I Believe in Fairy Tales Paper. This was placed centrally on the Rain Bazzill.

I gutted a piece 10cm x 10cm from the centre of the Glow Bazzill, which I used to die cut a stitched circle. I cut another stitched circle the same size from the White Bazzill. I also die cut a stitched panel from the White Bazzill for my title. Then I cut some pieces the same size as my photo, these were cut from Petunia Bazzill and both sides of Simple Stories - Little Princess - Enchanted. These and the photo were arranged on the layout.

The title, name and date were all cut from Petunia Bazzill with Sizzix Thinlits dies - Handwritten Celebrate and Alphanumeric Label. With buttons from my stash I placed one in the centre of each blossom. Then after inking the butterflies from the kit, I scattered them across the page.

Golden Wedding - for this layout I chose a photo of my parents celebrating their 50th Wedding Anniversary.


I used the Glow Bazzill as my base. With Authentique - Poised Collection - Poised Five paper I trimmed 2.5cm from two adjacent sides. Then I gutted the paper in decreasing sizes, alternating between both sides of the paper. My first frame (yellow leaf) is 2.5cm deep, my second frame (White floral) is 2.5cm deep, and the third frame (yellow leaf) is 3cm deep. The remaining square of paper was used white floral side up. These were all inked with Black Soot Distress Ink and arranged on the page as shown above. I then mounted my photograph onto the page.

With some gold/pearl card and some black Bazzil from my stash, I die cut some flowers and fronds using the Sizzix Thinlits set - Funky Floral #3. I also die cut some flourishes with the Sizzix Adorned Thinlits set and some cream Bazzill. These were all arranged top right and bottom left of the photo. I finished the flowers off with some cream flat-backed, self-adhesive pearls from.

I found some old Basic Grey letter stickers from my own collection for the title.

These are the first two of four layouts made with this kit. I will be back with the others in a few weeks.
Thanks for looking
Lynn x

Friday, 17 May 2019

May Crop

We are at that time of the month again when we spend the day at Otley Village Hall crafting with friends!  Our kit this month has been designed by Janina (based on a layout found online), and features the beautiful Vicki Boutin Field Notes papers:


As usual, there will be delicious home-made cakes, dies & punches to use, and a discount in the shop!
Hope to see you there!

Wednesday, 15 May 2019

Pink Paislee's Horizon collection by Paige Evans - Fussy Cutting

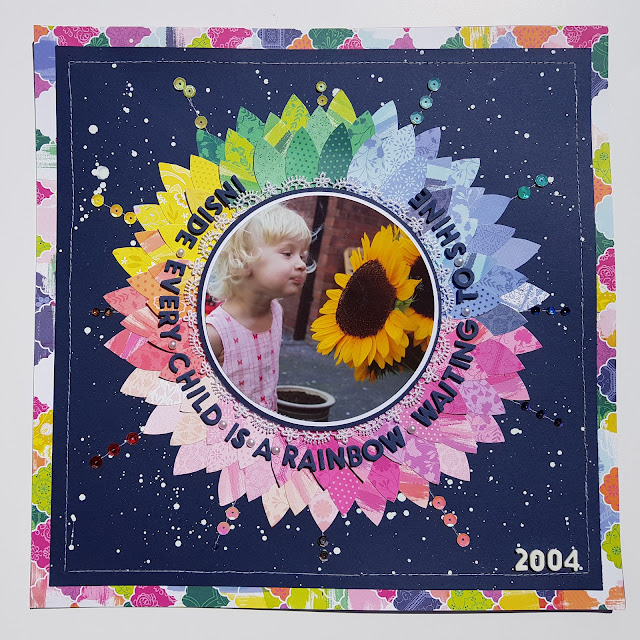
Hello, Karen C here again with my second layout using Pink Paislee's Horizon collection by Paige Evans. I'm really enjoying playing with this collection and the bright colours are right up my street. This layout involved lots of fussy cutting but as the shapes are simple shapes they were really easy to cut out whilst watching TV.


I used two sheets of paper from the collection for this layout (#12 & #20) and a sheet of Bazzill navy 'Moody Blue' cardstock.


I started by trimming a quarter of an inch off of each edge of the sheet of navy cardstock and then matted this onto the sheet of #20 paper. I cut a circle from the centre of the navy cardstock (which I wanted to use to mat my photo on) and then using some watered down white acrylic paint and a paintbrush I splattered paint all over the cardstock.


Once the paint had dried, I  machine stitched round the edge of the cardstock with white thread and also stitched a series of lines radiating from the circle out towards the edges of the cardstock.


I then fussy cut all the petal shapes from the sheet of paper #12 and glued these to a circular piece of scrap card in a flower design and roughly in rainbow order. There weren't many yellow petals so I cut a few extras from some scraps of yellow paper found in my stash,


My 5"x7" photo of my daughter was cut into a circle measuring just under 5" in diameter and was matted first on white cardstock and then on navy cardstock, before attaching to the centre of the circle of petals. The completed flower was then fixed to the centre of the layout (covering the circular hole!) with some 3D foam underneath to give some dimension, My title was added round the edge of the circle using navy Pink Paislee Paige Evans Pick Me Up - Happy Life Foam Thickers. Tiny self adhesive pearls were also added to the title.

.
I also tucked some white cotton lace under the edge of the circle.


I finished off the layout by gluing coloured sequins to the stitched lines and added the date in the bottom corner of the layout using the white version of the Foam Thickers.


I hope you like the layout - I really enjoyed making it. I'll be back in a few weeks with a final layout using this collection and in the meantime I  hope I've inspired you to take a look at the full collection in the shop.

Take Care
Karen x x

Monday, 13 May 2019

Planning again...

Popping in with another quick look at my planner for last month.
I tried to use pre made embellishments for this one from lots of my scraps and left overs.

I love using some of the pattern papers as well. The A sides of some papers that you have no idea what to with? These are perfect to use on these...I sit with something on to watch and do some fussy cutting.

Here is the other side of the week. You can see the papers I used for this spread here....


And some of the pattern paper cuts out!

And some left over embellishments

Thanks for popping in!

Friday, 10 May 2019

Pebbles ~ Chasing Adventures #2 with a Project Life how to!

Happy Friday everyone!
It's Anna with you today to share my second project using the Chasing Adventures collection from Pebbles, check out the whole range here
This time I've created a project life layout and I'm going to explain where I start and how I go about creating such layouts which some process photographs.

For me, a mixture of Project Life layouts as well as traditional 12x12 layouts work well for creating my albums. I find that they work well alongside my 12x12 layouts, enabling me to add in extra photographs of events that I may have otherwise not used, but at the same time not taking up loads of pages.
So for example, for today's post I have created a project life layout of the same event as my 12x12 layout form my first post using this collection. Here is the link for that post - Chasing Adventures #1
As I have used the same collection it flows well, tying the two pages together, while allowing me to add in an extra 10 photos!


So where do you begin? Well, you need to start by finding the size and layout of Project Life pages that work best for you. Most of the time I use Design A or C, take a look at the range that Papermaze has in stock here.


Then choose your photographs and base them around the page design. With Design A there are 4 6x4 landscape spaces and 4 3x2 portrait spaces. To fill the spaces, you can use pre cut Project Life cards, which come in many designs and have patterns, images and space for journaling too. Take a look here for Papermaze's range of Project Life cards. Or you could use cardstock for mounting pictures and then trim down to size. Many paper lines feature journaling cards like these and these which can be cut down and inserted too. Project Life cards always come with rounded corners, so I always round the corners of any non Project Life cards that I've used.  


Once you have filled each section, you can begin to add any embellishment, titles and journaling that's needed.


Thanks for looking! Have a great weekend! 
Anna
X


Wednesday, 8 May 2019

Little Poppet .... Stamperia Spring Botanic.

Anita here with you today,

I have a new layout to share using some papers from the detailed Spring Botanic range by Stamperia, featuring floral themes, garden insects and vintage ephemera.


I have been waiting a  few years to scrap this photo of my gorgeous niece, taken on a day that we went to visit some poppy fields on a day out. The beautiful sheet of Poppy and Bird paper was perfect for it, so I backed it onto a sheet of pale green card stock and then inked gently round the entire edge with a gold and then a coppery ink pad. I roughed up the edges of the paper to give a distressed look.

Although the sheet is really lovely I wanted to change the look of it slightly so I part misted and then also drizzled 2 different colors of Cosmic Shimmer mist , Tarnished Gold and Ancient Copper across and down the page.


From the sheet of Yellow Alpine Poppy I cut a few of the panels out, inked the edges and popped them partly behind the photo ( which I had matted in the same pale green card).


I had some Dusty Attic Wordplay chipboard pieces to work with, so chose a suitable word and inked it up gently and added to the right hand sight of the photo and did the same with a tiny chipboard lock and key.


I also added some pearls, a metal filigree and a faceted flat back crystal from the Prima Say it in Crystals range before finishing the layout with a strip of cotton lace and a title made using some copper chipboard alphabet letters from my stash.


I hope you likes the layout, Stamperia papers are beautiful and come in a range of different patterns and themes, why not pop over to the shop and have a look.

Hope you get some chance to craft today!

Warmest wishes
Anita xx