Thursday, 17 August 2023

August Crop

We are back at Otley Village Hall this Saturday, the 19th, for our monthly crop.  This month's kit is a grid-style layout...


We meet from 10am until 4pm, and there's the usual punches, dies, tea & coffee, plus delicious home-made cakes.  If you would like to come along, do get in touch - you'd be very welcome!

Monday, 14 August 2023

You Are My Happy - Simple Stories - Simple Vintage Essentials Collection

Hello, it’s Rebecca back with you today, sharing my second layout created with the amazing Vintage Essentials collection from Simple Stories. I’m loving pairing this collection with some grungy mixed media so I pulled a few supplies out for this layout.


I began by cutting a couple of strips of patterned papers, one shorter than the other, and tearing along the bottom of them to introduce some texture. I machine stitched the smaller strip in place on top of the larger, and then added some zig zag stitching for effect.


After matting my photo with a darker patterned paper, I adhered it to the strips with a layer of craft foam behind it. I always like to add foam behind my photo(s) to make sure they sit raised from the page, therefore remaining the focal point.

Once I had these larger elements stuck together, I was able to mark out the area where I wanted my mixed media to sit. I began by adding some grey ink to a sheet of Bazzill Marshmallow Cardstock using a Brayer. I love the effect brayers give – they also offer lots of control so perfect if you’re a bit nervous of mess! Once this was dry, I added some script stamping using black Staz On ink. On top of this, I pressed some Nuvo Glimmer Paste through a Tim Holtz stencil. I added a dot of black acrylic paint to the paste to darken it, being careful not to lose the glitter effect. I finished the mixed media off with some black splatters.


Behind my photo, I added some white sequin waste and black netted material to bring some more texture to the layout. I love building layers using different materials.


For my title, I’ve used my all-time favourite Simple Stories product – the Foam Stickers. I am always in awe of the amazing fonts Simple Stories come up with for these stickers, and the phrases are also perfect for lots of different titles.


I finished the layout off with a few ephemera pieces from the Botanical Bits pack. This pack is fabulous - it includes 38 die cuts including florals, butterflies and dragonflies!


I hope you’ve enjoyed the layouts I’ve created with this collection. It has fast become my new favourite Simple Stories collection (and yes, I know I say this every time they release a new collection!).

I’ll be back later in the month with a new layout using the gorgeous Vintage Artistry Sunburst collection from 49 and Market.

Take care

Rebecca x

@preciouspagespapercraft

Saturday, 12 August 2023

July Papermaze Kit - A Little Extra

Lynn here today, with an extra layout made using the July Kit. I made four layouts and still had plenty left in the kit for an additional layout. The photo is one from a Norfolk holiday and a day at Wroxham Barns when the triplets were two years old.


For full details of the kit, please see the first post for the July kit.

I love the colours in the 'Happy Plaid' paper, and wanted to use it as a wide frame for the layout. I gutted the paper to make a frame 1.5" deep.


With the White Bazzill trimmed down to 9.75" x 9.75" I set about creating a multimedia background. I used a Tim Holtz Layering Stencil (Rays)  together with Scattered Straw Distress Oxide Ink, to make a sunburst effect to show above my photo. Then with Broken China Distress Oxide Ink, I splattered wet ink over the page. Once dry I mounted the white card onto a piece of Blue Star Bazzill 10" x 10". This was then mounted over the paper frame.


I mounted my photo onto a piece of  'Brighten Your Day Dots' paper, with the blue side up. Then I cut another piece from the same paper, to place at an angle behind the photo mount with the dotted side up. Before sticking anything in position, I arranged other embellishments on the page. I chose pieces Ephemera Bits from the 49 and Market Spectrum Gardenia pack - using a picture wheel, slide mount, two phrase rings and two tickets. Once this was all arranged as I wanted them, I glued them in place.


Then I fussy cut butterflies from the 'Beautiful Butterflies' paper and scattered them over the page. I added the paper flowers and the Rosie's Studio puffy stickers from the kit. I selected two flair from my collection and placed them in the center of the die cut rings.


My title and the date were made with American Craft Thickers - Gathered which are foam and cardstock letters for 'Fun Fair', the gold on the letters matching the gold flower centers. I added Rosie's Studio Simply Charming puffy alphabet stickers to complete the title and the year. Finally, I wrote my journalling under the slide frame.


That's all from the July kit, I'll be back with the August kit very soon.
Thanks for looking.
Lynn x

Friday, 11 August 2023

Simple Stories - Boho Sunshine - You are my Sonshine

Hello, Karen here. I hope you're having a good summer and taking lots of photos to capture those summer memories. Today I'm sharing a layout using photos I took of my son one summer, and once again I've been using the fabulously sunny Simple Stories Boho Sunshine collection.


I started my layout by using a free cut file from www.happinessishomemade.net. The cut file said 'You are my Sunshine' but I altered it in the Silhouette Studio to say 'You are my Sonshine' before cutting it from a 12x12 sheet of smooth white cardstock.  


The words in the cut file were backed with a piece of the Happy Day paper and the sun rays were backed with pieces cut from the Groovy and Smile Big papers. 


Behind the sun shape I created a shaker pocket using acetate. I searched my stash for as many yellow sequins as I could find. I didn't find many, so I also punched a few tiny hearts and stars from yellow cardstock to bulk out the shaker pocket. 

The backed cut file was then trimmed to 11.5" x 11.5", attached to a bright yellow piece of 12 x 12 cardstock and machine stitched round the edges with white thread.


Using 6 strands of yellow embroidery floss I chainstitched lines between the sun rays. This added more texture to the layout.


I printed two small photos of my youngest son and stuck these onto two tags from the sheet of Tag Elements. 


The tags with the photos, and two others, were stuck to the bottom of the layout - two pointing up and two pointing down.


The tags were strung together with white string.


Finally, a few sequins and a smiley face sticker from the Sticker Book were used to embellish the tags .

I hope you like this layout and it has inspired you to scrapbook your summer photos using Boho Sunshine from Simple Stories which can be found here in the shop.

Until next time, Take Care
Karen x x

Wednesday, 9 August 2023

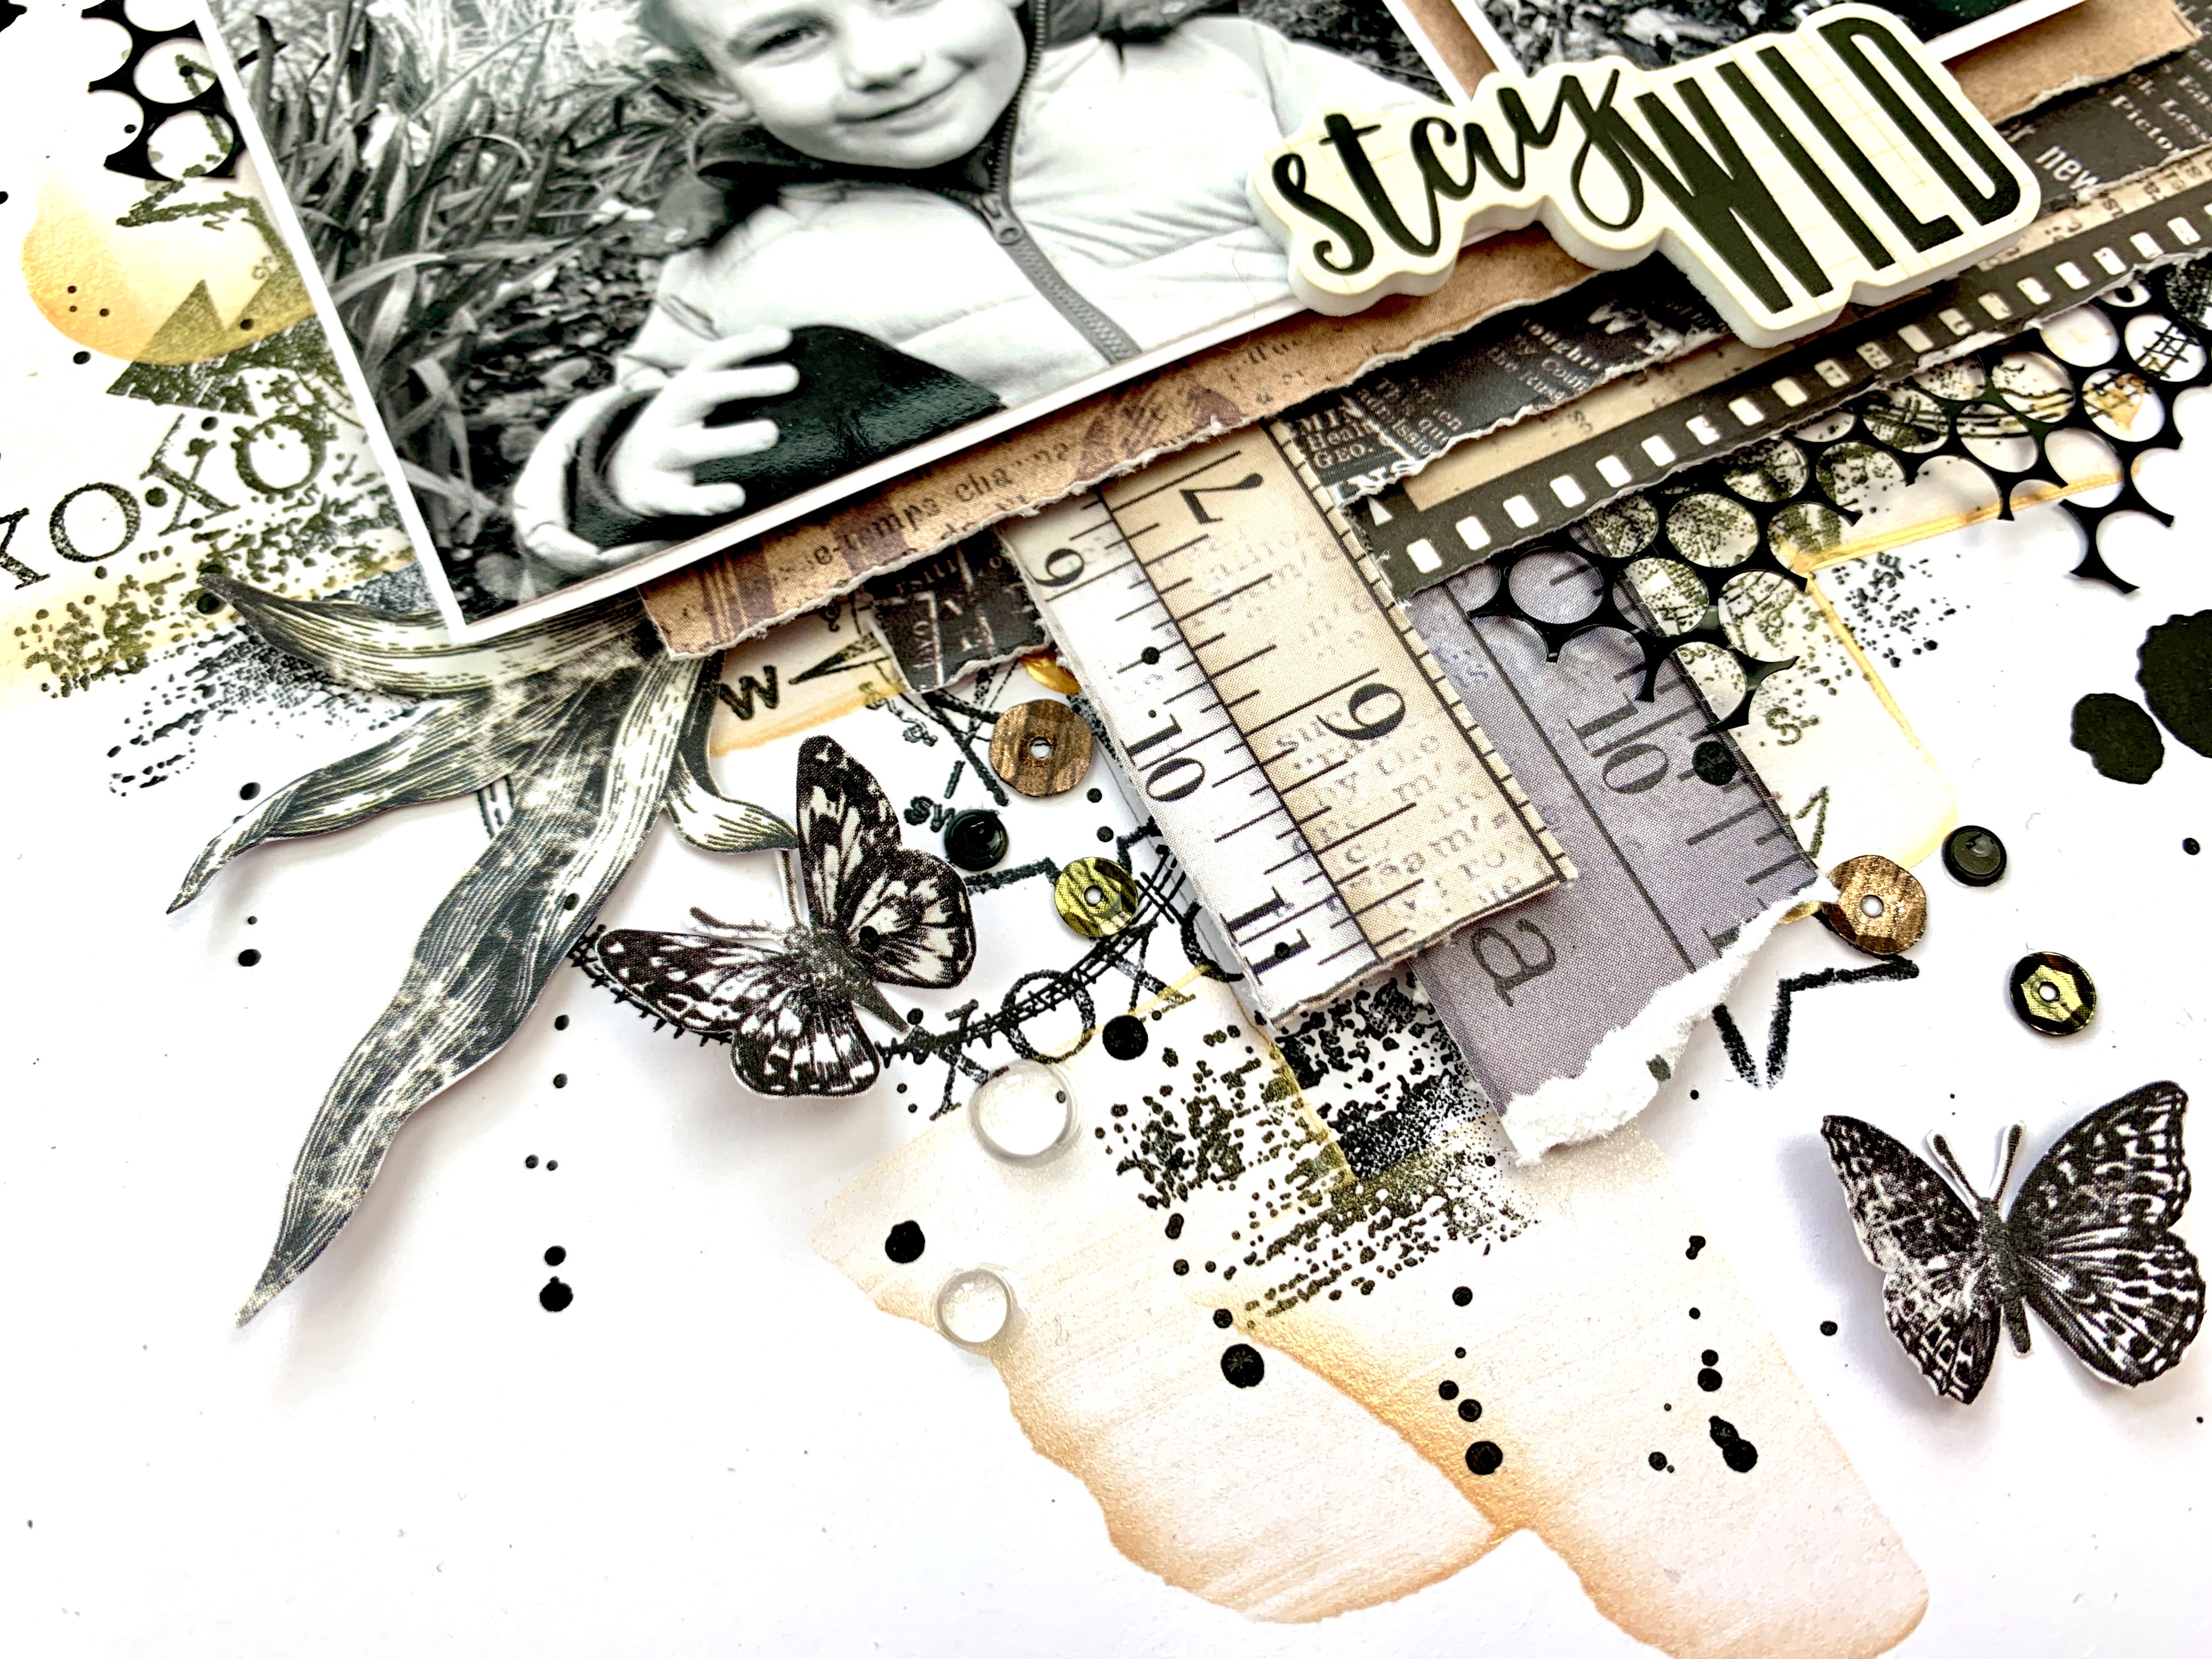
Stay Wild - Simple Stories - Simple Vintage Essentials Collection

Hello everyone, it’s Rebecca with you today blogging from my summer holidays on the Isle of Wight. Although it’s feeling more like an autumn holiday with the awful weather! At least bad weather usually means lots of scrapbooking!. This month I’ve been loving creating with the Simple Vintage Essentials collection from Simple Stories. It’s the perfect collection for those of us who love scrapping the boys/men in our lives. You can buy the collection from the store here.


I thought I’d try something slightly different for this layout and scrap photos of different sizes. (Mainly because of the way I had them printed out!!) I’ve cut sections of patterned papers and layered them behind my photos, selecting a brown paper and a black paper. Behind these, I’ve added a couple of film strips from the Captured Bits pack. Underneath these, I’ve added some strips of the ‘Authentic’ paper, running in the opposite direction. Distressing the edges of these papers has helped to introduce some texture to the page. 


Once I had all the papers stuck together behind my photos it made it easier for me to move them around as one piece so I could decide where I wanted to position them on my background. It also helps when it comes to mixed media! I’ve really been enjoying combining this collection with some dramatic stamping using my black Staz On ink. 


I’ve used a variety of stamps, adding them around the edges of the patterned papers so that they are just peeking out. With a bronze Nuvo Crystal Drops, I’ve scraped some colour on to the background using a plastic spatula too. When this catches the light, it adds a little bit of sparkle. 


Once my background was dry, I adhered my papers and photos using some adhesive craft foam to bring in a little dimension. 


I absolutely love the Foam Stickers with this collection - the pack includes 2 different colour ways - black with cream writing, and cream with black writing, so I selected one of those to use for my title. 


I felt with all the stamping on the background, I didn’t need to add much in the way of embellishments. I’ve simply added a few pieces of floral ephemera from the Botanical Bits, some sequin waste (punchinella) and some fussy cut butterflies. 


I finished the page off with some sequins, and dramatic black splatters. 


Thanks so much for reading, I’ll be back next week with another layout created with this fabulous collection. In the meantime, don’t forget to check it out in the shop! 


Take care,


Rebecca x

@preciouspagespapercraft


Monday, 7 August 2023

Heidi Swapp - Set Sail - Beach Fun

Hi everyone,

Claire here with you today, sharing a new layout made with the Set Sail collection from Heidi Swapp. You can find the collection in the shop here.


I love our trips to the beach, and we are lucky enough to have a few close by. This collection is perfect for local trips and those more further afield with a tropical climate.

As usual, I started with a piece of Premium White Cardstock and trimmed the edges by 1/4", backing it onto plain kraft cardstock and adding machine stitching (which I actually did at the end of the page once everything was in place).

I knew I wanted to add mixed media so applied a cost of gesso and left to dry.

In the meantime, I cut some planks from the Wood paper in different lengths and distressed the edges. Once the gesso was dry, I stuck them to the background and began to add watercolour pains in a few different shades of blue to create depth.

Once that was dry I added some modelling paste through a stencil on top of the mixed media (check out the stencil link because some of the cute beachy ones are in the sale right now!).

To add more texture, I found some white deco web in my stash and sprayed it with Distress Oxide Spray in neutral colours, and then hairspray to help set the colour, slotting it underneath each of the planks.

Once the moulding paste was dry I reapplied the stencil and brushed Distress Oxide over the top in Frayed Burlap, splattered white paint over the top and added a few clusters of white Nuvo Drops.


Next, I layered my photos using the softer neutral tones of the Small Ledgers paper and some plain white tissue paper.


Using a neutral tag fussy cut from the Tags paper and a blue tag with gold foiling tag from the Journaling Ephemera set, I layered them under the photos on either side. The gold foiling is spectacular, and makes the page feel quite luxurious.


I complemented this with a small cluster using a foiled shell, an anchor from the Ephemera Pack, and some small wooden chipboard pieces from the P13 Sea La Vie collection - the two go perfectly together.


On the other side of my photos, I created a second cluster, again using the small P13 chipboard and a label I fussy cut from the Tags paper.


For a bit of an extra beachy feel, I added some Distress Crackle Paste to the edges of the planks, adding Antique Linen Distress Oxide with a brush once dry. I love this paste - it gives such a lovely texture to your projects, perfect for the beach/outdoor layouts. The ink over the tops just adds a bit of extra depth. If you're going to use this, i'd recommend you apply a generous coat (the thicker the cost, the bigger the cracks). You'll need to leave it for a while to dry, with the cracks appearing throughout the drying process.


I also added some moss amongst my clusters, along with some small art stones from my stash, which I adhered to the page using Distress Collage Medium.


For my title, I just had to use those gorgeous Alphas! I Love the ombre look they have, and the darker blue helps add some definition to the page.

I staggered the title on either side of the photo to create 'Beach Fun', and added a few seagulls from the Cardstock Stickers to 'fly' along the top of the layout.


One is stuck flat to the photograph, the others are raised on foam for extra interest.

To help balance the page, I created a small cluster to anchor the bottom of the design. I replicated what I had in the main design, using fussy cut planks from the Wood paper, a bit of deco web, moss and stones and then created extra height and depth with the Cardstock Sticker Ship and a small striped banner, along with a foiled phrase from the Ephemera Pack.


I hope you've enjoyed this layout - I'm really loving expanding my mixed media products in particular, so hope this is something you have liked to see - If you have any questions I haven't covered off in my post, please don't hesitate to comment below and I'll answer as best I can. 

Until next time, happy scrapping!

Claire xx
@scrappysoulmate

Saturday, 5 August 2023

Somewhere Over The Rainbow

 Hello,


Lisa here with loads of rainbows!!

I got a new brother in June. My brother married his bf James.

We all went away for the weekend to the Isle of Sheppey for the wedding. It was so much fun and deserved a double spread in my journal.

And as it was Pride month too, I went overboard with all the rainbows.


For this page I used the Pretty Little Studio - Sun Kissed collection which you can see here. 

I had a lot of photos to include so I did my usual of flips and pockets in my journal : )


So many photos!!

Doodle Bug Designs have the best alpha stickers here.


I love these scalloped borders to edge.  It just adds so much colour.
And I've cut up some of the smaller elements from the papers to make cute little page embellishments.


I love seeing all these layers together.


I really hope you've enjoyed this bright colourful fun page.
If you'd like to see this page being created, there's a video here.

Thanks so much.
Lisa x