Showing posts with label Hearts. Show all posts

Monday, 10 October 2022

Vicki Boutin - Print Shop - Moments

Hi everyone!

I'm kicking off this beautiful new week with the newest collection from Vicki Boutin - Print Shop! This collection is a stunner - you're definitely going to want this one. It's jam packed with beautiful colours, bold patterns and is so versatile, you could scrap anything!

For my first layout, I'm channelling my love of graphic design, and creating a heart of hearts.


I started with two pieces of Premium White Cardstock.  I cut a plain heart shape from the first piece, centred on the page. I trimmed 1/4 inch from each side and added machine stitching, before applying sticky foam to the back, before mounting it centrally to the second sheet of white cardstock.


This left a hollow, heart shaped aperture - perfect for filling!

I cut almost all the large hearts from the Cross My Heart paper. To create dimension, I curled the sides of each heart around a pencil to give them extra lift, and then stuck just the centre of the hearts down with Glossy Accents.


When filling the heart, I started with the largest hearts and worked down to the smallest, overlapping and layering the hearts throughout the shape. In the smaller gaps, I fussy cut some of the smaller hearts from the paper and glued these flat.

I left a small space in the centre for my photo to sit. As the heart was so colourful, I wanted the photo to be black and white. To echo this, I backed it on a piece of the Typeset Paper. I double backed the photo with foam so that it would stand just a little bit taller than the hearts.


I love the extra little ink splatters that come on the Typeset paper. It's one of my favourites in the collection - really understated but so perfect for so many pages. I can't wait to see how you'll all use it.

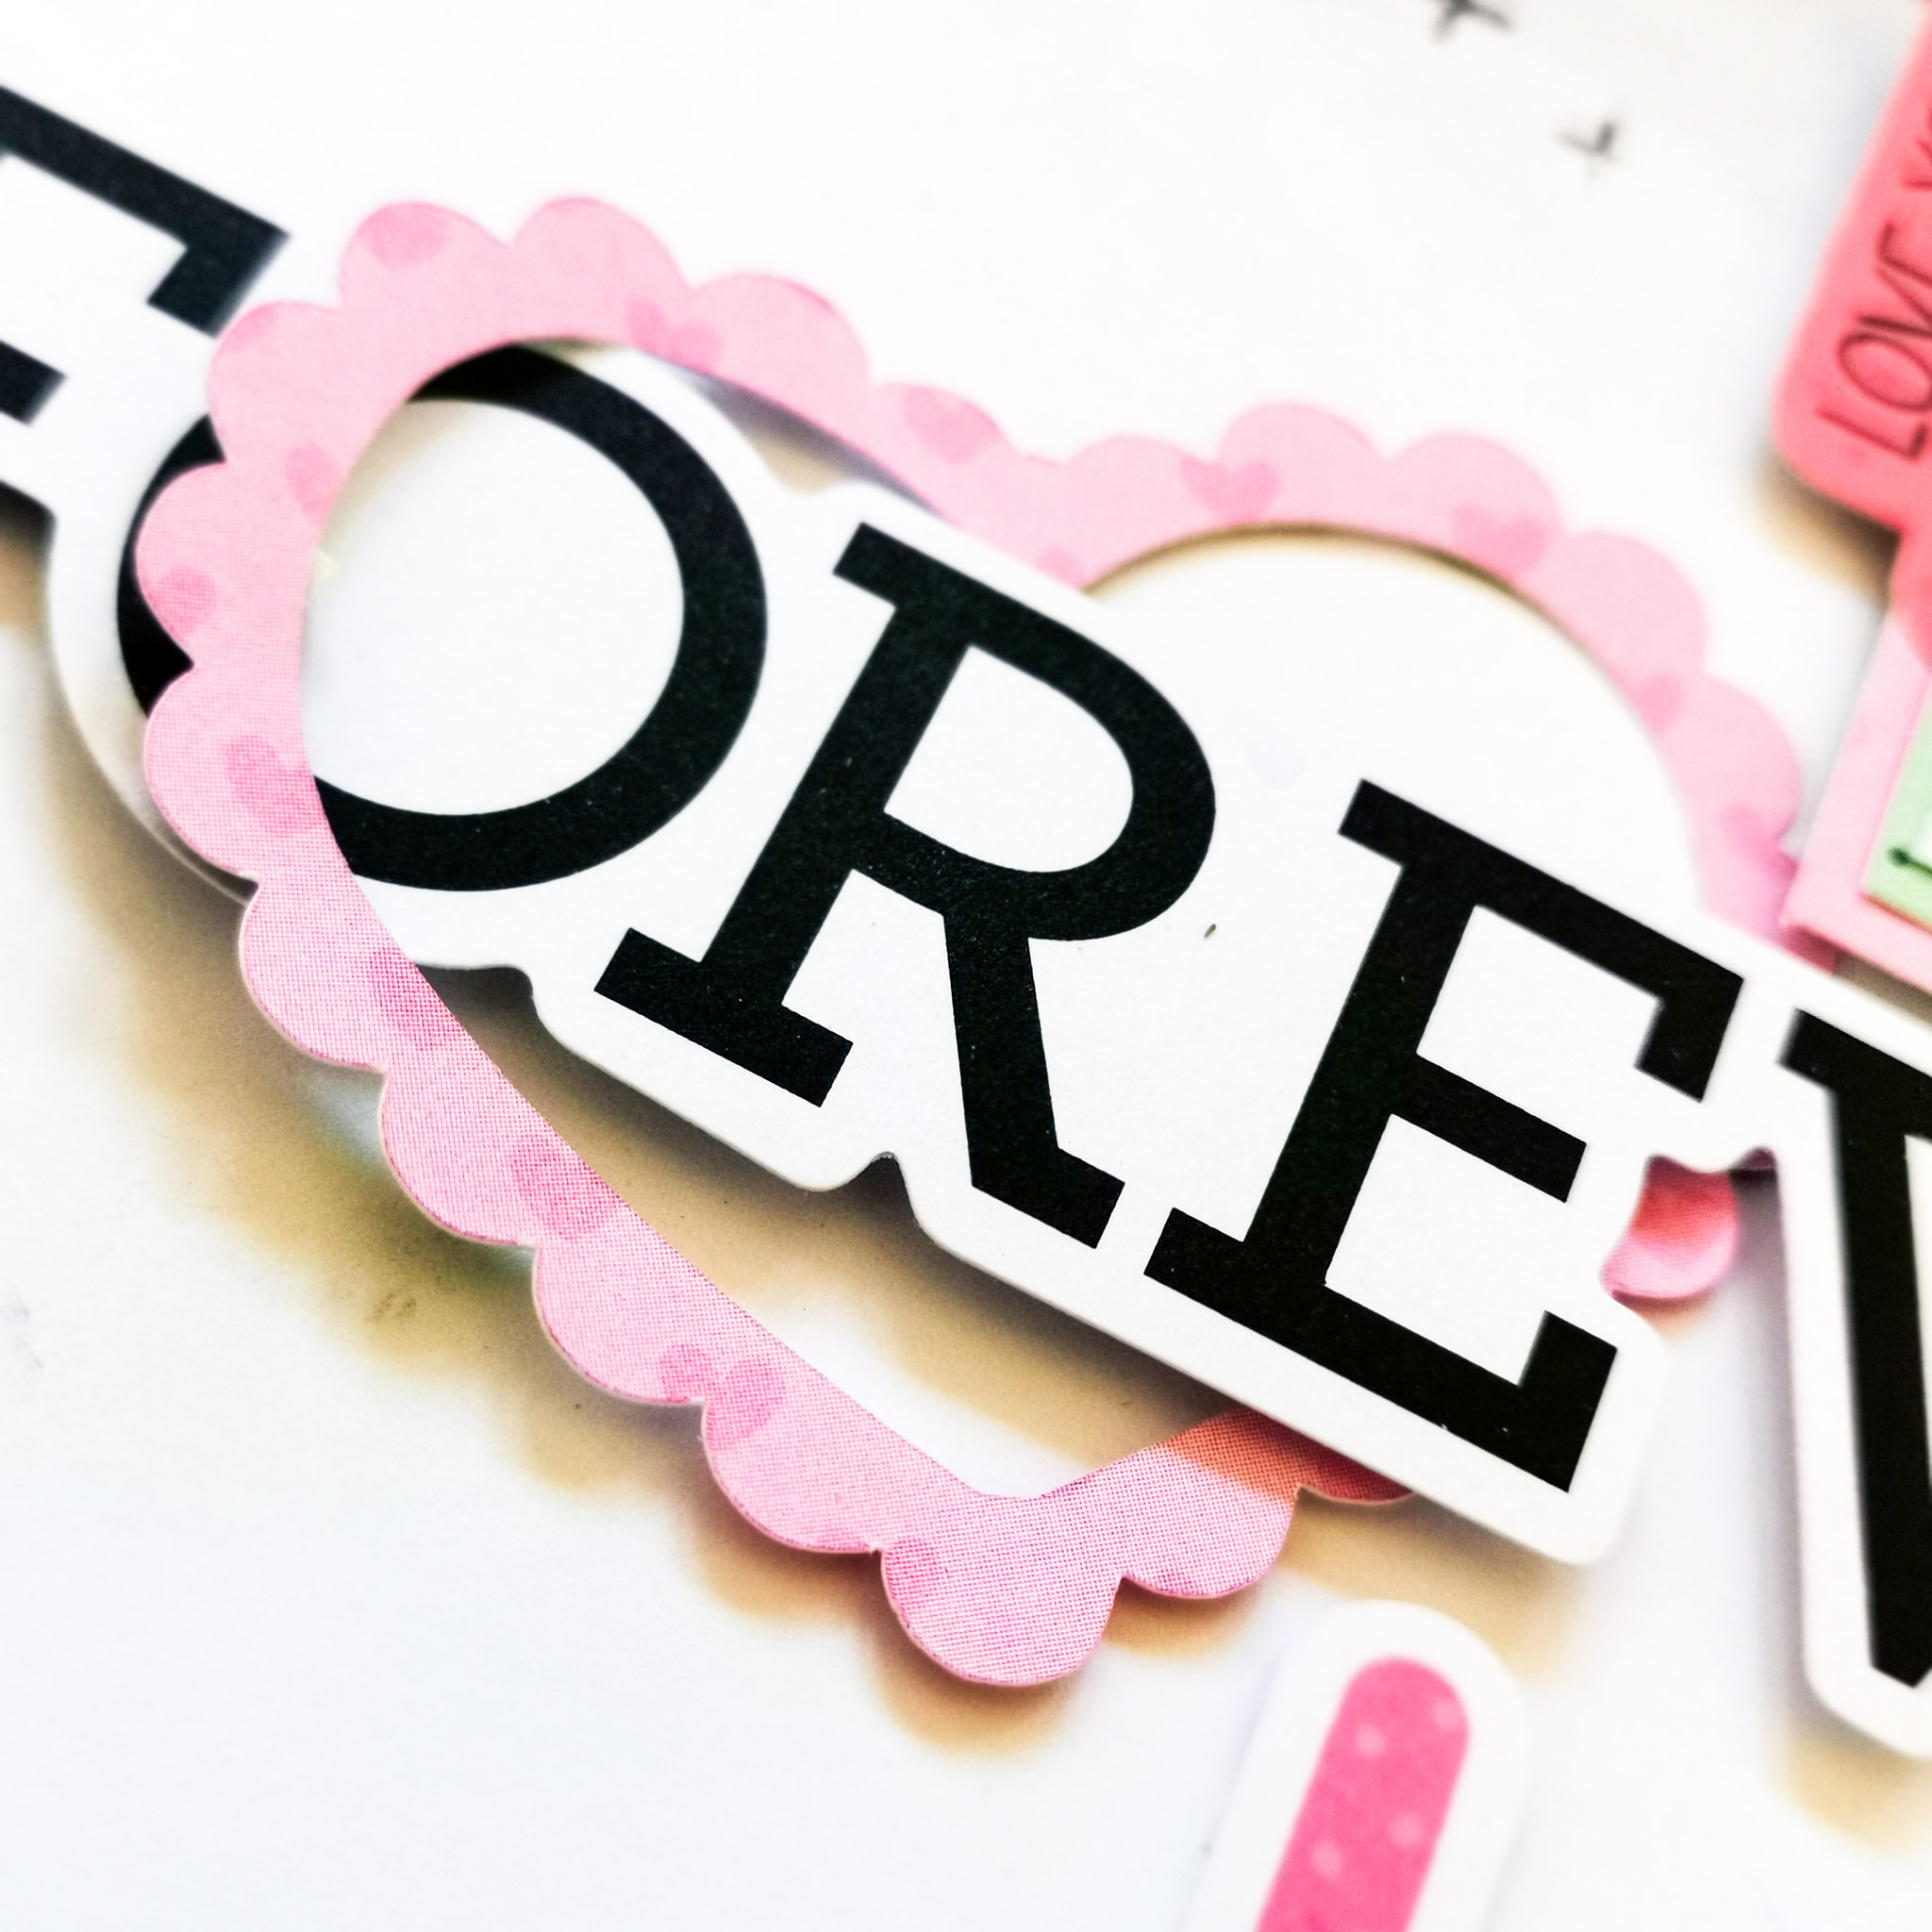
Next, I opened the Floral Ephemera Pack and used the 'Moments' piece for my title. I love the simplicity of this piece against the colourful heart - it was the perfect element for this style of layout.


As a finishing touch, I added a row of black Nuvo Drops all the way around the heart. This really helped tie in all the black and white elements against the colour.


I love the simplicity of this page, contrasted against the high impact from all those colourful hearts - I hope it's inspired you to try something a little bit different.

I'll be back later this month with another Print Shop layout, but until then, take care.


Claire xx

@Scrappysoulmate

Wednesday, 20 July 2022

Doodlebug Design - My Happy Place - Forever Love

Hi everyone!

Claire here with you today. I'm a little bit later with my blog post this month because I've been busy moving house and setting up my new craft room - always a much bigger job than you think!

But finally, I'm in, and I've had the opportunity to create!

Inspired by my move, and the gorgeous colours and patterns, I have chosen to work with the My Happy Place collection from Doodlebug Design.

This collection includes lots of home and garden elements, perfect for scrapping those day to day stories, but it's versatility goes way beyond that. You really can lend it to any story, and that's exactly what I've done in my first layout.


I cut a variety of hearts in various sizes, roughly from 1.5" - 2.5". I did this on my Cricut but the effect would work just the same with punches or free-hand drawn hearts.

I used  multiple patterned papers from the collection including Garden Party, Hello SunshineLove This!, Mint to be and Homeward Bound. I also cut some in plain black cardstock to help the colours pop off the page.

I tried several arrangements of the hearts, vertically and horizontally, but couldn't quite get it to work. I settled on a corner design (one of my favourite designs), but I still wanted some extra depth.

I reached for some Black Soot Distress Oxide ink and brushed it across the page using a dry brush where the hearts would sit. 

I also stamped some crosses randomly across the page, from an old Vicki Boutin Stamp Set I have, but the effect would work just as well with the small dotted pattern stamp included in the Vicki Boutin Color Study Hello Clear Stamps.


I staggered the hearts around the corner of the page, lying some flat and raising some on foam pads to create height.


I decided to lay the pink hearts on a larger black heart, folding the pink paper in half down the centre to create a bit of extra interest and movement.

To help the black and white striped hearts stand off the page, I doodled a messy border around them.


The photograph is a picture of our new furbaby who joined our family last month. I printed it in black and white so the beautiful patterned papers could shine. It was double mounted using the pink and aqua papers used for the hearts.


To my photo, I added a tab from the This & That Stickers and a small speech bubble from the Chit Chat pack.


My title piece comes from the same Chit Chat pack, but I added a heart around the Forever piece , making it feel part of the heart design.


As a finishing touch, I added some small heart stickers from the Icon Stickers and Chit Chat pack, and added a few drops of coordinating coloured Nuvo Drops.


I really loved making this page and hope it's inspired you to check out the collection in the store and to get those stories documented.

I'll be back again next week to share another layout with this fab collection.


See you then!

Claire

@scrappysoulmate

Sunday, 27 March 2022

Pebbles ~ Kid at Heart 🧡 #4

Hi all, hoping you are all well and enjoying the Spring sunshine!  

I’m still creating with Pebbles Kid at Heart as I’ve had so much fun with it! But I’m nearing the end of my supplies now, so this layout is very much created by using up some scraps. So I went with a heart’s background... 

To create this layout I began with a sheet of Bazzill white cardstock. I then created a heart template using some scrap cardstock. I then used this to create 8 hearts using various patterned papers. I also created a smaller template to cut out some smaller hearts to layer on top of the larger ones. I hand stitched around the two central hearts using coordinating threads. 


I mounted my photograph onto Bazzill whirlpool and the  ‘Happy Day’ patterned paper. 


I added in a couple of pieces from the phrase ephemera pack and fussy cut some florals from the ‘Scatter Happiness’  patterned paper.


I wanted to add in a few sparkly details, so I dotted some Nuvo drops around the central hearts and added some Pinkfresh Studio Jewels in clusters. 


Thanks so much for looking! 
See you next month! 
Anna
X

Sunday, 4 October 2020

Happy Life - Cocoa Vanilla Studio - Daydream Collection

Hello, Rebecca with you today with a bonus layout created using the beautiful 'Daydream' collection by Cocoa Vanilla Studio.


I started my layout by drawing a heart onto the 'Stepping Stones' patterned paper. I sectioned the heart into a starburst effect, and then cut out every other section. I then went around all the edges with the blade of my scissors to distress them. 

I used some water-soluble art crayons mixed with water to create a mixed media background. I used different shades of blue to mimic the colour of my husband's shirt in the photo. I created my background by using the packaging technique and by adding splatters with a paintbrush. I didn't go too mad - I just covered the centre of the page so that the mixed media showed through the open starburst sections of my heart.


I used the outer edges of the same patterned paper to add a border either side of my layout. I felt like I needed to bring in some of the darker tones in the collection as areas of my photo are quite dark. I did this by matting my photo onto the dark B-side of the 'Up in the Clouds' patterned paper - and again distressing the edges.

I fixed my heart to the centre of my page at an angle using double sided tape for the centre and foam pads for the outter edges to add dimension. I placed my photo off-centre onto the heart and begun to embellish!


Most of my embellishments on this layout have been fussy-cut from the 'Garden Variety' floral patterned paper. I've also tucked in some white die-cut leaves and some co-ordinating thread tangles.


Once the larger embellishments were in place, I worked on adding some smaller elements to the layout. I used some heart stickers and phrases from the Accessory Stickers sheet, and a Flair Button tucked in among the florals and added my title using the Die-Cut Titles.


I finished my layout by adding some Nuvo Drops in co-ordinating shades of yellow and blue.


I hope you've enjoyed the layouts I've created with this collection. As I said right at the beginning of the month - it's not my usual 'style' of collection at all, but it was so pretty I wanted to use it and challenge myself to create some layouts with a different 'feel'. And I'm so glad I did!

If you have access to YouTube, and you'd like to watch this layout coming together, you can check out my process video Here.

For October, I'll be working with the new 'Boo Crew' collection by Simple Stories. I've already started creating with it, so check back later in the month to see what layouts I make!

Until then, take care.

Rebecca x


Monday, 1 July 2019

Say Cheese..... AC Vicki Boutin Kaleidoscope

Hello,

Anita here today with you and I have a vibrant layout to share using the VERY colourful Kaleidoscope papers brought to you by American Crafts and designed by Vicki Boutin.

Our youngest daughter went through a phase of having the most beautiful, vibrant colours in her hair whilst she was in 6th Form at College ( infact she would STILL have her hair like it if her job allowed!) and I thought these papers were brilliant for this photo of us together playing with Snapchat filters and sporting her glorious magenta locks.


 I based the page on a sheet of White Canvas Bazzill cardstock that I had cut down to 11.25" x 11.25" and then stuck it in the centre of a sheet of Kaleidoscope, this created a lovely colourful frame all around the edge in a rainbow of colours.


There is a gorgeous sheet in the collection called Paper Hearts, its absolutely chock a block with a range of fabulous, bright hearts in every colour. I cut out a rainbow selection, however, you could select a smaller colourway instead if you wanted as there are lots of hearts in each colour.


After gently pencilling a large heart shape onto the page and popping the photo on, I stuck the cut out hearts all the way round in a graduation of colours, before gently bending up the edges to give them dimension.


The sheet of Beyond Words has a good selection of panels, words and pictures on so I chose a few bits to add to my layout and then finished it all off with some self adhesive colourful, faceted dots from my stash..... I was originally only planning a few odd ones here and there....but got a bit carried away!


Thank you for looking today, you can find these products and a fabulous selection of many others over at the SHOP.

Happy Crafting!

Warmest wishes
Anita xx