Friday, 22 November 2024
Simple Stories - Simple Vintage Yuletide - HoHoHo!
Wednesday, 10 January 2024
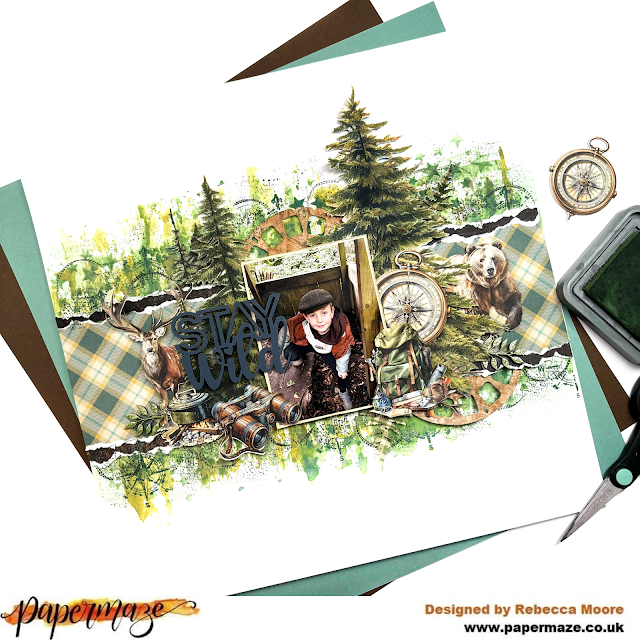
Stay Wild - Mintay Papers - The Great Outdoors Collection
Hi everyone, and happy new year! Rebecca with you today sharing my first layout of 2024! This year I am determined to try new things and I'm kicking this off with a collection from Mintay Papers! It's a new brand to me having never created with it before and I have to say I'm pleasantly surprised. The quality of the papers is really impressive - nice and thick with good quality die cut ephemera to match. I chose to work with 'The Great Outdoors' as I was drawn to the outdoorsy feel and the neutral colours. You can find the collection in the shop here.
I begun with Paper 05, tearing a strip to sit horizontally across my layout. I then tore 2 thin strips of the reverse of this paper to sit above and below to provide some contrast. The photo I'm scrapping here is of my son in a wildllife hideout in the woods. We were trying to stay quiet so that he could see an elusive red squirrel! I wanted to translate this onto the layout, so selected Paper 01 and fussy-cut the trees from it, which I positioned either side of my photo.
Using the Paper Die Cuts, I built clusters either side of my photo. Sadly, there are no red squirrels in this collection, but I felt that the bear and stag worked well as we saw plenty of wildlife in the woods.
With my Cameo 4, I cut a viewfinder from Paper 04, cut it in half and used it above and below my torn paper strips.
For my title, I added an acrylic perspextive from my stash. At this point, I was going to call the layout finished, but I felt like it needed something more. I decided on some mixed media. It's been a long time since I indulged in some messiness so I made the decision to go 'all out'.
I began with my brayer and Distress Oxides in the shades Rustic Wilderness, Iced Spruce and Forest Moss. After applying the inks to some packaging, I spritzed with water and then ran my brayer over the ink. I then rolled this over a sheet of Premium White Cardstock. On top of this, I added some stencilling using a star stencil. I wasn't too keen on how this looked, so ended up covering most of it up with more ink! To finish off, I added some stamping using various different stamps and my Staz On black ink pad.
Once the inks and stamping was all dry, I was able to move everything back onto the page. Luckily, I'd stuck everything together initially, but not to the page. This meant I could easily move everything off and back on again in one single piece.
To finish off the layout, I added two raw chipboard leaf clusters from Dusty Attic. To elevate them, I covered them in Nuvo Crystal Drops in the shade Bottle Green. I love how this looks - it cracked slightly as it dried which gives it the same effect as crackle paste!
And yes... eventually we did see a red squirrel!
I hope you've enjoyed this layout. I really enjoyed working with something different and trying a new brand. I'll be back later in the month with a second layout.
Take care,
Rebecca x
@preciouspagespapercraft
Friday, 21 April 2023
Simple Stories - Flea Market - Welcome Home
Hi there,
Claire here today sharing my second layout with you using the Flea Market collection from Simple Stories.
I am loving this collection - the colours are just perfect for Spring. So vibrant and happy.
For my base, I used a piece of Premium White Cardstock. I applied a thin coat of clear gesso as I planned to add watercolour to the background.
Whilst the gesso was drying, I cut three 3.5" squares of patterned paper and added a row of machine stitching around each one, distressing the edges for extra texture.
I used:
For the square holding my photo, I applied a double mount, also using a piece of pink Bazzill cardstock from the Matchmaker Pack.
I placed the squares roughly on my page and drew a light pencil outline to mark where the papers would sit before applying two different shades of watercolour paint with a brayer.
Once the paint had dried, I adhered each square with foam pads, laid them diagonally down the page and began to embellish.
I pulled out lots of florals from the Floral Bits & Pieces pack - there are so many in here! 48 pieces in total and they're all a decent size so are quite impactful, making the pack go a long way.
I created three clusters - at the top, middle and bottom of the design, using a mix of florals and leaves.
Some are adhered flat to the page, whilst others are raised on foam the give the clusters height. I added the leaves with Glossy Accents, sliding these in amongst the flowers and curling the leaves for dimension.
I used the bottom square as the anchor to hold my title.
To create it, I used the word Home from the Chipboard Stickers, and teamed this with the key from the same pack. For Welcome, I used some Puffy Alpha stickers from the Pinkfresh Studio Life Right Now range, which complement the colours in the Flea Market collection beautifully.
As a final touch, I added a few extra embellishments around my photo. I selected a colourful tag and small sentiment saying 'So Cute' from the Journal Bits & Pieces Pack. I sat it along the top edge of my picture, helping tie in all the colours together.
I hope you've enjoyed this quick and simple layout. It really was a pleasure to create as the patterned paper and floral ephemera make such an impact, it really didn't need lots more.
If you haven't seen it already, i'd recommend you check this collection out in the store. You can find it here. The photos really don't do it justice - it's absolutely stunning in real life.
Until next month, happy scrapping!
Claire xx
@scrappysoulmate


.jpg)


.jpg)


