Showing posts with label puffy alphabet stickers. Show all posts

Monday, 3 August 2026

July Papermaze Kit - Part 2

Lynn here today, with the pretty pastel July Papermaze Kit, and my second pair of Design Team layouts. Such a lovely kit with double-sided papers, Bazzill cardstock and a selection of embellishments. This second pair of layouts, are from two different children's farm visits, back in the 1990's.


Before looking at how the layouts were made - here is a peek at what you will find in the kit.


49 and Market - From The Garden collection - Wildflower & Foxglove
49 and Market - Travel Diaries collection - Sheet 1
Graphic 45 - Always & Forever collection - Regency Blue Pattern & Solid Sheet
Uniquely Creative - Tea & Tranquillity collection - Quiet Daydreams & Garden Sanctuary

This photo shows both side of the papers:


Embellishments:
2 Petaloo Flowers
1 Craft Consortium Dragonflies
1 Dovecraft Frame
3 Rosie’s Studio Jubilee Wax Seals
3 Uniquely Creative Ticket Washi Tape Stickers
50cm Twine
1 Mintay Chipboard Clock


Bazzill Basics Cardstock
Lagoon, Twig (included in kit), Avalanche, Smoky, Petunia & Nixon (extra Bazzill pack)


Farmyard Fun - My daughter Emily enjoying an evening at the children's petting farm, in the Wheatsheaf Inn in the village of West Beckham, Norfolk.


The base for this layout is a sheet of white cardstock, I used a Tim Holtz Layering Stencil THS070 to create a soft background, with Distress oxide inks. Then I tore two strips from the 
Uniquely Creative - Tea & Tranquillity collection - Quiet Daydreams. The wider stripe border was approx. 12" x 2" and the pink script side 12" x 1.5". these were placed to the right side of the layout, with the polka dot, barcode strip from the same paper, positioned in-between the two papers. 


I tore six of the large squares from the 
Garden Sanctuary paper, then layered these over-lapping one another in two rows at the centre of the layout. I did not add glue to the very edges of these squares as I wanted to tuck embellishments around the edges later. 


From the other side of the 
Garden Sanctuary I selected and fussy cut tags and tickets. I punched holes into the top of the tags. These were arranged around the squares. I placed two photos onto the squares, leaving room for the title. 


The title was cut twice on the Cricut, once in Nixon Bazzill and the second time, in the striped side of Quiet Daydreams paper. These were layered up to create a shadow, and placed above the photos.


I added a little Baker's Twine to two of the tags. 


The date was added with some puffy number stickers. Finally, I decorated the layout with 49 and Market, Laser cut elements from the Whispering Way collection.


Down on the Farm - My girls at Godstone farm, a twins club outing, we were accompanied by their Aunty and her girls.


I gutted the 
49 and Market - Travel Diaries collection - Sheet 1 paper, to make a 1" border, over this I machine stitched a 11" x 11" piece of Regency Blue Pattern & Solid Sheet paper. I rounded the corners of this paper before stitching it in place. The cut edges of all the papers were inked with Distress Ink.


With the piece gutted from the 
Travel Diaries collection - Sheet 1, (beige side up), trimmed down to 8" x 8", also with the corners rounded. I stitched this onto the centre of the layout. 


A scrap of the Regency Blue Pattern & Solid Sheet paper, trimmed to 1" x 10.5" was arranged across the middle of the page. on top of this and slightly lower I added a scrap of Foxglove paper after trimming one edge with a scalloped border punch. Both these pieces were inked with Distress ink.


I selected two photos, one was mounted onto a scrap of Quiet Daydreams paper, the other was mounted under the metallic copper Dovecraft Frame from the kit. These were arranged onto the page.


I fussy cut three more tags from the 
Garden Sanctuary paper, punched holes in the tops and tied them together with some natural twine. these were spread out and stuck to the bottom right of the photos, ready for my journalling. 


I used a selection of alphabet stickers to create my title, which I placed under the photos. To embellish, I used two 
Rosie’s Studio Jubilee Wax Seals from the kit and more of the 49 and Market, Laser cut elements from the Whispering Way collection.


That's all for today, back with more from this kit soon.
Thanks for looking.
Lynn x

Friday, 26 June 2026

June Papermaze Kit - Part 1

Lynn here today, to introduce you to the colourful June Papermaze Kit.  This month's kit is packed with a beautiful colour collection of yellows, pinks, oranges and fawn. Patterned papers, Bazzill card stock and a selection of embellishments. 

Here are the first two layouts I made with this lovely kit.


Before looking at how the layouts were made, here is what you will find in the kit.


Patterned Papers - 
49 and Market - Vicki Boutin Artful Moments - Starters Paper #7
Carta Bella - Silly Goose - Best of the Best Bunches
Graphic 45 - Scenic Route - Lemon Yellow Pattern & Solid
Graphic 45 - Always & Forever - Perfect Pink Pattern & Solid & Timeless Floral
Simple Stories - Simple Vintage Lavender Fields - Almond

Photo below shows both sides of the paper sheets


Embellishments - Rosie's Studio - Heartfelt - glitter foam sentiments, Prima - Among the Wild Flowers - Flowers and Tickets, Cocoa Vanilla - Bloom & Grow - Puffy Heart, Paper Favourites - peony diecuts, Pinkfresh Studio - Gems - clear with gold dust, Ivory Ribbon. 


Bazzill Basics Cardstock - Bazzill White, Yukon Gold (included in kit), Chiffon, Tutu Pink, Stream and Quick Sand (in Extras pack).

Afternoon Tea - In 2014 my Mum turned 80 and we took her to The Ritz for afternoon Tea, this photo shows me with my daughter at the famous venue.
 

For this layout I chose the sheet of Starters Paper #7 paper, and arranged it with the fawn band across the top of the page. I glued the lace from the kit across the base of this area. 
I mounted my photo onto some white card and positioned it to the right side. 


I picked three tags from a sheet of Starters Paper 8 from my own stash. I inked the edges with Distress Inks to match the colour of each tag. With a hole punched in the top I threaded some yellow twine through each hole and tied it in a bow.


I finished the tags off with a glittery brad through each hole. I trimmed one tag down, and tucked it into the top of the photo. The other two tags were applied to the side of the photo at an angle, so I could add my journalling. 


Using my Cricut and an Art Nouveau font, I cut the two layers of the title, using Bazzill card stock from the kit (Chiffon and Stream). This was placed to the top left of the layout.


I embellished the page with several Artful Moments Laser Cut Elements. Choosing a rosette, three tiny tags, two leaf fronds and several flowers. Some of these were raised with 3D foam pads to create dimension.


A Very Hungry Caterpillar Thank You - My daughter and I helped my granddaughter make thank you cards after her birthday recently. As she has several gifts and cards featuring the popular caterpillar, this was the theme we chose.


For the background of this layout, I used the Lavender Fields - Almond paper. My photos were trimmed to 6 x 6 cm. I selected two more sheets of the patterned papers (Best of the Best Bunches & Perfect Pink Pattern & Solid). With both these papers I cut 4 squares (also 6 x 6 cm). I arranged these down the left side of the layout, using both sides of both the papers, with the photos on top. 


I used a fine black marker pen to draw lines around the edges of the small squares, and the whole layout. I selected three bows from the Artful Moments Laser Cut Elements pack and added these to the photo side of the layout. 


I selected one of the caterpillars we made, and placed this to the bottom right of the photos. For the caterpillars we used some green paper to cut leaf shapes, and a hole punch to make munch holes in the leaf, Florence drew on the leaves with her pens. We added a 'Thank you' stamp, and then she had fun sticking a large and four small pom-poms onto the leaf to make the caterpillar. Adult help for adding the googly eyes, finished off the critter. 


For the title I used some glittery Thickers and some puffy alphabet stickers from my stash. 


Finally, I added my journalling to the patterned papers.

That's all for today, more from this kit soon.
Thanks for looking.
Lynn x

Friday, 7 July 2023

Pinkfresh Studio - Lovely Blooms - Relax

Hello Scrappy Friends,

Claire here today, sharing a new layout made with the beautiful Lovely Blooms collection from Pinkfresh Studio. You can shop the collection here.

For my first layout, I was instantly drawn to the Captured Moments paper - I love this paper - It showcases all the core colours of the collection and has so many creative possibilities!


After mulling over several ideas, I cut the edges off the paper to create a square diamond. Then, I sliced each piece to give me 8 small coloured triangles.  I distressed the edges of each of these and adhered them on foam to create a large square.


Using a large tag from the Journaling Bits, I made an anchor in the centre of the design, offsetting my photo which I backed with tissue paper from my stash.


Once the photo was in place, I added some flowers in a diagonal, on opposite edges to echo the angular design. These are from the Die Cut Floral Ephemera Pack. They are a must for this collection. They're gorgeous!


For extra dimension and height, I curled the edges and layered with foam.


I added a small banner from the Die Cut Ephemera pack and created my 'Relax' title using the Puffy Alpha Stickers.


As a final touch, I wanted to add a bit more  black to the page to help the colour pop. I doodled a border around the outer edges of the triangles and sprinkled some Enamel Dots to finish the page.


I hope you've been inspired to check out the collection and create - It really is a beautiful collection.


I'll be back again later in the month with another project to share.

See you then

Claire xx
@Scrappysoulmate

Friday, 19 May 2023

American Crafts - Maggie Holmes ~ Woodland Grove 🍃

 Hi all, it’s Anna back with you today. 

I’m working with the latest collaboration between American Crafts and Maggie Holmes - Woodland Grove. You can find the collection in the shop here

My first layout…

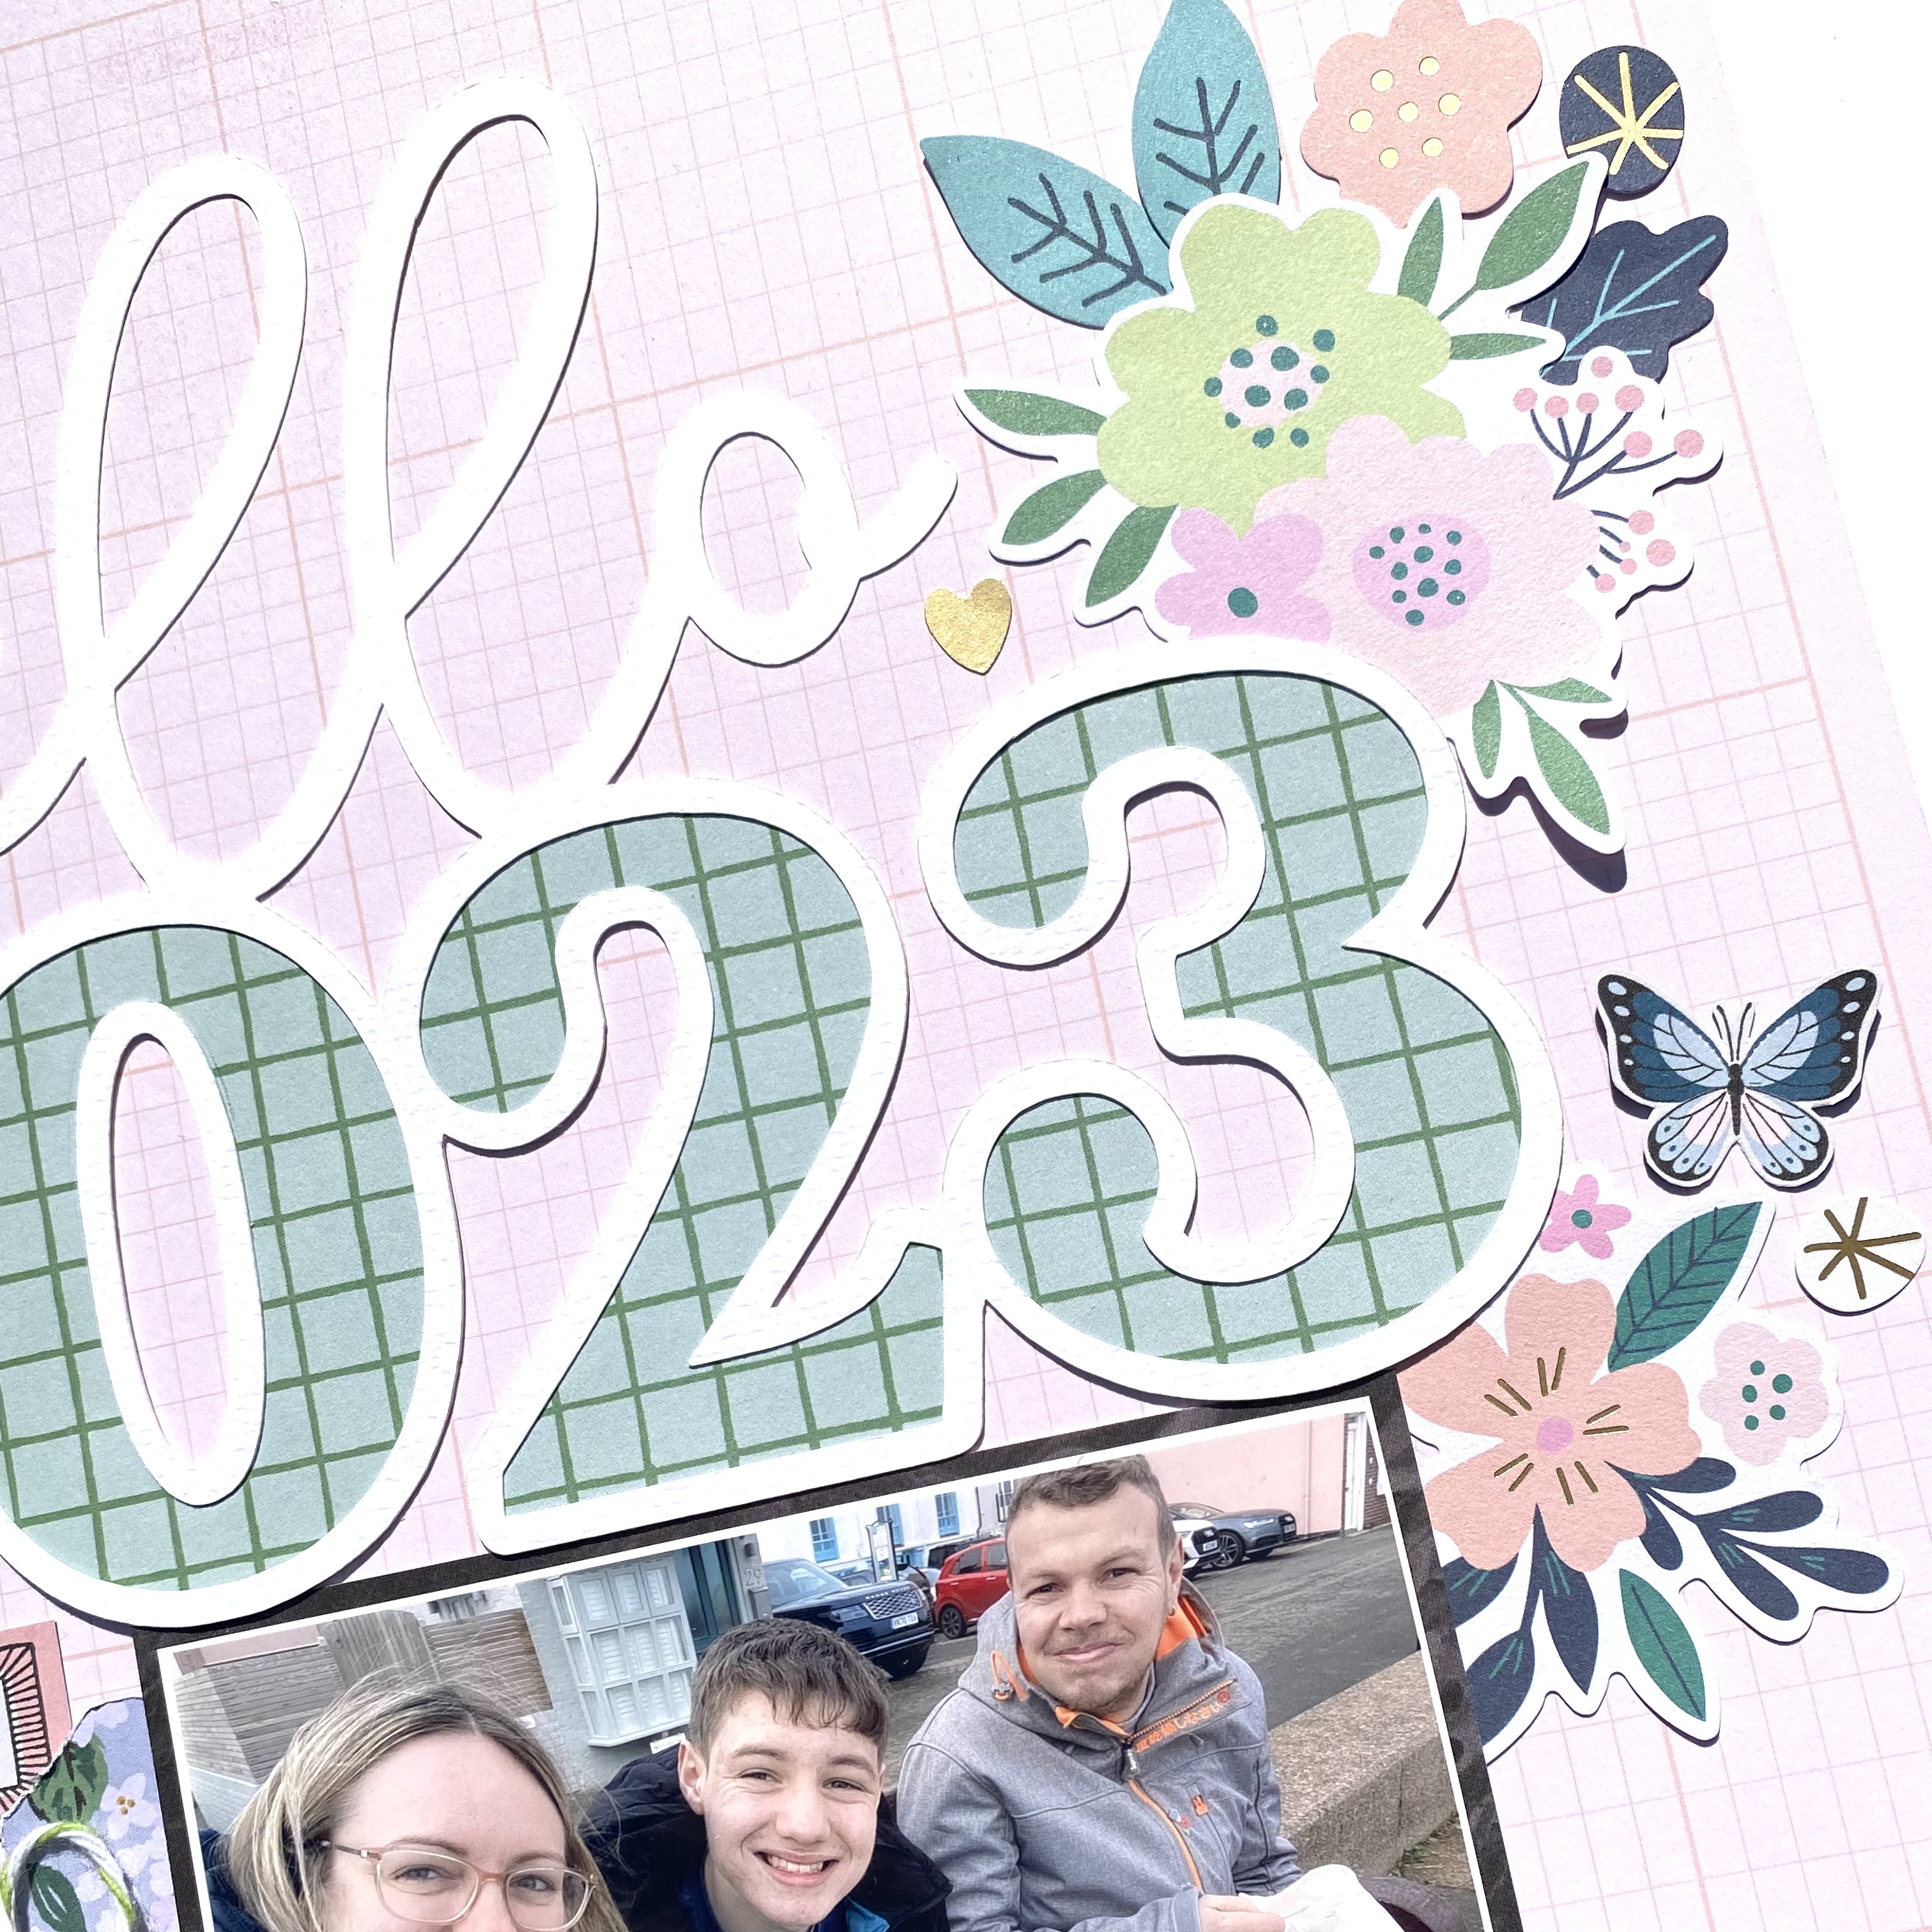
To create this layout I began by using the ‘b’ side of Field Notes as my base. 

I used my silhouette cameo to cut a large 2023 cutfile from white cardstock


I backed the 2023 numbers with the b side of Explorer


I added some florals and various other bits and pieces from the pack. Rosie’s Studio Die Cuts are great value for money, in this particular pack you get 182 pieces and two of each design. I’ll link all the Rosie’s Studio Die Cut Ephemera packs here
I love Rosie’s Studio, there are so many great products that are great for adding extra touches to your projects, I’ll link everything else here!


I mounted my photo with the b side of Uniquely You and cut out one of the tags to use as well. 


I tucked the tag behind the photo, punched a hole and added some twine. I also cut out the butterflies from ‘Uniquely You’ and placed them alongside my embellishment clusters. 
I used the Rosie’s Studio Simply Charming Puffy Alphabet to add a subtitle. 


Thanks so much for looking! I’ll be back soon with another layout using this collection. See you then 😊

Anna

@acraftylifewithanna

Friday, 21 April 2023

Simple Stories - Flea Market - Welcome Home

Hi there,

Claire here today sharing my second layout with you using the Flea Market collection from Simple Stories. 

I am loving this collection - the colours are just perfect for Spring. So vibrant and happy. 


For my base, I used a piece of Premium White Cardstock. I applied a thin coat of clear gesso as I planned to add watercolour to the background. 

Whilst the gesso was drying, I cut three 3.5" squares of patterned paper and added a row of machine stitching around each one, distressing the edges for extra texture.


I used:

For the square holding my photo, I applied a double mount, also using a piece of pink Bazzill cardstock from the Matchmaker Pack.

I placed the squares roughly on my page and drew a light pencil outline to mark where the papers would sit before applying two different shades of watercolour paint with a brayer.

Once the paint had dried, I adhered each square with foam pads, laid them diagonally down the page and began to embellish.

I pulled out lots of florals from the Floral Bits & Pieces pack - there are so many in here! 48 pieces in total and they're all a decent size so are quite impactful, making the pack go a long way.

I created three clusters - at the top, middle and bottom of the design, using a mix of florals and leaves.


Some are adhered flat to the page, whilst others are raised on foam the give the clusters height. I added the leaves with Glossy Accents, sliding these in amongst the flowers and curling the leaves for dimension.

I used the bottom square as the anchor to hold my title.


To create it, I used the word Home from the Chipboard Stickers, and teamed this with the key from the same pack. For Welcome, I used some Puffy Alpha stickers from the Pinkfresh Studio Life Right Now range, which complement the colours in the Flea Market collection beautifully.

As a final touch, I added a few extra embellishments around my photo. I selected a colourful tag and small sentiment saying  'So Cute' from the Journal Bits & Pieces Pack. I sat it along the top edge of my picture, helping tie in all the colours together.


I hope you've enjoyed this quick and simple layout. It really was a pleasure to create as the patterned paper and floral ephemera make such an impact, it really didn't need lots more.

If you haven't seen it already, i'd recommend you check this collection out in the store. You can find it here. The photos really don't do it justice - it's absolutely stunning in real life.


Until next month, happy scrapping!


Claire xx

@scrappysoulmate