Hello, Lynn back with you today to share the second pair of layouts made using the June kit. This has to be one of my favourite kits, I love all the soft tones, pretty papers and masculine ones too, all in one kit! I have two very different layouts this time.
Before I explain what I did, here is a reminder of the kit:
The Hiding Place
We recently gathered some pallets to make compost bins, they were piled up in the garden awaiting our attention. The kitten, Liquorice has take to playing and hiding in among them!
For this layout I used the sheet of Safari Bazzill as my base.
The with the
Studio Light - ultimate Scrap Collection paper I cut a pile of the
planks, to reflect the planks of the pallets - but before cutting - I preserved the butterfly from the other-side of the paper as well as one corner with printed stitching intact to use as a photo mount. I inked the planks and arranged
them on the page. I wrapped some of the jute twine from the kit around one of
the planks.
The planks have pretty wild flowers printed on them and they remind me of the images in the 'Flower Jar' stamps I have from the Tim Holtz Stampers Anonymous collection. So I used these along with some watercolour paper and my Distress Markers. I stamped the coloured images by applying ink straight onto the stamps. I cut them out using the corresponding Sizzix Thinlits die set. I cut a jar of each size in acetate to layer over the jars of flowers to give the appearance of glass. I also stamped a few flowers in brown around the edges of the wooden planks.
I mounted my photo onto the mat I cut earlier, and arranged my jars and flowers around it. I added lace from the kit above and below the planks. The butterfly was added to the top right of the photo.
The title was made with the Cocoa Vanilla letter stickers from the kit. Finally I added the dew drops also from the kit.
Ernest Charles Holder - my grandfather - this photo of my grandfather as a young man was recently discovered and so I was keen to scrap it. These papers were ideal for the purpose. The charms and acetate I chose to add were significant as he took a camera with him when he served in India during the first world war - the photos he took there are a subject for future scrapbook pages.
The cardstock for the background of this layout is the sheet of Bazzill called 'London Fog'. I gutted this so I could use it for another page later. I dry brushed the edges with white acrylic paint.
I trimmed the Studio Light Industrial paper (green side up) to 11.5" x 11.5" and turned this into a 2" frame by gutting out the centre. This was flipped to the brown side. These papers were distressed and inked with Gathered Twigs Distress Ink. I tore the Natural Bazzill to 10" x 10". Then stamped all over this with brown Archival Ink and the script stamp from Stampers Anonymous Entomology set. I inked the card and added a few drips of black ink.
I tore a couple of pieces from a pizza box and did a little more dry brushing.
I trimmed the manufacturer's strip from the industrial paper and a few pieces from the scraps of paper left over, these were distressed and inked too.
I used Tando Creative chipboard clock and clock hands and painted them with gold acrylic paint. I also tore a few pieces from the Dusty Attic chipboard chicken wire sheet.
The
photo and all the above pieces were arranged on the layout, together with a couple of film strips from Kaisercraft's Keepsake collection, and some charms from my stash. I also used the remains of the jute twine from the kit.
The title was created with more of the alphabet stickers from the kit and finally I added the sequins.
Thanks for looking
Lynn x
Showing posts with label Distress Markers. Show all posts
Wednesday, 3 July 2019
Wednesday, 22 March 2017
More Fun With PaperArtsy (JOFY) Stamps
Hi, Lynn back with another post for March, still using the same PaperArtsy stamps and technique as before, but decorating a different IKEA product this time.
I had a few old KNUFF magazine folders left empty when I sorted out some craft magazines. These were looking a bit tatty so I decided to treat them to the same technique as the bead chest I decorated at the beginning of the month. I made a start by allocating one to each colour of my stash of A4 coloured papers and cardstock.
I gave each box a light rub down with sand paper and then treated it to a quick coat of off-white acrylic paint. I kept the base plain this time as I wanted to dedicate each box to the colour of the papers it would store - I intended to display the colour in the images rather than the background.
The next step was to stencil (PaperArtsy) some images with Distress Paint. Then once this was dry I added stamped images and letters onto the box and the cartridge paper.
The images on the paper were painted using Distress Inks and Markers, with a brush and water. I cut them out and used Gel Medium to stick them to the boxes. The finished boxes were treated to a covering of the Matt Gel Medium to protect them.
The boxes were finished off with a little sparkle from Stickles and texture and shimmer from Liquid Pearls.
This will be an ongoing project, I have completed some and others are in the process of being completed - but you get the idea. I will add photos to this post as I go - so pop back later to see what I did with the rest.
Thanks for looking
Lynn x
Lynn x
Labels:
Distress Inks,
Distress Markers,
Distress Paint,
Gel Medium,
Ikea,
JOFY,
Liquid Pearls,
PaperArtsy,
Stickles
Friday, 3 March 2017
Fun With PaperArtsy (JOFY) Stamps
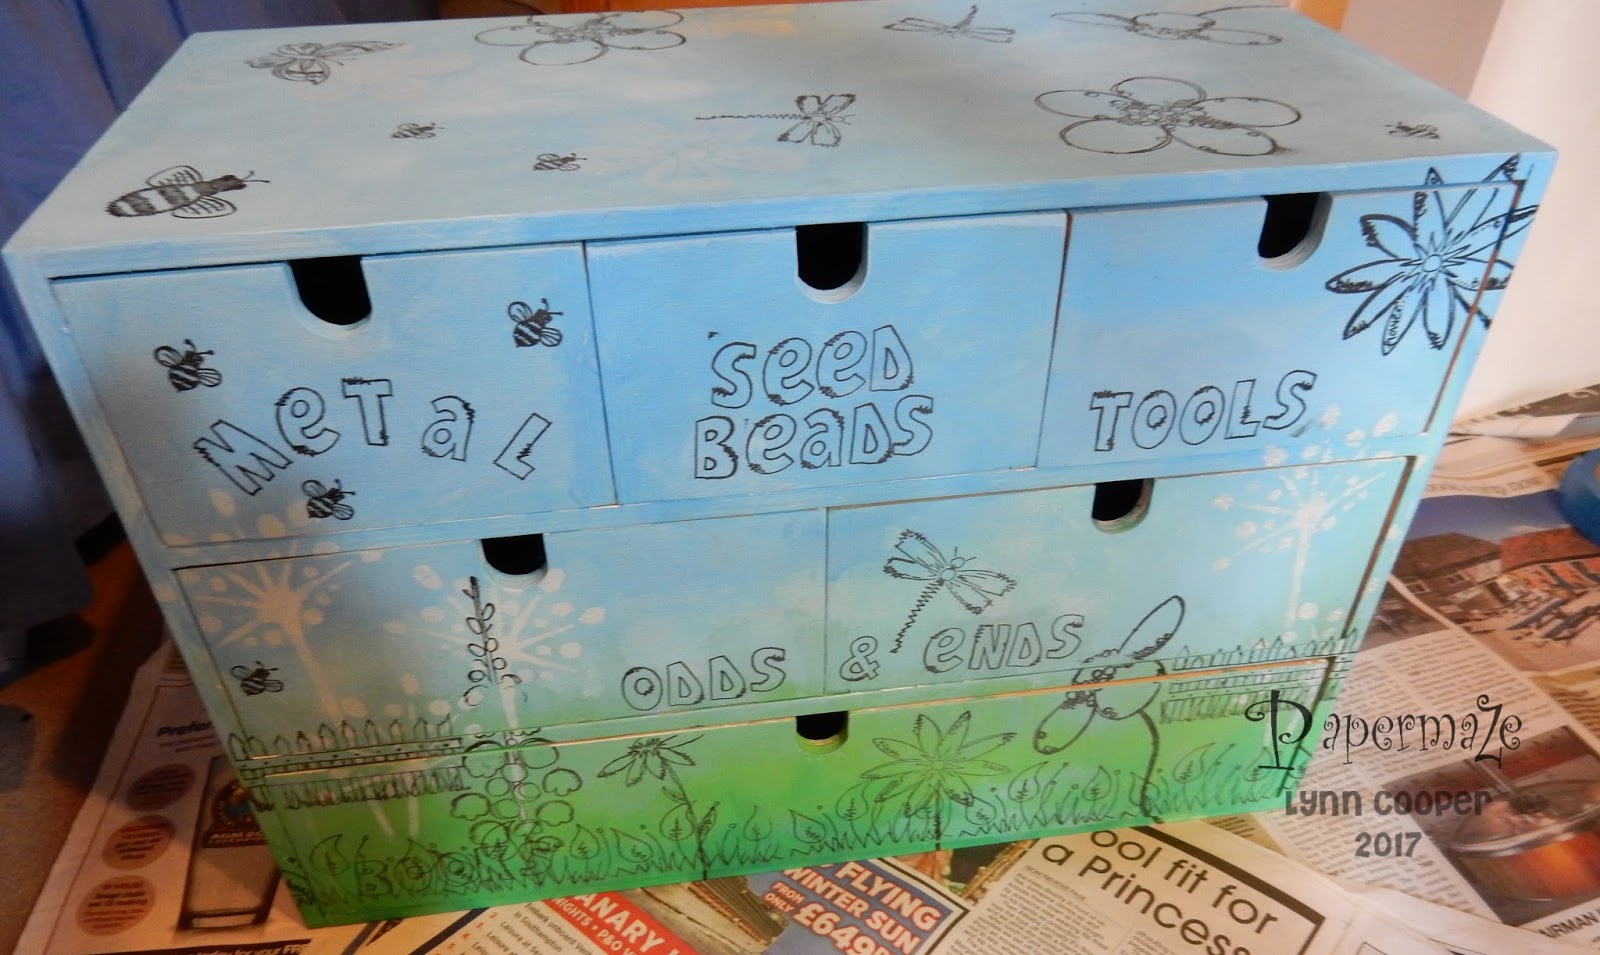
Hi Lynn with you today - I have been having fun with my JOFY PaperArtsy Stamps. There are plenty of these in the Papermaze shop. I had all my beads and jewellery making materials in a huge under-bed storage box and it always took time to find what I wanted. I had a sort out and once I had organised the content and thrown out the rubbish I was able to fit what was left into an IKEA - MOPPE mini chest of drawers. Mine was old and in need of attention but they are still available - just follow the link.
Here is my finished box - I will show you the main stages to create something like it.
The box needed cleaning out - it had had other craft materials and some ink had spilled and some drawers were a little glittery, so a light rub down and vacuum out.
As I used each stamp I re-inked it and stamped it onto a good quality cartridge paper, nothing too thick as I needed it to be easy to cut, and flexible when sticking to the box.
Next I coloured my images using Ranger's Tim Holtz Distress Inks and Markers. I applied the ink to the messy mat and used a water mister to mix and a paint brush to colour the images. Once dry the images were cut out and pasted over the same image on the box. Where necessary I cut them where they overlapped the edges of the box or over two drawers. (Note to self: - not a great idea to stamp the very detailed fence over two drawers and a support - this was very tricky to cut out let alone paste into position!).
I used Regular Gel (Matte) Medium, this is an clear medium which glues the paper in place and can be painted over the images to give a translucent water resistant finish. I extended this to the whole box when finished to make it more durable.
For finishing touches I added some dots with Liquid Pearls for flower centres and to create the tiny flowers in the grass. I glazed the wings and other bits with Stickles for a little shimmer.
Here is my finished box - I will show you the main stages to create something like it.
![]() |
| Front |
![]() |
| Right end |
![]() |
| Left End |
![]() |
| Top |
Then I primed the whole box with a white chalk furniture paint left over from another project. When this was dry, I mixed acrylic paint (Ranger's Tim Holtz Distress Paints) so that I could work in an Ombré effect working from green for the grass through to blue for the sky - I didn't want a defining line between the two. This has to be done quickly as the paints dry fast. I sponged in a little white to suggest clouds. Using PaperArtsy JOFY stencils I added some wild grasses with the white paint.
Once this was dry I stamped the images I wanted onto the box - this was tricky over the draws but I didn't worry too much as I was planning to cover the images with paper ones. I wanted to stamp the images on so I had the tiny details that are almost impossible to cut from paper, such as thin stems, insect legs and antenna.
As I used each stamp I re-inked it and stamped it onto a good quality cartridge paper, nothing too thick as I needed it to be easy to cut, and flexible when sticking to the box.
Next I coloured my images using Ranger's Tim Holtz Distress Inks and Markers. I applied the ink to the messy mat and used a water mister to mix and a paint brush to colour the images. Once dry the images were cut out and pasted over the same image on the box. Where necessary I cut them where they overlapped the edges of the box or over two drawers. (Note to self: - not a great idea to stamp the very detailed fence over two drawers and a support - this was very tricky to cut out let alone paste into position!).
I used Regular Gel (Matte) Medium, this is an clear medium which glues the paper in place and can be painted over the images to give a translucent water resistant finish. I extended this to the whole box when finished to make it more durable.
For finishing touches I added some dots with Liquid Pearls for flower centres and to create the tiny flowers in the grass. I glazed the wings and other bits with Stickles for a little shimmer.
Thanks for looking
Lynn
Lynn
Labels:
Distress Ink,
Distress Markers,
Distress Paint,
Gel Medium,
JOFY,
Liquid Pearls,
PaperArtsy,
Stickles
Monday, 2 May 2016
Reverse Box Canvas - Bo Bunny Soirée
Hello Lynn here with you today - and another project with the Bo Bunny Soirée papers together with JOFY stamps and Sizzix dies.
My trellis was cut using Sizzix Frameworks die, and the tiny flowers were cut using the Sizzlets Decorative Strip - Tattered Flower Garland, and more JOFY stamped leaves. Flat-backed pearls were added to the centre of the flowers and a few paper roses were added to the frame.
I turned the box canvas around to made a three-dimensional piece. I created the setting with stencils, texture paste, acrylic paints and embossing powder. I worked the over the sides as well as the face of the box. These are the materials I used:
Papermaze Mask - reverse brickwork
Crafters Workshop Template - Mini Chickenwire Reversed
Ranger Texture Paste
Ranger Tim Holtz Distress Acrylic Paints, I did some dry brushing with lighter colour over the brickwork.
Stampendous Frantage Embossing Enamel - Shabby White
I rubbed some gilding wax over the chicken wire to bring out the detail.
Ranger Texture Paste
Ranger Tim Holtz Distress Acrylic Paints, I did some dry brushing with lighter colour over the brickwork.
Stampendous Frantage Embossing Enamel - Shabby White
I rubbed some gilding wax over the chicken wire to bring out the detail.
I created the background with Bo Bunny Soirée - Charm paper covering the back and then layering up flowers which were cut from the edges of the paper. I stamped with a stamp from PaperArtsy JOFY stamp set 38 and embossed with a fine detail embossing powder.
The Hive, bees, and flowers were stamped using PaperArtsy JOFY Stamp Sets 30, 33 & 38 and coloured with Distress Markers. I used the page from an old book for the hive. The flower stems were strengthened with some acetate to help it hang or stand from the box.
The bunting (top left) and button tab (bottom right) were made with Bo Bunny Soirée - Buttons and some DMC stranded cotton threadg
Thanks for looking
Lynn x
Labels:
Blossoms,
Bo Bunny,
Buttons,
Canvas,
Crafters Workshop,
Distress Inks,
Distress Markers,
Gilding Wax,
masks,
PaperArtsy,
Sizzix
Subscribe to:
Posts (Atom)