Showing posts with label Buttons. Show all posts

Monday, 16 June 2025

June Papermaze Kit - Part 1

Lynn here today, sharing my first two creations using the delightful Papermaze kit for sunny June! Both of these layouts depict my granddaughter at her baby sensory group.


Here is what you will find in the kit:


Patterned Papers:
49 and Market - Vicki Boutin - The Flower Emporium - Starters Paper 3 & Starters Paper 9 
Echo Park - Firefly - Bright Floral & Shining Daisies
Simple Stories - Sunny Days - Happy Days & Soak It Up!

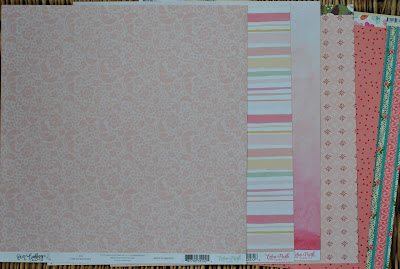
The photo below shows both sides of the papers:


Embellishments:
Pretty Little Studio - Love is Kind - Friends Forever Die Cut Titles
Pinkfresh - Chrysanthemum - Chipboard Flair
Rosie's Studio - Keeping Cool - Puffy Stickers & Frames
Cocoa Vanilla - Storyteller - Wood Button
Doodlebug Designs - puffy hearts - Bumblebee
Washi Tape


Bazzill Basics Cardstock - Coconut Swirl, Patch (included in Kit), Petunia, Powder Blue, Tangelo & Yukon Gold (in Extra pack).

Teddy Bear's Picnic - This sensory session involved teddy bear's picnic songs and activities. Lots of teddies and teacups! This layout was fun to create and I love the colour scheme. 


I started by gutting the Happy Days paper to create a border 12" x 12" and 1" deep. I gutted  a 10.5" x 10.5" piece of the Yukon Gold Bazzill to make a 1" frame and placed this over the paper. The Coconut Swirl Bazzill was trimmed to 10.25" x 10.25", I splattered Distress Ink over the cardstock using Wild Honey, Worn Lipstick and Faded Jeans. The Coconut Swirl was then mounted over the Yukon Gold and the paper. 


I selected two 4" x 6" photos, and cut a piece of Bright Floral paper to the same size and placed the three items across the layout.  


I used both the Rosie's Studio - Keeping Cool - Frames from the kit. I backed them both with some scrap white cardstock. I wrote my journalling into the single film frame, and placed this to the bottom right of the layout. The three-photo film strip was placed vertically to the right side.


I used all the Bazzill Basics Cardstock colours from the kit and some scraps in different shades from my stash to die cut the cups and animals. The animals were from a Katie Skilton Sizzix Thinlits set called 'Animal Portraits'. The Tea cups and saucers were cut from the Tim Holtz Sizzix Thinlits Papercut Cafe set. 


After cutting all the pieces and layering them up, I placed the cat above the first photo, the rabbit under the same photo, and the bear to the far right of the page. I added a cup to each section on the film frame, and I stacked two more beside the cat. I attached them all with 3D foam pads. 


With a selection of Doodlebug Designs Alphabet Soup Puffy stickers (Bumblebee, Swimming Pool and Cupcake), I spelt out the date. 


Using more of the Yukon Gold Bazzill, I cut the title using a Die-Namics alphabet die set. 


Finally, I used the Doodlebug Designs - puffy hearts - Bumblebee from the kit in both top corners of the layout.


St. Patrick's Day - Another baby sensory session, this time it was to celebrate St. Patrick's Day. I made Florence and her little friends knitted hats with large shamrocks. 

I started making this layout by gutting the Patch Bazzill to give me a 1" frame. I cut a sheet of Smooth White Bazzill to 10.5" x 10.5" and placed this over the green frame. I selected the area of the Soak It Up! paper I wanted to feature (the yellow sun section and some of the colourful rays), and trimmed this to 10.5" x 6" and used this to cover the top half of the white card. 


I cut a 12" x 1" strip of the Happy Days paper and trimmed it with a Martha Stewart border punch, and placed this directly under the patterned paper onto the white card. The washi tape from the kit was used over the join of thetwo papers. 


Three small photos arranged in a row to the left of the layout and overlapping the papers. I cut the title using the Cricut in Yukon Gold and Patch Bazzill and offset one over the other, to the bottom right of the layout. 


I made a shamrock with more of the Patch Bazzill and a heart punch. I cut 6 hearts, folded them all in half and arranged them to create the leaf. I popped a few 3D foam pads under the folds, to prevent them from laying too flat. I cut a stalk freehand from the Bazzill, then arranged the leaf and stalk to the right of the page. I threaded some green cord through a heart shaped button to add to the centre of the shamrock.


Selecting one of the Pretty Little Studio - Love is Kind - Friends Forever Die Cut Titles from the kit, I placed this with 3D foam pads to the top left of the layout, then added my journalling underneath. 


I happened to have some pretty little flower buttons on my desk from another project. The colours went well with the papers, so I strung them onto more of the cord. I arranged them, bunting style across the layout. I took three more buttons and some cord to place some flowers in the bottom right corner near the title. 

A few of the 
Rosie's Studio - Keeping Cool - Puffy Stickers were added to the photos.

That's all for today, I'll be back with more from this kit soon.
Thanks for looking
Lynn x

Saturday, 25 February 2023

February Papermaze Kit - Part 2

Lynn back here today, with the second two of my layouts using the new Papermaze kit for February. A very bright, cheery and colourful collection. Ideal papers and embellishments for St. Valentine's Day as well as other occasions.

Here are the details of what you will find in the kit:

For full details of the kit please see the first post HERE or the shop website HERE.


Merry & Bright - My nephew and his family out for a Christmas meal.

I cut a large heart shape from some scrap paper and placed it onto the centre of the Grenadine Bazzill. With Distress Mica Stain (Tart Cranberry and Merry Mint) I sprayed over the cardstock. Once dry I removed the heart shape and trimmed the cardstock down to 26.5cm x 26.5cm.  I placed this over a gutted frame cut from Sweetheart Plaid
paper.  


I mounted my black and white photos onto first black, then white cardstock. These were then arranged over the heart. 


To embellish, I used several items from the kit - I tied the ribbon into a bow and attached to the bottom right of the heart, just above this I placed the Prima flower and the two chipboard hearts. I die cut some leaf fronds from scraps of pink Bazzill and placed these above and to the side of my cluster of embellishments.

The title and the snowflakes are from a pack of
American Crafts Vicki Boutin Evergreen & Holly - Joyful Phrase Thickers.


I found some phrase stickers from an earlier kit to place in the bottom right corner of the layout accompanied by a small black flair from my stash.


Hello Lovely Little One - My new great niece born at the end of last year.


I created this layout using the gutted section of the Sweetheart Plaid paper and the sheet of Mauve Ice Bazzill. I decorated the cardstock using Vicki Boutin's Print Shop - Off Beat heart stencil, and a mix of pink Distress Oxide Inks. I randomly stamped tiny hearts using the stamps included in the kit.

I cut a piece of Sweetheart Plaid paper to 16cm x 21cm, and placed it to the right of the Bazzill (plaid side up). The from the remains of this paper I cut a selection of hearts. I inked all the edges with Distress Oxide Ink. I ran a length of pink twine along the top of the paper, curling the ends. The hearts were arranged over the twine, overlapping one another, some were raised with 3D foam pads.


I mounted my photo onto some gold glitter card, which I chose to match the Rosie's Studio glitter foam word stickers provided in the kit. I arranged the word stickers on a scrap of pale pink Bazzill, then I mounted this onto more of the glitter card. I flipped one of the tangerine doilies from the kit to the reverse side and cut a 5.5cm circle from white card to place in the centre.
I added the baby's name to the centre using Doodlebug Alphabet Soup Puffy Cupcake stickers. I die cut Prim Poppy using a Memory Box die, inked them and added them to the left of the doily.


For the bottom right on the layout I place two more hearts, and a little more twine, tied in a bow. to this I added the date using Doodlebug Alphabet Soup Lily White stickers. Then I scattered a few tiny heart shaped buttons from my stash.

Finally, I added the glitter hearts included with the Rosie's Studio word stickers, a few pink hearts from the Doodlebug Alphabet Soup stickers, and a smattering of heart sequins.


That's all for today, I have more to share as there is plenty of paper and card remaining in the kit.
Thanks for looking.
Lynn x

Friday, 12 November 2021

November Papermaze Kit - Part 1

The November Papermaze kit is available from the shop or online today, and I'm here to share my first pair of layouts. This month Vanessa has put together another lovely collection papers, card and embellishments in subtle colours, with an autumnal flavour.


 Let's have a look at what is in the kit:


Patterned Papers:
American Crafts - Jen Hadfield - Peaceful Heart collection - Breathe Deeply & Grow
Cocoa Vanilla Studio - These Days collection - The Good Life & Day Break
American Crafts - Paige Evans - Bungalow Lane collection - #10
Reminisce - Be Kind collection - Be someone's Rainbow
Bazzill Basics Cardstock - White & Ash

Reverse side of papers:

Embellishments:


2 CVS Wood Epoxy Buttons, 2 CVS Pocket Cards, PFS chipboard frame, 3 heart Brads, 8 Dew Drops, 2 Prima Flowers,  3 PFS chipboard flair

Extra Bazzill Basics Cardstock Pack:


Yukon Gold, Blossom, Jet Stream & Nixon

Bagpuss - This layout features a photo of my daughter's cat, who crawled into a large brown paper bag from a take away meal.

For the base I used the white Bazzill, a Tim Holtz Layering stencil (Nordic) and a selection of Distress Oxide Inks (Worn Lipstick, Fossilized Amber, Forest Moss and Dried Marigold). I used two methods of transferring the pattern onto the card. First I placed a little of each colour onto my craft mat, spritzed them with water, then dipped the stencil into the wet ink before transferring ink onto the card. Once this was dry, I used a blending tool and rubbed more of each ink through the stencil. This gave me some positive and negative images.


I inked the edges of my papers with Forest Moss Distress Oxide Ink.

Next, I built up the layers - I cut a piece of  Breathe Deeply paper (dark green side) 18.5cm x 16cm, and placed this in the centre of the layout, leaving the edges free of glue to allow me to tuck in embellishment later. Next I layered a piece of Grow paper (floral side) 16cm x 14cm. 


I used two photos of the same image, one a little larger then the other, these were mounted on top of each other over the papers.

Then I set about embellishing the layout, I cut flowers from the Breathe Deeply paper, shaped them and added them to the right side of the papers. I cut a wreath image from
The Good Life paper, cutting this in half and trimming the top of each piece to make a tag shape. Then I punched a hole, added a copper eyelet, I threaded a short length of Baker's twine through the hole. These were tucked under the papers to the top and left of the layout, and the date and cat's name were spelt out with PFS Mini Puffy Alpha. I also cut a small label from The Good Life paper and used this to add the subtitle.

My title was created with PFS Puffy Alpha stickers - Office Hours.

The layout was further embellished with two narrow strips of paper, a short piece of lace, buttons, washi tape and some Nuvo Glitter Drops - Honey Gold.


New Home - Last month my nephew and his young family moved into their brand new house. 


I started with the Jetstream Bazzill, added a strip of paper at an angle across the top left corner and then built up the layout in a 'patchwork' effect from there. I placed the photo first and worked around it.

I used Forest Moss Distress Ink on the edges of all my paper and card. 


Most of the patterned paper used was from
The Good Life as there are lots of strips, journalling blocks, flags, and phrases on this sheet. I also used the matching Pocket Cards and Wood Epoxy Buttons from the kit.


I found a selection of wooden houses and some numbers in my stash which matched the buttons well. 

The date and title were spelled out with CVS These Days Mini Puffy Alpha Stickers purchased from Papermaze.


That's all for today, I have more to share with you soon.
Thanks for looking
Lynn x

Wednesday, 17 March 2021

March Papermaze Kit - Part 1

Hello Lynn here today with the very pretty kit from Papermaze for March. I have my first two layouts to share with you, both very girly in theme.


Before we look at the process of making the pages, this is what you will find in the kit:


Patterned Papers:
Echo Park - Welcome Baby Girl collection - It's A Girl Floral & Rainbows
Echo Park - Our Wedding collection - I Do
Simple Stories - Winter Cottage collection - All is Calm
Simple Stories - Sweet Talk collection - Will You Be Mine?
Graphic 45 -Ephemera Queen collection - String of Pearls
Bazzill Basics Cardstock - Avalanche & Flamingo

Reverse side of papers:

Embellishments: exclusive chipboard rainbow, 6 glitter domes, Kaisercraft curio, 2 prima flowers, strip Pebbles puffy hearts, Prima charm, 15" Prima lace, 50cm string, 3 wood buttons


Extra Bazzill Pack: Blossom, Rain Forest, Whirlpool & Butter

Tea A Hug In A Mug - The photos for this layout show Scarlett enjoying her favourite refreshment - a cut of tea. She loves to dunk rich tea biscuits - she would much rather have a cup of tea than chocolate or sweets.  

Starting with the 'Our Wedding' paper I gutted this to give me a wide border, 4cm deep. The 'Avalanche' Bazzill was trimmed to 25.5cm x 25.5cm. I inked the edges with Worn Lipstick Distress Ink (I used this or Tea Dye for all cut edges). This was mounted centrally over the border.

With a Peartree Cutfile, I cut the title from the Blossom Bazzill, with the remains of the Our Wedding paper, I backed the mug and letters using both sides. I used a scrap of Avalanche and Kraft Bazzill for the inside of the mug and the tea. 


I heart on the mug was backed with acetate, a few sequins were added, then behind that more patterned paper to create a small shaker.

I cut a letter 'a' using my cricut and used the heart from the cutfile to add the word 'tea' to my title with some glittery foam alpha stickers. My photos were backed with some Kraft Bazzill, and together with a doily I arranged everything onto the page. Once happy with the placement I glued it all down.

To embellish I cut some biscuits with a Craft Creations die and more Kraft Bazzill and arranged them around the page. I used the gold puffy heart sitckers from the kit all over the layout. Finally I cut the date with the Tim Holtz,- Alphanumerics Label Sizzix die set and some Blossom scraps.


Cute Baby Girl
- This features my daughter Emily at 10 days old in her incubator, in the special care baby unit.

I wanted the backing for this layout to be white and so purchased an additional sheet of Avalanche Bazzill. I based the colour scheme on the 'Rainbow' paper, and so chose to use Distress Oxide Inks in Worn Lipstick, Dried Marigold, Evergreen Bough, Weathered Wood and Pumice Stone.

For the background I placed some of each colour of ink onto a craft mat in turn - mixed with water, I splattered them over the page. While this was drying, I roughly painted the chipboard rainbow pieces - first by using diluted inks, then I splattered them with water to cause more oxidation. Finally I flicked more concentrated colour to add extra variation of the same colour over the individual pieces. For the outline piece I used Ranger's Frosted Crystal Embossing Powder to give it a light sparkle without changing the colour.

I mounted my photo onto white card and then onto Flamingo Bazzill, then I cut two pieces of Rainbow paper,  a little bigger than my photo, and used the design from both sides. I distressed and inked all the edges. Then I arranged the patterned papers, mounted photos and rainbow onto the Bazzill background. I embellished the base of the photo with some bobble trim.


I used some DMC embroidery thread to hang the flower charm from the cloud, fashioning a tiny bow at either end. 


I used more thread to add to the wooden buttons, which were arranged near the base of the photo. 

My title was made with two sets of Pinkfresh Studio Puffy Alpha Stickers - Office Hours and mini Just A Little Lovely.


I tore some strips of Rainbow paper the ink and place at the top and bottom of the page. Lastly, I scattered sequins, gems, Nuvo Crystal
and Glitter Drops over the white areas of the page. 

That's all for today. I will be back with two more layouts soon.

Thanks for looking
Lynn x