Showing posts with label sequins. Show all posts

Friday, 25 September 2026

49 and Market - Glimmer and Glee - Part 2


Lynn here today, with more from the 49 and Market's pretty pastel Glimmer & Glee collection. As explained in the previous post, collection has water colour style images, which are great for documenting parties and birthdays. The palette is a clever mix of pretty corals, pinks, yellows, blues and greens. Here are my next two layouts using this collection and featuring birthdays, cakes and celebrations.


Happy 3rd Birthday Poppy! The first of these layouts features my great niece's birthday party.


For this layout I chose the Celebrate paper from the collection, this actually has cupcakes printed on one side, but I selected the reverse side with the pretty leaf trellis design down the left side. It also has a large bordered area which I felt was perfect for two photos to be showcased, side-by-side. I printed two pictures, 3.5" x 5", and placed these into this area. 


Using the Cricut, I selected a font with a deep shadow, I cut the shadow from Yukon Gold Bazzill, and the top layer of letters using Toast paper. I inked these up with Mustard Seed Distress Ink, and then layered them together before arranging onto the page. I glued most of the title and date to the page, with the exception of '3rd' which was mounted using 3D foam pads to give it some volume. 


From the Glimmer and Glee Laser Cut Elements pack, I selected several images. - A banner to hang from the top centre, balloons for the top right, A large birthday cake, two cup cakes, a flower and 2 party hats for the bottom right corner of the photos. I also chose the gifts, a flower and a drink for the bottom right of the whole layout. some were glued flat, others raised with more 3D foam pads.


With a selection of multicoloured pastel gems and sequins, I decorated the page to add a little glam.


Happy Cake Day - My granddaughter celebrating her 2nd birthday at our house, a few weeks after her birthday.


I selected the Hooray paper for the background this time. The is a subtle illustration of cake at the bottom left of the paper. 


I selected six small photos and mounted them individually onto spare white cardstock, then I mounted them in two rows of three onto the remains of Toast paper. I arranged these right up to the side edges of the layout, one on each side. 


Using the barcode strip trimmed off the page, I cut the statement into five smaller parts, and mounted the pieces down the right side of the page, using 3D foam pads.


I made my title with Yukon Gold Bazzill and a blue cardstock, I used the Spellbinders- Classic Pooh - Pooh's Alphabet, Numbers & More die set. I mounted the title across the centre of the page. The date was created with Paige Evans' Adventurous Thickers foam alphabet stickers 


From the Glimmer and Glee Laser Cut Elements pack, I chose two banners and strung these from the paper edge to the photos on each side of the layout. Then picked more elements and added these to the page.


With a scrap of paper from the collection I cut a small strip for my journalling and attached this to the bottom of the layout. Finally, I scattered colourful sequins over the page. 

That's all from me with the Glimmer and Glee collection, I'll be back with a new collection soon.
Thanks for looking.
Lynn x

Wednesday, 19 February 2025

February Papermaze Kit - Part 1

Hello, Lynn with you today, sharing details and layouts using the new February kit from Papermaze. Pretty romantic papers , together with Bazzill cardstock and embellishments. Both of these first two layouts, were based on stitching ideas.

Before seeing how these layouts were created, please see below, what you will find in the kit.


Patterned Papers:
Mintay Papers - See You in Paris! collection - #04 & #05
P13 - Love Stories collection - #01 & #05
49 and Market - Vintage Orchard collection - Solids Paper 1
Echo Park - Marry Me collection - Blush Floral

The photo below shows both sides of the papers:


Embellishments - P13 Light Chipboard Embellishments, P13 Dear Love Stickers, Craft Consortium 2 Belle Fleur butterflies, P13 Stitched With Love labels, 3 Prima flowers, Doodlebug Designs 5 puffy heart stickers, Little Birdie 3 heart stickers, 12" Pink Mesh ribbon, Papermania Bare Basics wooden dots.


Bazzill Basics Cardstock - Sweetheart and Stonehenge (included in kit). Peach Creme, Dusk, Tutu Pink, Guacamole (in extra Bazzill match kit).


Family Gathering - This photo shows us all gathering for Easter and an Egg hunt in the garden.


I gutted the Blush Floral paper to make a 1" frame, then I trimmed the Tutu Pink Bazzill to 11" x 11", and mounted it over the frame. I splatted the cardstock with pink, green and brown shades of Distress Oxide Inks.


Using Tim Holtz Stacked Tiles - Hearts Sizzix Die set, I cut 16 of the largest hearts from a thin cork sheet. I arranged these in four rows of four across the page. With the next two sizes of heart die from the same set, I cut 16 more hearts from the green side, and 16 more from the pink side of the Blush Floral paper. These were laid on top of the cork hearts, and I ran the sewing machine from top to bottom over each row, without any thread and set to a long stitch length.


I used 2 strands of DMC Embroidery thread, and stitched through the holes, catching in sequins here and there as I went. The photo was mounted to the bottom left of the page.


With Rosie's Studio, Simply Charming Puffy Alphabet Stickers, I placed a title onto the layout.
Then I added the date with Sizzix Alphanumeric Label die set.


Mary Jane Billington - This old photo was given to us recently; the lady is my husband's grandmother.

I started by drawing an 11" circle in pencil onto the Stonehenge Bazzill. I pricked holes around the circumference of the circle, roughly 0.75" apart. Using the P13 Love Stories #05 paper, I cut a piece 10" x 8.75", distressed the edges and placed it in the centre of the Bazzill near to the top.


With brown seam binding ribbon on the top of the circle, I caught this in place through the punched holes, using DMC embroidery thread.


I used scraps of other papers, used in previous layouts to embellish this page. P13 Love Stories #01 paper, cut to 5.5" x 6", which I placed at the centre base of the ribbon. The photo was mounted onto a piece of Blush Floral paper, and placed to the right side of the previous piece.


I also cut several pieces from the
P13 Love Stories #01 paper, using the floral side, and some panels from the #05 paper, these were all distressed and tucked around the photo. I used some of the panels as a journalling spot.


I found some old metal flowers, with pearl brads in my stash, and added them to the ribbon circle. The photo was embellished with two pieces from the P13 Light Chipboard Embellishments.


Using the Cricut I cut the lettering for the date and title using both the Sweetheart and Dusk Bazzill.


That is all for today, I will be back with two more layouts using this kit soon.
Thank you for looking.
Lynn x

Wednesday, 11 December 2024

December Papermaze Kit - Part 1

Lynn here today, I can't quite believe it's already time for the Christmassy December kit. This month's pack is full of traditional style, Christmas papers, embellishments and Bazzill cardstock. Red, white and green with gold are the main colours presented here.

Here is my first pair of layouts, both depicting my granddaughter's first Christmas:


Before we look at how each layout was created, here is what you will find in the kit:


Patterned Papers:
49 and Market - Evergreen Season collection - Ceremonious Poinsettias
Simple Stories - Simple Vintage Yuletide collection - Holiday Wishes and Filled with Wonder
Carta Bella - A Vintage Christmas collection - Holiday Floral and 3x4 Journalling Cards
Vicki Boutin - Wrapped in Ribbons collection - #5

The photo below shows both sides of the papers:


Embellishments:
Vicki Boutin - Wrapped in Ribbons Acetate 6cm strip, Prima - From The North Pole 2 lines of chipboard phrases, 2 Holly Berry stems, 6 ephemera pieces and 3 flowers, Rosie's Studio - All Wrapped Up - Puffy Word Stickers, Strip of gold pearls, 12 sequins.


Bazzill Basics Cardstock - Natural and Pomegranate Splash (in Main Kit). Aspen, Quartz, Parakeet and Grenadine (in extra Bazzill pack).

Believe in the Magic - This layout shows Florence in her sparkly ruby slippers and Christmas hat.


I started this layout with a scrap sheet of 12" x 12" paper, over this I created the background using two papers from the kit. The top 8" is covered with Holiday Wishes and the bottom 4" is Wrapped in Ribbons #5 including the manufacturer’s strip, the red bows were perfect for Florence's ruby slippers!


I used a Martha Stewart border punch and some white card to make a lacy strip with I added to the page above the row of bows.

Next, I arranged the photos, left to right, top to bottom overlapping one-another. The two smaller photos were matted with some red metallic card. Then I made three tags using the Sizzix Framed Tags Thinlits die set, and white card. I inked the edges of the tags with Festive Berries Distress Ink. Using red and green metallic card I cut the reinforcement rings for the tags using the same die set.


On the largest tag I created a title with Red and green metallic card, and the Sizzix Bold Text Christmas Set. I cut this twice and mounted it creating a shadow. Green jute twine was tied through the hole in the tag, and once the tag was stuck in place, the tails of the wine were looped and glued in place.


The medium size tag was used for a little more detail, and for this I used AC Foam and cardstock Thickers - Sugarplum Wishes. The smallest tag was used for the date and I created this with more metallic card and the Sizzix Alphanumeric Tiny Type sets, both upper and lower case. Once these were in place, I looped some read jute twine through the holes and attached it in the same was as before.


Finally, I added three chipboard phrases from my stash.


Oh, Christmas Tree
- Florence picking her first Christmas Tree!


I chose the Ceremonious Poinsettias paper as the background for this layout, and blurred the centre of the pattern with some white acrylic paint.


I printed my photo and placed it in the centre. With the Sizzix Woodlands Thinlits set I cut the two different trees, twice in
Aspen Bazzill and twice in Parakeet Bazzill. Four trees were arranged either side of the photo, expanding the tree display across the page.


I topped each tree with a large sequin from the kit, stitching in into position with gold metallic thread.


I selected and cut the 'Oh, Christmas Tree' title on the Cricut, the base was cut in cream cardstock, and alternate letters on the word 'Christmas' were cut in gold metallic card. I placed this below the photo.


With embellishments from the kit I added holly and poinsettias to either-side of the title. Finally, the date was added with
AC Foam and cardstock Thickers - Sugarplum Wishes.


That's all from me for today, I'll be back with more from this kit soon.
Thanks for looking.
Lynn x

Monday, 9 September 2024

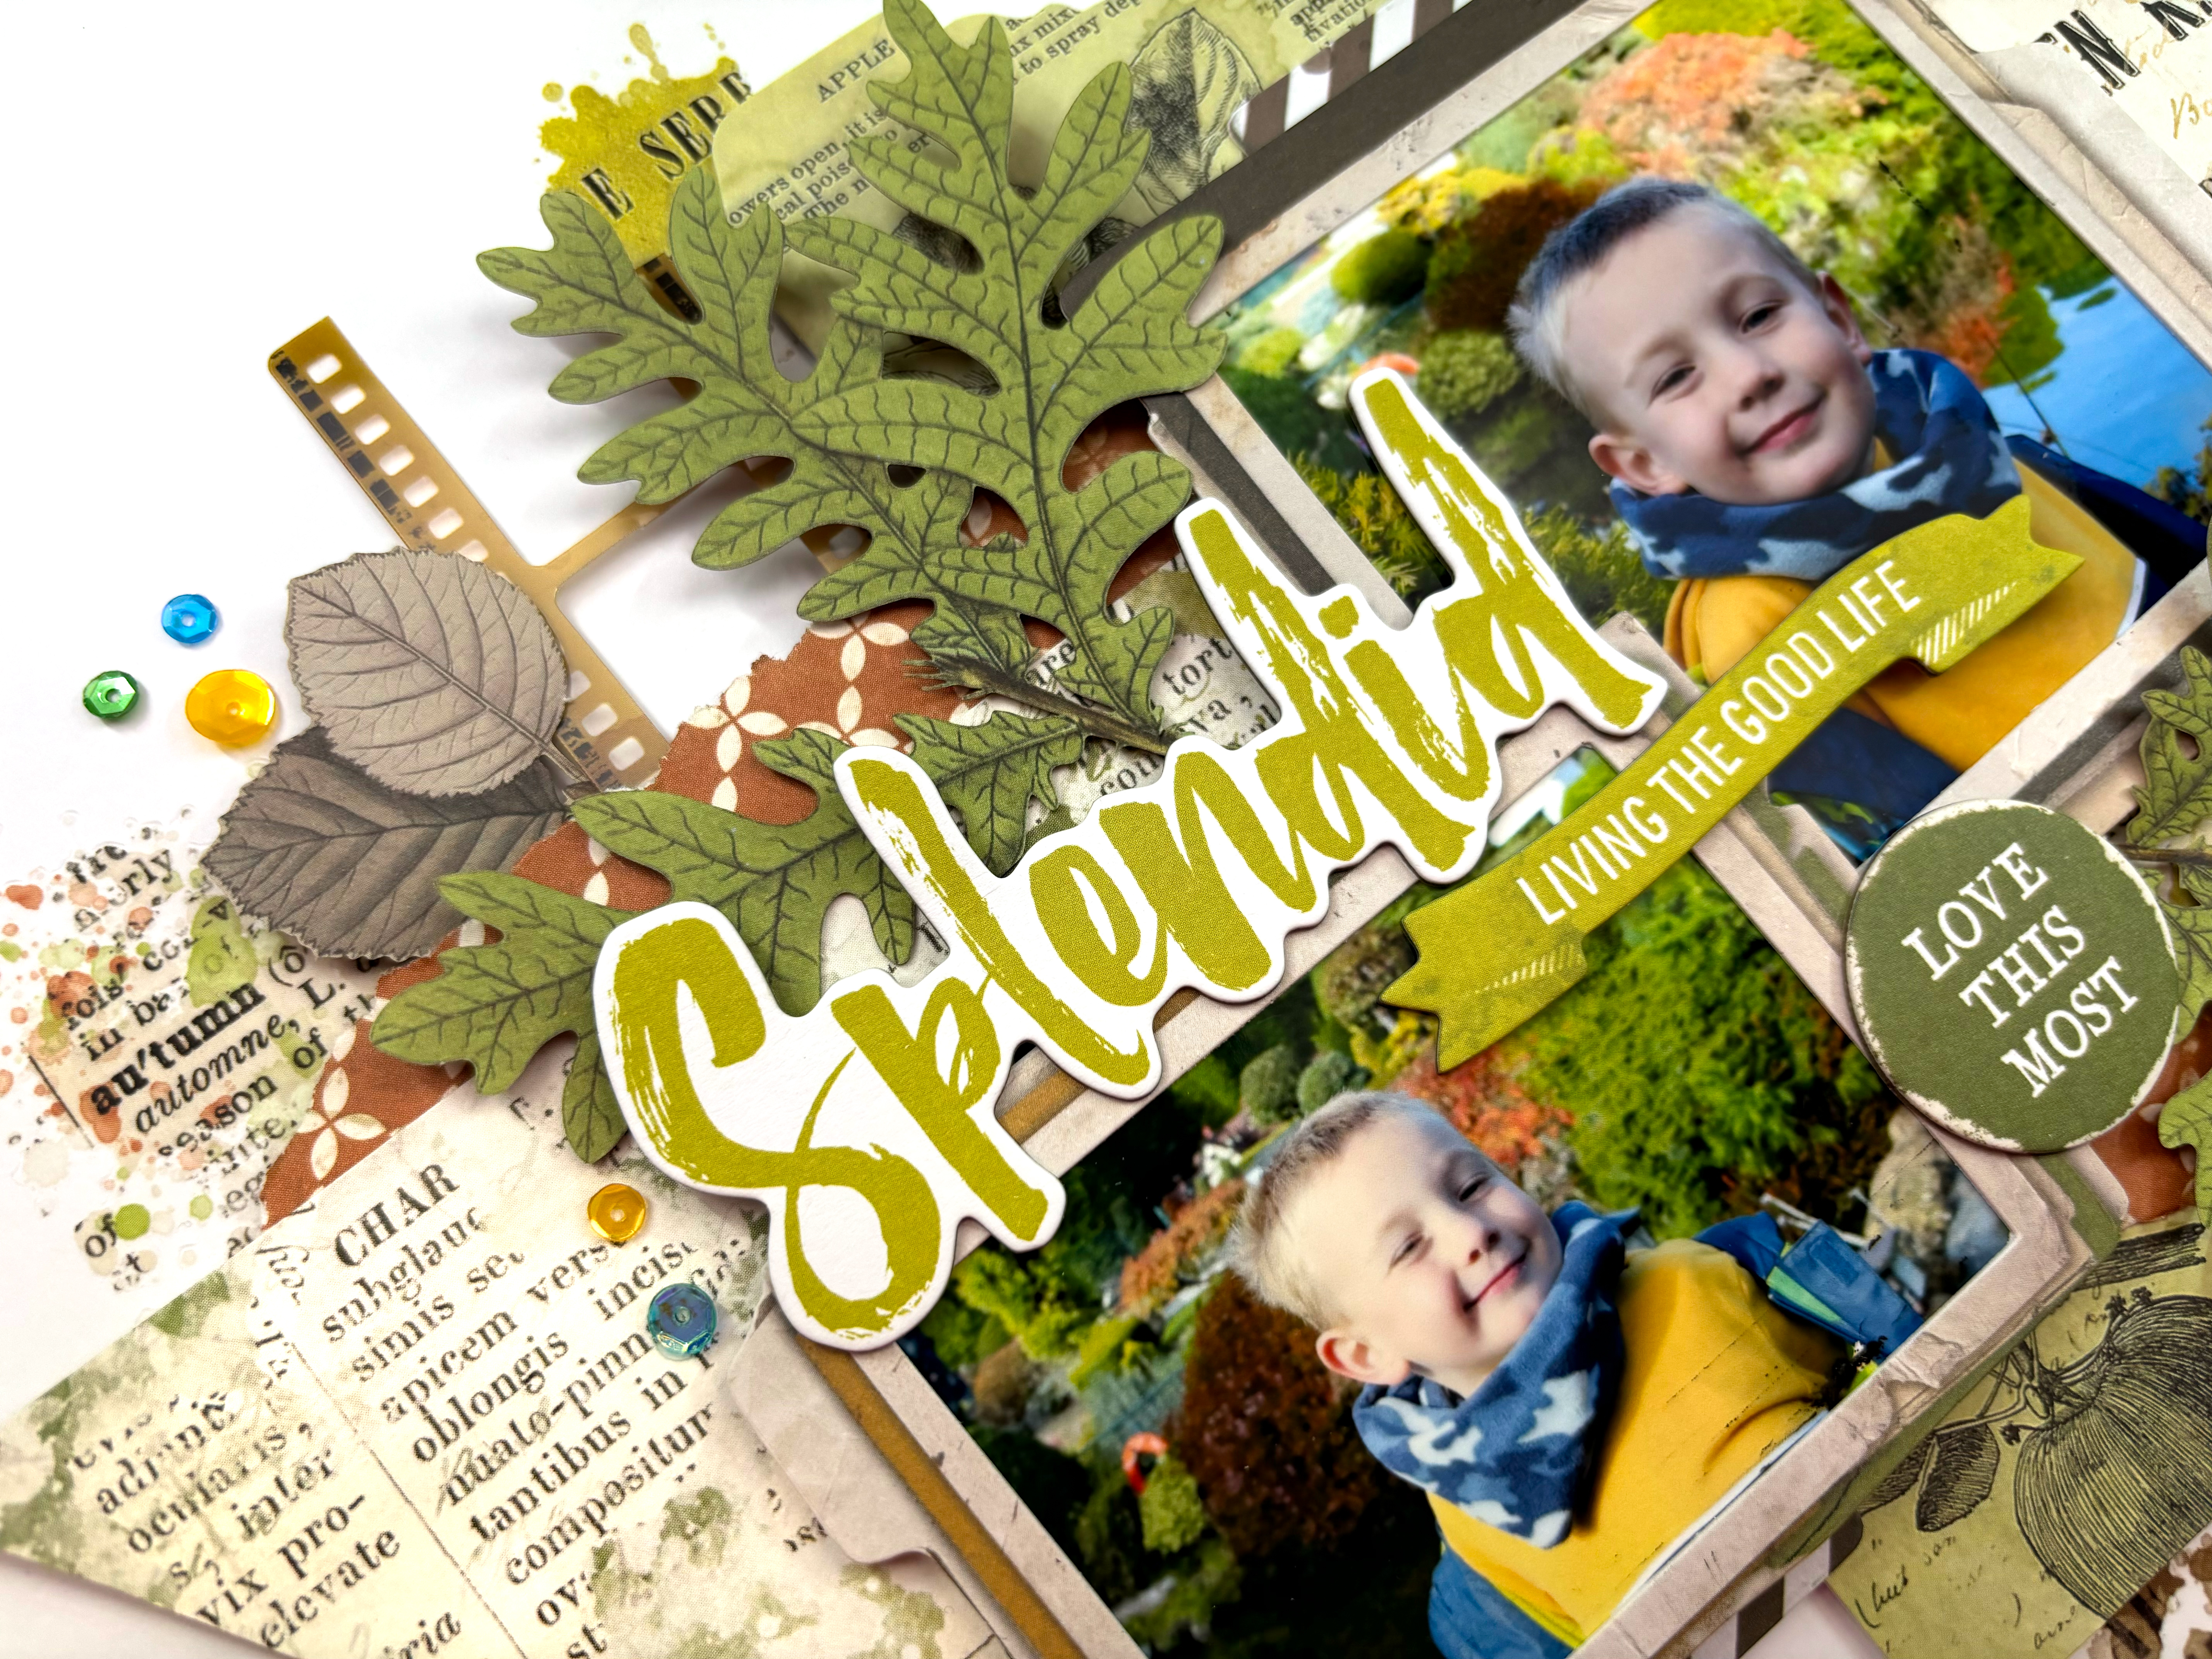
Splendid - 49 and Market - Vintage Orchard Collection

Hi everyone, it's Rebecca with you today sharing my first layout created with 49 and Market's 'Vintage Orchard' collection. The weather has certainly changed and Autumn is on the way. As sad as I am to say goodbye to Summer (although did it ever really arrive this year?!), Autumn is my favourite season to scrap so this collection was right up my street! You can find it in the store here.


I started with the 'Nestled' patterned paper - one of my favourites - and cut a 3 inch wide strip. I trimmed down either end and cut fish tails to make it more like a banner. I placed this in the centre of a sheet of Premium White Cardstock with some torn sections of the 'Painted Foliage' above and below it for contrast. At this point I hadn't stuck anything to the white cardstock - I was just sticking everything together and working on layers.


Behind the fishtail banner, I positioned one of the larger cards from the Ephemera Bits pack. This pack is amazing and includes 96 different elements so it will last a long time! 

On top of these layers, I added my photos, housed in two of the Stacked Frames. I've raised both photos up using foam to add in some dimension between the layers. I was then able to add in some smaller layers, including some striped frames from the Ephemera Bits and some filmstrips from the Acetate Assortment Set. I love how these little layers make all the difference.


I've used one of the Chipboard Words for my title, picking not only a phrase which works for the photos I'm documenting, but also a colour which matched my photos and the other elements on the page.


With these larger elements in place, I turned my attention to embellishing, which for me is the fun part and where the layout really comes together. I selected some gorgeous green leaves from the Laser Cut Wildflowers. This is another amazing pack which includes 92 pieces so is really good value for money. 


Once I'd gone through and adhered all these pieces together, I was able to see how much of the white cardstock my layout was covering. This makes it so easy to add details to the background because I can move everything on and off the page in one piece. The Vintage Orchard collection includes 3 sets of rub-on transfers. I selected some from the Blendable Rub-Ons and the Essentials Rub-Ons and applied them to my background. I love how easily they apply, and they don't really leave an 'outline' as such, so they really do look like stamping and mixed media (just without all the effort and mess!).


I finished off with a couple of laser cut butterflies and some sequins for a little bit of sparkle!

Thanks so much for reading! I hope you've enjoyed this layout and it offers you some inspiration. Vintage Orchard is a stunning collection and is available in the shop now.


Take care

Rebecca x 

@preciouspagespapercraft