Showing posts with label Thread tangle. Show all posts

Thursday, 6 May 2021

Always Look On The Bright Side of Life - P13 Paper Products - Soulmate

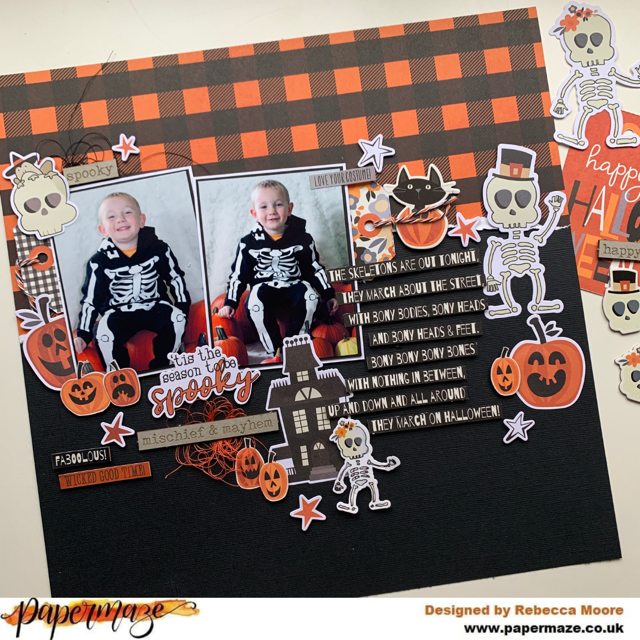
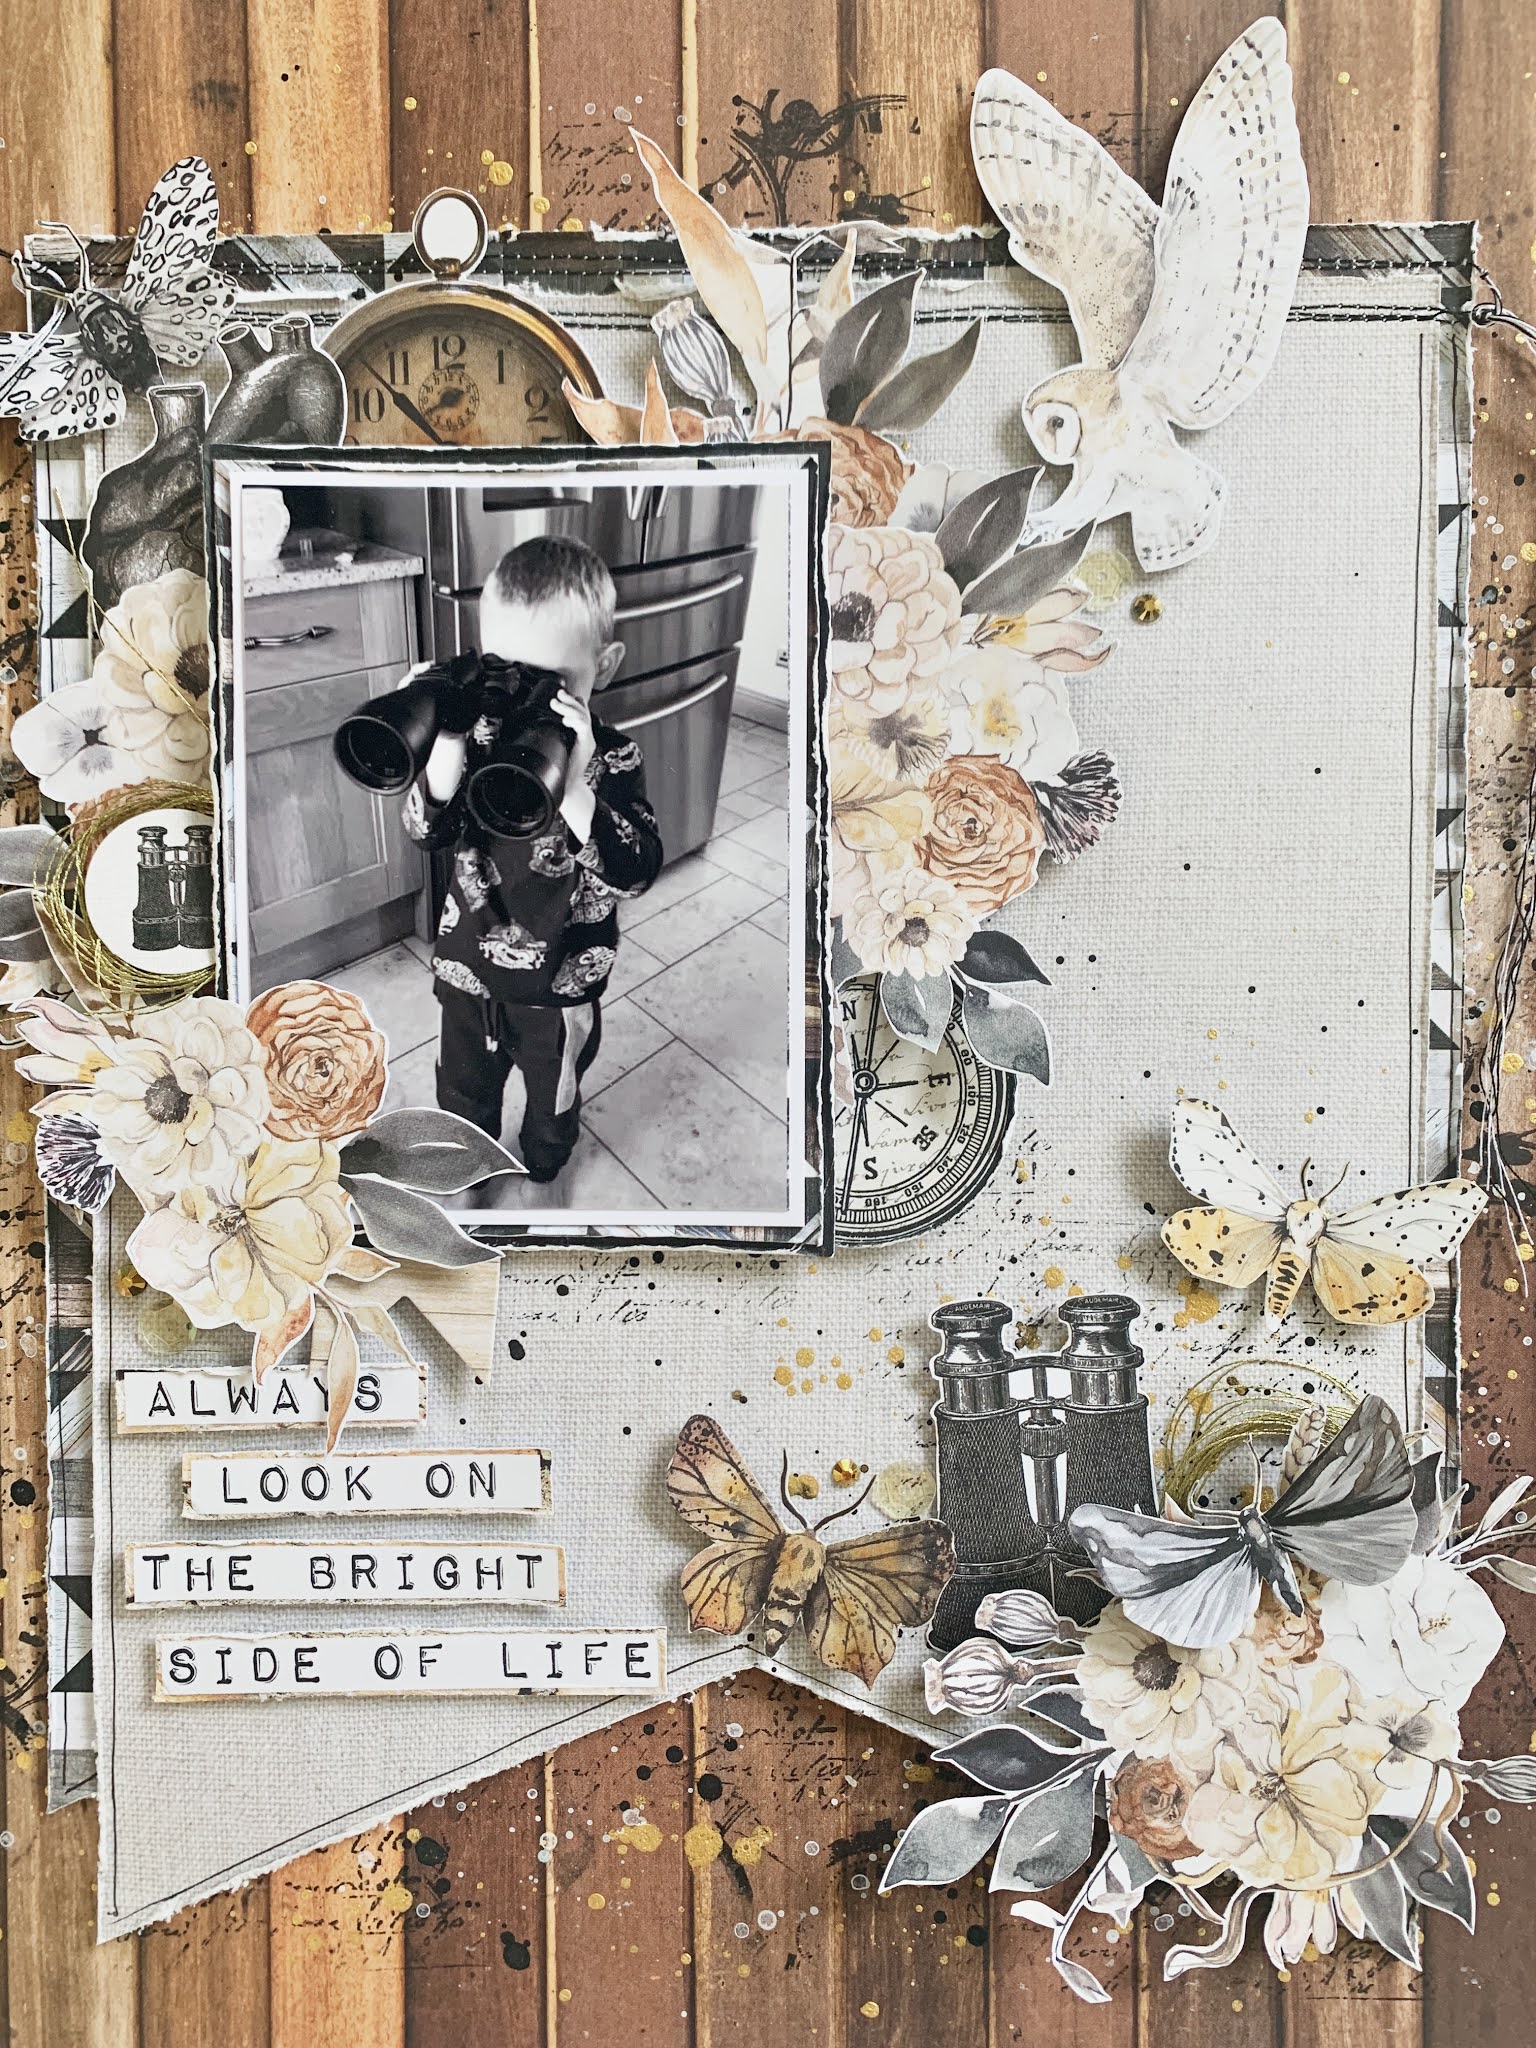
Hello, Rebecca with you today sharing an extra layout I've created using the Soulmate Collection from P13 Paper Products. I actually had this layout all planned out before this collection had even landed on my doormat, but it's ended up being the third layout I've created! I was inspired by a layout I'd seen on Pinterest that had two oversized banners and that was the basis for this layout.


I selected Paper #06 and Paper #03 and cut two large banners from them - making one slightly larger than the other. I then layered them on top of each other, slightly offset, and machine stitched them together along the top with a couple of messy lines of black stitching.

Still on my 'avoid white cardstock' drive, I decided to use the gorgeous woodgrain B side of Paper #01 for my background, but jazzed it up slightly by adding some simple mixed media. I added some stamping in Jet Black Stazon Ink and on top of that, paint splatters in gold, black and white. I did the same thing with the banners and then drew a doodled black border around them to add some interest.

I matted my photo with a couple of layers of patterned paper - I've used Paper #03 again, and also the B side of Paper #02 to bring in some darker tones behind my photo to give it some separation from the background. My photo is of my little boy last summer, looking through my parents binoculars which I thought would work really well with this collection seeing as it has a couple of elements with binoculars on!

I then set about the fun part of embellishing my layout. This is the part I find most enjoyable with the P13 collections because everything 'goes' really well. I spent some time fussy-cutting lots of elements from several of the patterned papers. The floral clusters are from Paper #02, the moths are from Paper #03 and pretty much everything else on the layout is from my favourite - Paper #07.

I built up a large cluster around my photo in the top left corner, and then created a second cluster in the bottom right corner to balance the page out. I nestled a pair of binoculars in the smaller cluster and I just love how it looks!

I wanted to incorporate some circular elements to the layout as the two rounded lenses on the binoculars in the photo were really standing out to me. I placed a sticker from Sticker Sheet #03 with a thread tangle behind it - of course using my favourite WRMK Metallic Gold Thread - to the left of my photo.

To bring a circular element to the other side of my photo, I used a compass from Cardstock Tags #1.

It was at this point that I realised I didn't have a title on my page, and I hadn't left a massive amount of space for one either! I had a look through the patterned papers and found a cut-apart element with the sentiment 'Always look on the bright side of life' on Paper #05. I cut the words out, leaving a very thin border and raised them up on foam pads before adding them to my layout.

The final touch to my layout was to add a couple of sequins and bronze coloured jewels.

If  you'd like to watch how this layout came together, there is a process video up on my YouTube channel, which you can find here.

I'm sure this won't be the last you see of me using this collection - I love it so much that I couldn't resist adding a few more bits to my basket!

I'll be back next week, sharing my first layout using the new Color Study Collection from Vicki Boutin.

Until then take care,

Rebecca x

Wednesday, 28 April 2021

Feed the Ducks - P13 Paper Products - Soulmate

Hello, Rebecca with you today. I hope you are all keeping well and enjoying a little bit of freedom as the restrictions are starting to be lifted. I’ve popped by to share another layout I’ve created with the gorgeous 'Soulmate' collection from P13 Paper Products. I am really enjoying this collection and the neutral tones mixed with the dark Navy. It's perfect for scrapping more masculine pages.


I was really drawn to Paper #1 with all the beautiful feathers. I fussy cut loads of them out and as they were sitting in a pile on my desk they reminded me of a dream catcher - and that's where the idea for this layout was born! I used a 10cm wide metal ring and wrapped some string around it to add some texture and to make it look more like a dream catcher. I then painted the string gold using a metallic acrylic paint, and wrapped my favourite WRMK Gold Metallic Thread all around it to give it the classic dream catcher look.

I selected Paper #4 for my background as I loved the contrast of the bright gold against the dark navy. I wanted to jazz the paper up a bit so I added some gold splatters to the left hand side of my page, where the dream catcher would sit, and finished it off with a few white splatters. I then added a little bit of stamping with black ink for some subtle texture.

I used Glossy Accents to stick my dream catcher in place, and then I set about attaching the fussy-cut feathers. I tied the metallic gold thread around the top (well, technically I suppose it’s the base!) of the feathers and then attached the thread to the dream catcher hoop, making sure they all hung at different lengths. I placed foam pads behind the feathers for a bit of dimension.

The photo I’d chosen for this layout is of my little boy feeding the ducks at a local lake - I thought it went perfect with the feathers theme, and the colours in the photo worked perfectly with the layout. I printed it smaller than usual, at just 2x3 inches so that it could sit nicely on the dream catcher. I added a white border to my photo to help separate it from the background slightly, and added a layer of vellum behind it. 

I then moved on to embellishing my layout. Normally the embellishing part is where I struggle the most when creating layouts, but I’m finding it really enjoyable with these P13 collections. It really helps that the collections tend to have a colour scheme, or at least a limited number of colours to them. The embellishments all match perfectly with all the patterned papers, so it offers so many different options when it comes to deciding what to use. 

As with Beyond the Sea, the Soulmate collection has plenty of opportunity for fussy-cutting! I spent some time cutting the individual elements from Paper #7, the florals from Paper #2 and the moths from Paper #3 and this gave me lots to work with! 

I started with the floral clusters as they are the biggest elements. I layered them underneath my photo and then I worked in some of the elements from Paper #7. I absolutely loved the owls, and although we weren’t feeding owls at the lake, owls have feathers and so they work for me! I also added in a round sticker from Sticker Sheet #3 with some of the same gold thread tangled behind it and a skeleton leaf from my stash.

I added a couple of the moths from Paper #3, raising them up on foam pads to give the appearance that they were flying.

For my title I’ve fussy-cut some of the letters from Paper #4 to make the word ‘ducks’ and then I’ve used Alpha Sticker Sheet #2 for the rest of my title. I had the problem that my alpha stickers were never going to show up against a navy background, so I stuck them onto white cardstock and cut them out leaving a thin border to help them stand out more.

I then finished my layout with a couple of phrase stickers from Sticker Sheet #1 under my title. 

So that’s another layout from me with no white cardstock! It’s becoming a habit with the P13 collections!! The thing is, the patterned papers are so beautiful I just HAVE to use them! 


If you’d like to watch how this layout came together, I have a process video up on my YouTube channel, which you can find here.

Until next time, take care

Rebecca x


Tuesday, 2 February 2021

Snow Finally! - Carta Bella - Winter Market Collection

Hello, Rebecca with you today to share a new 12x12 layout using the beautiful Winter Market Collection by Carta Bella. If you aren't familiar with Carta Bella papers, they have a lovely texture to them which makes them feel really luxurious and fantastic quality. It adds a lovely texture to your layouts - and looks especially fab in this collection.


I had some papers left over from last months DT box and I couldn't resist using them to create another layout. We have waited TWO YEARS for snow where I live.... yes... two years! And two weeks ago it was finally our turn, so naturally we were straight out there to play, camera at the ready for some snow pics! 

Because it was snowing and we had snowballs fights and snowballs are round, I was in the mood for circles! I used some circle punches, and metal nesting dies to cut circles from the patterned papers in various sizes. I've used the B side of the 4x4 Elements, the B side of the Snowmen and the Winter Floral patterned papers. For somebody who normally shies away from floral patterns, I really do love the two floral papers in this collections! I then used the blade of my scissors to distress the edges of all the circles. I find this adds much more interest and texture to my layouts so it's one of my favourite techniques.


I used the same patterned papers to cut some snowflake shapes using some Snowflake metal dies. I kept the scraps of patterned paper that I'd cut the shapes from - read on to find out why!

I cut my two photos into circles, slightly larger than the patterned paper circles and arranged them on my layout, just to the left of the centre point. I then arranged the patterned circles around my photos in a verticle design. Ok - confession time - I actually spent about an hour moving the circles around my page until I was happy!! This happens sometimes - but don't give up - you'll eventually find a design that works and that you're happy with!

Remember the scraps of paper I cut the snowflakes from? Well I used them as stencils on my background! I used two different ink pads and an ink blending tool to add the ink to my Premium White Cardstock to make it appear as if the snowflakes were cascading down the layout. For this I used a Distress Ink pad in Tumbled Glass and a Distress Oxide pad in Broken China.


I stuck some of the circles flat, and raised others up onto foam to add dimension to the layout. I used foam behind both of my photos to raise them up and help draw your eye to them. 

At this point I decided I wanted to add some mixed media to my layout. I hadn't really been in a 'mixed media mood' when I started this layout - but that's part of the fun of scrapbooking for me - I never know where my layout will take me! I sprayed a small amount of a shimmery pigmented ink spray onto some packaging and applied a small amount of it, watered down, with a paintbrush just around the edges of my circles and smudged it a bit with my finger so that the lines weren't so harsh. I then added lots of splatters on top. I also watered down some white gesso and added that in the form of splatters too to mimic some snowfall on my layout.


I added my die cut snowflakes, scattering them over my layout randomly and then looked at how I could embellish the layout further. On my previous layout I really showcased the Elements Stickers so for this layout I decided to focus more on the Ephemera pack. I selected several pieces that I thought would work on this layout and distressed the edges with my scissors before adhering them down. I also cut two sections from the 3x4 elements patterned paper that read 'Happy Snow Day' and 'Snow Much Fun' and added those too. I finished off this section of my layout with some tangles of my favourite metallic silver thread.


Because I'd offset my layout to the left of my page slightly, the right hand side was looking a bit bare. I decided to tear a strip of the Witner Floral patterned paper and add it vertically to the edge of my layout. I stenciled a couple more snowflakes over to the right hand side and added another die cut snowflake to the bottom section of the layout.

This left the top section free to add a title. I used a mix of alphas for this - I created the word 'snow' with some Freckled Fawn alpha's from my stash, and used the Aria Puffy Alpha Stickers from Bella Blvd (in Oyster) to make the word 'Finally!'. I had to do a bit of 'letter surgery' with both sets of alpha's to get the letters I required as I'd run out!


And I completed my layout with some Nuvo Drops (Liquid Mercury, Blue Lagoon (Glitter Drops) and Ivory Seashell). I have to say I really love how this layout turned out. Considering I spent an hour faffing with circles of patterned papers, struggling to make them work for me - I'm over the moon with the result and it's one of my favourites!

If you'd like to watch how the layout came together, I have a process video up on my YouTube channel which you can find here.

I'll be back later in the month, working with a brand new collection - Carta Bella's 'Let's Celebrate', so watch out for that!

Take care,

Rebecca x

Wednesday, 13 January 2021

Hello Snow Day - Carta Bella - Winter Market Collection

Hello, Rebecca here with you for the first time this year - so Happy New Year! Not quite the start to the year we were hoping for, but hopefully scrapbooking will see me through this lockdown like it did the last one! (Well... that and the gin...!)

This month I’m working with Carta Bella’s ‘Winter Market’ Collection and seeing as it’s a very wintery/snowy collection, and we’ve not had any snow at all here in the Chilterns for over a year, it’s giving me the opportunity to scrap some older photos. 


I started with the ‘Snowmen’ patterned paper and cut a large snowflake shape from the B side. The cutfile is by Peartree Cutfiles and was perfect for this collection and my photo. If you don’t have an electronic cutting machine, you could always draw or trace a snowflake onto the paper and cut it out by hand - it would give exactly the same end result. 

I stuck the snowflake to a piece of white cardstock to make it a bit sturdier, and then I pierced holes all around the outside of it (the holes were pierced into the white cardstock, not the patterned paper). Using embroidery thread, I then hand stitched all around the outer edge of the snowflake. (I left two ‘arms’ of the snowflake without stitching as I knew my photo would be covering those.) I then cut the snowflake out, leaving a thin white border as I knew I was going to have a dark background, and I wanted my snowflake to have some contrast.


I put my snowflake to one side, and worked on the background of my layout. I’d selected a dark blue Bazzill Basics cardstock from the Matchmaker Pack for my background, but wanted to add some colour and interest to it. I kept my mixed media very simple and just used a paintbrush to add paint splatters - that’s it! Nothing difficult at all, but because I’ve used shimmery paints, it’s really effective. I’ve used a Cosmic Shimmer Iridescent Watercolour paint, a Shimmerz Paint and a Lindy’s Starburst Spray all in shades of blue (all from my stash). I added some final splatters using a Distress Spray Stain in ‘brushed pewter’ - which is a metallic silver shade. Once this was dry, I stick my snowflake to my background with a layer of craft foam underneath to lift it off the page and help it really stand out  


As is often the case with me, I felt like my layout needed a frame, so I used the outer edge of the ‘Snowmen’ patterned paper to create a border. This is really simple to do - I just trim 1/4 inch off each each side of my background cardstock, distress the edges with my scissors and then stick it down to the border using double sided tape. The distressed edges are obviously optional - but I love the added texture it brings to a layout. Handy tip - if you don’t want to waste a whole sheet of patterned paper adding a border then you can ‘gut’ the middle section out before sticking, and retain it to use on another layout.

My photo has been matted onto white cardstock, then a second time onto blue Bazzill Basics Cardstock and then for some added sparkle, I’ve brought in a layer of silver glitter cardstock too. 


I’ve then built up the area around my photo using the Elements Stickers - which is fab in this collection and contains so many stickers, and also some die cut cardstock pieces from the Ephemera pack. I’ve raised some of the embellishments up onto foam pads to bring in even more dimension so that my embellished area doesn’t look too flat. I’ve also pierced holes into the ‘snow’ die cut and threaded two different blue embroidery threads through to bring in another texture. I’ve added two thread tangles using the gorgeous metallic silver thread by WRMK. I love this thread so much and it also comes in gold which is equally as fantastic! I’ve scattered a few clear gems around my photo too, in an attempt to mimic some snowballs! 

Ive added to my background further, with a few of the tiny snowflake stickers from the Elements Stickers sheet, which I scattered in amongst my large patterned paper snowflake. 


And my layout was completed with the addition of a Nuvo Drop border all around the edge of the page. I’ve used Ivory Seashell and Blue Lagoon, which has glitter in it! 


If you’d like to watch how the layout came together, I have a process video up on my YouTube channel, which you can find here.

Thank you for reading today, I hope you’ve enjoyed this layout. The collection is still available in the shop and don’t forget there’s 20% off at the moment in the January sale! 

Until next time, take care.


Rebecca x

Wednesday, 9 December 2020

Hello December - Simple Stories - Jingle All The Way Collection

Hello, it's Rebecca with you today sharing my first Christmas layout of 2020. We are normally very traditional in that the Christmas tree goes up 12 days before Christmas... but all rules have gone out the window this year! The tree is up, the window lights are up, the decorations are out and we are in full-on Christmas mode - which works great for me as it gives me lots of new photos to scrap! I'm working with the 'Jingle All The Way' collection by Simple Stories this month, which can be found in the store here - and this layout documents us picking and putting up our first ever real Christmas tree. 


I really love the traditional Christmas colours in this collection - it's mainly reds and greens which is great for me as I've gone with a red, green and gold colour scheme on my tree this year! I've used a plain Bazzill cardstock for my background in 'Fig Swirl' which is a lovely grey-ish, off-white colour and works perfectly with the collection. I'd seen a pin on Pinterest about a year ago showing how to make 3D Christmas trees, and this layout gave me the perfect opportunity to try them out.


I started with the 'Tree Trimming' patterned paper and trimmed it down into squares. I made the first square 4x4 inches, and made 4 more reducing the size by a quarter of an inch each time, and made the last one 1.5 inches square. I then folded each square in half, marked the centre point and folded the two sides in diagonally towards the centre-point to form a triangle. The final step was to slot the triangles inside each other slightly, starting with the largest, and sticking them together.

I repeated this process using the B side of the Tree Trimming paper, and then made a third tree using the B side of the 'Santa Squad' patterned paper. 


Once I'd decided where I wanted my trees to sit on the layout, I matted my photo onto white cardstock and again onto a mustard coloured Bazzill cardstock to match my son's jumper in the photo. I used foam on the back of my photo to raise it to the same level as the trees and stuck it down in among them. I also created some tree stumps using textured brown Bazzill cardstock to 'ground' them on the page.

I wanted to keep my embellishments to a minimum on this layout as I knew I wanted to add a large amount of journalling on the page. I placed three presents from the 'Bits & Pieces' ephemera pack to the left of my photo, as if they were sitting under the Christmas tree, and did the same on the right using presents from the Puffy Stickers sheet. I also included a Christmas tree from the Combo Cardstock Stickers and a banner which says 'Joy'. 


I selected my title, 'Hello December' from the Foam Stickers and placed it on top of the presents with a Metallic Gold Thread tangle behind it. There is a lot of gold on my Christmas tree this year so I wanted to get some gold onto my layout! I added yellow stars to the top of my 3D trees - two from the Foam Stickers Sheet and one which I'd fussy-cut from the 'Tags' patterned paper. I then slotted the top section of this tag behind my photo, and added some gold thread through the hole to add more interest and texture to my layout.

There are three large baubles in the 'Bits & Pieces' pack and they were perfect for this layout, given that it is all about our Christmas tree. I placed the baubles in the top section of the layout, among the tree tops, and added gold stitching above them to give the appearance of them hanging from the top of the layout.


I created a small cluster in the bottom left hand corner of my layout using a couple of Christmas trees and a car with a tree in it from the 'Bits & Pieces' pack. I don't normally get to use the car ephemera pieces from Christmas collections as we've always had an artificial tree, so I was really pleased to finally get to use one! 


My layout was completed with my journalling and the addition of two more Puffy Stickers around it.

I hope you've enjoyed my first layout with this collection. If you'd like to watch how it came together, there is a process video on my YouTube channel, which you can find here

I'll be back next week with another festive layout using this collection, so until then,

Take care,

Rebecca x


Wednesday, 11 November 2020

Happy - Simple Stories - Cozy Days Collection

Hi everyone, Rebecca with you today - November already! I really don't know where this year has gone. Suddenly the dark nights have crept in and the temperature has dropped. I'm finding we are needing an extra layer to go out these days and when we get home we are needing a nice hot chocolate to warm us up! It hasn't stopped us getting out for our fun woodland walks though - and that's what I'm scrapping today.

I'm working with the beautiful 'Cozy Days' collection by Simple Stories this month. It's full of warm autumnal colours and all the things that make us feel warm and fuzzy on a chilly day!


I started this layout by tearing strips from the  'Comfy Cozy' patterned paper. I didn't worry about them being neat or even - I just tore randomly making sure I had a white edge on each strip. I wanted my layout to have lots of texture as the forest floor is full of texture at this time of year and this photo of my son was taken in the forest a few weeks ago. I then stuck the strips to the top section of a sheet of 'Natural' bazzill cardstock from the Matchmaker Pack, making sure they were overlapping slightly.

My photo is matted onto white cardstock and again onto green bazzill basics cardstock from the matchmaker pack. I placed my photo to the right of my layout, with a layer of craft foam behind it to add a bit of dimension.

The Journal Bits & Pieces has lots of larger elements that would be great for adding journalling - but I selected a couple and used them as added layers on my layout. I've used one behind my photo, and another to the left on my photo. I distressed the edges of both before raising them up onto foam pads. I've cut one of the tags from the 'Tags' paper and used that to add a pop of grey to the page. I did this because I knew I was going to use grey alphabet stickers for my title so wanted to make sure that the colour appeared on the layout.


I fussy-cut a number of the gorgeous small leaves from the B-side of the 'Harvest Wishes' patterned paper, and also a couple of adorable forest creatures from the B-side of the 'Comfy Cozy' paper and arranged them around my photo. I added a round cardstock element which says 'Fall' with a grey thread tangle behind it, and fussy-cut the envelope bursting with florals from one of the Jounal Bits & Pieces. 


I popped a few acrylic pieces on the page - some leaves and some acorns which match the collection perfectly. I used the Aria Puffy Alphabet Stickers by Bella Blvd for my title. It took me a while to decide on my title but I decided to go with 'Happy' because my son is so happy in the photo - and he was in his element running through the forest and jumping in all the muddy puddles. I then added the word 'together' underneath from the Journal Bits & Pieces and a couple more fussy cut elements.


I finished my layout by adding some journalling and gold paint splatters using gold acrylic paint mixed with a tiny amount of water.


This layout actually came together really quickly considering I didn't really have a plan when I sat down at my desk! If you'd like to watch the process of the layout coming together I have a process video up on my YouTube channel here

I'll be back later in the month with more Cozy Days layouts - if you'd like to see more of the collection then it is now available in the shop.

Take care

Rebecca x

Saturday, 31 October 2020

Happy Halloween (2) - Simple Stories - Boo Crew Collection

Hello, it's Rebecca here - I couldn't resist popping by to say HAPPY HALLOWEEN and to share another layout I've created using the Simple Stories 'Boo Crew' collection. I am still really enjoying this collection, and think I'll be creating layouts with it for weeks to come!


I started this layout with a sheet of 12x12 textured ivory cardstock, and added some mixed media by colouring my texture paste with distress inks, and pressing it through a stencil by Echo Park (the stencil can be found here). This has given me a gorgeous orange and black star background to build my layout upon. I also mixed the two distress inks with a little water and added paint splatters using a paintbrush. The background did't take very long at all, and it was very simple - but its added a lot more interest to my layout. If you are new to trying out mixed media, using texture paste and a stencil is a really great way to dip your toes in!

I mounted my photos first onto white cardstock, and then onto black to help frame them and placed them in the centre of my page towards the top. I selected four tags from the 'Tags' patterned paper, distressed the edges and added some embroidery thread and placed two just peeking out either side of my photos.


For my title, I've used the 'B' side of the 'Happy Haunting' patterned paper. I hand-drew the letters to spell 'Halloween' and cut them out. I drew a black border on each of the letters using a black fine liner pen to help give them a more defined edge, which I think helps them to pop off the page a little more. I adhered the letters under my photos using foam pads to add dimension. I then placed the word 'happy' from the Bits & Pieces pack above to complete my title.

I felt like my layout needed something dark at the top and bottom as it was looking a little stark with just the ivory cardstock. So I tore some strips of the 'Happy Haunting' patterned paper - using both the 'A' and 'B' sides. I layered these on top of each other with the darker 'A' side being more dominant, and the orange 'B' side just peeking out from behind it.


Next, I set about embellishing my layout. I still had the female skeleton left over from my last layout so she finally found a home on this page! She's from the Bits & Pieces ephemera pack. I am really impressed with this pack- I don't think I've ever had an ephemera pack with so much in it, and I love every single bit! The little cat riding the broomstick is also from this pack, as is the 'Hey Pumpkin' banner flag at the bottom. I also fussy-cut a little dancing skeleton from the 'Tags' patterned paper.

The Combo Cardstock Stickers sheet in this collection is just as amazing as the 'Bits & Pieces' and is jam-packed with so much! I've used several stickers on this layout - The 'A Wicked Good Time' sign at the top left, the male skeleton, the banner under my title, the pumpkin and also the word stickers at the bottom! And I still have soooo much left on the sticker sheet! It's a bit like Mary Poppin's handbag... never ending!


I finished my layout by adding a male skull face from the Chipboard Stickers and several thread clusters in orange and black. 


When I started this layout I had no plan other than wanting to have the orange and black texture paste stars on my background! And from those stars, the layout just grew and came together really quickly.

If you'd like to watch how my layout came together, there is a process video up on my YouTube channel which you can find Here

Wow, that's me done for October! I can't believe how fast this month has gone. I still have loads of this collection left so I'm sure there will be more layouts here and there once we have some photos from this evening! Can you tell I love Halloween?!

I'll be back next month with some more layouts. I'm sticking with Simple Stories and working with the 'Cozy Days' collection so I can't wait to get creating some Autumnal layouts.

I hope you all have a fabulous weekend, and if you celebrate Halloween then I hope you have a wickedly spooky night, and stay safe.

Take care,

Rebecca x


Monday, 26 October 2020

Tis the Season to be Spooky - Simple Stories - Boo Crew Collection

Hello everyone, Rebecca here with you today.  Happy Halloween week! (Yes, it's a whole week affair for me!) I love Halloween so much so we usually find lots of local events to go to and things to take part in during half term, leading up to the big day itself, however this year is obviously very different. Although there are still lots of events happening around where we live, we have decided to stay home and make our own Halloween entertainment this year and stay safe.

Today's layout documents the start of our 'at home Halloween fun' - a pumpkin photoshoot in our living room! And what better collection to use than the new Simple Stories 'Boo Crew'?! I am loving this collection - it's probably one of my favourite ever Halloween collections. I love that the whole collection is made up of really only four colours. I've found that it's helping layouts come together really easily - which is always a bonus for me as I'm a notoriously slow scrapbooker.


This entire layout was inspired by a section of the 'Cast a Spell' patterned paper. It's a poem about skeletons and bones and instantly I had an idea for the back bones of my layout (pun intended!). My son has a new Halloween tracksuit set with skelly bones on it so these photos were perfect to go with the poem. The ideas were flowing and I ran with them...

Since it's Halloween, I've gone with a black bazzill cardstock background and have torn a section of the 'Treat Yo'self' patterned paper for the top half. I've matted my photos onto black, and then white cardstock to give them some separation from the black background. I knew I wanted the photos to sit on the left of the layout with the poem cascading down to the right. So then I just had to decide on the rest of the layout. 


I pulled some tags from the 'Tags' patterned paper and tucked them either side of my photos with some Halloween Devine Twine threaded through them. 


I then begun to pull out alllllll the skeletons from the collection. I spent ages faffing and trying to fit as many skeletons on the page as possible. In the end I had to reign myself in because I was getting carried away! I placed the large male skeleton from the Bits & Pieces ephemera pack to the right of my poem. I felt that the ivory skeleton with the white border was getting a bit lost against the dark background of the layout, so I drew around the outline of all the bones with a black fineliner pen and I was so much happier with him. I tried to get the female skeleton on the layout too but in the end decided she was one skelly too far!


In my photos, my little boy is sitting among all SIXTEEN of our pumpkins (told you I love Halloween!!) and so it felt very appropriate to have lots of pumpkins on the layout. I took a couple from the Bits & Pieces pack, and fussy-cut the smaller ones from the 'Hey Pumpkin!' patterned paper, and scattered them around the layout. 


I placed a skull with a frog sat on top to the top left of my photos. He's from the Bits & Pieces pack and just had to make it onto the layout as my son's nickname is 'Froggy'! Next I added a scattering of stars around the layout and a smaller version of the female skeleton from the Combo Cardstock Stickers - again drawing around the bones with a black fineliner to help her stand out more. I also added the large haunted house from the Bits & Pieces pack - the photos were taken at home and it's a house - so that works for me, and also a cat sat in a pumpkin from the Chipboard Stickers.


I used the 'Tis the Season to be Spooky' ephemera piece as my title and again drew around each element with a black pen. 

I finished my layout with a phew of the phrase stickers from the Combo Cardstock Stickers, two pieces of laser cut chipboard from Dusty Attic ('Wordpl@y #6' set) and tangled some thread behind both of them.


I decided to stop there before I tried adding any more skeletons onto the page! I hope you've enjoyed this layout - I think it's one of my favourites of 2020. I'm enjoying this collection so much that I've ordered a whole lot more of it. Don't fear though - there's still some left in the shop if you'd like to pop over and place an order.

If you'd like to watch how this layout came together, you can find the process video on my YouTube channel here.

I'm sure I'll be back with some more Boo Crew layouts over the next couple of weeks as I get more Halloween photos to work with. I just can't help myself!

Until then, take care and have a Happy Halloween!

Rebecca x