Showing posts with label Ranger. Show all posts

Saturday, 12 June 2021

Colour By Numbers

Here is a little extra layout I created with Alcohol Inks I purchased from Papermaze. I also used some cardstock left over from the May kit and some Yupo Paper from my own stash.


The photo is from a dance show my girls took part in some years ago.

I started by gutting the sheet of Yukon Gold Bazzill Cardstock to leave a frame of 2.5cm. I had some A3 Yupo paper, and I cut this down to 29.5 x 29.5cm. Before mounting the Yupo over the Bazzill, I worked on it with the Alcohol Inks.


I selected Orange Sunset and Honeycomb Alcohol Inks, and Enchanted Pearl Alcohol and dripped these over the page, I allowed them to run into one another and then added some Alcohol Blending Solution to lighten and blend the colours. Then I added a few drops of Gold Alcohol Mixative creating polished golden highlights to the mix.  


Once throughly dry I added this to the Bazzill frame created earlier.


My photo was mounted onto some Black Bazzill, and arranged to the centre of the page. With Tim Holtz - Stacked Labels - Sizzix Thinlits dies, I cut a journalling plate and frame using the Yukon Gold and Black Bazzill. I scribbled my journalling onto the card and mounted it onto the page with some black organza ribbon.


I found some felt alphabet stickers in my stash and used them to create the title. Then with some smaller, old black alpha stickers, I scattered random numbers over the page.

Finally I trimmed some phrases from the Jen Hadfield - Reaching Out collection - Stick Together paper, and added them to the sides of the photo.

Thanks for looking. Busy working on the June kit now and will be sharing the layouts next week.
Lynn x

Wednesday, 1 July 2020

June Papermaze Kit - Part 2

Hello, It's Lynn here today with another two layouts made using the bright, sunny June Papermaze Kit. This month I have been experimenting with the Distress Embossing Glazes.


Before we look at how these layouts were made, this is what you will find in the kit:


For a full list, links and details please see the previous post June Papermaze Kit.
Treble Act - This layout shows the children in their new rugby style tops from Kid's Stuff. The title of the layout is a play on words to the title of the favourite story by Jacquline Wilson - Double Act.


This time I trimmed a piece of White Bazzill to 27.5cm x 27.5cm, and I inked the edges with different colours of the rainbow. 

I gutted the centre from the Vicki Boutin - Let's Wander - Chasing Stars paper, so I had a frame 3cm deep. I mounted the bazzill centrally over the paper frame. Then I used the Cricut and an SVG file to cut a star wreath from the remaining paper.

With the star stencil from the kit I stencilled tiny stars in a circle using different coloured Distress Inks and a blending tool. Then I placed the star wreath over the stencilled stars.
I mounted my photo with two mats, from scraps of Stonewash and Candle Glow Medium Bazzill. This was mounted to the right of the wreath. I typed my journalling into a semi-circle and cut this out to place to the right of the photo. 


I created my title with American Crafts Thickers Paige Evans Happy Thoughts foam letter stickers in line with the wreath. Then I inked the edges of a few of the stars left over from cutting the wreath and added these to the page using foam tape for dimension. 

Finally I added some pretty sparkly star gems from my stash.

Make Your Own Magic -  This layout shows my daughter in Washington DC, taking part in a Christmas charity run called 'Jingle All the Way'. 


For this page I gutted the Red Rock Bazzill to give me a frame of 2.5cm. 


I trimmed the Heidi Swapp - Art Walk - Sea to Sky paper to measure 29.5cm x 29.5cm. I took a Tim Holtz Layering stencil, a Ranger Clear Emboss It Dabber and Distress Embossing Glazes in Fried Brick and Weathered Wood; I had been keen to try these glazes as I was interested to see how they worked, The translucent quality of them means they can be overlapped to give another shade of colour where the two combine. They give a high shiny finish and any pattern on the paper underneath will show through too. They give more of a tint of colour compared traditional embossing powders. 

I mounted my photos onto cardstock, using scraps of Red Rock and Stonewash, and arranged them across the middle of the page under the stars.

I printed my journalling in similar colours to the stars, onto some card, and trimmed the top of the panel with a binding edge EK Success punch. I placed this below the photos. 


I used the 'Believe' puffy sticker from the kit at the bottom left of the layout.


The title was made with the words 'Make Your Own Magic' from the Truly Grateful Puffy Phrase & Accent Sticker - AC Thickers set. 


That's is all for today, but I have two more layouts to share - coming soon.
Thanks for looking
Lynn x

Friday, 29 September 2017

Kaisercraft - Factory 42 - Part 2

Hi! Lynn here today - with my second post using the versitile Factory 42 collection from Kaisercraft. My first post used just the 6.5" x 6.5" Paper Pad, this time I have made a layout and used some 12" x 12" paper and some stickers, together with more from the paper pad (details below).


This photo of my Dad was taken in his darkroom developing photographs of Mum. Probably late in the 1950's. Not a brilliant photograph but well worth preserving this memory in my scrapbook. I can remember this room from my early years, and in 1968 it was turned into a bedroom for my baby brother!


 The paper I chose for the base of this layout is called Machine, and I used the reverse side, with the bluish-grey hezagon pattern. I mounted the photo onto a another image the same but slightly larger. The two photos were mounted onto some gold matt cardstock. 
 
I used a sheet of paper from the 6.5" x 6.5" paper pad to display the photos as this was grey in colour and had some gogs along the sides.


Using Sizzix Thinlits, Tim Holtz, Alterations, Gearhead dies I cut a lot of cogs - I used cardstock and all 22 dies in the set twice! Then all the diecuts were heat embossed with a selection of embossing powders and enamels in metalic colours. This meant I had plenty to select from and more to use on another occasion. I used the large corner dies made up of many cogs in to opposite corners of the paper pad paper.


  Two large kraft Tags (Ranger Inkssentials #8), were tucked behind the mounted photo.  I did a little doodling and inked the egdes of these first. I also used them for a little journalling.

As photography was my theme I used some Kaisercraft acetate filmstrips from the Keepsake collection.  


 Other items used are:
Twine
Distress Inks in various colours
The Sticker Sheet from the Kaisercraft Factory 42 collection
Metal Key embellishments from my stash.

Papermaze have put together a Bazzill Plain Matchmaker pack of five sheets of cardstock in co-ordinating colours to go with this collection.

This collection also works well with several other Kaisercraft collections:
Barber Shoppe
Just Landed
Base Coat
&
Antique Bazaar

I will be back with some male cards using the paper pad next month.
Thanks for looking

Lynn x

Wednesday, 14 September 2016

Ranger's Enamel Accents Review

Hi, Lynn here! This month I'm reviewing one of the newest products to arrive on the shelves of the Papermaze store - Enamel Accents by Ranger. Well… not ‘totally’ new - black and white enamel accents were introduced in 2010. 

So, what’s new?

10 bright colours. So now there’s a rainbow palate of 12 to choose from.


What are Enamel Accents?

Enamel accents are a dimensional medium that dries to a very shiny, opaque, domed finish. They are available from Ranger in 14ml bottles with a nozzel and cap. 


What projects could they be used for?

These fine-tip applicators are great for detailed work. They can be used on paper, card, glass, plastic, fabric, wood, metal, canvas… the list goes on, but in all cases you can create an extra dimension to your work with faux enamel accents.

So far I’ve seen them used to great effect with paper crafting, home décor, mixed media, and jewellery projects. Some have chosen to work directly on their project with the accents, others make accents on scraps of acetate to be added to a project at a later date.

These enamel accents have been used to doodle, dot, dash and decorate craft projects, achieving the look of shop sold enamel dots with a non-toxic formula. 

What colours are available?  


The Enamel Accents colours match the Ranger Dye Ink Pads (which are also available from Papermaze) and are available in:
  • Black Tie
  • Blue Ribbon
  • Caribbean Coast
  • Cheese Puff
  • Classic Cherry
  • Electric Lime
  • Glacier White
  • Grape Soda
  • Lily Pond
  • Pink Gumball
  • Wild Orchid

How do I use them?

Top tip: Before you start, grab a piece of scrap paper or paper towel to establish the flow before working directly on your project. This will eliminate any air bubbles from the nozzle which may spoil the finished shape of your enamel piece.

If the nozzle becomes blocked use a fine piece of wire with a blunt end (about the width of a pin) to remove the problem. Do not use a pin as the sharp point may make a hole and cause a leakage where you don't want it!

It is a good idea to invert the bottle while the cap is still attached and give one good shake to move the fluid to the tip of the nozzle. There is no need to repeatedly shake the bottle.

The medium is easy to apply, simply hold the bottle upside down and gently squeeze the sides until the required amount of medium has been dispensed.

Experiment. I found a little practice was needed until I was happy with the shape of the results.


If you are not working directly onto your project, use a piece of acetate. You can store the dots until you need them, and pick your favourites.

When you’re finished, wipe the nozzel with a clean cloth and replace the cap. Once the cap is definitely secure, bang the bottle on the table to move liquid from the nozzle and back into the bottle to prevent blockages.

When finished it is wise to wipe the nozzel with a clean cloth and once the cap is replaced bang the bottle on the table to remove liquid from the nozzel back into the bottle, to prevent blockages.


How long does it take to dry?

That depends on the surface size and depth your accents. It is best to leave your accents overnight for best results. 

What base materials can it be used on? Can I use different colours?


Ranger’s Enamel Accents are opaque - which means they can be used on any colour base. The colours remain true on white, black and any other colour.

What if I need a different shade of enamel dot?


I’m sure more colours will be introduced at a later date, but in the meantime, you can colour your dots.

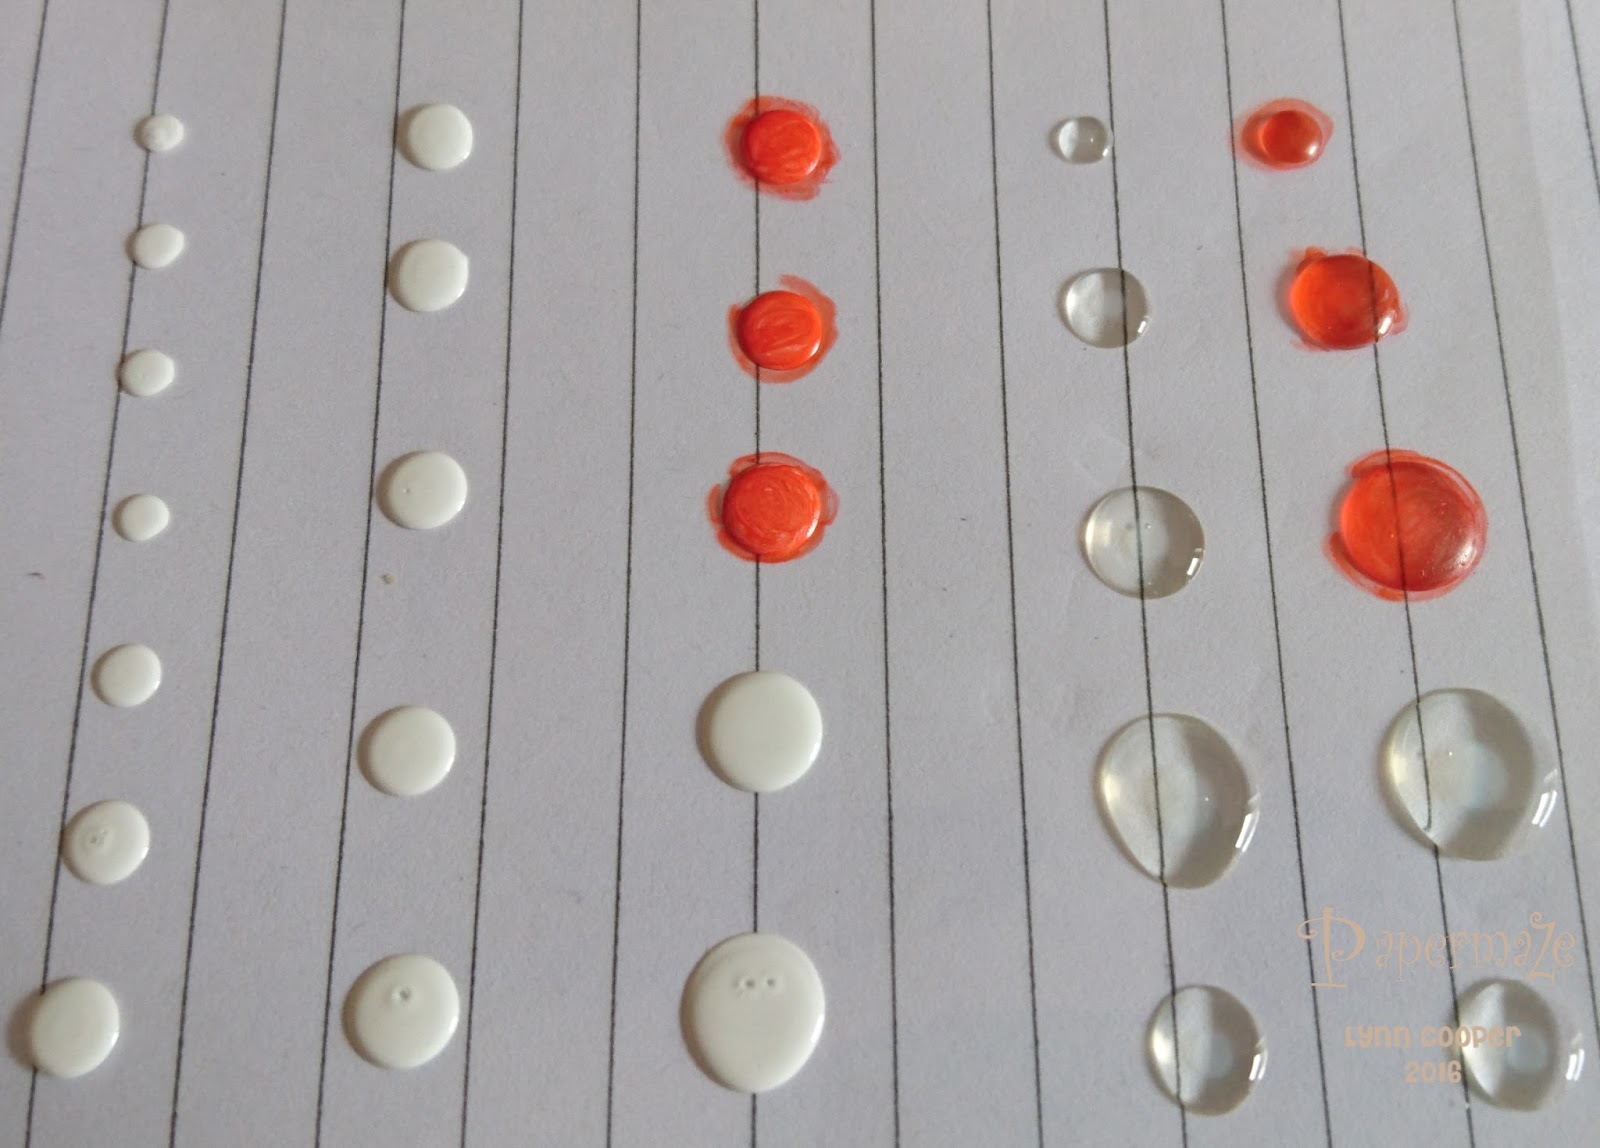
Take the Glacier White and make the dots in the sizes you require. 
Allow to dry and then colour with your favourite alcohol markers. You can also try this with Glossy Accents instead of the Enamel Accents (see above).


How do I adhere my pre-made dots to my projects?

Peel them from the backing and simply stick in place with adhesive. Glossy Accents works well. I found that if I took the finished dots off the acetate and put them together, they don't appear to stick together. They look very attractive together in a jar, but it’s not quite so easy to see them all.


Can I use more than one colour in a single accent?


Yes, you can use colours to make designs or make eye balls on stamped images!

Tim Holtz Bird Crazy Stamp
In the image below I have used several colours, dragging a spot of green outwards with a pin to create a flower pattern. See this tutorial HERE by Ranger for more ideas. I think I need more practice!


How do Enamel Accents compare with Liquid Pearls?

Both have a place in my craft stash. The Accents (right) leave a high gloss, domed finish and the Liquid Pearls (left) a pearly, more peaked finish.


Have fun experimenting with the Enamel Accents,
and don't forget to share what you make.
Thanks for looking
Lynn x