Showing posts with label circles. Show all posts

Friday, 27 March 2026

Simple Stories - Color Me Happy - The Best Memories

Hi!

It's Claire back on the blog today and I have another layout made with the Color Me Happy collection from Simple Stories.

I loved this collection as soon as I saw it, but creating with it makes me love it even more! It's such good fun!


For this post, I'm focusing more on the floral elements which are so pretty. I started with a sheet of plain white cardstock, and cut a circle from the How Cool notebook paper to act as my base layer.


On top of this, I cut a polka dot fishtail banner from the Right Now! paper and lay this across the centre, raising on foam to create separation. To help them stand out, I added a dotted black line with a Sharpie pen to each of the coloured edges.

Next, I wanted some bold pops of colour, so I cut out lots of circles from the All About It? Paper. I positioned 5 along the top, and 5 along the bottom of the banner, again adhering on foam for extra depth.


I cut my photo to the same sized circle and added this along the top of the banner, before creating a pretty floral cluster around it using flowers from the Floral Bits & Pieces.


For balance, I created a second cluster opposite my photo, using this space to house my title. Of course, I opted for the Foam Stickers for the 'Memories' phrase, complemented by a small chevron arrow from the Chipboard Pieces.


To finish, I added a few sequins from my stash to give it that little extra sparkle.

Thank you for joining me on the blog today. Don't forget to check out this stunning collection in the shop here.

Happy scrapping!
Claire x
@scrappysoulmate.

Monday, 25 November 2024

Nature - P13 Paper Products - Into the Woods Collection

Hi everyone,

It's Rebecca with you on the blog today sharing my second layout of the month, created with the gorgeous 'Into the Woods' collection by P13 Paper Products. You can find the collection in the shop here.


This layout was entirely inspired by one of the images on Paper #05. I really loved the circle image with the toadstool and decided to cut it out and create a layout made of circles.

Using a set of metal nesting dies, I cut circles of varying sizes form several of the patterned papers. I adore the green tones with the contrasting bright orange. I arranged the circles onto a sheet of Premium White Cardstock and adhered them together - but not to the background as I knew I wanted to come back later and add some mixed media. 


With the circles in place, I added a circular photo. I made sure to cut my photo larger than the other circles on the page to help it stand out. I fussy cut some toadstools from Paper #03 and arranged them among the circles, raised up on foam pads for dimension. To embellish further, I fussy cut a hare and some florals from Paper #07 and some butterflies from Paper #01. To build up the embellishment clusters further, I selected some leafy elements from the Flower and Leaves Ephemera Pack.


For my title, I rummaged through my stash and selected a perspextive title by Bramble Fox. The green colour was a perfect match for the green circles on this layout. Simple things like that make me really happy! 


I finished off embellishing with some phrases from Sticker Sheet #1.

With everything in place and adhered together, I was able to move everything off my background as one piece. This makes adding the mixed media much easier as I don't have to keep rebuilding my layout to see if I've added enough ink.

Using a brayer, I added some colour to my background using a Distress Ink Pad in the shade 'Peeled Paint' and a Distress Oxide Ink Pad in 'Iced Spruce'. Once this was dry, I returned everything to the centre of the page and adhered it with a layer of adhesive foam behind it.

Thanks so much for reading. I hope you like my layout and it offers you some inspiration. This collection is selling fast so grab it whilst you can!

Take care,

Rebecca x

@preciouspagespapercraft 


Wednesday, 20 September 2023

American Crafts - Shimelle Main Character Energy #3 ☀️

Hey everyone, it’s Anna back today. I’m sharing my third layout using Main Character Energy by Shimelle and American Crafts. You can find the collection in the shop here. 


I used the b side of ‘prop table’ as my base and then trimmed a strip of the b side of ‘after hours’ and adhered it to the left side of the layout. 


I cut my photos into circles and also created some circles out of cardstock from the matchmaker pack. I used a yellow circle to create a sunshine, which I then added some stitched sunbeams to using matching yellow thread. 


I fussy cut lots of florals from ‘prettiest pick’ and adhered them down the meeting point of my two papers. 


I then arranged my circles overlapping them slightly. I added some cardstock stickers on the cardstock circles and layered around them too. 


I added my title using the cardstock stickers and a few of the gold hearts dotted around. 


Finally, I finished my layout by adding some enamel dots to the fussy cut florals. 


Thanks so much for looking. 

I have one more layout to share using this collection, so I’ll see you soon with that! 

Anna 
x

@acraftylifewithanna

Wednesday, 8 March 2023

Happy Day - Simple Stories - Simple Vintage Life in Bloom Collection

Hello, it’s Rebecca with you today and I’m really excited to be sharing my first layout created with Simple Vintage Life in Bloom - another beautiful collection from Simple Stories. The colours in this collection, mixed with the pops of black, are just simply stunning and I’m loving creating with it. I’m also loving that there are some new products with this collection - including rub-ons, ephemera and washi tape! You can find the full collection in the shop now! 


The patterned papers in this collection are beautiful, so I wanted to create a layout which showcased several of them. To do this, I decided to cut circles from several of the papers. I’m a sucker for circles and hexagons on a layout, and it’s my go-to technique when I want to use lots of different papers, without overcrowding the page and making it look too busy. To cut my circles, I used a set of metal nesting dies. These allowed me to easily cut several circles of varying sizes. 


I arranged the circles on my background - offset slightly and more towards the right hand side of the page, and with a circular photo in the centre. I decided to go for a black and white photo today - mainly because there were so many different colours in the photo and I thought it would take away from the beautiful colours in the collection - but also because the collection has pops of black, and so a black and white photo seemed the obvious choice! 


With my circles and photo in place, it was time to add my title. I selected the ‘Happy Day’ Foam Sticker as it describes the photo perfectly, but also because I felt it was well-suited to a circular photo and had a natural spot for the photo to nestle in. 


Now it was time to add the beautiful florals! This collection is certainly not short of florals - it has floral patterned papers (perfect for fussy cutting), Floral Bits and Pieces and florals in the sticker book, so I was spoilt for choice. I selected a couple from the Floral Bits and Pieces, and some from the Sticker Book and arranged them around my circles. 


I embellished further with a couple of fussy-cut butterflies from the ‘Shine Bright’ patterned paper, a few chipboard hearts from the chipboard stickers, and a couple of phrases from the element stickers.


As my design was offset towards the right of the page, it left me some space on the left, which I felt needed some colour. I tore a strip of floral patterned paper and layered it with some bazzill cardstock behind it for contrast. I then added a chipboard sticker and a tiny fussy cut butterfly to finish. 


I absolutely adore how this layout turned out. I always love the Simple Vintage collections from Simple Stories but this has to be one of the most beautiful collections I’ve ever seen. It’s definitely love at first sight!


If you’d like to watch this layout come together, there is a process video over on my YouTube channel.  


Thanks for reading, I’ll be back later in the month with another Life in Bloom layout. 


Take care,


Rebecca x

@preciouspagespapercraft

Friday, 13 January 2023

Simple Stories - Simple Vintage Christmas Lodge - Peace & Joy

Hi Everyone! 

It's Claire with you today, and for my first layout of the year, I'll be continuing to create with the beautiful Simple Vintage Christmas Lodge collection from Simple Stories. You can find it in the shop here.

My resolution for 2023 is to minimise waste - whether that be food and cooking or indeed scrapbooking. With this in mind, I wanted to set myself a challenge this month to see just how far I could stretch my supplies, and see how versatile a Christmas collection can really be.


So for my first layout, I wanted to use up some of the leftover patterned papers. I decided to use the technique of filling shapes with paper strips, creating a fun and vibrant anchor for my photo to sit on.

Of course, I started with a sheet of 12x12 Premium White Cardstock. I used a circle cutter to cut two circles, each roughly 4" in size which I backed with 1" strips of patterned paper.

The papers I used were:


Once both circles were filled, I used a punch to create a circular photo. Unusually for me, I decided not to give it a white border or back it with any more paper as I wanted it to feel blended with the two patterned paper circles, and I thought more paper may be distracting.

I layered it on foam pads before adhering directly to the page.

Then came the embellishing! There are so many beautiful embellishment options in this range - It's quite hard to scale back and not throw everything at it as it's all so pretty.

In the end, I opted for some foliage from the Woodland Bits & Pieces Ephemera Pack (my favourite!), some puffy stickers from the Foam Stickers and some ephemera from the standard Bits & Pieces Pack.


For my title, I used the Foam Stickers - these are awesome, taking all the stress out of deciding on what to call your layout. I laid this directly on the page, overlapping the circles to ensure it 'belonged' as an integral element of the design.


When layering, I incorporated some of the ephemera from the Bits & Pieces pack to create a small cluster. Similarly, I created a cluster at thee top of the design using the tags and foliage pieces to bring it all together.


Once all the elements were in place, I added some Nuvo Glitter Drops in Golden Sunset to act as a frame for the design.

As a finishing touch, I trimmed the edges of 3 sides of the page, creating small insets for patterned paper to peek through, acting as a delicate border for the layout.


I hope you've enjoyed this page. I'll be back later this month with another layout, which sees this collection used to create a none-festive page.

See you then :)

Take care,
Claire
@scrappysoulmate

Friday, 6 January 2023

Carta Bella ~ Bon Voyage 🛳️

Hello! It’s Anna back with you today and this month I’m working with Carta Bella’s Bon Voyage collection, this was a new release just before the January sale began. But you can grab it with 20% off during the sale period this month! 
You can find this collection in the shop here and while you’re there, why not stock up on essentials or treat yourself to some new stash to make the most of this saving! 


I’ve travelled back in time to scrapbook some photos of a family holiday when I was in my teens. 
These papers were perfect for getting these photos scrapped. 
I used the b side of Locale Luggage as my base and began by tearing a strip of Buoy Bash which I adhered to the left side of the layout. 


I had four photos that were quite similar to use, so I wanted to scrap them all together on one page. Sometimes when you’re scrapbooking a holiday and you want to keep it together in one album, it’s nice to do some multi photo pages to condense pages down. I also like to use pocket pages to allow for extra photos. 


I cut my four circles in various sizes and and mounted them with coordinating cardstock as well as the b side of cocktail hour.
I also cut out some more circles from cardstock and the b side of ‘Tags for Travel’
After arranging them on my layout, I added a title and embellishments using the element stickers. 


I finished the layout off by adding some enamel dots and words from Vicki Boutin Print Shop Thickers.


Thanks so much for looking! 
See you later in the month with another layout using this collection. 

Anna
X

Monday, 7 November 2022

Paige Evans ~ Garden Shoppe #3 🌻

Hello! It’s Anna back on the blog today and I’m sharing my third and final layout using Paige Evans Garden Shoppe. 
You can find this collection in the Papermaze shop here.
I have found this collection to be very versatile, it is suitable for a variety of themes of scrapbook pages ranging from Summer Sunflowers to Autumnal Leaves. 


To create this layout, I used the B side of Paper #19 as my base. 
I then used my silhouette cameo to cut out a sunflower cutfile, which is also by Paige Evans. I backed the cutfile using Paper #7 and Paper #14 and some scraps of brown cardstock for the centres of the sunflowers. I trimmed it down slightly and adhered it to the left side of the layout.


I had lots of pictures that a wanted to use of a visit to some sunflower fields during the summer. So I decided to cut them out in circles with the hope of using at least 3 or 4, but I’ve ended up with 6! To cut out circles, I always use my trusty Creative Memories circle cutters or circle punches depending on the required sizes. 
I mounted the photos using Paper #7 and then distressed the edges. 


I chose some coordinating flowers and leaves from the floral ephemera to tuck in behind several of the photos. 


I added some word sentiments from Paper #23 to add a little detail to the top right side of the layout as well as adding some in between the photos. 


To finish the layout off, I added a title using coordinating alpha stickers by LDRS Creative. Unfortunately in the photograph they aren’t showing up very well, but in real life they coordinate well! 


Thanks so much for looking! 
See you soon with a brand new collection. 
Anna 
X


Friday, 10 June 2022

Memorable - 49 and Market - ARToptions Viken Collection

Hello, Rebecca with you today sharing my first layout of June. This month I am really excited to be working with the new ARToptions Viken collection from 49 and Market. This is only the second 49 and Market collection I've ever created with (the first being Spectrum Sherbet) and I'm really loving it. 


The colours in the collection lend themselves perfectly to scrapping bluebell photos so I've purposely been saving my photos until this collection was released! 

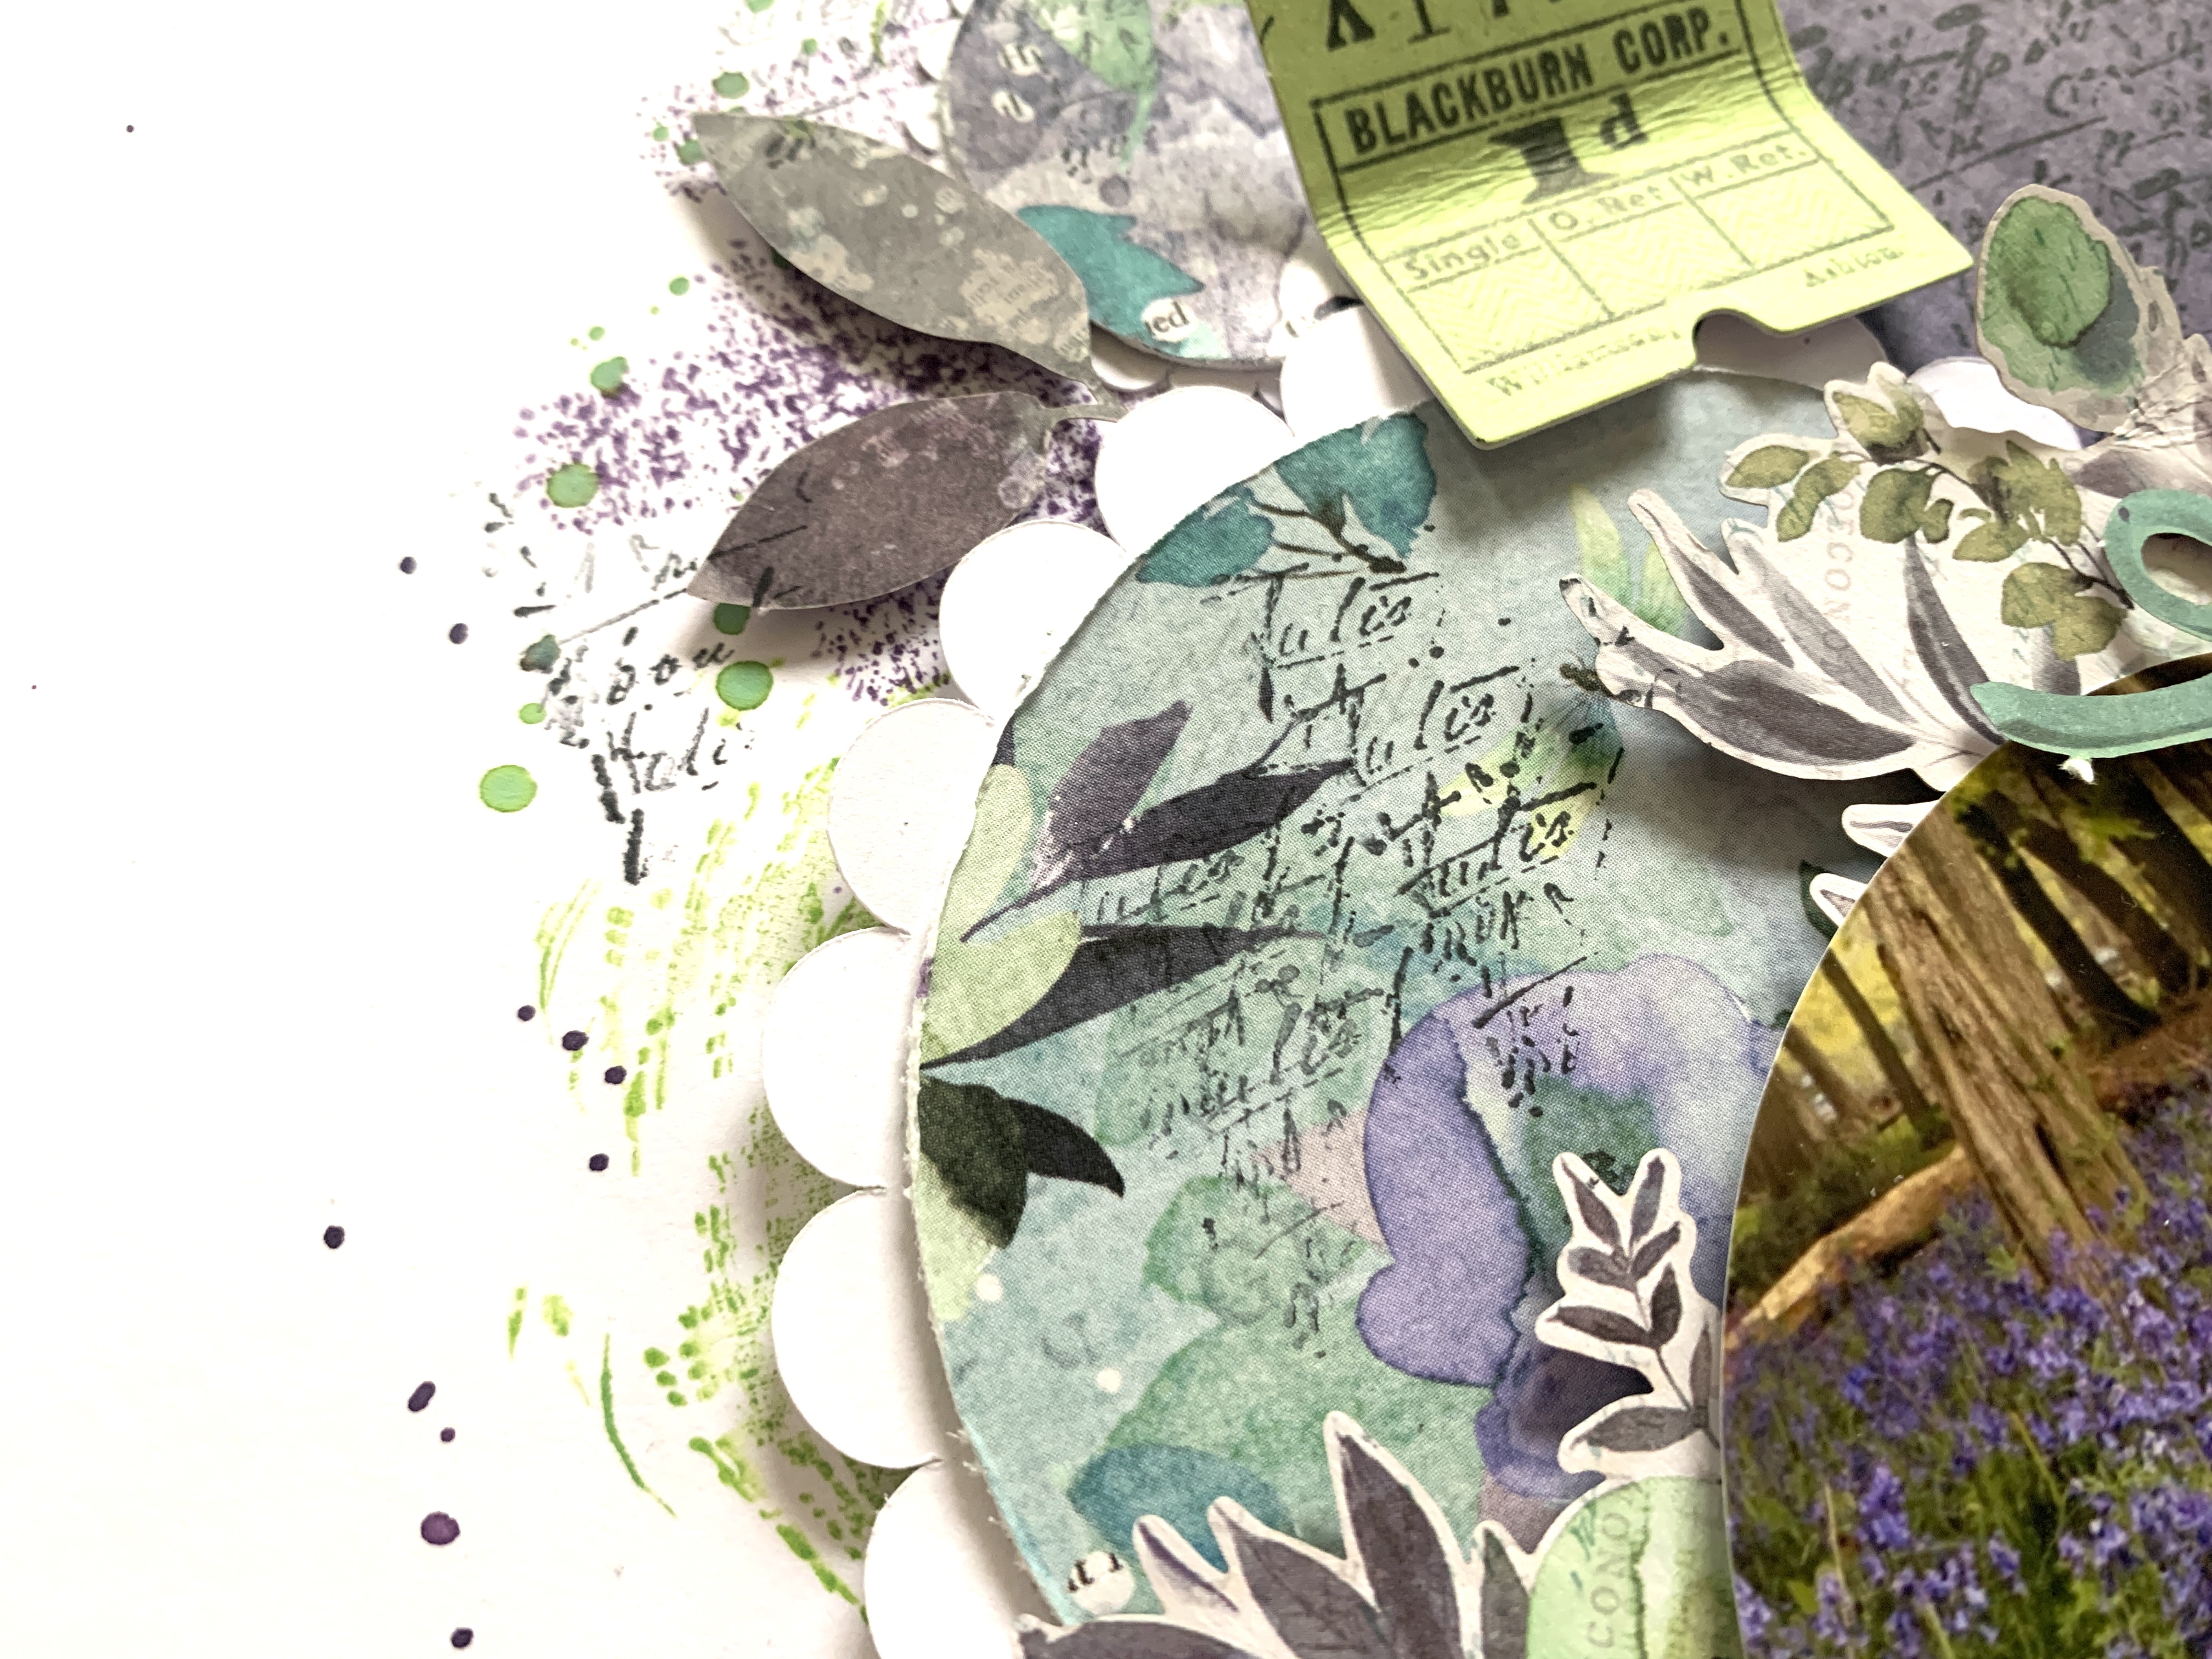
I cut some scalloped circles on my silhouette cameo from white cardstock, and then cut out circles from some of the patterned papers to fit within the scalloped edge. I've used both sides of 'Enchanted Fields', the A side of 'Floral Notes' and the B side of 'Endearing'. I selected these papers as I thought floral tones would work perfectly with my theme, and the purple and green papers added some solid blocks of colour - which match my photo perfectly. I adhered the patterned paper circles to the white scalloped edge and arranged them on the right hand side of my layout, overlapping slightly.


Once I was happy with my arrangement, I drew around the circles with a pencil and took them back off so that I could had some light mixed media. I've used a set of stamps by Tim Holtz (they are called 'Brushstrokes') and a Distress Ink Pad in the shade 'Dusty Concord' to add some colour around the edge of my design. I purposely left some gaps and filled them in with a different stamp from the same set, using a Distress Oxide Ink Pad in the shade 'Mowed Lawn'. I love the effect that stamping brings to a layout. It's not a complete colour-wash, but it adds so much texture and some subtle colour. I also added some scripty stamping using a black Staz On Ink Pad. I've added this to the background, and also to the green and purple circles as they were looking very 'clean'. I finished the background off with some purple and green splatters.


With my mixed media finished and dried, I adhered my circles to the background, using my pencil lines to help me get them in the right position. I then added a circular photo to the centre of the circles. I love the way that the colours in my photo continue out onto the page. 


Embellishing this layout was so much fun - and really easy! I have the 'Laser Cut Elements' (which is jam-packed with beautiful pieces) and the 'Die Cut Pieces' (again - jam packed with no less than 73 pieces of ephemera!). I've selected small die cuts to embellish the page with as I didn't want to cover too much of my background or the patterned papers. 


I started with two large floral clusters around my photo, and then added lots of small things - leaf sprigs, butterflies, a couple of postage stamps and bows and also a couple of tickets. I also used one of the die cuts for my title.

To help balance the page out, I also created a cluster over to the left of the page. I've used two of the lace trim die cuts from the 'Laser Cut Elements' and then to keep my embellishing consistent, I've added similar die cuts to those that I used on the right - a postage stamp, leaf sprigs, a bow and a butterfly. I also extended my mixed media over to the left hand side.


I really adore how this layout turned out and I'm so glad I saved my bluebell photos for this collection! I hope you've enjoyed it and it's given you some inspiration. If you'd like to watch along and see how the layout came together, there is a process video up on my YouTube channel which you can find here.


Keep an eye on the Papermaze website- this collection will be uploaded soon! 

I'll be back later in the month with another Viken layout, so until then, take care.

Rebecca x

@preciouspagespapercraft